Best smell in the world. If they made it into a candle, I'd be first in line.He remembers the smell of the Klotz 2-stroke oil and race fuel and it brought back fond memories.

You are using an out of date browser. It may not display this or other websites correctly.
You should upgrade or use an alternative browser.
You should upgrade or use an alternative browser.
ZMotorsports Shop Projects 2.0
- Thread starter zmotorsports
- Start date
OP
zmotorsports
ALLIANCE MEMBER
Matco's Part number was SP7 or SP205 (no longer made)
Here's one is from Mayhew
https://mayhew.com/products/specialty/specialty_seal_puller
Thank you. If memory serves, mine is the SP205 but I'll have to check and see as it has been many years since I purchased it. I have a coworker that did purchase the Mayhew one a year or two ago, however, I like the slightly larger striking block and the small angle it is on compared to the Mayhew. Although, the Matco not being available any longer kinda ***** as I think it is a nice tool.
Best smell in the world. If they made it into a candle, I'd be first in line.
Agreed. I would buy that and I'm my son would as well.

ntsqd
Well-known member
My sniffer doesn't work very well either. Can't smell skunk, no idea what that smells like. I'm told that I'm lucky that way, but how would I know? Gear lube I can smell, but oddly Redline's various gear lubes have no odor to me.
One test and tune day at Willow Springs (where there are neither) I got edumacated first hand at what castor oil (or whatever the heck it is that they used to use) smells like from a Brit engine's exhaust. I see why some are nostalgic for that smell, but I'm glad that I don't have to smell it very often.
We used to joke in the gun shop that we should make a line of men's aftershave products named "Eu du Hoppe's". We figured that we could make a fortune off of that idea.
Oh boy, my cart now has that Mayhew tool and some syl-glide in it. This thread continues to cost me money.
One test and tune day at Willow Springs (where there are neither) I got edumacated first hand at what castor oil (or whatever the heck it is that they used to use) smells like from a Brit engine's exhaust. I see why some are nostalgic for that smell, but I'm glad that I don't have to smell it very often.
We used to joke in the gun shop that we should make a line of men's aftershave products named "Eu du Hoppe's". We figured that we could make a fortune off of that idea.
Oh boy, my cart now has that Mayhew tool and some syl-glide in it. This thread continues to cost me money.
OP
zmotorsports
ALLIANCE MEMBER
This thread continues to cost me money.
I'm not taking all the blame Thom. I think it is more this forum than this thread, because I feel the same way, it costs me money to play here.
aka Larry
Well-known member
We used to joke in the gun shop that we should make a line of men's aftershave products named "Eu du Hoppe's". We figured that we could make a fortune off of that idea.
I like the smell of Hoppe's too! However my bride doesn't so I can't use it as cologne...LOL
ntsqd
Well-known member
I'm not blaming anyone, except me.I'm not taking all the blame Thom. I think it is more this forum than this thread, because I feel the same way, it costs me money to play here.
I was told once, no idea if correct or not, that the unique smell of Hoppe's comes from an oil in banana's.I like the smell of Hoppe's too! However my bride doesn't so I can't use it as cologne...LOL
aka Larry
Well-known member
I was told once, no idea if correct or not, that the unique smell of Hoppe's comes from an oil in banana's.
If that was true, I would think my wife would find it more appealing....

Finallygotit
ALLIANCE MEMBER
I was told to add a friction modifier to my pumpkin in the Cobra from the guy that built it. I think I now know what rotting flesh and fish entrails in the bilge of an old Swedish trawler smells like. I just about gagged when I opened that bottle. I pray that I never have to uncork that pumpkin.

Just Fishing
Well-known member
If that was true, I would think my wife would find it more appealing....
It's better than the stuff I use to remove copper fouling from precision barrels.
Smells like old cat piss!


Motown
Well-known member
I was working at GM's St Therese plant for the the 98 Camaro launch. The rear axles came in dry, so the line workers had to fill the axles. They started really complaining of the gear oil smell. If I recall, they started using synthetic oil that year. To appease the workers, they added in grape smell to try and solve the complaints.
4 FN 27
ALLIANCE MEMBER
Ya know guys, I don't have the best "smeller" in the world, nothing like my wife's anyways.
I remember when I was an early teenager and my dad would bring me down to my uncle's shop where he'd let me dig through his used lawnmower and snowblower parts looking for a carburetor or cable that I needed for a mower I was trying to repair to sell, the smell of his shop was soothing and almost intoxicating to me and I still remember that smell to this day. The feeling I had just being in that automotive shop because of the smell brings back fond memories. Memories that I hope one day my son and now grandson will have when I am long gone.
Machine Shop
Gun Range
Spent Race Fuel
Silage
Fresh cut Hay
Milking Parlor
Grandma's Kitchen
All destinations in memory set off by my sniffer.
Reading the other posts on smells. Only one thing comes to mind:

Bob Heine
ALLIANCE MEMBER
@Just Fishing, if you'd like to have a similar room odorizer for your garage, pick up a jug of Dragon's Breath wheel cleaner. It's appropriately named.It's better than the stuff I use to remove copper fouling from precision barrels.
Smells like old cat piss!

Bob Heine
ALLIANCE MEMBER
Mike, there are smells that send you back to your childhood. A Formula 1 pre-race with antique cars running castor oil sent me back to my childhood and the first and only time I ever complained about being constipated. Actually, the smell of it burning wasn't that bad.
I also grew up when coal-fired steam engines were disappearing but I rode one that serviced the eastern part of Long Island (NY) in the early 1950s. A ride on the Zig Zag Railway in Australia in 1990 gave me an unexpected flashback from 40 years before. Smells are a great part of our memory and often bring back wonderful moments in our lives.
[EDIT]
Machine Shop
Gun Range
Spent Race Fuel
Silage
Fresh cut Hay
Milking Parlor
Grandma's Kitchen
Thanks Pat, I forgot about those but you're right -- especially Grandma's Kitchen when she cooked on a half gas, half wood stove.
I also grew up when coal-fired steam engines were disappearing but I rode one that serviced the eastern part of Long Island (NY) in the early 1950s. A ride on the Zig Zag Railway in Australia in 1990 gave me an unexpected flashback from 40 years before. Smells are a great part of our memory and often bring back wonderful moments in our lives.
[EDIT]
Machine Shop
Gun Range
Spent Race Fuel
Silage
Fresh cut Hay
Milking Parlor
Grandma's Kitchen
Thanks Pat, I forgot about those but you're right -- especially Grandma's Kitchen when she cooked on a half gas, half wood stove.
Last edited:
ntsqd
Well-known member
So, Steel-it paint.
I've owed this thread some pics and I've been slow getting that done. This pic was taken on Sept. 25th '22 while on a trip in Nevada:
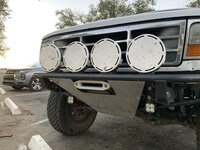
The winch didn't have it's poly line spooled on yet, but I put it together enough for the trip. The Barnes 4WD winch plate and the structure that moved the fairlead forward enough to clear the bash plate were both painted with Steel-It just before assembly.
For the last ~9 months "Snowball" has been my DD. The route to work has about 10 miles of ocean-front exposure. The sequence is literally waves, PCH & Hwy 101, and then the coastal hills. Google Maps Sample. Which means that I am semi-frequently driving thru a salt air fog one or both directions.
The prep for paint was rudimentary. Spray off with CRC brake cleaner in direct sunlight. Paint once dry and warmed back up.
How they look as of this morning:
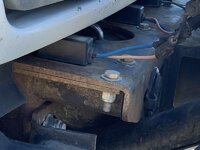

The paint has adhered well, but it hasn't resisted the rust very well. I grant that I'm a tough use case, but a bumper that I coated with POR-15 and then while the POR was tacky I top-coated it with Rustoleum stood up to more than a decade of a similar drive (longer, but thru that same area).
For the curious, this is what that bracket behind the fairlead looks like:

It bolts to the Barnes tray and to two tabs welded to the top bumper tube. This was my first project using SendCutSend.com.
I've owed this thread some pics and I've been slow getting that done. This pic was taken on Sept. 25th '22 while on a trip in Nevada:
The winch didn't have it's poly line spooled on yet, but I put it together enough for the trip. The Barnes 4WD winch plate and the structure that moved the fairlead forward enough to clear the bash plate were both painted with Steel-It just before assembly.
For the last ~9 months "Snowball" has been my DD. The route to work has about 10 miles of ocean-front exposure. The sequence is literally waves, PCH & Hwy 101, and then the coastal hills. Google Maps Sample. Which means that I am semi-frequently driving thru a salt air fog one or both directions.
The prep for paint was rudimentary. Spray off with CRC brake cleaner in direct sunlight. Paint once dry and warmed back up.
How they look as of this morning:
The paint has adhered well, but it hasn't resisted the rust very well. I grant that I'm a tough use case, but a bumper that I coated with POR-15 and then while the POR was tacky I top-coated it with Rustoleum stood up to more than a decade of a similar drive (longer, but thru that same area).
For the curious, this is what that bracket behind the fairlead looks like:
It bolts to the Barnes tray and to two tabs welded to the top bumper tube. This was my first project using SendCutSend.com.
Bob Heine
ALLIANCE MEMBER
Thom, I think of California vehicles as pristine, rust- free treasures, forgetting the corrosive air from the Pacific.The route to work has about 10 miles of ocean-front exposure.
In the late 1970s my mother rented an apartment a block from the Atlantic. Everything made of metal corroded and the windows that could be opened were nearly opaque. Whenever she opened a window, all of which were on the ocean side of the apartment, the breeze would knock over stuff she treasured twenty feet from the window.
I used to drive my Corvette to the beach for lunch every day to get away from the e-mails and phone calls (IBM had e-mail in the 1970s). There's not a lot of rust on the car but what there is came from those beach visits. I feel your pain but your drive to work would calm me enough to make it through the workday and the drive home would relax me right up to the day rust bubbles appeared on the windshield surround.
ntsqd
Well-known member
For the most part they are usually minimal rust. BUT with most of the population of the State living on the Coast that means percentage-wise that most of the vehicles see at least a little salt air exposure.
As those who live in the desert States can confirm, just because a vehicle came from the CA desert doesn't mean that it will be rust-free either. Some of those desert soils are highly corrosive. The wet dirt from the West Side Rd. in Death Valley flung up into the undercarriage of one of my vehicles was amazingly corrosive! I was aggressive, but not aggressive enough in cleaning after that trip, and the vehicle paid for it. I don't know if it was acidic or basic, but I clearly needed to spray on something to neutralize it. So late, so smart.....
As those who live in the desert States can confirm, just because a vehicle came from the CA desert doesn't mean that it will be rust-free either. Some of those desert soils are highly corrosive. The wet dirt from the West Side Rd. in Death Valley flung up into the undercarriage of one of my vehicles was amazingly corrosive! I was aggressive, but not aggressive enough in cleaning after that trip, and the vehicle paid for it. I don't know if it was acidic or basic, but I clearly needed to spray on something to neutralize it. So late, so smart.....
olsenmotorsports
Well-known member
For the most part they are usually minimal rust. BUT with most of the population of the State living on the Coast that means percentage-wise that most of the vehicles see at least a little salt air exposure.
As those who live in the desert States can confirm, just because a vehicle came from the CA desert doesn't mean that it will be rust-free either. Some of those desert soils are highly corrosive. The wet dirt from the West Side Rd. in Death Valley flung up into the undercarriage of one of my vehicles was amazingly corrosive! I was aggressive, but not aggressive enough in cleaning after that trip, and the vehicle paid for it. I don't know if it was acidic or basic, but I clearly needed to spray on something to neutralize it. So late, so smart.....
I just learned something new! Had no idea. Thanks for sharing!
OP
zmotorsports
ALLIANCE MEMBER
I hope everyone had a great weekend.
I was able to get quite a bit done on the Jeep JKU between Friday night and Saturday afternoon. The wife and I then accompanied out son, DIL and grandson to Ogden City's Christmas Village to see the light and displays. It has been quite a few years since the wife and I walked through Christmas Village during the Holiday season, probably since our son was younger, so I'll bet it's been 20~ish years or so. Our grandson has made the season enjoyable again for us rather than just something we want to get through.
I remember Ryan (@Bigblue&Goldie ) had inquired about the driver that I used to remove the outer bearing race from the axle tube so I thought I'd snap a picture of it over the weekend.

It is in fact the Matco model # SP205.

I was also tapping a couple of holes on Friday night and the first one I tapped, the damn Starrett 91B anvil broke, AGAIN. This is really ******* me off and I do not abuse my tools. This is the first time I used the tap handle since I replaced the anvil a few weeks ago. I was nearly through the hole when I heard the faint "crack" or "ting" sound and I knew what it was. YEP, as soon as I pulled the tap handle off the tap the broken piece fell out.

I reached for one of my old tried and true tap handles to finish the job. I have never had an issue with either the Morse or my Greenfield tap handles but this Starrett handle is trying my patience.

After completing the job, I grabbed the package that contained the other anvil, as I purchased two when I did the last repair about a month ago. It is repaired and ready to be used again, but I have to admit, my confidence in this tap handle is not very high at this point.
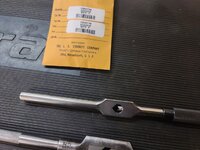
I also dug out my old homemade tap handle that I made about 30 years ago and thought that I should probably start using it more often as it has never failed me.

Saturday morning I was leaving to meet my son for breakfast and had to snap a picture of the inversion that has settled in along the Wasatch Front this past week. So thick you could cut it with a knife.

By late morning it had cleared out and turned into a beautiful day.

Thanks for looking.
I was able to get quite a bit done on the Jeep JKU between Friday night and Saturday afternoon. The wife and I then accompanied out son, DIL and grandson to Ogden City's Christmas Village to see the light and displays. It has been quite a few years since the wife and I walked through Christmas Village during the Holiday season, probably since our son was younger, so I'll bet it's been 20~ish years or so. Our grandson has made the season enjoyable again for us rather than just something we want to get through.
I remember Ryan (@Bigblue&Goldie ) had inquired about the driver that I used to remove the outer bearing race from the axle tube so I thought I'd snap a picture of it over the weekend.
It is in fact the Matco model # SP205.
I was also tapping a couple of holes on Friday night and the first one I tapped, the damn Starrett 91B anvil broke, AGAIN.
This is really ******* me off and I do not abuse my tools. This is the first time I used the tap handle since I replaced the anvil a few weeks ago. I was nearly through the hole when I heard the faint "crack" or "ting" sound and I knew what it was. YEP, as soon as I pulled the tap handle off the tap the broken piece fell out. I reached for one of my old tried and true tap handles to finish the job. I have never had an issue with either the Morse or my Greenfield tap handles but this Starrett handle is trying my patience.
After completing the job, I grabbed the package that contained the other anvil, as I purchased two when I did the last repair about a month ago. It is repaired and ready to be used again, but I have to admit, my confidence in this tap handle is not very high at this point.
I also dug out my old homemade tap handle that I made about 30 years ago and thought that I should probably start using it more often as it has never failed me.
Saturday morning I was leaving to meet my son for breakfast and had to snap a picture of the inversion that has settled in along the Wasatch Front this past week. So thick you could cut it with a knife.
By late morning it had cleared out and turned into a beautiful day.
Thanks for looking.
Last edited:
OP
zmotorsports
ALLIANCE MEMBER
Now back to work on the Jeep JKU that I have in the shop. I nearly finished it over the weekend and should be able to get it back to the owner within the next day or two.
I started by cleaning all of the corrosion and debris off the axle flanges so that the new brake backing plates will sit flat.
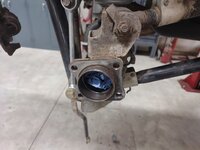
Then sprayed a couple light coats of Seymour E-Coat primer on the bare steel to prevent corrosion.
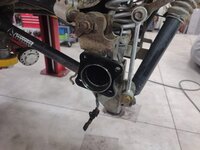
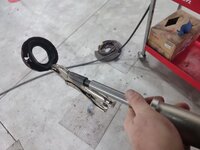
With the primer drying on the axle flanges, I removed the pinion seal, which was really stuck on there I might add. The hook style of seal remover wouldn't even begin to move the seal. So out came the vise grips and Snap-on 3 lb. slide hammer to pursuade the seal to relent.

And that made short work of the seal.
I then drove the inner and outer pinion races out of the housing and began the cleaning process. I spray the axle tubes and chase them with a towel and long prybar to ensure there is no residual debris before starting assembly.

With the axle tubes clean, I moved to the center section for the cleaning process.

Next was to remove the inner pinion bearing to reveal the OEM's shim stack for pinion depth.

Old components all sorted and inspected to make sure nothing jumps out at me.

With everything looking good, it was time to clean the parts that will be reused as well as all of the new parts prior to the first mockup.

Ring and pinion cleaned and stoning the surfaces of the ring gear and carrier assembly to ensure a flat and true mating surface.

Stay tuned for more of the axle assembly.
I started by cleaning all of the corrosion and debris off the axle flanges so that the new brake backing plates will sit flat.
Then sprayed a couple light coats of Seymour E-Coat primer on the bare steel to prevent corrosion.
With the primer drying on the axle flanges, I removed the pinion seal, which was really stuck on there I might add. The hook style of seal remover wouldn't even begin to move the seal. So out came the vise grips and Snap-on 3 lb. slide hammer to pursuade the seal to relent.
And that made short work of the seal.
I then drove the inner and outer pinion races out of the housing and began the cleaning process. I spray the axle tubes and chase them with a towel and long prybar to ensure there is no residual debris before starting assembly.
With the axle tubes clean, I moved to the center section for the cleaning process.
Next was to remove the inner pinion bearing to reveal the OEM's shim stack for pinion depth.
Old components all sorted and inspected to make sure nothing jumps out at me.
With everything looking good, it was time to clean the parts that will be reused as well as all of the new parts prior to the first mockup.
Ring and pinion cleaned and stoning the surfaces of the ring gear and carrier assembly to ensure a flat and true mating surface.
Stay tuned for more of the axle assembly.
OP
zmotorsports
ALLIANCE MEMBER
Continuing on.
A quick trip to the set-up bearing drawer to grab the correct bearings for pinion setup.

With the pinion setup bearings ready, the pinion can be installed for preliminary setup.
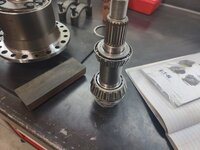
Trueing the mating surfaces of the carrier and ring gear.

Prior to joining the ring gear to the carrier, I like to measure the original carrier's width and compare it to the new, just to ensure the widths are the same, which should mean the carrier side shim sum should be accurate and provide the correct carrier preload. Otherwise, now is the time to start making changes, during mockup. The Eaton Truetrac was a perfect match to the OG carrier. Again, another step I highly doubt most shops will check, as they just assume everything matches. I like to trust but verify.

Now the ring gear can be installed on the carrier and bolts torqued to spec.
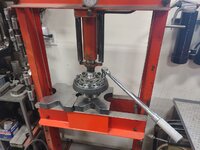
I also took a few minutes to install the new backing plates now that the E-coat has dried sufficienctly. I use a brass drift to align the bolt holes.
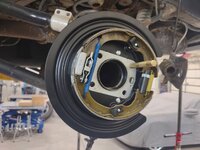
Then a larger brass drift to lightly tap the backing place into position flat against the flange.

Repeat on the passenger's side.

New inner and outer pinion races driven into the carrier.

Carrier bearings are ready to be installed. I choose the correct driver to ensure it won't damage the bearing nor impede with the machined hub and prevent the bearing from being fully pressed onto the carrier. This one fits the inner race of the bearing.
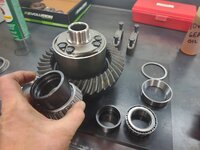
Stay tuned for more of the axle assembly.
A quick trip to the set-up bearing drawer to grab the correct bearings for pinion setup.
With the pinion setup bearings ready, the pinion can be installed for preliminary setup.
Trueing the mating surfaces of the carrier and ring gear.
Prior to joining the ring gear to the carrier, I like to measure the original carrier's width and compare it to the new, just to ensure the widths are the same, which should mean the carrier side shim sum should be accurate and provide the correct carrier preload. Otherwise, now is the time to start making changes, during mockup. The Eaton Truetrac was a perfect match to the OG carrier. Again, another step I highly doubt most shops will check, as they just assume everything matches. I like to trust but verify.
Now the ring gear can be installed on the carrier and bolts torqued to spec.
I also took a few minutes to install the new backing plates now that the E-coat has dried sufficienctly. I use a brass drift to align the bolt holes.
Then a larger brass drift to lightly tap the backing place into position flat against the flange.
Repeat on the passenger's side.
New inner and outer pinion races driven into the carrier.
Carrier bearings are ready to be installed. I choose the correct driver to ensure it won't damage the bearing nor impede with the machined hub and prevent the bearing from being fully pressed onto the carrier. This one fits the inner race of the bearing.
Stay tuned for more of the axle assembly.
PhantomEB
Well-known member
Ain’t looked under one lately but does JEEP still run uncaptured coils?
OP
zmotorsports
ALLIANCE MEMBER
Continuing on.
And it also fits easily over the carrier's hub so it won't hang up during the pressing process.

Now we go back to the hydraulic press and press the carrier bearings into place. I think Anders asked me earlier about my tube of Sil-Glyde, well I also had to open a new tube of CMD Press Lube recently as the tube I have used for the past 10~ish or so years was empty.
I have used this CMD #3 for about as long as Kroil and Sil-Glyde as it was introduced to me in the late 80's when I began my career as an Industrial Maintenance Mechanic. This stuff hasn't changed formula in all that time and works great for pressing together interference fit parts. In the Industrial field, it seems like there are many, many more parts that require pressing than in the automotive world so the lube has lasted me a long time. The rep we used to get this from no longer supports our company so I had to source it elsewhere, but I was pleasantly surprised when I discovered that Summit Racing carries it. I thought for sure I was going to struggle to find some more, but it was easy to find, once I looked.
I very thin coating around the mating surfaces aids in pressing together parts. I HATE that "eek, eek, eek" sound while pressing parts together. That stick then slip rhythm is hard on parts and many times results in galling or damaging the mating surfaces. When using this press lube it is a nice smooth press fit with not jerking or damage to the surfaces or finishes.

One carrier bearing being pressed in place. I like to make sure to spin the bearing once in a while during the pressing process to ensure the tooling is not contacting the cage and causing damage to the bearing.

One down and one to go.

On many carriers, the hub is slightly recessed from the inner race of the bearing so another tools is required so that the forces on placed on the bearing's inner race and not on the case. However, in this application the hub stands proud of the bearing slightly so it can sit directly on the press plate, but I still like to spin the bearing once in a while during the pressing process to ensure no forces are making their way to the bearing's cage or rollers. Just habit I guess.

Then the second carrier bearing can be pressed into place.

Carrier is at the ready for preliminary mockup.
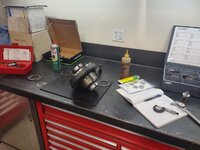
The case is spread, carrier installed. This is critical to make sure there is clearance (backlash) before tightening the carrier in place. IF there is no clearance (backlash) then stop immediately and do not proceed as you will damage the gears. I found I had clearance so I snugged the caps down, then backed the tension off the case spreader to relax the case/housing and torqued the bearing caps to spec.

At this point I am just trying to confirm pinion depth, not to worry about backlash so much, just that there is in fact backlash so the teeth don't crash together. Here you can see the pinion appears to be a bit shallow on the ring gear mesh pattern. You wan to see the pattern a bit more centered between the face and flank of the teeth, this is riding a bit too high as noted by the hard line near the face of the tooth.

Backlash was a bit much as well. Although it was within spec. being @ .010" it is a bit too loose for my liking. The specification for this application is .006"-.010" backlash. I want to be closer to the .006"-.008" range if possible with all new bearings and components.

Stay tuned for more progress pics.
And it also fits easily over the carrier's hub so it won't hang up during the pressing process.
Now we go back to the hydraulic press and press the carrier bearings into place. I think Anders asked me earlier about my tube of Sil-Glyde, well I also had to open a new tube of CMD Press Lube recently as the tube I have used for the past 10~ish or so years was empty.
I have used this CMD #3 for about as long as Kroil and Sil-Glyde as it was introduced to me in the late 80's when I began my career as an Industrial Maintenance Mechanic. This stuff hasn't changed formula in all that time and works great for pressing together interference fit parts. In the Industrial field, it seems like there are many, many more parts that require pressing than in the automotive world so the lube has lasted me a long time. The rep we used to get this from no longer supports our company so I had to source it elsewhere, but I was pleasantly surprised when I discovered that Summit Racing carries it. I thought for sure I was going to struggle to find some more, but it was easy to find, once I looked.
I very thin coating around the mating surfaces aids in pressing together parts. I HATE that "eek, eek, eek" sound while pressing parts together. That stick then slip rhythm is hard on parts and many times results in galling or damaging the mating surfaces. When using this press lube it is a nice smooth press fit with not jerking or damage to the surfaces or finishes.
One carrier bearing being pressed in place. I like to make sure to spin the bearing once in a while during the pressing process to ensure the tooling is not contacting the cage and causing damage to the bearing.
One down and one to go.
On many carriers, the hub is slightly recessed from the inner race of the bearing so another tools is required so that the forces on placed on the bearing's inner race and not on the case. However, in this application the hub stands proud of the bearing slightly so it can sit directly on the press plate, but I still like to spin the bearing once in a while during the pressing process to ensure no forces are making their way to the bearing's cage or rollers. Just habit I guess.
Then the second carrier bearing can be pressed into place.
Carrier is at the ready for preliminary mockup.
The case is spread, carrier installed. This is critical to make sure there is clearance (backlash) before tightening the carrier in place. IF there is no clearance (backlash) then stop immediately and do not proceed as you will damage the gears. I found I had clearance so I snugged the caps down, then backed the tension off the case spreader to relax the case/housing and torqued the bearing caps to spec.
At this point I am just trying to confirm pinion depth, not to worry about backlash so much, just that there is in fact backlash so the teeth don't crash together. Here you can see the pinion appears to be a bit shallow on the ring gear mesh pattern. You wan to see the pattern a bit more centered between the face and flank of the teeth, this is riding a bit too high as noted by the hard line near the face of the tooth.
Backlash was a bit much as well. Although it was within spec. being @ .010" it is a bit too loose for my liking. The specification for this application is .006"-.010" backlash. I want to be closer to the .006"-.008" range if possible with all new bearings and components.
Stay tuned for more progress pics.
olsenmotorsports
Well-known member
Loving the details. Keep killing it!
OP
zmotorsports
ALLIANCE MEMBER
Continuing on.
At that point, I removed everything and took the original .045" shim out and installed a .042" shim on the pinion. Also thinking it was going to tighten up the backlash slightly. Which it did, but too much as I ended up with about .004"-.005" backlash, which is too tight and not enough to allow for thermal expansion as components heat up during use.
Then it was a matter of lather, rinse, repeat as far as opening the case, removing the carrier, adjusting side shims, reinstalling, loosening the case spreader, taking measurements and readings, then repeat until I got where I was happy with the results. This is why it is so time consuming to get them perfect. The time spent taking the assembly apart in and out of the housing is part of it, but a lot of time is spent getting components properly prepped before they even make it to the housing. I know some shops slap these things in/out with little attention paid to the prep work and details, but it really is not that hard to just take that extra time to ensure everything is prepped. These parts are expensive and this is an integral part of a vehicle's reliability and dependability, so I feel these steps are the difference between a vehicle going down the road (and trail) for thousands of miles after thousands of miles and years after years vs. one that doesn't.
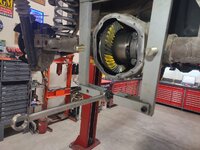
Pretty good-looking pattern. Nice evenly centered between the toe and heel as well as the face and flank of the tooth. The drive side is the most crucial and that is about picture perfect looking pattern as one can ask for. Unfortunately, the backlash was on the tight side being around .005". The next iteration I moved the carrier over a couple of thousandths to try and get closer to .007"-.008" backlash.
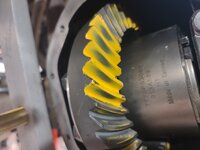
Bingo. All in all, it took me four iterations to land on the perfect wear pattern and backlash reading. I nailed the pinion depth in two, but the backlash didn't want to cooperate as much and took me two more minor side shim adjustments.

Drive side pattern.

Coast side pattern.
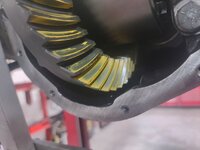
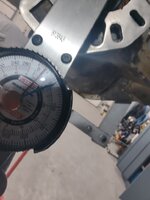
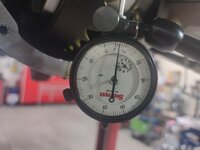
And .007" of backlash measured at three different places around the ring gear. I don't like to check just one place, I take reading at least 2, usually three areas around the ring gear as well as markup teeth at least 2 and sometimes 3 spots as well. Taking multiple readings really doesn't add that much time, the dial indicator is already in place, just pull the plunger and move the ring gear 120 or so degrees and release the plunger. I've gotten beat up before by people screaming that time is money and some people make it sound like it is so time consuming to check multiple places, but it really takes seconds. Same with painting 4 or 5 teeth in 2 to 3 places, it takes mere seconds to do so.

With all shims identified, it was time to remove the pinion one last time, remove the setup bearings and install the new bearings. Press lube applied to the surface, the .042" shim in place and ready to press the bearing onto the pinion.
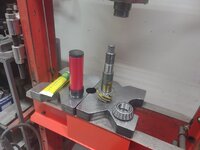
While I was pressing this bearing into place, the outer pinion bearing was on the bearing heater and being brought up to temperature for installation.
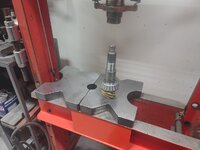
I found that by using my camera mounting magnetic base and arm, it aids in holding the pinion in place so I don't have to chase it around. It is held into position while I have the hot bearing placed into position, then the slinger. Prior to driving the seal into the housing, I pour gear oil around the bearing once it is fully seated onto the pinion. This aids in pre-lubing the bearing but also cooling it and therefore shrinking it onto the pinion. Once the seal is driven into place, the yoke can be installed and the crush sleeve initial crush can begin.

The crush sleeve is tightened just until all of the clearance is removed from the assembly.

Stay tuned for the last of the assembly pictures.
At that point, I removed everything and took the original .045" shim out and installed a .042" shim on the pinion. Also thinking it was going to tighten up the backlash slightly. Which it did, but too much as I ended up with about .004"-.005" backlash, which is too tight and not enough to allow for thermal expansion as components heat up during use.
Then it was a matter of lather, rinse, repeat as far as opening the case, removing the carrier, adjusting side shims, reinstalling, loosening the case spreader, taking measurements and readings, then repeat until I got where I was happy with the results. This is why it is so time consuming to get them perfect. The time spent taking the assembly apart in and out of the housing is part of it, but a lot of time is spent getting components properly prepped before they even make it to the housing. I know some shops slap these things in/out with little attention paid to the prep work and details, but it really is not that hard to just take that extra time to ensure everything is prepped. These parts are expensive and this is an integral part of a vehicle's reliability and dependability, so I feel these steps are the difference between a vehicle going down the road (and trail) for thousands of miles after thousands of miles and years after years vs. one that doesn't.
Pretty good-looking pattern. Nice evenly centered between the toe and heel as well as the face and flank of the tooth. The drive side is the most crucial and that is about picture perfect looking pattern as one can ask for. Unfortunately, the backlash was on the tight side being around .005". The next iteration I moved the carrier over a couple of thousandths to try and get closer to .007"-.008" backlash.
Bingo. All in all, it took me four iterations to land on the perfect wear pattern and backlash reading. I nailed the pinion depth in two, but the backlash didn't want to cooperate as much and took me two more minor side shim adjustments.
Drive side pattern.
Coast side pattern.
And .007" of backlash measured at three different places around the ring gear. I don't like to check just one place, I take reading at least 2, usually three areas around the ring gear as well as markup teeth at least 2 and sometimes 3 spots as well. Taking multiple readings really doesn't add that much time, the dial indicator is already in place, just pull the plunger and move the ring gear 120 or so degrees and release the plunger. I've gotten beat up before by people screaming that time is money and some people make it sound like it is so time consuming to check multiple places, but it really takes seconds. Same with painting 4 or 5 teeth in 2 to 3 places, it takes mere seconds to do so.
With all shims identified, it was time to remove the pinion one last time, remove the setup bearings and install the new bearings. Press lube applied to the surface, the .042" shim in place and ready to press the bearing onto the pinion.
While I was pressing this bearing into place, the outer pinion bearing was on the bearing heater and being brought up to temperature for installation.
I found that by using my camera mounting magnetic base and arm, it aids in holding the pinion in place so I don't have to chase it around. It is held into position while I have the hot bearing placed into position, then the slinger. Prior to driving the seal into the housing, I pour gear oil around the bearing once it is fully seated onto the pinion. This aids in pre-lubing the bearing but also cooling it and therefore shrinking it onto the pinion. Once the seal is driven into place, the yoke can be installed and the crush sleeve initial crush can begin.
The crush sleeve is tightened just until all of the clearance is removed from the assembly.
Stay tuned for the last of the assembly pictures.
Last edited:
OP
zmotorsports
ALLIANCE MEMBER
Last of the pictures thus far.
Once all of the clearance is removed using the old nut and washer, it is removed and the new washer and nut are prepped. I apply a small amount of RTV sealant to the underside of the washer. This prevents oil from wicking its way up the splines and creating a leak through the yoke. I also apply some red thread locker to the new nut and then install to creep up on the final pinion preload.

Grunt tool installed on the yoke and creeping up on the pinion preload. The specs. on this axle are 14-19 in/lbs.

I landed around 16-17 in/lbs. of rotating torque. You want to watch closely at the actual reading while rotating and not the breakaway torque as it can be a bit misleading by a few inch-pounds.
With the pinion fully installed and completed, attention was turned to the carrier assembly. Here I'm pre-lubing the carrier bearings.

The carrier installed for the last time, then the case spreader was removed and bearing caps were torqued to spec.

Paint marks on the bearing cap bolts indicating that they have been torqued.

And just for shits and grins, a final backlash reading was taken. If everything goes as planned this should be the same as the last iteration of mockup. If this doesn't match, something is wrong so no sense in continuing until you figure out what that is.

Perfect @ .007" backlash and everything rotates nice and smooth.
Driveshaft is reinstalled and fasteners torqued.

And that is pretty much where I closed up the shop Saturday afternoon.

Thank you for following along.
Once all of the clearance is removed using the old nut and washer, it is removed and the new washer and nut are prepped. I apply a small amount of RTV sealant to the underside of the washer. This prevents oil from wicking its way up the splines and creating a leak through the yoke. I also apply some red thread locker to the new nut and then install to creep up on the final pinion preload.
Grunt tool installed on the yoke and creeping up on the pinion preload. The specs. on this axle are 14-19 in/lbs.
I landed around 16-17 in/lbs. of rotating torque. You want to watch closely at the actual reading while rotating and not the breakaway torque as it can be a bit misleading by a few inch-pounds.
With the pinion fully installed and completed, attention was turned to the carrier assembly. Here I'm pre-lubing the carrier bearings.
The carrier installed for the last time, then the case spreader was removed and bearing caps were torqued to spec.
Paint marks on the bearing cap bolts indicating that they have been torqued.
And just for shits and grins, a final backlash reading was taken. If everything goes as planned this should be the same as the last iteration of mockup. If this doesn't match, something is wrong so no sense in continuing until you figure out what that is.
Perfect @ .007" backlash and everything rotates nice and smooth.
Driveshaft is reinstalled and fasteners torqued.
And that is pretty much where I closed up the shop Saturday afternoon.
Thank you for following along.
OP
zmotorsports
ALLIANCE MEMBER
Damn Mike that anvil issue pisses me off for you. I know you don’t want to hear this but Starrett or no Starrett I’d have round filed that POS immediately and with great prejudice
Agreed Cam, I was pissed as soon as I heard it pop. I had all I could do not to toss the damn thing in the garbage and almost didn't waste the time to replace the anvil again, but I hate having tools in my toolbox that are not in pristine and ready to use condition. I think I have resorted that this will be an ornamental tool from here on and I'll just use the ones that have proven themselves year after year, the Morse and the Greenfield. To say I am less than impressed with the Starrett tap handle at this point is a huge understatement.
Ain’t looked under one lately but does JEEP still run uncaptured coils?
No, Jeep does not utilize captured coil springs from the factory. My last suspension iteration I had fabricated retainers for mine but since switching over to these dual rate coils from MetalCloak about 4 years ago, I have not needed retainers. Even at full droop, they stay firmly seated in place. On my son's WJ we are running in-house fabricated coil retainers along with his Kartek limiting straps to keep things in place. Coils popping out on the trail is not something I like to deal with. I have had to deal with that enough on other people's Jeeps over the years and don't want to have my own suffer from the same.
Loving the details. Keep killing it!
Thank you very much. That means a lot coming from you and I am flattered.
PugetDude
ALLIANCE MEMBER
Send the newly broken anvil to the President of Starrett with a polite thank you note and a link to your tribulations with them in this thread.
Finallygotit
ALLIANCE MEMBER
Mike, you mentioned that you measure the backlash on the ring gear in three places. Have you ever noted that there was a difference in backlash in the three places in past setup's?
Finallygotit
ALLIANCE MEMBER
Agreed, I would make sure Starrett knew that they have an issue with those pieces.Send the newly broken anvil to the President of Starrett with a polite thank you note and a link to your tribulations with them in this thread.
OP
zmotorsports
ALLIANCE MEMBER
Mike, you mentioned that you measure the backlash on the ring gear in three places. Have you ever noted that there was a difference in backlash in the three places in past setup's?
I have not noticed much of a difference Dan. However, that could be because I am **** about making sure the mating surfaces are clean and any burrs are knocked down with a stone before mating the ring gear on the carrier. I've noticed less than a thou. in most cases, but there is a slight deviation in the needle on the dial indicator. It wouldn't take much of a spec of debris sandwiched in between the ring gear or carrier/case or a raised burr on a holt hole to cause a few thousandths deviation. I guess I do it more for a confirmation of sorts that everything is running true and flat more so than anything in the manufacturing process.
Here's Mike, I got you covered.Agreed, I would make sure Starrett knew that they have an issue with those pieces.
亲爱的斯塔雷特先生,你们的产品真是太糟糕了
Qīn'ài de sī tǎ léi tè xiānshēng, nǐmen de chǎnpǐn zhēnshi tài zāogāole
Finallygotit
ALLIANCE MEMBER
I fixed it for youHere's Mike, I got you covered.
亲爱的斯塔雷特先生,你们的产品真是太糟糕了
Qīn'ài de sī tǎ léi tè xiānshēng, nǐmen de chǎnpǐn zhēnshi tài zāogāole
尊敬的斯塔雷特先生,您的产品是狗屎!
Zūnjìng de sī tǎ léi tè xiānshēng, nín de chǎnpǐn shì gǒu shǐ!
Just my luck. Dan’s bi-langrillI fixed it for you
尊敬的斯塔雷特先生,您的产品是狗屎!
Zūnjìng de sī tǎ léi tè xiānshēng, nín de chǎnpǐn shì gǒu shǐ!

mbryson
Well-known member
Mike, you mentioned that you measure the backlash on the ring gear in three places. Have you ever noted that there was a difference in backlash in the three places in past setup's?
I still remember one gear set I set up in an XJ D44 with Genuine Gears and a spool that changed depending where it was on the ring gear. As Mike mentions, that could be many issues. The gears, the face of the spool or burrs/debris on the surfaces. I told the guy the situation that I was having setting up the gear set for as he wasn't keen on my time required to figure out what was wrong. I showed him the pattern, he determined that it wasn't an issue to him and took the diff. I never heard if that diff had catastrophic failure or not.
For me, I think it very wise to check the pattern in three places. WAY overkill but if I'm putting my name on something, I like that check a lot. I haven't setup a lot of differentials, but something over 15-20. Mike has done that many this year, I'd imagine.
Last edited:
WoodsTruck
Well-known member
- Joined
- Jan 12, 2013
- Messages
- 1,028
Mike,
Question from post 11,786 where you measured carrier width.
I guess I don't see the full significance of this measurement as nothing rides against this width. To me the greater value would be the width of the bearing shoulder mating surfaces from side to side as this is dictates where the bearing will ride in the races. Ideally, the distance from the end of the snout to the bearing mating shoulder should be the same, but possibly not.
Thoughts?
Question from post 11,786 where you measured carrier width.
I guess I don't see the full significance of this measurement as nothing rides against this width. To me the greater value would be the width of the bearing shoulder mating surfaces from side to side as this is dictates where the bearing will ride in the races. Ideally, the distance from the end of the snout to the bearing mating shoulder should be the same, but possibly not.
Thoughts?
Jeff Ivers
Well-known member
I was looking at the picture of your tap handles after you replaced the anvil on the Starret. Perhaps it is just the photograph, but on the two larger tap handles both the valley and the peaks of the anvil appear to be rounded, whereas the Starret appears to have very sharp point in the valley and on the peaks of the anvil. If I remember my Carrol Smith correctly, that would appear to create a stress point which is exactly where it broke. Perhaps this is a manufacturing/design flaw.
OP
zmotorsports
ALLIANCE MEMBER
Mike,
Question from post 11,786 where you measured carrier width.
I guess I don't see the full significance of this measurement as nothing rides against this width. To me the greater value would be the width of the bearing shoulder mating surfaces from side to side as this is dictates where the bearing will ride in the races. Ideally, the distance from the end of the snout to the bearing mating shoulder should be the same, but possibly not.
Thoughts?
That is correct, that nothing rides against that particular point. However, by measuring from that area back to the machined area of the case where the bearing presses to is a critical measurement and determines where it sits in the housing. It was easier to measure overall width and then subtract the two bearing depths and compare to the old carrier. I didn't show all of that because to be honest, I didn't think anyone would care as it is already way overkill.
OP
zmotorsports
ALLIANCE MEMBER
I was looking at the picture of your tap handles after you replaced the anvil on the Starret. Perhaps it is just the photograph, but on the two larger tap handles both the valley and the peaks of the anvil appear to be rounded, whereas the Starret appears to have very sharp point in the valley and on the peaks of the anvil. If I remember my Carrol Smith correctly, that would appear to create a stress point which is exactly where it broke. Perhaps this is a manufacturing/design flaw.
Yes, a couple pages back Thom posted some images depicting this topic and we went into depth about a couple different modified or varied V's as he played with the angles.
Thanks for posting the seal puller picture.I hope everyone had a great weekend.
I was able to get quite a bit done on the Jeep JKU between Friday night and Saturday afternoon. The wife and I then accompanied out son, DIL and grandson to Ogden City's Christmas Village to see the light and displays. It has been quite a few years since the wife and I walked through Christmas Village during the Holiday season, probably since our son was younger, so I'll bet it's been 20~ish years or so. Our grandson has made the season enjoyable again for us rather than just something we want to get through.
I remember Ryan (@Bigblue&Goldie ) had inquired about the driver that I used to remove the outer bearing race from the axle tube so I thought I'd snap a picture of it over the weekend.
It is in fact the Match model # SP205.
I was also tapping a couple of holes on Friday night and the first one I tapped, the damn Starrett 91B anvil broke, AGAIN.
I reached for one of my old tried and true tap handles to finish the job. I have never had an issue with either the Morse or my Greenfield tap handles but this Starrett handle is trying my patience.
After completing the job, I grabbed the package that contained the other anvil, as I purchased two when I did the last repair about a month ago. It is repaired and ready to be used again, but I have to admit, my confidence in this tap handle is not very high at this point.
I also dug out my old homemade tap handle that I made about 30 years ago and thought that I should probably start using it more often as it has never failed me.
Saturday morning I was leaving to meet my son for breakfast and had to snap a picture of the inversion that has settled in along the Wasatch Front this past week. So thick you could cut it with a knife.
By late morning it had cleared out and turned into a beautiful day.
Thanks for looking.
i have the same design SnapOn tool. Instead of the welded socket mine has a threaded pin (handle)

Mine has always done the job but if I were using it now I would seriously consider welding a socket to mine like your Matco has. I don’t think I’ve used mine in the ten years since I retired.