To avoid these ads, REGISTER NOW!

Show us your welding projects

zmotorsports

ALLIANCE MEMBER
Joined
Oct 20, 2009
Messages
21,308
Location
Northern Utah
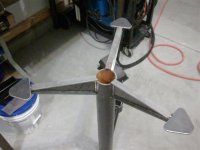
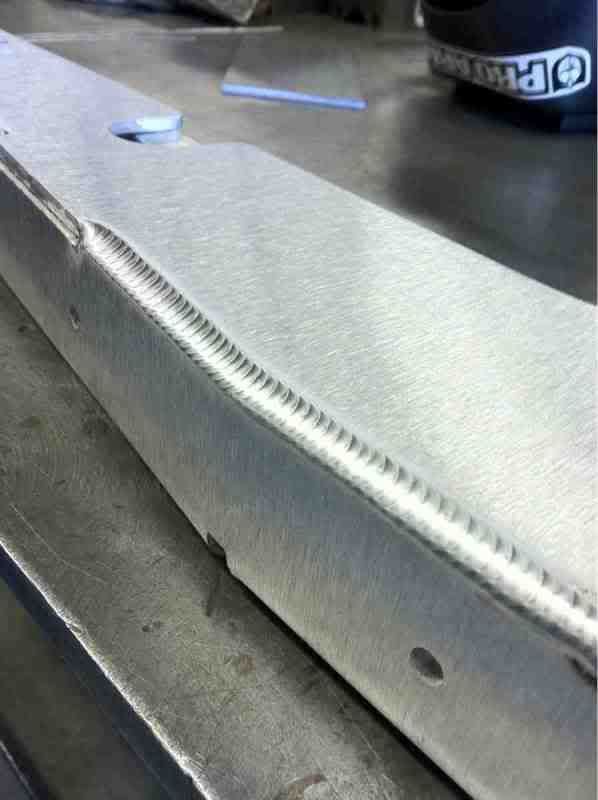
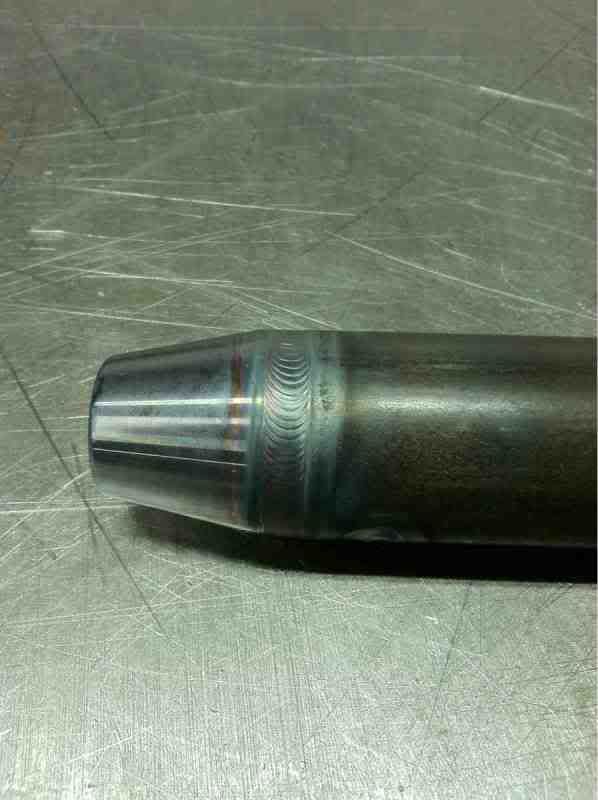
Here's a water-to-air intercooler I did about 8 years ago, along with the mounting base from 4130. I made it with an integral water reservoir, integral submerged water-to-oil transmission cooler and attached the water pump to the base. It all fit onto the factory seat mounts for a Fox-body Mustang. I believe it made 1177RWHP with a 302 and an 88mm turbo.

It eventually split a seam at 32psi of boost, so I later reinforced all the seams. The plugs in the inlet/outlet were for pressure testing.


Andrew, very impressive work. Looks great.

Mike.
 
To avoid these ads, REGISTER NOW!

ZTFab

Well-known member
Joined
Jan 6, 2008
Messages
397
Location
Upland, CA
Here's an aluminum trailing arm guard for a UTV.

Photos_0.jpg


Here are some Radius rods for the same car

Photos_1.jpg


Photos_2.jpg


Photos_4.jpg


Photos_5.jpg
 

Jack Olsen

Super Moderator
Staff member
Joined
Mar 22, 2009
Messages
6,678
Location
Los Angeles
It's very hard to follow any of ZTFab's welds without looking like a rank amateur. But heck, I am a rank amateur, so I'll post a project and everyone else who follows will look great by comparison. :)

My first welding project was probably too ambitious, in terms of the amount of work involved and my skill set. I bought my welder in order to do it, and figured I'd learn by doing. Fortunately, I also bought a grinder to obscure some of those learn-by-doing goobery welds.

I have a tiny plot of land with a front yard that was not much use for kids. Easy to fall right off that retaining wall.

JacksWall1238956761.jpg


Cut some pickets:

Pickets.jpg


Welded on some finials.

PicketStack.jpg


Made a fixture/jig/thing in order to make assembling the sections faster and more consistent.

Jig.jpg


Started welding together sections.

UnpaintedSections.jpg


Priming and then painting.

Primed-1.jpg


I used portable curtains to keep the neighbors from looking at the arc.

Curtains.jpg


And I got a little fancy (well, for me) with the gate:

Gate-Final.jpg


Changed some of the landscaping, and now it's a functional front yard.

fencefinal.jpg
 

zmotorsports

ALLIANCE MEMBER
Joined
Oct 20, 2009
Messages
21,308
Location
Northern Utah
Here's an aluminum trailing arm guard for a UTV.


Here are some Radius rods for the same car

]


Damn Paul, just when I start feeling pretty good about my welding you have to go and post something like that. What the hell.

Seriously, I hope to someday weld like you. I could look at your welds all day long.

Mike.
 

richtersrodz

Well-known member
Joined
May 16, 2011
Messages
983
Location
Waxahachie, TX
Wow Jack.. That looks great! I am always going, "I could just make that.. or I could do
that myself.." And just about that time, I look over and see my wife rolling her eyes and
letting out a sigh... :) My hang-up is ever finding the time...
 

zmotorsports

ALLIANCE MEMBER
Joined
Oct 20, 2009
Messages
21,308
Location
Northern Utah
It's very hard to follow any of ZTFab's welds without looking like a rank amateur. But heck, I am a rank amateur, so I'll post a project and everyone else who follows will look great by comparison. :)

My first welding project was probably too ambitious, in terms of the amount of work involved and my skill set. I bought my welder in order to do it, and figured I'd learn by doing. Fortunately, I also bought a grinder to obscure some of those learn-by-doing goobery welds.

I have a tiny plot of land with a front yard that was not much use for kids. Easy to fall right off that retaining wall.

Cut some pickets:

Welded on some finials.

Made a fixture/jig/thing in order to make assembling the sections faster and more consistent.

Started welding together sections.

Priming and then painting.

I used portable curtains to keep the neighbors from looking at the arc.

And I got a little fancy (well, for me) with the gate:

Changed some of the landscaping, and now it's a functional front yard.

Jack, that looks awesome. I wouldn't tell anyone your a novice. If you didn't tell them they would never know. Keep it up.

Mike.
 

ZTFab

Well-known member
Joined
Jan 6, 2008
Messages
397
Location
Upland, CA
Thanks guys. :beer:

...and Jack, I agree with Mike...doesn't look like an amateur job to me! Great work.
 

Larwyn

Well-known member
Joined
Oct 10, 2011
Messages
378
Location
Texas
Looking good. I'm just happy being able to convert scrap metal into useful projects. I know my welds will never look as good as what some of you are doing.
 

SWT Racing

Well-known member
Joined
Jun 13, 2009
Messages
137
Location
South Carolina
Thanks guys. :beer:

...and Jack, I agree with Mike...doesn't look like an amateur job to me! Great work.

I agree Jack. . .looks great.

Based on your location, I bet you bought everything at Industrial Metal Supply. ;) I wish we had a place like that here in South Carolina. It is a real pain to get smaller lots of material here. I've even bought material from IMS when I've visited SoCal and shipped them to myself in flat rate postage boxes.:bounce:
 

smooth72

Well-known member
Joined
Jul 26, 2005
Messages
354
Location
Newcastle, Oklahoma
I have completed way too many fabrication projects to mention but here are a few of my favorites.

A receiver hitch for my lawn tractor
A cargo carrier for the tractor hitch
A stand for my slightly customized Horror Fright H/V bandsaw
A bicycle repair stand
A rack for the front of my '72 Raleigh Sports
A "mobilizer" for my weed burner
LeftCloseUp.jpg

RearView.jpg

CargoDeck.jpg

SawOverall.jpg

HPIM2501a.jpg

HPIM2537.jpg

Front.jpg

Great work, will have to borrow some especially the lawn mower hitch.


ZTFAB you are a fine tuned welding machine.
 

hunter1151

Well-known member
Joined
Jun 19, 2011
Messages
202
Location
Kansas
ZTFab........as usual very nice. If I may, how do you decide what tungsten size to use for material thickness. Also how do you decide on the width of your weld puddle.

Thanks in advance
 
To avoid these ads, REGISTER NOW!

Heavy Metal Doctor

Well-known member
Joined
May 26, 2010
Messages
5,417
Location
Mason Dixon Line
Last edited:
OP
N

neonnblack

Well-known member
Joined
Jun 7, 2010
Messages
4,913
Location
Reno, NV
Dyna Bill. I'm just curious, but why would anyone want to **** at any age. Its real puzzle to me Mac

Lol? its a sig i stole from him without his permission, just ignore it!

that is a nice gate jack, and the other gate is great too.

And you should show close up welds, might get a tip or two of something you might be able to change to get a better weld.
 

Garage5.9

Well-known member
Joined
Jan 26, 2011
Messages
2,508
Location
Maui,Hawaii
I allways liked this picture:

DSC01514.jpg


Part of this:
DSC01505.jpg

Lined a roll-off dumpster so liquid would drain off. Did it in the shop at home for a friends business. It got me that suitcase mig in the picture above, plus some extra cash.

If you really have some time to kill, here's a link to the whole project:
http://s265.photobucket.com/albums/ii225/doctordc/In the shop/Home Shop Projects/roll off/

Nice , i really like that suit case welder. Seen on at the welding supply shop before. Is it flux core or MIG , didn't see the bottle any where in the pics
 

Wanna Ride

Well-known member
Joined
Jul 28, 2010
Messages
2,790
Here's a few of my projects. I've always enjoyed building practical stuff that would make life easier in the shop. And just about everything is better with casters!

Drill press cart:
CIMG4879Small.jpg

CIMG4886Small.jpg


Torch bottle rack and grease gun rack:
CIMG4878Small.jpg

2011-08-26_22-17-57_858CopySmall.jpg


Saddlebag rack:
CIMG4497Small.jpg

2010-10-28190320Small.jpg


Tour pak rack:
CIMG4489Small.jpg

CIMG4494Small.jpg


ATV, motorcycle and utility trailer:
Bike-ATVtrailerSmall.jpg


Welding and fab table:
2010-11-26180501Small.jpg

2011-07-29_11-46-22_289Small.jpg
 
Last edited:

silentpoet

Well-known member
Joined
Apr 21, 2011
Messages
795
That last welding table is giving me some ideas. I am going to be making mine soon. Already have the framework from an old power rack. Right now I am using it with just a wooden top for my tools. I am not able to get any of my pics uploaded right now, but I am nowhere near some of you guys. I just started welding.
 

Heavy Metal Doctor

Well-known member
Joined
May 26, 2010
Messages
5,417
Location
Mason Dixon Line
Nice , i really like that suit case welder. Seen on at the welding supply shop before. Is it flux core or MIG , didn't see the bottle any where in the pics

For that job, I got a 80 cu/ft bottle back in a corner against the wall with a enough gas hose to reach all over the shop. You can just tell in the pictures the back end of he suitcase has the power from the other welder and the gas hose. I have not run FC yet, but I'm sure it'd be no problem.
This is what I power it with:
DSC01172.jpg
 

PCO6

Well-known member
Joined
Dec 25, 2008
Messages
4,573
Location
Newmarket, Ontario
Here are a few of mine ...

A utility trailer ...
DSC_0340.jpg


A muddy dune buggy ...
CORRA2.jpg


A welding cart (NOT the welder I built the above with) ...
Welder-Mig-Clarke-2.jpg
 

ZTFab

Well-known member
Joined
Jan 6, 2008
Messages
397
Location
Upland, CA
ZTFab........as usual very nice. If I may, how do you decide what tungsten size to use for material thickness. Also how do you decide on the width of your weld puddle.

Thanks in advance

Thanks Hunter.

Tungsten size is dictated by material thickness...which is what dictates amperage needed for the weld.

I use mostly 3/32" Thoriated because I weld materials in the 1/8"-1/4" range. Each diameter of tungsten is good for roughly 100 amps....3/32" being good for approximately 150-250.

The width of the puddle depends on the joint design. An outside (open) corner joint will basically dictate itself by the parent metal. The legs of the weld will be the thickness of the material(s).

For fillet welds, again total joint/part design has to be assessed but a good rule of thumb is about 75% of the parent metal thickness for the leg lengths of the weld.
 

tolly4503

Member
Joined
Oct 12, 2011
Messages
14
I dont have any close up pics, wouldn't even want to show them after looking at your guys welds, but this is my welding project I've been working on and off for the past year.
 

Attachments

  • P9090157.jpg
    P9090157.jpg
    46.5 KB · Views: 557
  • PA270159.jpg
    PA270159.jpg
    29.9 KB · Views: 565

Jim Stabe

Well-known member
Joined
Feb 18, 2009
Messages
801
Location
San Diego, Ca
I make most of everything I use around the shop. I have a lot more but don't have pictures of them to post

Jib crane

Crane 008 (Medium).jpg

Tool stands

Brake%20Stand%20003.jpg

English wheel

New Wheel 021.jpg

Gas weld cart

Welding tank cart 001.jpg

Rotisserie

Rotisserie10.jpg
 

Cryptic1911

Well-known member
Joined
May 24, 2008
Messages
2,884
Location
Willimantic, CT
Jim, would you happen to have any plans or drawings for that english wheel? also, did you buy the wheel pieces or make them as well? I'd like to build one like that at some point
 

Jim Stabe

Well-known member
Joined
Feb 18, 2009
Messages
801
Location
San Diego, Ca
Jim, would you happen to have any plans or drawings for that english wheel? also, did you buy the wheel pieces or make them as well? I'd like to build one like that at some point

The plans for the frame are really unnecessary. Mine is made from 4" x 8" x 1/4" tubing that I got at the scrap yard. The scrap yard is the best way to go because the new stuff is sooo expensive. The ends are cut at 22.5 degrees. I made mine with a 30" throat from the center of the wheels to the back of the frame but you can make yours whatever size you want. I have to make a hood for my project car that is almost 5' wide so I made a 30" throat.
There are some good tips on welding the frame here http://weldingweb.com/showthread.php?t=26663

I prefer the design with the adjuster on top rather than having to stand on one foot and use a kick wheel. The adjuster is made from 3 1/2" x 1/4" wall sq tubing. The ram holding the upper wheel is 2" x 1/4" wall sq tubing. The space around the ram is taken up with 1/4" HDPE backed by 1/4" steel plates. If you do the math that takes up the space and 2 sides can be adjusted with the set screws to get a snug fit. There is a 1" - 14 nut welded into the top of the ram and a 1" - 14 screw mounted in bearings moves it up and down. There are 2 sets of roller thrust bearings that allow adjustment to control up and down movement of the screw. Sorry I don't have pictures of the guts of the adjuster.

I made my own anvils from 4340 and the top wheel is an 8" x 3" forged steel caster with good bearings and trued up. Your best bet is to buy a set from Joe Andrews at Hoosier Profiles http://hoosierprofiles.com/Home_Page.html the quality is supurb and making your own is not an easy task and will likely cost you almost as much.

New wheel 004.jpg

New wheel 010.jpg

New Wheel 023.jpg
 

PCO6

Well-known member
Joined
Dec 25, 2008
Messages
4,573
Location
Newmarket, Ontario
How do you like that JawHorse PCO6?

I've been eyeballing them for years....
I love it! :thumbup: 
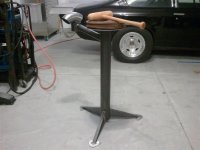
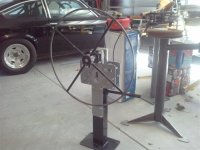
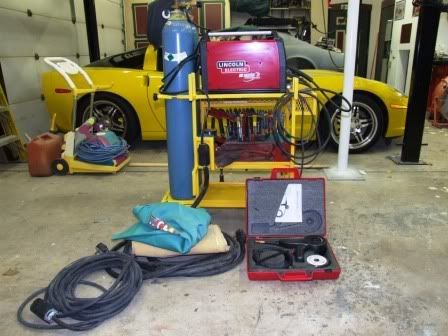
I hummed and hawed for a while too before I bought it and I don't regret it at all. Welding up that trailer tailgate was my first job with it and it cut down my welding, grinding, riveting and painting time by quite a bit. It allowed me to weld for example in a very comfortable position. It's a very sturdy unit and the foot pedal and release mechanism work very well. It's basically a big vice. That tailgate isn't very heavy but I could easily clamp one corner of it in the jaws and the rest of it would just "hang out" allowing me to work on it. It was well worth the money.
 

ctb

Well-known member
Joined
May 8, 2011
Messages
1,121
Location
Central Europe
Here's a few of my projects. I've always enjoyed building practical stuff that would make life easier in the shop. And just about everything is better with casters!


Welding and fab table:
2010-11-26180501Small.jpg

2011-07-29_11-46-22_289Small.jpg

That's a really great looking welding table. The top looks 1/4 inch, Is it? Also could you reveal the dimensions? Reason I ask is I have a 4x6ft 1/4 top and need to build similar to yours. Yours has a balanced look to it.
 

SWT Racing

Well-known member
Joined
Jun 13, 2009
Messages
137
Location
South Carolina
I worked on welding the braces for the legs on my shot bag stand tonight. I still need to weld the underside of the upper braces, but my helmet has decided to periodically turn off on me. I can already feel the grittiness in the eyes coming on. :eyecrazy:

I also rolled a round ring handle for my ring roller and finished mocking up the rings and outriggers for the hammer rack for the stand. I'll probably put some expanded metal in the center ring of the hammer rack for some more storage.
 

Attachments

  • 2011-10-20 19.12.11 (Medium).jpg
    2011-10-20 19.12.11 (Medium).jpg
    76.5 KB · Views: 1,002
  • 2011-10-20 19.32.45 (Medium).jpg
    2011-10-20 19.32.45 (Medium).jpg
    105.8 KB · Views: 1,058
  • 2011-10-21 22.19.42 (Medium).jpg
    2011-10-21 22.19.42 (Medium).jpg
    76.8 KB · Views: 1,128
  • 2011-10-16 15.16.17 (Medium).jpg
    2011-10-16 15.16.17 (Medium).jpg
    91.8 KB · Views: 1,162
  • 2011-10-21 22.15.50 (Medium).jpg
    2011-10-21 22.15.50 (Medium).jpg
    113.6 KB · Views: 980
OP
N

neonnblack

Well-known member
Joined
Jun 7, 2010
Messages
4,913
Location
Reno, NV
welding is very fun, just go out and weld two pieces of scrap together, then a few more, in variations of lap, **** angled welds. I did that and ended up with a heavy piece of metal made form about 10 different pieces.
 
To avoid these ads, REGISTER NOW!
Top Bottom