To avoid these ads, REGISTER NOW!

Show us your welding projects

DirtyWhiteBoy

Well-known member
Joined
Aug 18, 2009
Messages
141
Location
Byrdstown,TN
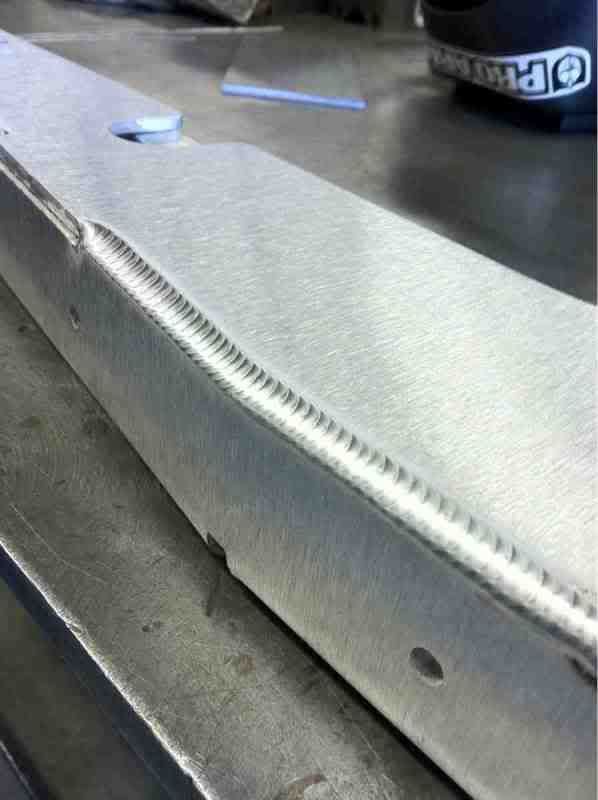
OK strictly Amateur Hour here, but here goes.
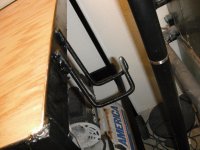
kayak wall mount

CIMG0413.jpg


CIMG0413-1.jpg


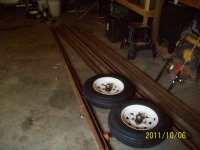
kayak trailer (conversion from old trailer)

CIMG0416.jpg


legs for cheap shelving unit

CIMG0416-1.jpg


CIMG0421-1.jpg


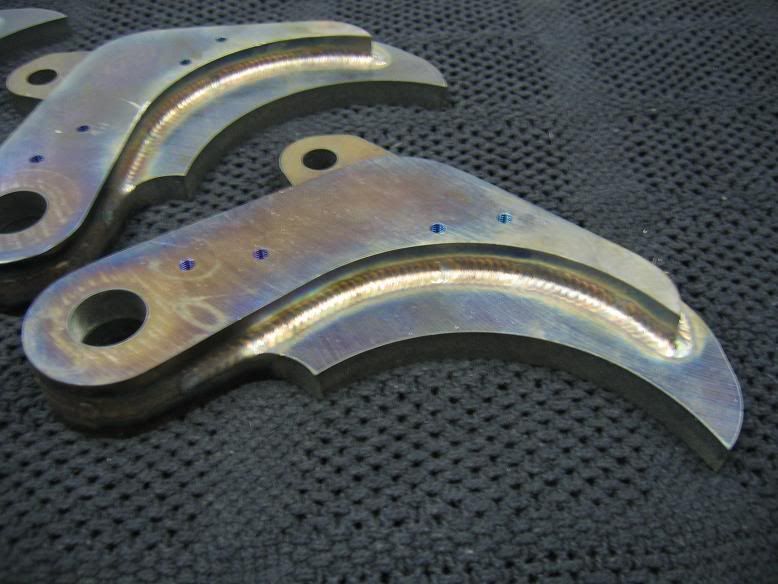
engine dolly (future test stand)

CIMG0330-1.jpg


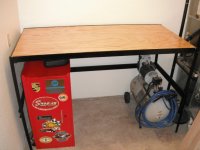
work table -it now has expanded metal drawer and bottom shelf
(currently has a 1974 150 hp Mercury outboard hanging on it:wtf:)

CIMG04312.jpg
 
To avoid these ads, REGISTER NOW!

Larwyn

Well-known member
Joined
Oct 10, 2011
Messages
378
Location
Texas
My projects are not as fancy as some but I have fun working on them anyway. Here's the latest that I just finished up, a "Third Hand Tool", currently clamped to my welding table.

Empty_Handed.jpg

Beer_Keep.jpg
 

Yotaforce

Well-known member
Joined
Aug 24, 2007
Messages
377
Location
Western NC Mountains
All these nice welding carts....mine is an old TJ Max shopping cart with the sides cut out of it and a bottle bracket welded to the back. Lol.
Can't beat free, but Northern tool has a nice cart I would not mind having that has drawers for the weld stuff. They also have a bigger cart that I could have both the welder and plasma cutter on.
 

Larwyn

Well-known member
Joined
Oct 10, 2011
Messages
378
Location
Texas
I added a "second story" to the cart which came with my MM180 for my plasma cutter. It was intended as a temporary measure until I build a "proper" cart but it has worked out so well for so long now that I'm in no hurry.:thumbup:
NewWheels.jpg
 

reznunt

Well-known member
Joined
Dec 13, 2009
Messages
273
Location
Socal
beautiful work, ztfab. i always enjoy looking at pics of your work. i've seen your posts on 3 or 4 different forums and your skills are amazing.

one thing i noticed is that you have welded a ton of different stuff. that's what i need to do to get my welds as pretty as yours... practice!
 

ZTFab

Well-known member
Joined
Jan 6, 2008
Messages
397
Location
Upland, CA
beautiful work, ztfab. i always enjoy looking at pics of your work. i've seen your posts on 3 or 4 different forums and your skills are amazing.

one thing i noticed is that you have welded a ton of different stuff. that's what i need to do to get my welds as pretty as yours... practice!

Thanks. :beer:

Yep, there's no book, teacher, or website that can make up for the time you spend behind the torch. Learn the fundamentals and practice, practice, practice.
 

ZTFab

Well-known member
Joined
Jan 6, 2008
Messages
397
Location
Upland, CA
These are some parts I used to do a few years ago.

They are the blades for a "jaws-of-life" style rescue tool used by Fire Departments.

They consist of S7 tool steel and between cutting, welding, heat treating, machining, and grinding they had about 15 steps in total to produce a finished set.

These are just the raw blades after welding.

IMG_0309.jpg


IMG_0308.jpg


IMG_0307.jpg
 

usafmora

Well-known member
Joined
Jun 24, 2011
Messages
195
Location
Indiana
Working on a trailer.
 

Attachments

  • new build 009.jpg
    new build 009.jpg
    140.3 KB · Views: 578
  • new build 023.jpg
    new build 023.jpg
    143 KB · Views: 613
  • new build 026.jpg
    new build 026.jpg
    148.3 KB · Views: 639
OP
N

neonnblack

Well-known member
Joined
Jun 7, 2010
Messages
4,913
Location
Reno, NV
And on the note of using different brands of flux core wire, I was using Italian HF brand wire before, bought US lincoln wire now, no differance.
 

SWT Racing

Well-known member
Joined
Jun 13, 2009
Messages
137
Location
South Carolina
These are some parts I used to do a few years ago.

They are the blades for a "jaws-of-life" style rescue tool used by Fire Departments.

They consist of S7 tool steel and between cutting, welding, heat treating, machining, and grinding they had about 15 steps in total to produce a finished set.

Very nice ZT!

If I may ask, what alloy did you use on the S7? HS-7-10 or maybe Hastelloy W. . .or did the customer specify a specific filler on the drawings?

At any rate nice looking welds, as usual. You are a TIG welding machine. . .those beads look fully automated. :beer:
 

ZTFab

Well-known member
Joined
Jan 6, 2008
Messages
397
Location
Upland, CA
Very nice ZT!

If I may ask, what alloy did you use on the S7? HS-7-10 or maybe Hastelloy W. . .or did the customer specify a specific filler on the drawings?

At any rate nice looking welds, as usual. You are a TIG welding machine. . .those beads look fully automated. :beer:

Thanks Andrew. :beer:

I use S7 filler for a pure match to the parent metal since they are heat treated.

If you look at the parts closely you can see small ding marks on the top laminate piece, that is from "peening" the part with a hammer during welding. Since S7 is an air-hardening tool steel it helps to relax the part by tapping it with a hammer while you weld it.

I also had to preheat each part to about 500* and monitor interpass temps to avoid cracks.
 

NASTYZEN

Well-known member
Joined
Jun 11, 2010
Messages
2,823
Location
St-Colomban,Que. Canada
My projects are not as fancy as some but I have fun working on them anyway. Here's the latest that I just finished up, a "Third Hand Tool", currently clamped to my welding table.

beerkeep.jpg


That's great. Just in time for Halloween!:thumbup:

ZT you machine you! Excellent welding as always.:thumbup:

A slight mod to a Lotus 11 oil pan.

miscprojects493.jpg


:beer:
 

SWT Racing

Well-known member
Joined
Jun 13, 2009
Messages
137
Location
South Carolina
I also had to preheat each part to about 500* and monitor interpass temps to avoid cracks.

Isn't it fun having to stop, check, reheat, and/or let cool if necessary before continuing? :bounce:

I've never had to weld tool steel. . .yet. Although, I've brazed thousands of carbide teeth to milling cutters in another life. Do you have to let something like that slow cool in powdered lime or dry sand after welding to prevent hydrogen embrittlement?
 

SWT Racing

Well-known member
Joined
Jun 13, 2009
Messages
137
Location
South Carolina
Do you use a caliper to measure out your welds so they are perfectly even??:headscrat


hahah:bowdown::bowdown::bowdown:

No doubt!

While my skills are not up to par with some of the fabricators here, I will tell you that a tight, consistent fitup can help tremendously.

A lot of practice also helps. :bounce:
 
To avoid these ads, REGISTER NOW!

ZTFab

Well-known member
Joined
Jan 6, 2008
Messages
397
Location
Upland, CA
No doubt!

While my skills are not up to par with some of the fabricators here, I will tell you that a tight, consistent fitup can help tremendously.

A lot of practice also helps. :bounce:

Tight fit-up doesn't just help...it is crucial for consistent welds.

Here are some pics of how tight I make my tube junctions on roll cages.

IMG_1780.jpg


IMG_1781.jpg


IMG_1833.jpg


IMG_1842.jpg
 

USMCdodge

Well-known member
Joined
Oct 12, 2011
Messages
453
Location
MCBH
^^thats a Nice bead man. here is a workbench i just got done with. its all u channel and 1 and 1/2 angle iron and 2 sheets of oak for the work surface. and my recently restored kr274a :)
extention cord holder. for when halloween is over.
 

Attachments

  • DSCF6397.jpg
    DSCF6397.jpg
    143.2 KB · Views: 675
  • DSCF6396.jpg
    DSCF6396.jpg
    132.1 KB · Views: 748
Last edited:

iamironman

Well-known member
Joined
Dec 28, 2009
Messages
159
Location
Marshall, NC
Tight fit-up doesn't just help...it is crucial for consistent welds.

Here are some pics of how tight I make my tube junctions on roll cages.

IMG_1780.jpg


IMG_1781.jpg


IMG_1833.jpg


IMG_1842.jpg

Paul your s*** is just bada**!

Miss having you over at WW, but I get it, sometimes the folks over there are full of you know what.
 

ZTFab

Well-known member
Joined
Jan 6, 2008
Messages
397
Location
Upland, CA
Paul your s*** is just bada**!

Miss having you over at WW, but I get it, sometimes the folks over there are full of you know what.

Thanks Brian.

I miss WeldingWeb, too....at least what it used to be. The members weren't necessarily the problem there, it was the B.S. that went on behind the curtain. As moderator(s) we had to deal with a lot of **** and the Admins were nowhere to be found. We were caught in the middle, lied to by the Admins/owners, and basically stabbed in the back then told to deal with it.

I have better things to do with my "free" time.

I've seen a few members from WW here on this board and, quite frankly, I like this place.

I may venture over there again someday...I still check in once and a while to clear my PM's.
 

monkers

Well-known member
Joined
Nov 30, 2009
Messages
159
ZTFab, I seen your stuff over at welding web, sorry you`re not there anymore. Glad you are here so I can learn some more. Your work is amazing, Ive been welding for a long time (on and off) and thought I was "ok"......untill I look at your stuff!!! Good God!!! Your welds are perfect, and I love looking at your projects. Thanks for staying on the web to help us less skilled than you are. If I remember, in one of your threads over there you said you were using a Lincoln Mig welder? I was just curious because I have a Miller power source with wire feeder at work, and I just am not pleased with it.....never as smooth as the Lincoln to me. I just thought it was me...... Thanks for sharing your knowledge and your projects with us!!
 

digdug18

Well-known member
Joined
Feb 14, 2010
Messages
311
Location
Danville, PA
ZTFab, I'm guessing your using a dedicated tubing cutter/grinder to get cuts that close in your tubing. I can't afford anything dedicated, I use an angle grinder to get it as close as possible.
Is there a better way other then a angle grinder to get a close tubing fit, and where I don't need to lay out the money for a dedicated machine?

Andrew
 

silentpoet

Well-known member
Joined
Apr 21, 2011
Messages
795
Maybe use a dremel with the right attachments if the piece is small enough. It would be slow though. If you have air you could use one of those little grinders like they use for porting heads.

And those welds make me want to weep. I can't do anything that pretty, but at least I can make strong enough welds if I can follow the line.
 

ZTFab

Well-known member
Joined
Jan 6, 2008
Messages
397
Location
Upland, CA
ZTFab, I seen your stuff over at welding web, sorry you`re not there anymore. Glad you are here so I can learn some more. Your work is amazing, Ive been welding for a long time (on and off) and thought I was "ok"......untill I look at your stuff!!! Good God!!! Your welds are perfect, and I love looking at your projects. Thanks for staying on the web to help us less skilled than you are. If I remember, in one of your threads over there you said you were using a Lincoln Mig welder? I was just curious because I have a Miller power source with wire feeder at work, and I just am not pleased with it.....never as smooth as the Lincoln to me. I just thought it was me...... Thanks for sharing your knowledge and your projects with us!!

Thanks monkers.

Yes, I use Lincoln wire feed machines.

I too have found that the Miller power sources (in their wire fed machines) is harsher than Lincolns. I had a Miller 250 for a few years and ended up selling it because it sat unused. At one point I had 7 Lincoln's and still own 4.

I have an SP125 Plus (setup with flux core for our chase truck for desert racing), an SP135 Plus (.023" ER70S-6), an SP170-T, and a PowerMIG 200.

Oddly though, I prefer Miller TIG welders over Lincoln and have a Syncrowave 250DX TIGRunner. A Chassis shop I used to work at had Lincoln TIG's and find that I prefer my Miller.
 

ZTFab

Well-known member
Joined
Jan 6, 2008
Messages
397
Location
Upland, CA
ZTFab, I'm guessing your using a dedicated tubing cutter/grinder to get cuts that close in your tubing. I can't afford anything dedicated, I use an angle grinder to get it as close as possible.
Is there a better way other then a angle grinder to get a close tubing fit, and where I don't need to lay out the money for a dedicated machine?

Andrew

I use a JMR hole-saw notcher and compared to the other brands and styles that I have tried, I love it. If you're a purely hobby guy then the $600 can be a little tough to choke down but there are other brands that are a little more affordable and will do a decent job.

To me, the $600 was more than worth it considering I have used dedicated notchers that cost $3-4k and they weren't as quick, quiet, or accurate.

If you don't have any money at all for a notcher then you can use programs like this to print out a "wrapper" that you place over the tube. Mark the tube and grind to the lines. Fairly simple but tedious.

Tube Coping Program
 

SWT Racing

Well-known member
Joined
Jun 13, 2009
Messages
137
Location
South Carolina
Tight fit-up doesn't just help...it is crucial for consistent welds.

Here are some pics of how tight I make my tube junctions on roll cages.[/IMG]

That's probably what I should have said.:( It also helps control distortion due to suckup in the weld joint. I was somewhat mesmerized by that nice outside corner joint on your aluminum weldment. :thumbup:

For the automotive oriented fabricators out there, it is worthwhile to note that in the automotive realm (not to discount other areas like, aerospace, etc), the quality of fabrication and welding on off-road vehicles like Trophy Truck and Class 1 will make or break a team. You can see this when looking at ZT's fab work. The cyclic loads, HF vibration, and weights on a TT are tremendous. While design plays a huge part, it still has to stay together.

My hobby is drag racing, and I have been privileged to know a few off-road racers who do some of the best fab out there. They have definitely influenced how I design and fab things. Depending upon the class, you can see some of the best and worst fab on some of the drag cars out there. . .partly because of the nature of the sport. What will fly on a drag car wouldn't even make it into the dust in a SCORE race.

Don't get discouraged if your MIG/TIG welds don't look as nice as some of those posted. . .make sure they are solid and have good penetration. If you have to weld a sample and cut it across the weld to check pen, go for it! Even if you're welding a wrought iron fence, someone might be lean on it and fall. Not everyone needs to know AWS D1.1, and we all started somewhere.

I'm rambling a bit as usual but my point is that, as fabricators, we all have something to learn. Always strive to be better as welders and fabricators and your skills will improve. I see a lot of aspiring welders/fabicators out there get discouraged, and the world could always use more great fabricators.:beer:

I use a JMR hole-saw notcher and compared to the other brands and styles that I have tried, I love it. If you're a purely hobby guy then the $600 can be a little tough to choke down but there are other brands that are a little more affordable and will do a decent job.

I use the JMR at work, and it is a very nice piece! I needed something at home, and just couldn't afford the JMR notcher. I ended up with a JD2 Notchmaster. Not as nice as the JMR, but at $250 it works very well for the hobbyist and is much better than the "joint jigger" style notchers.

popup.aspx
 

Deltarat

Well-known member
Joined
Nov 29, 2006
Messages
341
ZTFAB, that is the best fit and weld on a roll cage that I have ever seen. Damn nice work. I wish I could do that when I get around to my cage.
 

srupp

Member
Joined
Jul 4, 2010
Messages
20
I use a HF machine I had a lot of splatter also so a friend said switch wire
my splatter decreased also try holding the torch closer I do better with OA
but I want to do mig
 

ZTFab

Well-known member
Joined
Jan 6, 2008
Messages
397
Location
Upland, CA
Thanks for that! it takes too long to draw them out, I will play with it.

No problem! :beer:

ZTFAB, that is the best fit and weld on a roll cage that I have ever seen. Damn nice work. I wish I could do that when I get around to my cage.


Thanks Deltarat. If you have any questions when you get around to doing yours...feel free to PM me if you want.
 

ibedayank

Well-known member
Joined
Feb 2, 2011
Messages
2,619
Location
Columbia TN
nope nope not gonna post pics after ztfab...nope not gonna do it .....
makes my stuff look like a backyard hobbiest/hack with a fluxcore only cheapie welder...


oh wait that is me....
 

omr

Banned
Joined
Jun 1, 2011
Messages
723
nope nope not gonna post pics after ztfab...nope not gonna do it .....
makes my stuff look like a backyard hobbiest/hack with a fluxcore only cheapie welder...


oh wait that is me....
on this topic he is kind of a thread ender huh ? lol
 
OP
N

neonnblack

Well-known member
Joined
Jun 7, 2010
Messages
4,913
Location
Reno, NV
Nah i dont think he is a thread killer. infact i have been working ona project im about to post up, jsut a welding table made from scrap metal from my stores shelving units.
 
OP
N

neonnblack

Well-known member
Joined
Jun 7, 2010
Messages
4,913
Location
Reno, NV
Now, the point of this thread was mainly for begginers to learn more about welding and fab. with help from people like zt and that guy with the barn and has all the old pictures of cool stuff he has done (i forgot your name : O). NO ONE should be discouraged from posting in this thread no matter how feeble your welding skill is. It is all about learning.

So to maybe boost up peoples willingness to show their beginer projects, i will start with my own.

Welding table: 3'x3'x3', made out of roughly 2x4 steel tubing with tab holes all over it, leveling feet, and soon to have wheels on it also. Table top will be a thick 3/4 or 1 piece of plywood, i dont want to really put money into this and im not buying a steel top so shhh to you that will say bad wood top. Will have a carrier in the bottom to stuff the welder on one side, with shelved on the other. On with the pics.

Pieces all cut to length with my HF grinder.
2011-10-22112607.jpg


Old HF grinder, 5 or so years old i think, is finally biting the dust after much of this project, barely stays on anymore but it got the job done for me.
2011-10-22112639.jpg


One side welded.
2011-10-22130222.jpg


Both sides welded.
2011-10-22135414.jpg


All of it welded together into the basic table shape.
2011-10-30141433.jpg


This is as far as i have gotten in two weekends of tinkering for a few hours.
All in all its been good so far, table is square and legs are true. The only discrepancy is in the corner opposite of where im standing is about 1/8 inch too wide, but im ok with that considering it was ALL cut, welded and built in my delux shop:
2011-10-30143543.jpg

Its dirty, unpleasant to work in sometimes, but damn do i love it.

Hopefully in the next few weeks ill have the time to add the welder "Cradle" and shelves down below. thanks.
 
To avoid these ads, REGISTER NOW!
Top Bottom