To avoid these ads, REGISTER NOW!

Built-it-myself tools/machines - show us what you've done

Outlawmws

Well-known member
Joined
Aug 9, 2011
Messages
39,080
Location
The Badlands
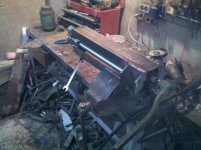
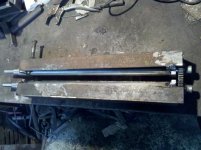
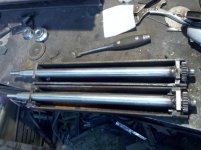
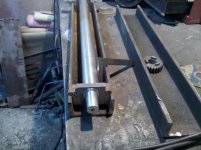
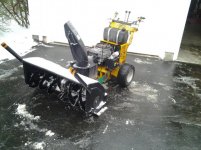
I had to fire this up agian today, so decided to get it posted:

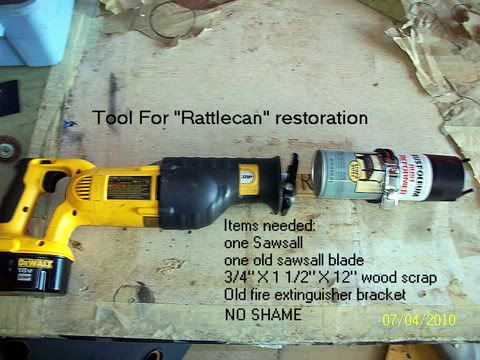
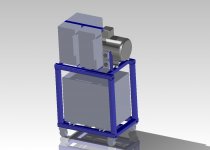
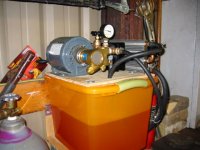
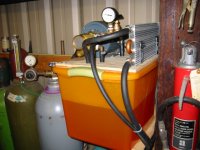
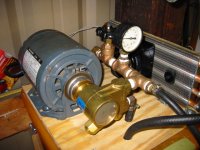
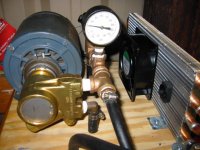
Anyone get tired of shaking a rattle can to get it liquid again instead of settled into a big glop on the bottom that will plug the tube/nozzle as soon as you try to go?

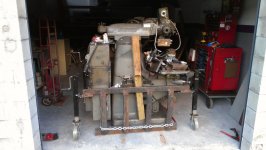
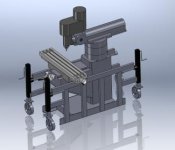
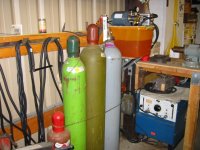
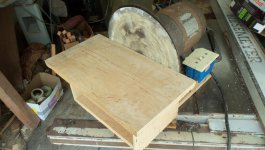
The gear reduciton takes it down to 500 RPM. fabbed it from stuff I had laying around the shop. I think the motor was $5 at a yard sale some years back...
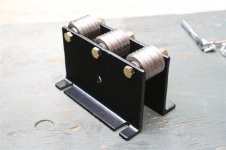

attachment.php
 

Attachments

  • Rattle can paint shaker.jpg
    Rattle can paint shaker.jpg
    135.8 KB · Views: 8,441
Last edited:
To avoid these ads, REGISTER NOW!

machine_punk

Well-known member
Joined
May 14, 2011
Messages
2,540
Location
Napa Valley, California
That's a great spray can shaker. I remember when I worked at a paint store as a kid, customers would often come in and buy a dozen spray cans of the same color. To shake them, we loaded 6 cans in each side of the old double one-gallon shakers. It worked beautifully. So, we sent the customer home with a case of spray cans, ready to use.

M_P
 

FrostBite

Member
Joined
Aug 5, 2010
Messages
21
This is a 12" grinder I made using a Shop Smith platen from eBay, a 40 year old, 1.5HP grain bin fan motor, and some scrap I had around the shop. I still need a harrow disk to add to the bottom.

IMG_20120422_231935.jpg


It still needs a shroud under the table to catch the swarf.
 

mgermca

Active member
Joined
Apr 3, 2008
Messages
35
Lots of great ideas on this thread!

Once you get the cnc bug, it's very addictive and you've got it for life.

I picked up a late seventies Bridgeport cnc milling machine for 1000$ on Kijiji a couple of years ago. It had been listed as 'best offer'. Cleaned it up and built a new controller for it, now using MACH hobby software to run it.


Once it was done, I decided to use it and the same stepper driver I had built to run a homebuilt 48" x 48" cnc plasma table. I have just gotten it up and I am now running/testing it. Some vid clips of the build...


Outlawmws

Well-known member
Joined
Aug 9, 2011
Messages
39,080
Location
The Badlands
I've wanted to try something similar for cleaning out motorcycle gastanks that have had old/bad gas in them (slower RPM though, more sloshing rather than violently shaking).

Havent found a suitable/cheap gearhead motor yet though....

I've seen guys use an old dryer for that. Cut the heat, but BB's in the tank and "wrap" it in an old comforter so it doesn't get beat adn is sort of tight, and let'er roll!
 

thruthefence

Well-known member
Joined
May 31, 2012
Messages
61
I light of some of the work submitted here, I feel unworthy, but here are a few I've made through the years.

Hydraulicpress.jpg


hydpress2.jpg

My version of a hydraulic press. Ram is a Flap actuator from some unkown aircraft, and the pump is an emergency gear pump from another. Not alot of horse power, but for the small stuff I do, it works well.The reservoir was supposed to be "proof-of-concept", but it's been fine for years, just ugly.


Puller1.jpg


Puller2.jpg

Centrifugal cooling fan puller for a Robinson R44 helicopter. Made from scrapbindium & a big sprung C clamp.


flywheeltool2.jpg


flywheeltool1.jpg

Flywheel holding tool for R44. Used for doing differential compression tests.


rattlecan001-1.jpg

my version of the paint shaker theme


bulletconnectortool2.jpg


bulletconnectortool1.jpg

Lucas "bullet" connector tool, worn out set of channel locks, mild steel & brazing rod. A must have for old english cars.


towbar2.jpg


towbar1.jpg

Aluminum towbar for small aircraft


Towmotor1.jpg


Towmotor2.jpg

Towmotor for the R44, made from a powered wheelchair. This was a team effort, not all my doing. Also works as a redneck Segway for roaming around the airport!


filterelementcutter3.jpg

Oil filter element cutter. I've posted it before, but it works so well, I couldn't resist.
 
OP
J

Jim Stabe

Well-known member
Joined
Feb 18, 2009
Messages
801
Location
San Diego, Ca
I haven't seen this thread pop up in a while. I'll throw in a couple more just to keep it going. This is my rotisserie. I could never figure out how to get the car up on the ones that have a fixed height so I incorporated winches at each end to raise the car. They are HF worm drive winches so you can let go of the crank and they won't unwind. The rollers at the top are from a powered gate that roll along a piece of angle on the ground. Making an exhaust system is easy with the car upside down.

Rotisserie.jpg

Rotisserie3.jpg

Rotisserie2.jpg

Rotisserie10.jpg

bottom2.jpg
 
OP
J

Jim Stabe

Well-known member
Joined
Feb 18, 2009
Messages
801
Location
San Diego, Ca
This is the shrinker I built back in 2008. Like many of the tools I build, it bolts/clamps to my steel work table and is less than 32” high so I can store it under my bench when not in use. I wanted something simple and inexpensive but wanted adjustable speed, stroke and die positioning.

I got 5’ of 2 x 6 x ¼ rectangular tubing at the scrap yard (just went up to $0.40 per pound – ouch!) and made the 14” throat frame. The upper die holder/ram is a piece of 1 x 1/8” wall sq tube with a ¾” long piece of 1½” round bar welded on and drilled for the ¾” round shank of the die (yet to be made). The die will be located with two 5/16” set screws 90* from each other that will bear against flats on the die shank. The attachment holes are slightly elongated to be able to tilt the ram slightly to get it aligned vertically to the lower tool holder arm. I used ¾” round shanks so I can use my planishing dies in it also. The ram rides in 2 x ¼” wall square tube with ¼” UHMW gibs shimmed for tight clearance.

The lower holder is a piece of 2½ x ¼” wall square tube with a piece of 2” square stock inside that is raised by a ¾” threaded rod from the bottom. It is held in place by ½” bolts from two sides to wedge it into the corner of the tube. The arm is two pieces of 2 x ½” bar on edge with a 1” space between.

The eccentric is made from 3” round and is adjustable for up to a ½” stroke (1/4” offset). It originally drove the ram through a connecting rod made up of male and female ½” rod ends. The lower rod end survived OK but the upper one rotated with the shaft and burned up pretty quickly. The connecting rod has been replaced with an aluminum bar that has ½” ball bearings pressed in each end. The driven pulley is a 5” diameter. The shaft rides in 1” pillow blocks that are the deal of the century for $6 each (if you buy 3 or more) from Northern Tool. With a 6” motor pulley it runs at just under 2100 RPM. I have another motor pulley (8” diameter) that gives 2760 RPM but it vibrates too much at that speed. The original motor was a 1½ hp 1725 rpm I have had lying around for years gathering dust. I always thought it was more power than I needed but when the motor on my belt grinder started making noise, I put that motor on the grinder and put a ½ hp on the shrinker and it works fine. The machine went from 160 lbs to 135 with the motor change.

Total out of pocket was $36 for the project - $24 for tubing and $12 for pillow blocks (Northern Tool – best deal around). The $14 for rod ends I didn’t count because they are not in the final configuration. The rest was in the steel pile or lying around the shop. I even had a v-belt that fit. There is no reason this could not be duplicated for about $100 (plus the cost of a motor) if you had to buy all the steel. Motors are cheap to free if you scrounge around and tap into your circle of friends that hoard that kind of stuff.

The monster 1 1/2 hp green motor was replaced with a more sensibly sized 1/2 hp one and the original connecting rod was replaced after I learned that spherical rod ends don't like to be spun at high speeds. The new one is aluminum with ball bearings pressed in. I can either have domed forming dies or shrinking dies The dies shown aren't mine but look similar.

Shrinker 001.jpg

Shrinker 008.jpg

Shrinker.jpg

Con Rod.jpg

Shrinker 017.jpg

Motor 002.jpg

9940120844435.jpg
 

Richard D

Well-known member
Joined
Jan 19, 2007
Messages
1,921
Location
Texas City, between Houston and Galveston
How about one of you geniuses help me figure out how to build motorized end trucks for a one-ton capacity bridge crane? From scrap, or at least real cheap! Maybe two torque wrenches for power in both directions? I have machine shop tools.
 

mag409

Member
Joined
Oct 7, 2007
Messages
5
Here are some I have built over the years. A tipping wheel for panel edge work, a beadroller, hydraulic conversion and stand for my tube bender, a rotisserie, and a CNC plasma table.


IMG_0633.JPG


IMG_0978.JPG

IMG_0999.JPG

Copy of IMG_0601.jpg

IMG_3251.JPG
 

Kevin54

MEMBER EMERITUS
Joined
Jan 12, 2005
Messages
29,341
Location
Urbana, Ohio
Here are some I have built over the years. A tipping wheel for panel edge work, a beadroller, hydraulic conversion and stand for my tube bender, a rotisserie, and a CNC plasma table.


IMG_0633.JPG


IMG_0978.JPG

IMG_0999.JPG

Copy of IMG_0601.jpg

IMG_3251.JPG

Those tools look first class all the way :thumbup::thumbup:

By the way....the Tipping Wheel. What is the purpose of that? I'm having a dumb moment this morning.
 

LutzTD

Well-known member
Joined
Dec 31, 2011
Messages
3,673
Location
Lutz, Florida
some of you have seen these in my shop thread, but heres a 3phase converter power cart and a heavy machine mover I built, hopefully once I get power and the machines set up I will be tooling up with english wheel rollers and a power hammer, I plan to build these myself.
 

Attachments

  • IMAG0352.jpg
    IMAG0352.jpg
    142.3 KB · Views: 331
  • machine mover assy.jpg
    machine mover assy.jpg
    11.9 KB · Views: 88
  • untitled.jpg
    untitled.jpg
    10.9 KB · Views: 87
  • IMG_2560.jpg
    IMG_2560.jpg
    93.1 KB · Views: 291
  • power%20cart%20model.jpg
    power%20cart%20model.jpg
    81.7 KB · Views: 220
  • machine mover swivel side.jpg
    machine mover swivel side.jpg
    9.1 KB · Views: 86
  • IMG_4589.jpg
    IMG_4589.jpg
    150.6 KB · Views: 306

Scoutman

Well-known member
Joined
Mar 3, 2010
Messages
161
Location
Huntsville, AL
Here's an adjustable height gantry I made a few years ago. I have used it quite a bit and don't know how I moved stuff around the garage without it.
 

Attachments

  • IMG_1284 (Medium).JPG
    IMG_1284 (Medium).JPG
    99.6 KB · Views: 686
  • IMG_1283 (Medium).JPG
    IMG_1283 (Medium).JPG
    77.9 KB · Views: 578
  • IMG_1277 (Medium).JPG
    IMG_1277 (Medium).JPG
    43.3 KB · Views: 582
  • IMG_1264 (Medium).JPG
    IMG_1264 (Medium).JPG
    69.3 KB · Views: 474
  • IMG_1280 (Medium).JPG
    IMG_1280 (Medium).JPG
    54.9 KB · Views: 582
  • IMG_1260 (Medium).JPG
    IMG_1260 (Medium).JPG
    81.3 KB · Views: 544
Last edited:

slickgt1

Well-known member
Joined
Oct 11, 2010
Messages
1,674
Oh my, I like that one. So simple to make and looks like it'll work great.

I've done this too. Duct tape, and an old blade. Or any blade for that matter. Was too ashamed of posting it as a tool though. lol.

This thread is awesome.
 
To avoid these ads, REGISTER NOW!

mslisaj

Well-known member
Joined
Jun 12, 2009
Messages
251
Location
Klamath Falls, Oregon
Well I built a TIG cooler. I just couldn't see spending $500 on this little device and figured I could build my own. For years I had my welder plumbed directly to the water supply and would run the water through the machine and just dump in outside. But when I moved to Klamath Falls my shop will freeze so this was a necessity. It's fully adjustable for flow and pressure too.

Lisa :thumbup:
 

Attachments

  • IMG_0693.JPG
    IMG_0693.JPG
    106.8 KB · Views: 443
  • IMG_0694.JPG
    IMG_0694.JPG
    110.7 KB · Views: 408
  • IMG_0695.JPG
    IMG_0695.JPG
    121.7 KB · Views: 403
  • IMG_0696.JPG
    IMG_0696.JPG
    119 KB · Views: 365
  • IMG_0697.JPG
    IMG_0697.JPG
    124.6 KB · Views: 361

FarmerSid

Well-known member
Joined
Dec 12, 2005
Messages
145
Location
Ontario, Canada
Lots of great ideas on this thread!

Once you get the cnc bug, it's very addictive and you've got it for life.

I picked up a late seventies Bridgeport cnc milling machine for 1000$ on Kijiji a couple of years ago. It had been listed as 'best offer'. Cleaned it up and built a new controller for it, now using MACH hobby software to run it.


Once it was done, I decided to use it and the same stepper driver I had built to run a homebuilt 48" x 48" cnc plasma table. I have just gotten it up and I am now running/testing it. Some vid clips of the build...


Very well done! From a fellow Canuck.
 

Finnrodder

Member
Joined
Dec 28, 2012
Messages
17
Location
Finland
Here is something i've made:

Stand for the shrinker/stretcher

shrinker.jpg


Harbor freight bead roller,i had to make it a bit beefier because it was flexing

roller004800x600.jpg
 

Finnrodder

Member
Joined
Dec 28, 2012
Messages
17
Location
Finland
Thanks!
I tried to post a link (there is some photos of the guide behind that link),but i got a note that the moderators must approve my post first,i guess thats because i am newbie.
I think its pretty good way to get rid off the spammers.
 

e-tek

Well-known member
Joined
Dec 19, 2007
Messages
10,690
Location
Saskatoon, SK
Thanks!
I tried to post a link (there is some photos of the guide behind that link),but i got a note that the moderators must approve my post first,i guess thats because i am newbie.
I think its pretty good way to get rid off the spammers.

I think u got a setting wrong or somethimg - omce u can post one pic u should b ablr to post anything. maybe try agsin?

Loobr the ss stand - esp the feet!
 

Finnrodder

Member
Joined
Dec 28, 2012
Messages
17
Location
Finland
Nope,its not up to my settings.There was a post about this in questions and suggestions.Its just like i thought,forums anti-spam setting,but it should be fine when i got my post count up.
 

Finnrodder

Member
Joined
Dec 28, 2012
Messages
17
Location
Finland
Here is one other thing i've done.I have Harbor Freight beadroller,so i made a beadroller dies that match on 51' Ford floor:

shoebox025800x600.jpg


Here is piece of factory floor with the die:

shoebox027800x600.jpg


And new floor with beads:

floor033800x600.jpg
 

camarotoolman

Banned
Joined
Mar 12, 2011
Messages
2,372
Location
cocoa Fl.
I made these two sanders out of some flee market parts, used motors, and scrap lumber. They get the job done for cheap.
 

Attachments

  • 008.jpg
    008.jpg
    138.3 KB · Views: 520
  • 007.jpg
    007.jpg
    144.6 KB · Views: 539

impala4speed

Well-known member
Joined
Oct 11, 2009
Messages
194
Location
Youngstown, Ohio
I made these two sanders out of some flee market parts, used motors, and scrap lumber. They get the job done for cheap.

Very nice. I've got parts collected to build one like in your first pic. I know this is the wrong thread but in the second pic I see some 70's era stereo items. I'm into this stuff too; just wondering what they are.
 
OP
J

Jim Stabe

Well-known member
Joined
Feb 18, 2009
Messages
801
Location
San Diego, Ca
I posted my bead roller a while back but have since made some modifications. I wanted it to run a little slower so I changed the sprocket ratio from 15:29 to 15:48 so it now runs at 6-7 rpm. While I was doing that I also added bracing to stiffen everything up some more so I can now run 16 ga steel through it if I want in one pass. I also added a jack shaft and hand wheel to make manual operation more convenient. I can disengage the winch motor from the drive to do intricate work manually.

Bead roller mods 004.jpg

Bead roller mods 002.jpg

Bead roller mods 003.jpg

Bead roller mods 007.jpg
 

napalmv8

Well-known member
Joined
Aug 30, 2012
Messages
57
Location
Minsk, Belarus
Bead roller we have made a couple of days ago together with my friend.
Gears taken from russian motorcycle "Voshod" gearbox, frame welded from scrap box iron ;)
Dies are designed to reproduce beads from buick 1981 floor pans.
 

Attachments

  • IMG_20130129_204645.jpg
    IMG_20130129_204645.jpg
    143 KB · Views: 285
  • IMG_20130128_213325.jpg
    IMG_20130128_213325.jpg
    143 KB · Views: 289
  • IMG_20130128_213316.jpg
    IMG_20130128_213316.jpg
    141.5 KB · Views: 264
  • IMG_20130128_200901.jpg
    IMG_20130128_200901.jpg
    145.4 KB · Views: 256
  • IMG_20130128_195827.jpg
    IMG_20130128_195827.jpg
    143.5 KB · Views: 288
  • IMG_20130126_201756.jpg
    IMG_20130126_201756.jpg
    145.1 KB · Views: 272

msportbiker6666

Active member
Joined
Jan 23, 2013
Messages
35
I am a part time landscaper and full time tinkerer. I had the howard price power unit laying around unusednfor 11 months a year. The unused 2 stage simplicity blower was offered to me for 200$ and a couple of hours later, ok days, this was born....
 

Attachments

  • IMG_20130312_194936.jpg
    IMG_20130312_194936.jpg
    67.1 KB · Views: 628

dladcock

Well-known member
Joined
Jan 29, 2010
Messages
855
Location
North Carolina
Posted these somewhere else, probably a better fit here.

Made up ten of these for the shop air drops. Plan to polish and plumb with 1/2 SS tubing.

022_zps418c8658.jpg


021_zps901aa7f3.jpg


dla
 
To avoid these ads, REGISTER NOW!
Top Bottom