To avoid these ads, REGISTER NOW!

Reorganization, it's like a renovation.

Status
Not open for further replies.

lisiecki1

Well-known member
Joined
Feb 6, 2013
Messages
742
Location
SE Texas
Been pretty absent in the garage. Too much time has gone by to recap but as of now it looks like we are moving. Doing a lot of purging around the house. I am not certain I want to do this but thinking I'll need to get the Craftsman DP to a new home. I don't know what my garage space will look like at the next place. Thinking between the Delta floor DP or Cman bench DP, the floor DP will be easier to keep. I don't even know if I will be able to take the workbench I spent forever building.

If anyone here in DFW can give this Cman DP a good home, I'm willing to get it go for the dollar value I put into it, $85. I do have it torn down. I've cleaned up a few pieces but that is it. I will leave it in pieces as it is much easier to transport. I'll send the new belt with it too. If it doesn't go to someone here on GJ, I'm keeping it and will just store it.


I wish you were closer, I'd be more than happy to take it off your hands.
 
To avoid these ads, REGISTER NOW!

Hornman

Well-known member
Joined
May 9, 2013
Messages
517
Location
Southwest DFW
If anyone here in DFW can give this Cman DP a good home, I'm willing to get it go for the dollar value I put into it, $85. I do have it torn down. I've cleaned up a few pieces but that is it. I will leave it in pieces as it is much easier to transport. I'll send the new belt with it too. If it doesn't go to someone here on GJ, I'm keeping it and will just store it.

If you feel that you HAVE to get rid of a DP :(, I will volunteer to be your accomplice. I'm in the DFW area, so PM me if you want to proceed.
 

hafi

Member
Joined
Jul 2, 2013
Messages
7
Hi Girl,

this is now the third thread in this board, which catched my eye. It is stunning to read and see, what you have set up.

I also have an shop in an two car garage. It is always crumbled up with lots of projects and I sometimes don't see any progress. A thread like yours is very helpful.

Keep on, I am very curious to read from you :)

Cheers

Jan
 

RickP

Well-known member
Joined
Jan 15, 2013
Messages
1,549
Location
Annapolis, MD
WOW!
That about sums it up.
I'm speechless.
Really.


I just read through all 45 pages and your projects are awesome. Just the right GJ blend of function and form.

For your garage, I was sorry to see that you're moving. But you can take some of your projects with you, and with your newly learned skills, just think how easy the projects in the new house will be. Best of luck with your move.
 
OP
G

GirlnAgarage

Well-known member
Joined
Jan 21, 2011
Messages
4,669
Location
Texas
Thanks yall. The more I think about all the work I've done here the more I'm sad to be leaving it all behind. The renters that come in here had better take care of this place :see:


If you feel that you HAVE to get rid of a DP :(, I will volunteer to be your accomplice. I'm in the DFW area, so PM me if you want to proceed.

If you're really interested in it we can get together. I'd hate to see this Cman DP just sit and rust in the Florida humidity. It'd be best it stayed here in TX. Besides, I don't have as big a garage in the new place. (I know right, smaller than this one!) and I can't spare bench top room for the Cman either. The Delta floor press is really going to earn it's keep being stand alone.

I'm here all week but kind of everywhere with errands as we are about a week out from packing up. If you can meet during the day that'd be great so we can avoid traffic and meet halfway in Arlington along 360 somewhere.

Let me know and we'll get it done.
 

markviii

Well-known member
Joined
Jan 25, 2010
Messages
1,310
Location
east central IL
Life's an adventure and you never know what great things might be around the corner. Think positive and you'll be able to make the new (albeit smaller) space yours in no time!

Good Luck with the move.

Chris
 
OP
G

GirlnAgarage

Well-known member
Joined
Jan 21, 2011
Messages
4,669
Location
Texas
WE MOVED:3gears:


Well folks, we got moved. I should have taken a pic of our empty garage the morning we left. Would have been a nice closer on this garage thread.

I'll take a shot of our new garage. It's full of boxes and a total wreck. I can't wait to get it settled out. I was talking to my husband comparing the garages. I told him it was funny that I did all the work to our garage to install outlets, shelves, paint the walls, storage. And all I had left really was a nice ceiling, florescent lighting and maybe a floor. This new garage only has a nice ceiling, florescent lighting and a well used epoxy coated floor. :eyecrazy:

Since we are renting I can't do any permanent upgrades. We'll see how it goes.
 
Last edited:
OP
G

GirlnAgarage

Well-known member
Joined
Jan 21, 2011
Messages
4,669
Location
Texas
THanks tinbender.

FarmerPete, indeed I did. I think the unloading crew received hernias for their trouble :lol: After unpacking boxes and finding new storage places for a lot of things I realized just how much I depended on the shelves & storage I built in DFW. Everything had it's place. Now here, things don't have their places.

I am surely back to square one. My hands are tied because we are only renting. I can't change another person's house. I'll figure out some alternatives I think.
 

machine_punk

Well-known member
Joined
May 14, 2011
Messages
2,540
Location
Napa Valley, California
When I lived a more-nomadic lifestyle, I bought a bunch of the freestanding chrome-wire shelves (like you see in commercial kitchens). They are reconfigurable as your needs change, they hold a LOT of weight (as long as you don't install the casters), and all the parts work with each other (you can put just a couple of shelves on one unit, then use the extra shelves on another unit). They break down into almost no space (four poles and a stack of shelves) for easy moving to the next home (or storing at the next home, if you don't have room to put them all up).

For moving from home to home, having your own, freestanding shelves is vital for storage.

Kev
 

mdbeck1

Well-known member
Joined
Mar 7, 2010
Messages
2,297
Location
Norman, OK
THanks tinbender.

FarmerPete, indeed I did. I think the unloading crew received hernias for their trouble :lol: After unpacking boxes and finding new storage places for a lot of things I realized just how much I depended on the shelves & storage I built in DFW. Everything had it's place. Now here, things don't have their places.

I am surely back to square one. My hands are tied because we are only renting. I can't change another person's house. I'll figure out some alternatives I think.

At one time I lived in a duplex. The garage was too short for my vehicle so I had a large woodworking shop. I started building wood boxes and putting them on their sides so that the open side was to the front. They made good shelves and when I moved I just had to pick them up, rotate 90 degrees and stack them in my truck. For shelves I bought damaged bi-fold doors from the local lumber yard. They are light, wide and hold quite a bit of weight. I even had a couple with fluorescent lights and power plugs so I could have more plug ins available while working.

When you make the boxes if you set the bottoms and sides up right they will stack on top of each other. Then when you move you don't have to pack as many boxes.
 

FarmerPete

Well-known member
Joined
Jul 24, 2013
Messages
258
Location
Lansing, MI
When I lived a more-nomadic lifestyle, I bought a bunch of the freestanding chrome-wire shelves (like you see in commercial kitchens). They are reconfigurable as your needs change, they hold a LOT of weight (as long as you don't install the casters), and all the parts work with each other (you can put just a couple of shelves on one unit, then use the extra shelves on another unit). They break down into almost no space (four poles and a stack of shelves) for easy moving to the next home (or storing at the next home, if you don't have room to put them all up).

For moving from home to home, having your own, freestanding shelves is vital for storage.

Kev

For my basement, I bought three wire shelves like that. I wanted shelves that were a little taller, so I took the extra shelves that I didn't use and I hooked the shelving units together. So my 3 shelving units became 5 units. My basement is dry, so I didn't need the bottom shelf on any of the units. THey are all attached to each other, so everything is very sturdy.
 
OP
G

GirlnAgarage

Well-known member
Joined
Jan 21, 2011
Messages
4,669
Location
Texas
Over the past couple weeks I finally got the urge to get the garage a bit more cleared. I've put it off, much because of the "I don't want to start over" attitude and being pissed. But my OCD "Clear the clutter" attitude finally broke down my resistance. I wish my compulsions wouldn't override each other, I lose bargaining power with my husband by being able to adapt, dang it.

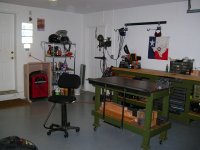
Clearing the garage involved setting up the final empty room, the workroom. I set up my stitching machine to get things started. Then I moved to the garage. The big items of clutter taking up floor space were the frames and tops of my workbench. Hauled those to the room and set them up with my new Dewalt drill driver. That was the motivational gift to get it done - a new toy! zzzzzttt zzzzzttt!! At our previous house (from now on shall be known as "OPH") I had these two benches wall mounted, set up in an "L" shape. One is a 2x4 the other a 2x8. Unfortunately because the house being a rental I couldn't/wouldn't mount them up the same. So, I improvised and stacked the benches, the 8' over the two and threw in some legs.

While I was there I also (finally) mounted the cow skull that I had finished back in Dec (whitened and top coated, ready to hang). The skull weighs 9lbs. I used a 200lb rated "L" hook in the wall and two 50lb rated wires looped through the skull. Not the most sophisticated job but it'll do the job.

Moving the workbenches and skull made some breathing room in the garage. Now I'm getting somewhere.

Since the workbench was setup I could now unpack and assemble my 4" vise and arbor press. Those items were just stacked in a corner waiting for a place to be.

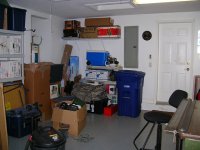
Next order of business in the garage was to push boxes around, move shelves, unwrap contents of boxes and then push, lift, carry, slide a box back into position. At this point I was really cursing our move. I was stuck doing this stuff when at OPH I had already built in shelves and some great storage and have already put this stuff away! :mad: I used my anger and The Force to consolidate holiday ****, random **** and was able to throw out six cardboard boxes. Now I'm getting somewhere in spite of this small garage, with stucco/cement walls and only ONE OUTLET, again!!! :)tantrum2:) Anyway, I did enough in the garage to have some walking space and some organization going on. Least I saw results for my efforts! :rocker:

Now that space was cleared I focused on the next easy, big thing that could clear up space - the Cman DP. Where would I put it? :headscrat There was no space in the garage for it. I have a floor standing Delta that covers the DP needs in there. So, really the only space that made sense was inside in the workroom. Since I am the woman of the house I'll put my machines whereverthehellIwant :see: To put it in there I 1. had to clean up the DP well and 2. had to build a stand.

Since building a stand was more fun - Stuart sent me a Dewalt Impact driver I wanted to use/review - I started looking for shop stand ideas.

I found this one

Still a bit unsure it would be the right stand for the Cman I kept searching. Until I saw this in post #26
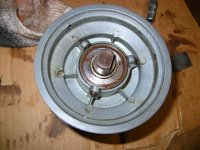
They came from the factory with this piece, depending on the age of the press (I know mine has one.) I think it would help dress it up. You can see it in the photo of my drill press below.

attachment.php

Ok...gotta stop here to cook some dinner. To be continued
 

Attachments

  • skull1.jpg
    skull1.jpg
    76.3 KB · Views: 64
  • skull2.jpg
    skull2.jpg
    119.1 KB · Views: 62
  • skull3.jpg
    skull3.jpg
    59.3 KB · Views: 53
To avoid these ads, REGISTER NOW!
OP
G

GirlnAgarage

Well-known member
Joined
Jan 21, 2011
Messages
4,669
Location
Texas
Thanks yall! :) Good to be back.
Ok, dinner eaten, glass of cabernet within reach...

Where was I, oh yes, the stand. I saw Stuart's stand and since I was the same design I thought it'd be good to go. I scratched out my dimensions (after downloading and dimensioning out from the sketch on the FWW site) & notes, gathered some 2x4s and kicked up some sawdust. That project I touched on in my post #44 of Dewalt - got the Drill/Driver but not the Impact - Mistake?

attachment.php


With the stand wrapped up I moved to getting the Cman together. When I first brought it home it was in good working order, though dirty and sort of forgotten about. It was my CL find: Edit: 50s Cman DP on CL - too late, I bought it

cmandp1.jpg


Back at OPH I disassembled it and had started cleaning up pieces. I polished the pole (heh, silence!), polished the handles, polished the table & base surfaces, and tried to get to the chrome covered handles.

Working on things now I touched up each of those pieces again, brush polished out the head strap and tried the chrome handles. Again I decided to forget those. The chrome was pitted but it was still thick enough that it was hard to get the chrome off to bare aluminum. I decided to leave the handles alone and assemble the DP. My intention is to tackle a handle now and again since they are easy to remove from the bolt hex head via set screw.

I moved the stand & base to the workroom. I carried all the Cman pieces to the workbench in there and began assembling. I completed the head and attached the pole. I attached the motor to the motor mount plate. I cribbed up the head on the workbench so no handles were bearing the load. My husband got home and with extra hands we installed the work table. From there I had him stand on the workbench and deadlift the DP to vertical. As he lifted it off the edge I guided the pole to the base and set it in, snugged it down. Then had him lift the motor/mount into place. I installed the belt and we tensioned it down. From there we slide the entire unit into it's place in the room.

attachment.php


attachment.php


The pic there ^ shows the DP stand with the lower shelf installed. I decided to use the remaining 2x4s for that. While it looks goofy with the upper surface with horizontal 2x4s and the lower with vertical 2x4s I did it for two reasons. 1. Less cutting and more importantly 2. I thought the verticals would hold the load and help prevent the legs from splaying under the weight of the DP. Also goofy isthat the 2x4s didn't cover the space evenly. Rather than figure out filler strips I used 3/8" bolt from my hardware drawer to space out the 2x4s evenly while I secured them. Not perfectly gorgeous but functional.

With the DP out of the garage and into the workroom I had to clean up the garage from getting the DP out of the garage and into the workroom. After vacuuming the saw dust and putting away tools this is where the garage currently sits.

The section I use is nice. The section of storing junk is, well, not. Of course the landlord left several chincy shelves, paint buckets, old rugs, tiles and all kinds of house **** that we have to store and it takes up valuable floor space. Particularly space on the front wall. Also needing space is the metal hurricane shutters. Those use to be strapped to the wall with a chain where my workbench currently sits. But being a garage person no way in Hades was seasonal items going to hog the most valuable wall of the structure. The rest is our stuff that has to be put in a place. I figure another round or two before that is under control.

Well, there it is.
 

Attachments

  • 5.jpg
    5.jpg
    115.5 KB · Views: 193
  • 4.jpg
    4.jpg
    125.3 KB · Views: 217
  • 3.jpg
    3.jpg
    129.8 KB · Views: 1,450
  • 2.jpg
    2.jpg
    108.7 KB · Views: 241
  • 1.jpg
    1.jpg
    116.7 KB · Views: 258

Wingnut65

Well-known member
Joined
Apr 21, 2010
Messages
3,170
Location
Tampa Bay, FL
Welcome back! Glad to see the clutter got the best of you to inspire motivation. And the new spaces feel so much better to look at and use!

Great looking DP stand. :thumbup: And, I love the deep green of the workbenches in the garage. The place is really taking shape. Give it time and all will be back to the new norm!
 
OP
G

GirlnAgarage

Well-known member
Joined
Jan 21, 2011
Messages
4,669
Location
Texas
I have 2 more steer skulls got them personally off dead cows,they worth anything to u?? or anyone else??:headscrat

I'd love to take a good skull so my advise is prep and mount those around your place. You'd be surprised what those things cost if you tried to buy one at any kind of home decor or shop. Nice big spreads can bring $2-300 easy. My dad has a bunch and that's where I got this one. (He finds them and arrowheads in the field like I find used gum on the sidewalk). He liked what I did with this one he offered me a couple more. And Dad has some really nice ones in the garage :rocker:

If you decide to keep them check this link. http://www.cowboyway.com/HowTo/WhitenBone.htm
I used it for the methods to prep this one. I wrapped the skull in paper towels, saturated with peroxide, wrapped in a trash bag and let it soak for a day/overnight. Then removed the stuff and let the skull air dry. Then I used the syringe and glue to glue the loose teeth. Then I made a glue/water wash and liberally top coated everything I could get a brush on. I even pulled the horn covers and did the horn bone.

The finish came out great. I did not overdo it. It doesn't look fake white or fake plasticky shiny. Very subtle, undetectable prep & finish. Perfect for conserving the dead look.


Welcome back! Glad to see the clutter got the best of you to inspire motivation. And the new spaces feel so much better to look at and use!

Great looking DP stand. :thumbup: And, I love the deep green of the workbenches in the garage. The place is really taking shape. Give it time and all will be back to the new norm!

Thanks Wingnut. You know I was looking at the green yesterday and wondering if it was time to change that or not. I said "not" because it'll be a lot of work to change it :lol_hitti
 
OP
G

GirlnAgarage

Well-known member
Joined
Jan 21, 2011
Messages
4,669
Location
Texas
Hey, that's my drill press stand. :) Glad I was able to provide some inspiration.

It sure is. I figured "Well if that guy did it." :D
Heh, really though I wanted to be sure the stand was up to the task of carrying the heavy DP. Last thing I want is for that heavy hard iron to end up on the floor.

What I liked about the design is it is small & unobtrusive. It doesn't take up a huge footprint or feel overbearing in a space. The other design I had in mind was the shape & size of the small 2drawer filing cabinet type. I have always liked that furniture for a machine and it provides storage for that machine's accessories & bits.

I have to admit, part of me is thinking of building a second stand and chopping down my Delta floor press to convert it back to a bench top. I'd have to get a different base, probably find the original part to stick on there from ebay. But it'd be a nice change I think. Anyway, I'm thinking about it.
 

nine4gmc

Well-known member
Joined
Mar 24, 2012
Messages
14,357
Location
Dallas
Dang girl you rocked it! Love that stand and great job cleaning up the DP. I too sew, I do upholstery and can appreciate the "in home" shop. :beer:
 
OP
G

GirlnAgarage

Well-known member
Joined
Jan 21, 2011
Messages
4,669
Location
Texas
Dang girl you rocked it! Love that stand and great job cleaning up the DP. I too sew, I do upholstery and can appreciate the "in home" shop. :beer:

Hey alright :beer:
An indoor workroom makes work really comfortable. The toughest part is not getting the walls & floor too dirty.
 

xtremek

Well-known member
Joined
Apr 13, 2012
Messages
11,603
Location
St. Johns, Mi
I started at the end and now I have to go back through this whole thing and it's all your fault.;) I did skip around a little and noticed a home built brake. I'm doing something similar. I'm going to have to go through that part real s-l-o-w so I can see how it worked out. I blame you for not getting to work in my barn tonight because I was to busy reading the first page of your thread.:lol: Looking forward to going through your thread.:drool:
 

Shoottx

Well-known member
Joined
Jan 30, 2011
Messages
314
Location
Plano Tx
The other day I was wondering how you were doing with the move. It is hard to transplant a Texan.

Glad yoou decided to keep the Cman Drill Press.

Looking forward to more of your projects!:beer:
 
OP
G

GirlnAgarage

Well-known member
Joined
Jan 21, 2011
Messages
4,669
Location
Texas
I started at the end and now I have to go back through this whole thing and it's all your fault.;) I did skip around a little and noticed a home built brake. I'm doing something similar. I'm going to have to go through that part real s-l-o-w so I can see how it worked out. I blame you for not getting to work in my barn tonight because I was to busy reading the first page of your thread.:lol: Looking forward to going through your thread.:drool:

My apologies for the evening derail :bounce: Though I feel a little bad, if I had a barn I'd want to be out there too.

The press brake worked out really well. Looking back to that, still can't believe I built a brake to build the drawers to build a bench. All the work - Oy vey! Overall, real impressed that the brake folded up that many wide 16ga edges. The brake did suffer a little fatigue right in the middle of the span which slightly increased the roll radius in the center of the fold, I think I documented that. But I predict with a better foundation, as in steel instead of the wooden bench top, that fatigue would be mitigated. Of course the gauge of metal mattered a lot too. This brake would have no trouble with 18-22ga.

What project will you be working on?


The other day I was wondering how you were doing with the move. It is hard to transplant a Texan.

Glad yoou decided to keep the Cman Drill Press.

Looking forward to more of your projects!:beer:

That is the truth. And when the area is invaded by a non-native species of Texas Bluebonnets they'll know who to blame.

I'm glad I kept the Cman too. What's better I think my husband now appreciates why I got it when I already had the Delta. As I flipped the ON switch after we set it up he says, "Man, you just can't buy anything like this anymore". He was replying to my "Don't stick your fingers in the belt" instruction. But I could tell, he liked the Cman too.
 

shopnut

Well-known member
Joined
Feb 22, 2006
Messages
4,237
Location
Florida
I had to laugh when I saw your location “Land of the Bad Drivers”. I’ve been in this state for 22 years now, and I don’t think a day goes by when I don’t say WTF while out on the road. What’s really bad is I commute to work on my M/C nearly even day, so it’s defensive riding at its best.

It looks like you have settled in nicely there at the new place and are nearly ready for action. It seems the last couple boxes are the worst to put away – for me, they’re usually a collection of oddball stuff from all the other boxes that I didn’t know what to do with and just set them aside until the end.

Good luck with whatever the next project is.
 
OP
G

GirlnAgarage

Well-known member
Joined
Jan 21, 2011
Messages
4,669
Location
Texas
I had to laugh when I saw your location “Land of the Bad Drivers”. I’ve been in this state for 22 years now, and I don’t think a day goes by when I don’t say WTF while out on the road. What’s really bad is I commute to work on my M/C nearly even day, so it’s defensive riding at its best.

It looks like you have settled in nicely there at the new place and are nearly ready for action. It seems the last couple boxes are the worst to put away – for me, they’re usually a collection of oddball stuff from all the other boxes that I didn’t know what to do with and just set them aside until the end.

Good luck with whatever the next project is.

Thanks :)
And you are not kidding! It gets ka-RAY-zAY here. Funny about MC defensive riding, my husband put his foot down and forbid me to ride here. He doesn't pull the forbid card often, but I'll let him have this one. I don't like driving my nice big 2500 4x4 here!:scared:

Funny about the last few boxes. That is exactly what they are - a mix of random stuff that has to go every which way to be "put away". Even then it is kinda like putting things in another place it doesn't belong just to move it.


Well this morning I ran into a gem of a thread: http://www.garagejournal.com/forum/showthread.php?t=227480

This is Frank Lee's Craftsman Drill Press thread and it contains some great info concerning the multispeed pulley and various items. I believe I will get that set up next on mine. I also learned Frank is becoming a Cman DP hoarder. GJ we might need to do an intervention. If so, write down the parts you need and bring an appropriate vehicle to carry them home. J/K Frank :bounce: You're doing some nice work over there and finding some great deals on old iron that needs to go to a good home. Thanks for keeping us posted.

Upon reading that thread I went ahead and placed an order at HF for the Accu-link belt (and the circular saw blade sharpener too. My Rage3 blade is tearing edges of wood). Then went out to the garage, pulled the pulley from the shelf and proceeded to clean it up. It was covered in a a rough layer of dirt and grim.

cmandp22.jpg


cmandp5.jpg


I disassembled the pulley. Referenced this THREAD. Cleaned and reassembled. It sits ready to be dropped into the DP column. It's not showroom level clean, just working level cleaned. Interesting note, the bearing on the pulley is marked "Made in USA Norma 204 PP * ". I believe it is the original bearing to the pulley. It still runs smooth and true. How about that?
 

Attachments

  • MSPulley1.jpg
    MSPulley1.jpg
    144.4 KB · Views: 136
  • MSPulley2.jpg
    MSPulley2.jpg
    51 KB · Views: 344

xtremek

Well-known member
Joined
Apr 13, 2012
Messages
11,603
Location
St. Johns, Mi
No particular projects yet, but it's something I've needed in the past and I want something a little better than clamping a 2x4 on the edge of the bench and beating the panel to the angle I want. Still reading.
 
OP
G

GirlnAgarage

Well-known member
Joined
Jan 21, 2011
Messages
4,669
Location
Texas
No particular projects yet, but it's something I've needed in the past and I want something a little better than clamping a 2x4 on the edge of the bench and beating the panel to the angle I want. Still reading.

Well, once you have a press brake together you'll think of a few projects right off the bat. Thanks for reading.

Wow, what a great thread, love your work, thanks for posting.:thumbup:

Thanks 1/2 Cup :)


Update tonight, pulled the motor from the Cman and have it on the bench. I removed the set screw holding the pulley to the shaft but can't get the pulley to budge off with gentle prying. I've soaked the shaft with atf/gear oil (my mix of choice) . Is there a better method I can try that won't wreck the shaft, bearings or pulley? Thanks.
 

Outlawmws

Well-known member
Joined
Aug 9, 2011
Messages
39,262
Location
The Badlands
Girl, Make sure there isn't two setscrews one atop the other (to lock the first one) that was a fairly common practice.

Can you get something under the pulley and lever against the center of the hub? whatever you do don't pry on the thin edges of the pulley, it won't take it! It should be a snug slip fit only, but time has a habit of getting them tighter...
 
OP
G

GirlnAgarage

Well-known member
Joined
Jan 21, 2011
Messages
4,669
Location
Texas
Had a relook, the pulley is on with a single, long set screw (5/32" allen).

Yeah those thin aluminum pulley edges are what I'm being real careful with. The only thing I can get in there is a flathead screwdriver, the perfect universal prying tool ;) I'm trying to keep the head in real close to the spindle and rotate after each gentle prey. No go yet.

I have pulled off the base so have a look inside. It's all original and I shouldn't have pulled the cover. I'm afraid now I have to dig in as the power wire is pretty cracked, even frayed, and the black & white wires are very cracked too. Printed out the diagram right now. Because I've seen it, I'm going to have to get in there and rewire. This is not up my alley. But since I'll be in there I would like to wire in a three wired cord (green white black to ground the unit). Is that possible?

I shouldn't have pulled the base :eyecrazy:
 

Outlawmws

Well-known member
Joined
Aug 9, 2011
Messages
39,262
Location
The Badlands
The grounded plug is very doable, and highly recommended!

Ground the green to the motor (dedicated screw). Run he black through the switch, then back to the motor, and the white to L1 or L2 (Typically) of the motor.
 

cbacres

Well-known member
Joined
May 28, 2010
Messages
5,998
Location
SW Florida
I don't like driving my nice big 2500 4x4 here!

It's the perfect truck for down here! Just add a set of air horns if you don't have already, the idiots are immune to regular horns, just another background noise to them. Got to make em jump!
 
OP
G

GirlnAgarage

Well-known member
Joined
Jan 21, 2011
Messages
4,669
Location
Texas
I don't like driving my nice big 2500 4x4 here!

It's the perfect truck for down here! Just add a set of air horns if you don't have already, the idiots are immune to regular horns, just another background noise to them. Got to make em jump!

Oh, you're definitely right, it is the perfect vehicle to drive here. What I meant by not wanting to drive it here is that I don't want to get my pretty truck all dinged up. (I hit the roof the other day when I looked at the new dimples n my rear bumper from the parking lot idiots that pull up too far or back out without looking). When I'm at stoplights I can't help but look at the cars around me and see just how much damage they've incurred. That is the scary part :scared::lol:

Oh and I would love an air horn, I'm just being lazy about buying and installing. People like to honk around here. Well, if we're honking let's honk right! :evil:
 
Status
Not open for further replies.
To avoid these ads, REGISTER NOW!
Top Bottom