To avoid these ads, REGISTER NOW!

Above 1200 Sq/FT Restored 1930's Auto Shop

Wokspaces above 1200 squarefeet.
OP
B

BB767

Well-known member
Joined
Dec 24, 2009
Messages
3,724
Location
Philo, IL
Re: GUS Update

:thumbup:

I'd live in there

Hi Christopher and welcome to the thread. Yeah the shop tuned out pretty well and at times Chris has accused me of living out there because I spend so much time out in the shop. It's a great work space.

Thomas

Thomas, seeing those grease fittings brought back memories. Of the cars I've owned, my 1947 Ford had the most grease fittings but every car since then has had fewer and fewer. My 2004 PT Cruiser has none.

I expect an oil change and grease job on Gus is a pretty long and involved process to do correctly.l........

Grease%20Fittings_zpsobci6ewe.jpg

Bob your service chart is very similar to ones in the Willys shop manual for Gus. There are grease fittings all over Gus. Someone in the recent past took it upon themselves to grease them and not just a little bit. There is grease all over the underside from over servicing it with grease and more grease. Additionally the grease seals in the wheels didn't really seal grease in the wheel. The wheel hubs had boat loads of grease all over them as well. Maybe that's why there's so little rust?! :D

Gus doesn't have an oil filter (very common back in the 1940's and earlier) and at this juncture I don't know if I'll be putting one on. It will depend on how much driving I do once we get him back up to snuff and out on the road. I'd be doing an oil change once a year no matter how few miles I drive and I bet I don't put 500 miles on in a year so we'll see.


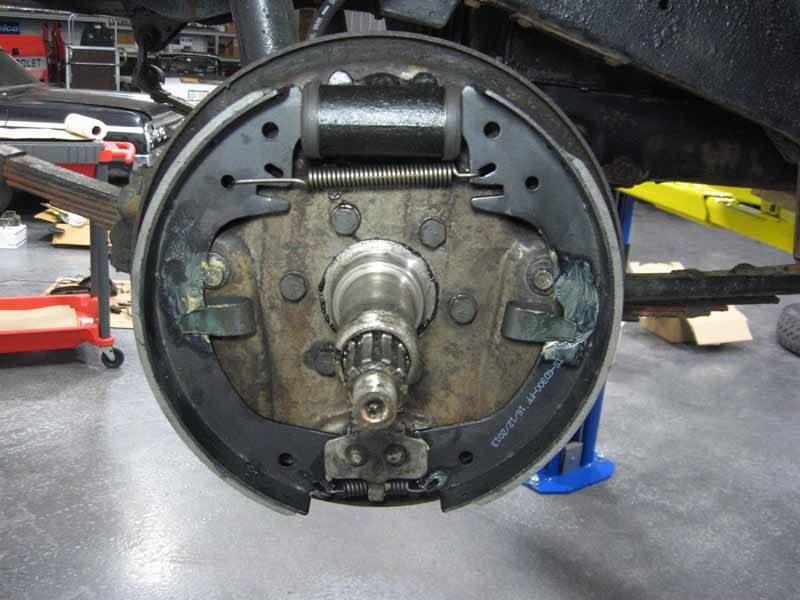
Here's what the Lockheed style brakes on Gus look like when completed and here's a close up of...


...one of those pesky, stubborn brake shoe adjusters installed and in use. Note how it's rotated against the inside of the brake shoe.


As the shoe wears it's rotated to take up slack and keep the shoe close to the drum.

You might also want to know this about Lockheed style brakes. Hydraulic pressure expands the wheel cylinder cups, which push the shoes against the drum. The shoes are NOT self-energizing. The Lockheed system is a front/rear shoe design with the bottom pivot for each shoe anchored to the backing plate. This design requires more pedal pressure to stop than self-energizing brakes since they rely solely on hydraulic pressure. The front shoes (primary) do most of the stopping and normally use a longer friction band. The rear shoes (secondary) normally use a shorter friction band. That might help some of you who think the shoes were installed backward as they would be if these were a Bendix style. Read the shop manual! :D

I'll get a post on here showing how to make double flares which you'll need to do if you make your own brake lines. It's so easy even a retired airline pilot can do it! ;) Thanks everyone.

Thomas
 
To avoid these ads, REGISTER NOW!

scramboleer

Active member
Joined
Feb 3, 2013
Messages
37
Location
San Francisco
Hi Thomas,

RE: Gus, the folks over on oldwillysforum.com are quite helpful. Also there is a technical library of original documents, manuals, service updates, etc.

Cheers,


Scramboleer
 
OP
B

BB767

Well-known member
Joined
Dec 24, 2009
Messages
3,724
Location
Philo, IL
Hi Thomas,

RE: Gus, the folks over on oldwillysforum.com are quite helpful. Also there is a technical library of original documents, manuals, service updates, etc.

Cheers,


Scramboleer

Hi Scramboleer and many thanks for the excellent referral. Lou and I have been diligently working on Gus every day (and some long nights) for over a week now. That's why I haven't been updating here, but tonight we finally saw some light at the end of the tunnel.


After soaking in AeroKoil for a couple of days I finally freed up the only emergency brake cable that was stuck. By placing it in the vise I was able to soak oil in from both ends without out it dripping out one end. With that done our plans are to completely finish tomorrow and test drive Gus around a bit. I've got an extensive set of pictures detailing all of our various exploits that I'll be posting here. A small sample included removing the drivers door for various repairs, crafting a temporary remote master cylinder brake fluid reservoir...


...out of this Dawn dishwater soap bottle to aid in bleeding the brakes among others. There were a few technical obstacles but as of tonight it looks like we've over come them all. I am pumped! :bounce:

Thomas
 

stillp

Well-known member
Joined
May 5, 2015
Messages
428
Location
Midlands, UK
"By placing it in the vise I was able to soak oil in from both ends without out it dripping out one end. "
Wouldn't it have been better for the oil to drip out of one end, perhaps bringing some of the crud with it?

Pete
 
OP
B

BB767

Well-known member
Joined
Dec 24, 2009
Messages
3,724
Location
Philo, IL
"By placing it in the vise I was able to soak oil in from both ends without out it dripping out one end. "
Wouldn't it have been better for the oil to drip out of one end, perhaps bringing some of the crud with it?

Pete

Pete that's partially what I was after. At first I wanted the penetrating oil to sit in the cable a while and help soften up whatever was causing it to stick. Once the cable was free, yes, I wanted it to drip out carrying crud with it. Must have worked, the cable moves silky smooth now. :)

Thomas
 
OP
B

BB767

Well-known member
Joined
Dec 24, 2009
Messages
3,724
Location
Philo, IL
Shake Down Test Drive

With the exhaust system re-installed and everything buttoned up Lou and I went on a little test run..


...to check out all the various repairs and service we performed on Gus.


I'm happy to report Gus is running, shifting and stopping better than ever. We took a GPS along to certify what death defying speeds we were achieving. Good thing we revamped the brakes, Gus can break the speed limit driving through Philo. :scared: Comfortable cruise for now is about 40 mph (64 Km/hour). I still need to have the front end alignment checked before we really push the envelope. I think factory literature states top speed in the 48 mph (77 Km/hour) vicinity with the present gearing. All in all a very successful outing. Gus is standing tall once more. :3gears:

Details of what service work was done to follow. Thanks everyone.

Thomas
 
OP
B

BB767

Well-known member
Joined
Dec 24, 2009
Messages
3,724
Location
Philo, IL
Jeep Truck Brake Service Work Remote - Reservoir Part I

To illustrate some of the obstacles we had to overcome, take a look at the location for the brake master cylinder...


It's nicely tucked up underneath the floor board...


...making it extremely hard to check the fluid level or add brake fluid without getting foreign material falling into it. The master cylinder is circled in white, the yellow arrow points to the screw on cap (the white line is the cap gasket), the orange arrow points to the floor board directly above the master cyl opening. There are removable floor board panels somewhat above the master cyl opening but not positioned to where you can see the opening or pour fluid into it. During the brake bleeding process as you know, you're constantly refilling the master cyl reservoir. Here's how we were able to get brake fluid into a very inaccessible opening. :headscrat


Using an empty Dawn dishwashing liquid bottle with a squeeze cap and some clear tubing a remote brake fluid reservoir was constructed.


To get the tubing over the squeeze opening...


...a taper punch was placed in the tubing and heated with Chris's old hairdryer to make it more pliable. Thanks Chris for taking one for the team!! :thumbup:

To make sure the tubing didn't come off...


... some small copper wire...


...was twisted around the tubing to ensure it was firmly installed.


With the Dawn bottle upside-down, a small refill hole was cut in the bottom of the bottle. We now had one part of a remote brake fluid reservoir. Stay tuned for Part II; how we persevered despite some very poor engineering on Willys part. :eek:

Thanks everyone.

Thomas
 

stillp

Well-known member
Joined
May 5, 2015
Messages
428
Location
Midlands, UK
Nice work and well described, as always Thomas. Do you have the Gunson Eezi-Bleed over in the US? It's a plastic fluid reservoir with a 'universal' cap that fits most master cylinders, and an air pipe that connects to a spare tyre, pressurising the fluid in the reservoir. Bleeding is then just a matter of releasing each bleed ****** in turn until the fluid coming out is free of air.

Pete
 
OP
B

BB767

Well-known member
Joined
Dec 24, 2009
Messages
3,724
Location
Philo, IL
Nice work and well described, as always Thomas. Do you have the Gunson Eezi-Bleed over in the US? It's a plastic fluid reservoir with a 'universal' cap that fits most master cylinders, and an air pipe that connects to a spare tyre, pressurising the fluid in the reservoir. Bleeding is then just a matter of releasing each bleed ****** in turn until the fluid coming out is free of air.

Pete

Pete I'm not familiar with the Gunson Eezi-Bleed. Using the spare tire for an air source is very clever. If you're just bleeding the brakes it sounds like a great way to go. Thanks for the information.

Thomas
 
OP
B

BB767

Well-known member
Joined
Dec 24, 2009
Messages
3,724
Location
Philo, IL
Remote Reservoir Part II

With the upper portion of the remote reservoir completed, here's how the bottom part was done.


This is the new metal brake master cyl cap and gasket on the left. Note it has threads on it since it threads onto the master cyl. body.


On the right is a brass hose barb with 3/8" pipe threads.


An appropriate hole...


... was drilled into the cap. I used 3 different smaller sized drills to step the hole up to this size instead of drilling it with just the final sized drill.


After that, the hole was tapped with 3/8" pipe threads. Shown here, I'm using the old master cyl body to hold the new cap while it was threaded. That helped prevent the threads on the new cap from being damaged in a vise while it was being threaded.


Once the new cap was threaded, the brass hose barb was installed in it using teflon tape. The hose barb just needed to be a snug fit.


With that all completed we now had a workable, sealed and spill proof remote brake fluid reservoir.


Here it is in use in the cab of Gus. The lower circle shows the removable floor board panels removed from around the brake and clutch pedals. The yellow arrow points to the tube going through that hole, below the floor. The purple arrow shows where a piece of wire was installed in the bottle to hang it and the orange arrow points to the refill hole in the bottom of the bottle. That's where brake fluid was pored using a small funnel to refill the bottle as needed. From the bottle the brake fluid then went down the tube into...


...the brake master cyl below, via the brass hose barb fitting and the screwed on master cyl cap. This way there was no possibility of spillage and I was able to constantly refill the plastic bottle as Lou bled the individual wheel cylinders. Since I was in the cab, I could pump the brakes as appropriate and I could always see the fluid level in the plastic bottle which ensured that the master cyl was always full. When we were all done, any residual brake fluid in the bottle and tube was bled out of the system via a wheel cyl bleeder. Then the master cylinder cap was unscrewed and removed, the brass hose barb removed from it and a 3/8" brass plug was installed in the cap, sealing up the threaded hole. Unfortunately I don't have a picture of the cap with the brass plug in it......my bad! :eek:

In this way we defeated the evil Willys engineers who were sure bleeding brakes in Gus would always be a nasty, spilled brake fluid hassle. The whole process worked exceptionally well. It was easily worth the extra steps and effort to service the brakes in this manner. :)

I have more Gus service work in store, coming this way so please check back. Thanks everyone.

Thomas
 

charlief1

Well-known member
Joined
Dec 1, 2010
Messages
248
Since you already have a cap that's tapped for a ******, and it looks like you have enough room, you should add a 45 degree ****** and mount an actual remote reservoir for the brake reserve. You could hide it but it would make it easier to check the fluid level when you need to.
 
OP
B

BB767

Well-known member
Joined
Dec 24, 2009
Messages
3,724
Location
Philo, IL
Beautiful patina on Gus.
What brake fluid are you using Thomas? Silicone, or paint stripper?

Pete

Pete, I'm using regular DOT 3 brake fluid in Gus. The cars I have DOT 5, silicone brake fluid in are the Corvettes, the Chevy II and both my silver '64 Impalas. I have found it can be a problem getting it to not weep at fittings but once you get everything tight and dry DOT 5 works very well. I just didn't feel it necessary in Gus. I might change my mind about that next time I have to flush out the old fluid.

Thomas

Since you already have a cap that's tapped for a ******, and it looks like you have enough room, you should add a 45 degree ****** and mount an actual remote reservoir for the brake reserve. You could hide it but it would make it easier to check the fluid level when you need to.

If I drove Gus more than I do that would be an excellent idea Charlie. At a 40 mph cruise speed you don't go anywhere in a hurry. I still might do it in the future but I'm going to wait and see how the factory setup works out. Thanks.

Thomas


Hi Roland, there is a very small vent hole...


...in one of the cap flats about where the arrow is pointing. It's about twice the diameter of a straight pin. Additionally on the under side of the cap...


...there is an anti-slosh guard positioned about here. It was a press fit that was removed to drill the hose barb/plug hole and then reinstalled. I'm sorry I don't have a picture of it. That guard keeps brake fluid from sloshing out the vent hole above it during normal driving. During the bleeding operation that vent hole was plugged with the end of a round wooden toothpick to keep fluid from dribbling out. When we were done bleeding the toothpick was removed and the master cylinder was vented once again.

Pedal pressure is high on Gus if you need to stop in a hurry but that's due to the Lockheed style brakes. Stops are all smooth and straight with no tendency to pull to one side or the other...


...just like the Lotus 19. You just need to plan ahead a little bit more than you do in the Lotus. ;)

I'll bet you'll want to use Gus for your parts chaser truck next summer for the race cars...


...instead of the van. Omar would love that don't you think? :dunno:

Thomas
 
Last edited:

jbmatth

Well-known member
Joined
Jun 3, 2013
Messages
5,684
Location
Northern Ok.

There is just something about this picture that made me love it, with gus on the lift and those amazing race cars in the foreground, I think I'm in love again.

On another topic, I've finely found a suitable slab for finishing off the cabinetmakers bench you so graciously allowed me to become the caretaker of. I found a sawmill near me that cut a 2" x 17" x 8' (5cm x 43cm x 2.4m) piece of red oak that should fill the hole nicely. It is relatively crack free and will be beautiful when cleaned up, oh and it weighs about 120lbs (54.5kg). I'm letting it cure another few months while I work a large project or two and will post information and photos as I go.
JB
 

DoorBreaker

Active member
Joined
Dec 9, 2013
Messages
26
Location
Central N.Y.
OK, that was a LONG and incredible read... Really love what you did with the place and I'm sure that Mr. Johnson is still there looking over the shop.

One suggestion on Gus. (or any of the daily drivers that you want to stop from rotting) Get some Fluid Film, Waxoyl or the home made version of them and spray it into the door areas, frame and anywhere you want to stop rust. Unlike the rubber undercoatings, these actually soak into the seams and hidden spots and don't trap moisture. They are basically a blend of Lanolin, a wax (beeswax or paraffin) and a light solvent carrier. They creep in like Kroil and the solvent evaporates and the oil/wax is left behind as a barrier.

Oh and thank you for taking this motley bunch along as you and your long suffering wife journey through life in the Center of the Universe.. :)
 
OP
B

BB767

Well-known member
Joined
Dec 24, 2009
Messages
3,724
Location
Philo, IL
There is just something about this picture that made me love it, with gus on the lift and those amazing race cars in the foreground, I think I'm in love again.

On another topic, I've finely found a suitable slab for finishing off the cabinetmakers bench you so graciously allowed me to become the caretaker of. I found a sawmill near me that cut a 2" x 17" x 8' (5cm x 43cm x 2.4m) piece of red oak that should fill the hole nicely. It is relatively crack free and will be beautiful when cleaned up, oh and it weighs about 120lbs (54.5kg). I'm letting it cure another few months while I work a large project or two and will post information and photos as I go.
JB

Thanks JB for the update on Mr Johnson's cabinet makers bench. Knowing your attention to detail I'm confident it will not only be highly functional when done but a nice to look at as well. Good call on letting it cure before you use it. Wood will move but you can minimize that by letting as much moisture evaporate as possible before you start to shape it.


If you don't have a wood moisture meter try to see if you can find one to borrow to ensure the wood is dry enough before you use it. Remember, when done, pictures are a must! :thumbup:

Thomas

OK, that was a LONG and incredible read... Really love what you did with the place and I'm sure that Mr. Johnson is still there looking over the shop.

One suggestion on Gus. (or any of the daily drivers that you want to stop from rotting) Get some Fluid Film, Waxoyl or the home made version of them and spray it into the door areas, frame and anywhere you want to stop rust. Unlike the rubber undercoatings, these actually soak into the seams and hidden spots and don't trap moisture. They are basically a blend of Lanolin, a wax (beeswax or paraffin) and a light solvent carrier. They creep in like Kroil and the solvent evaporates and the oil/wax is left behind as a barrier.

Oh and thank you for taking this motley bunch along as you and your long suffering wife journey through life in the Center of the Universe.. :)

A hearty welcome to you DoorBreaker. Excellent advice about Fluid Film: http://www.fluid-film.com/products/ and other like products. I've used similar rust converter products like that before with great success.

One such project was Mr Johnson's cast iron bench...


As it was made of cast iron and in a rather damp environment at the time I purchased the shop, it was covered in a thin layer of rust on all surfaces. After wire brushing it relatively clean I applied some rust converter on all surfaces and it dried black and stopped all further rust.


That's the cast iron bench in the background, sorry, this is the best picture of it I could find.

But back to your point, yes many of those products will definitely help Gus and halting the rust is on the agenda.....at some point. For now I'm doing a mechanical service and stabilization process on Gus. He has surface rust over an extensive portion of unpainted metal surfaces that will need to be address as per your excellent suggestion. Many thanks again and welcome to the family.

Thomas
 

jbmatth

Well-known member
Joined
Jun 3, 2013
Messages
5,684
Location
Northern Ok.
Thomas,
I do not currently have a moisture meter but will pick one up prior to working on it. I was told the log it came from had been drying for about 7 months and I seem to remember wood needs about 1 year of dry time per inch of thickness before it can be considered relatively stable. I don't know if I will be able to hold off for another year before starting on it so having the moisture meter will help me either hold off or let me know when I can get cracking on it. Gus is looking great by the way, I like to see you breathing new life into everything you touch.

How is the new house coming along? I seem to remember ya'll saying you had a contract on your old house contingent upon the buyers house selling.
JB
 
To avoid these ads, REGISTER NOW!

Craptain

Well-known member
Joined
Apr 18, 2013
Messages
4,028
Location
Tampa Bay FL
Thomas.
Fluid Film is not a converter it is a protectant. We use it on the Research Vessel for cables that spend their working lives underwater. I can wholeheartedly recommend it.

Sent from my LG-D801 using Tapatalk
 

markviii

Well-known member
Joined
Jan 25, 2010
Messages
1,310
Location
east central IL
No "long suffering wife" here, DoorBreaker, at least in relation to the shop and accompanying property. Just awaiting a final closing on our house sale, as mentioned by jbmatth. We've pretty much missed the building season this year,though.

And I don't see much of a "motley bunch". We're all in the same vortex that seems to lead to the Center of the Universe. And learning lots...every day... Keep reading and posting while awaiting the quiz.

Waiting and more waiting,

Chris
 
Last edited:
OP
B

BB767

Well-known member
Joined
Dec 24, 2009
Messages
3,724
Location
Philo, IL
Thomas,

How is the new house coming along? I seem to remember ya'll saying you had a contract on your old house contingent upon the buyers house selling.
JB

So far the buyers of our home have not sold theirs so we're in a holding a pattern for now. I'm not going to start the house this late in the season so look for it next year, early summerish. ;)

Thomas

Thomas.
Fluid Film is not a converter it is a protectant. We use it on the Research Vessel for cables that spend their working lives underwater. I can wholeheartedly recommend it.

Sent from my LG-D801 using Tapatalk

Many thanks Craptain for the clarification. So you'd recommend rust conversion first and then apply Fluid Film, correct?

Also since you didn't want BS 1.0 sent to you in London, we'll need your USA address once Dom is done with it and it comes back here for its second North American tour. For now just send me a PM.

Thomas
 
OP
B

BB767

Well-known member
Joined
Dec 24, 2009
Messages
3,724
Location
Philo, IL
Gus Update

There were two important alterations made to Gus by the previous owner.

1. The first being that the original 6 volt electrical system was converted to a 12 volt system. The major advantage being a 12 volt battery will turn the engine over more reliably in colder weather and it's not as sensitive to corrosion with all the various ground connections. There's a reason in the mid 1950's automotive manufacturers all converted over 12 volt systems. That conversion consisted of the generator, voltage regulator, battery, coil, all the light bulbs( don't forget the gauge cluster) windshield wiper motor, blower motors, starter motor and solenoid for example. Well none of the light bulbs were converted so I had to do that. I used halogen headlights BTW. Much brighter now. The fuel, oil press and engine temp gauges haven't been converted yet either. I'll do that later with a ballast resistor of some sort and the windshield wipers are vacuum so that's all done.

2. The second change was going from a mechanical fuel pump to an electrical fuel pump.


The previous owner had installed a Carter electrical fuel pump near the fuel tank. Because of this, Gus always starts very easily, even when sitting unused for several weeks at a time. I'm not one to mettle with success so I'm completely good with it. There was an issue caused by that pump however that I had to change.


Here's a look under the hood the day I picked Gus up. An electric fuel pump typically requires a fuel pressure regulator for an engine equipped with a carburetor. The pressure regulator that Gus had is circled...


..here's a better look at it. The arrow is pointing to where the fuel line comes into the engine compartment from the fuel tank via a hard line, up the white plastic fuel filter below the old pressure regulator. Not only is the whole set up rather ungainly looking, the regulator was suspended by the rubber fuel hoses allowing it to shake and vibrate mighty. Not all that safe in my estimation. To alleviate that situation first off a better fuel pressure regulator was needed.


I found the smallest, lightest regulator I could. This one was made by Mr Gasket and is very compact and different pressures are easily adjustable without tools. To mount the new regulator I made a couple of different patterns using cardboard for a mockup as seen.

Ultimately I decided to install the mount for the regulator using...


...this small metal ledge on the firewall. To drill a hole so close to the firewall I used my...


...90º air drill. Very handy in these tight areas.


Here's the new mount installed on the firewall with the regulator securely installed on it. In case you're wondering, the yellow object below the regulator is the new fuel filter.


Using a couple of 90º hose fittings and here's the new fuel pressure regulator installed. It's now securely mounted and presents a much more compact, unobtrusive presentation. It's not stock original but highly functional and serviceable. Gus starts and runs like a champ with this set up. :thumbup:


For those that wondered, here's a look at the brake master cylinder cap with the brass plug installed in it. You also get an idea of how difficult this would be to refill the master cylinder during the brake bleeding process. :wtf:

Gus updates to be continued. Thanks everyone.

Thomas
 

charlief1

Well-known member
Joined
Dec 1, 2010
Messages
248
If you decide to get rid of the old regulator you can send it my way Thomas. I picked up a NASCAR Buick V6 pump for my car and it pushes close to 20 PSI to the carb.:willy_nil That's just a bit more than I need, unless I want to see a major flooding event like we had this spring.:eyecrazy: These old draw through systems are just a bit finicky about to much fuel and can catch fire when they flood.:scared:
 
OP
B

BB767

Well-known member
Joined
Dec 24, 2009
Messages
3,724
Location
Philo, IL
If you decide to get rid of the old regulator you can send it my way Thomas. I picked up a NASCAR Buick V6 pump for my car and it pushes close to 20 PSI to the carb.:willy_nil That's just a bit more than I need, unless I want to see a major flooding event like we had this spring.:eyecrazy: These old draw through systems are just a bit finicky about to much fuel and can catch fire when they flood.:scared:

PM me a mailing address and it's yours Charlie. There is no manufactures name on it anywhere and I have no idea of what it's specifications are but you are more than welcome to it. It did work on Gus. I hope you can use it since I was going to scrap it. Good luck with your project. :thumbup:

Thomas
 

frikkie

Member
Joined
Jan 19, 2013
Messages
12
Location
Cape Town, RSA
Thomas.
Fluid Film is not a converter it is a protectant. We use it on the Research Vessel for cables that spend their working lives underwater. I can wholeheartedly recommend it.

Sent from my LG-D801 using Tapatalk

Very popular product here in South Africa amongst the biking fraternity.
http://www.fluidfilm.co.za/
Imported and distributed by a mate of mine here in Cape Town, it is by far the best thing to use as chain/sprocket preserver and rust prevention in the wet climate of the Western Cape.

Excellent product and really good value for money too.
 

MPOWERD

Well-known member
Joined
Jun 7, 2011
Messages
578
It's great to come back and read more posts in this awesome thread... I have been reading it off and on for the last 4 years, since I joined. You must have such a feeling of accomplishment and joy each day you walk into your shop! :thumbup:
 

Boosted1

Well-known member
Joined
Nov 25, 2007
Messages
1,679
Location
Georgetown, KY
In your final install pic of the regulator, it looks like the rubber fuel line could easily be pushed into contact with the hot exhaust pipe..
 

stillp

Well-known member
Joined
May 5, 2015
Messages
428
Location
Midlands, UK
Thomas,
I do not currently have a moisture meter but will pick one up prior to working on it. I was told the log it came from had been drying for about 7 months and I seem to remember wood needs about 1 year of dry time per inch of thickness before it can be considered relatively stable. I don't know if I will be able to hold off for another year before starting on it so having the moisture meter will help me either hold off or let me know when I can get cracking on it. Gus is looking great by the way, I like to see you breathing new life into everything you touch.

How is the new house coming along? I seem to remember ya'll saying you had a contract on your old house contingent upon the buyers house selling.
JB
JB, if you can weigh that chunk of wood fairly precisely then you don't need a moisture meter, when it stops losing weight it's as dry as it's going to get. Remember wood floats, so much of the weight of a green board is water.
 

Craptain

Well-known member
Joined
Apr 18, 2013
Messages
4,028
Location
Tampa Bay FL
Many thanks Craptain for the clarification. So you'd recommend rust conversion first and then apply Fluid Film, correct?


Thomas

This is an either or situation. A rust converter is a base for priming and painting, whereas the protection from Fluid film will prevent rusting through application of a film that resembles, but is not thin grease. The Fluid film is what I would use on surfaces that will never normally see paint.
 
OP
B

BB767

Well-known member
Joined
Dec 24, 2009
Messages
3,724
Location
Philo, IL
In your final install pic of the regulator, it looks like the rubber fuel line could easily be pushed into contact with the hot exhaust pipe..

The fuel line in the picture looks like its touching your exhaust.

If you could see it in person you'd see that it really isn't that close.


The angle from where that other picture was taken it makes it looks that way. I'll still follow up tomorrow and make sure it can't come in contact with the exhaust and report back here.

I do appreciate you folks looking out for my best interests! Many thanks. ;)

Thomas
 
OP
B

BB767

Well-known member
Joined
Dec 24, 2009
Messages
3,724
Location
Philo, IL
It's great to come back and read more posts in this awesome thread... I have been reading it off and on for the last 4 years, since I joined. You must have such a feeling of accomplishment and joy each day you walk into your shop! :thumbup:

Joy is certainly a good way to describe it MPOWERD. It is really, very satisfying to work on projects out there. The shop is set up as I had envisioned and I like just looking around and being out there. I am quite happy with how well it turned out. Thanks for your continued interest all these years.

Thomas

I used these for the voltage drop on the gauges for my 1949 Cadillac. They worked great, you need one for each gauge. http://www.speedwaymotors.com/Runtz-12-Volt-to-6-Volt-Reducers,2374.html

Great information, that might be just what I need. Contributions like this are what helps make this thread so helpful to not only me, but everyone else. Thanks for the link!

Thomas

Very popular product here in South Africa amongst the biking fraternity.
http://www.fluidfilm.co.za/
Imported and distributed by a mate of mine here in Cape Town, it is by far the best thing to use as chain/sprocket preserver and rust prevention in the wet climate of the Western Cape.

Excellent product and really good value for money too.

frikkie my friend, it's so good to hear you're still with us. Thanks for the information too. Nice to know the product works as advertised.

Thomas

JB, if you can weigh that chunk of wood fairly precisely then you don't need a moisture meter, when it stops losing weight it's as dry as it's going to get. Remember wood floats, so much of the weight of a green board is water.

That's an excellant suggestion. Weighing a large, heavy chunk of wood like that might be a little tricky but it would certainly be a way of determining the water content. If you're going to do much wood working in the future, I would still recommend a moisture meter. I've had mine for about 35 years now.

Thomas

This is an either or situation. A rust converter is a base for priming and painting, whereas the protection from Fluid film will prevent rusting through application of a film that resembles, but is not thin grease. The Fluid film is what I would use on surfaces that will never normally see paint.


Might the areas where the paint had chipped off on the auger of my snow blower then be a good place to apply fluid film? When the auger hits gravel paint just won't hold up for very long.

Thomas
 

jbmatth

Well-known member
Joined
Jun 3, 2013
Messages
5,684
Location
Northern Ok.
JB, if you can weigh that chunk of wood fairly precisely then you don't need a moisture meter, when it stops losing weight it's as dry as it's going to get. Remember wood floats, so much of the weight of a green board is water.

Stillp,
I'll have to see if I can handle it and use the bathroom scale, if nothing else just to find out how much it weighs. I'll probably go ahead and pick up a moisture meter too though.

Also, Caddyman, that voltage reducer is a great idea for the 6v to 12v systems, I'll keep that in mind if I end up converting my tractor to 12v.
JB
 

stillp

Well-known member
Joined
May 5, 2015
Messages
428
Location
Midlands, UK
That's an excellant suggestion. Weighing a large, heavy chunk of wood like that might be a little tricky but it would certainly be a way of determining the water content. If you're going to do much wood working in the future, I would still recommend a moisture meter. I've had mine for about 35 years now.
Thomas
Thomas, moisture meters are great, but their limitation is that they'll only tell you the moisture content of the wood between the pins. Even if you use the type that is driven into the wood with a hammer, with a thick chunk of wood, the outside might be much drier than the inside, whereas weighing will give you an average.
I occasionally turn wooden bowls, and sometimes rough-turn from green wood, then weigh the blank and set it aside, weighing occasionally. When the weight stops reducing, it's as dry as it's going to be, so I can finish the turning.

Pete
 

charlief1

Well-known member
Joined
Dec 1, 2010
Messages
248
PM me a mailing address and it's yours Charlie. There is no manufactures name on it anywhere and I have no idea of what it's specifications are but you are more than welcome to it. It did work on Gus. I hope you can use it since I was going to scrap it. Good luck with your project. :thumbup:

Thomas

PM sent, and thanks Thomas.:rocker:
 
OP
B

BB767

Well-known member
Joined
Dec 24, 2009
Messages
3,724
Location
Philo, IL
Fuel Line Clearance

Taking a better look at the fuel line in question...


...as seen from just about right above it looking down, you can see there is ample clearance between it and the exhaust manifold.

The other picture was taken somewhat from the side making it look as if it were indeed almost contacting the exhaust. I myself thought it might be close taking a second look at the previous picture! Also due to the positioning and length of the line, it can't get any closer to the exhaust so I'm happy with it. No vaporization problems from heat either since it's got an electric pump pushing fuel through the line with good pressure.

Thanks all for the heads up.

Thomas
 
Last edited:
To avoid these ads, REGISTER NOW!
Top Bottom