To avoid these ads, REGISTER NOW!

The Aerodrome Studio - Machine_Punk

OP
M

machine_punk

Well-known member
Joined
May 14, 2011
Messages
2,540
Location
Napa Valley, California
I got some time in the studio this weekend.

I've mentioned that I recently got into arc welding with the Lincoln 210 MP. I'm the sorta guy who likes to be prepared, so I picked up some spare consumables at the LWS. I prefer to use the Local Welding Supply, if I can. I have an account there (even though I always pay cash) and the salesman usually gives me a pretty good break on prices. Now that I know most of the guys there, I usually walk in with, "This is what I can get it online for, can you get close to that?" Even if it is a few dollars more, it is worth it to me to shop locally.

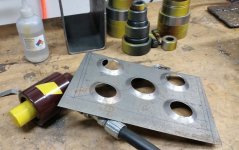
Here is a picture of several things, including the fishing tackle trays I use, for now, for TIG and MIG consumables. I'm going to do something different than this on the welding cart I am designing, but you'll have to wait to see what that is.

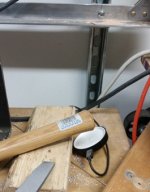
When I learned to TIG, at Contour AutoCraft in England, They had a jelly jar full of sharpened tungstens, so we didn't have to stop and sharpen one, if we messed it up. I like the idea of keeping several, sharpened tungstens on hand, now that I finally have a TIG welder. I assume they used a glass container to prevent contamination of the tungstens. I was not enthused about the idea of a glass container in my own shop. I don't seem to have a very good track record of keeping glass from being broken in the shop.

You can see below, in the bottom right of the picture, that I started with a cutoff bottom of an isopropyl alcohol container. Well, that is fine for while, but totally unacceptable in this studio as a long-term solution.

My requirements for a tungsten holder:
- made of a non-breakable material
- will not contaminate the tungstens
- Able to hold any length of tungsten, as you grind it shorter and shorter.
- Able to easily identify which type of tungsten is in the holder.

This means it cannot be steel or aluminum. I considered copper, but wasn't sure if that could cause issues with contamination of the tungstens. I've been stumped about what to use for the last couple of weeks. Then, today at Home Depot, I figured out what would work.
View media item 64421
PVC pipe. These are the two tungsten racks I came up with. Not the prettiest material, but easy to work with and easy to glue together. I've gone for an unconventional use of PVC glue here--**** joints. Certainly not recommended for pipes carrying water, but I think it will be more than strong enough for this purpose.

I think this meets my requirements. I've certainly never heard of tungsten contamination by PVC. I cut a larger (1.25", 30mm) PVC pipe in half to use as the base and thinner (3/4", 19MM) PVC pipe for the vertical tubes. I cut the tops of the pipes at a 45-degree angle (not sure what that is, in metric ;) ). I coped the bottom of each pipe, with my oscillating spindle sander, to match the diameter of the base. I made the tallest pipe to hold new tungstens (7", 175mm) and the shortest pipe to hold the shortest tungsten I could imagine being effective in a TIG torch. For reference, the tungstens in the middle pipe were cut in half (3.5", 90mm). Now, I just need to do something about identifying which type of tungsten is in the rack.
View media item 64423
This is an awkward picture, because they are still upside-down, at a weird angle, on the wires I used to hang them while painting them. Here is my solution to "which tungsten is this?" I simply painted the racks the same color as the end of the tungstens are painted. Now I can tell, at a glance, across the studio, how I am doing on any given tungsten.
View media item 64419
I've been on a roll with painting lately. I take a fair number of my tools to different events, such as Metal Meets, and I like to be able to quickly identify them and hopefully prevent others from confusing them with their tools. So, everything that might leave the studio on a trip gets The Aerodrome Studio Skunk Stripe (yellow, with a brown stripe down the center). The goal is to be able to quickly identify my tools across the room. I wanted to just use brown, because I haven't seen anyone else use it for tools, but it is not bright enough color for this purpose, so I use yellow with brown.

This is a Harbor Freight 5-Drawer Service Cart, which recently became the storage cart for my welding tools. Here is a drawer full of my welding wrenches.

"Welding wrenches?" you ask.

Yes. I don't like those inexpensive, punched steel wrenches they sell to people who weld. I made a list of all the wrench sizes I need for all of my welding equipment, went to the flea market, and bought one of each. I bought the two largest ones new, from eBay, because each end has a different size, but both sizes are used when installing or removing a gas regulator on a cylinder. You also see a couple of grinder spanners in there, since I use my grinders a lot while welding.
View media item 64420
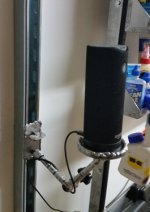
Here, you see some more painting silliness. My goal is eventually to have just about everything in the studio matching the theme in one way or another. I want it to be a place full of stuff I like, which inspires me to be creative on my projects. Here are a couple of standard quart-size (1100 ml) paint cans I use to store borax and boric acid.

I originally thought powdered brazing flux was mostly borax, so I got a box of the commercially-available washing powder. Then, I read a little more and figured out it was actually boric acid, which is the primary ingredient in borax. We can buy this in bulk in the US for pest control. Roaches really don't care for boric acid. I've gotten in the habit of pouring some under any base cabinets I install, to prevent roaches in the future. Anyway, bulk boric acid is even cheaper than brazing flux. I just needed a can to keep it in. Since this is The Aerodrome Studio, it couldn't just be a plain can.

I know the painting in theme colors is a little over-the-top for some, but I grin every time I see it and it makes working in the studio a very personal and pleasing experience. And yes, I am aware of the orange-peeling on the borax can. I haven't had that happen before. The paints are the same type from the same manufacturer. I may fix it someday, but for now, it just adds more character to the studio and gives me something to tell a story about.
View media item 64418
I did also run a temporary compressed air hose this weekend. It is the BRIGHT orange hose you see in the first picture. I want to install one of the aluminum pipe kits eventually, but I want to focus on upgrading electrical first. So, this is just a regular 3/8" (9.5mm) air hose I strung along the wall, from the workbench to the compressor, with "J" hooks screwed into the wall.

That's about it, for this week's update.

#ContourAutoCraft
#Lincoln210MP

KDub
 
Last edited:
To avoid these ads, REGISTER NOW!

racingtadpole

Well-known member
Joined
Dec 3, 2011
Messages
2,029
Location
The far side of crazy.. but sometimes Australia
I like the electrode holders.

Couple of suggestions you may find useful....
Lanthanated electrodes, one electrode for pretty much everything.
If you use a single colour electrode for all material you can sharpen both ends without having to worry about losing the colour banding.
Have a look on evilbay for a 3" diamond grinding wheel for your little 'tungsten only' grinder. I bought a 300 and 600 grit in cup shape. The 600 is a bit too fine, the 300 cuts with reasonable speed and leaves a very good edge. I'll probably look at a 100grit for roughing to speed things up a bit. Waaaaaayyyyyy less dust too.
 
OP
M

machine_punk

Well-known member
Joined
May 14, 2011
Messages
2,540
Location
Napa Valley, California
Thanks for the ideas.

I appreciate the input on tungsten color. I've done TIG welding before, but never had to pick my own equipment (it was all set up for me, when learning).

I got the 3-wheel set of diamond wheels from Harbor Freight, here in the US. So, I do have diamond wheels on the mini grinder (and I agree...much less dust and no sparks). It doesn't cut very fast, though...I might need to look on eBay.

I posted the tungsten holders on one of the welding forums and got eaten alive. Lotsa negative comments on storing tungstens that way..

Thanks for stopping by!
 
OP
M

machine_punk

Well-known member
Joined
May 14, 2011
Messages
2,540
Location
Napa Valley, California
Mainly, 'the need for.' There were a lot of suggestions, from "just use the package they come in," to a block of wood with holes drilled in it. Actually, there were some really good ideas.

I think the issue is that I see my self primarily as a designer who fabricates. Setting the design parameters, then meeting them in innovative ways, is the goal of most my projects. I like the fabrication well enough, but it is the solution-finding which is the most pleasing part of the process.

Nobody said anything particularly bad...just didn't seem to get where I was going with the project. Some didn't seem to change tungstens often and didn't see a need for it. Others pointed out the likelihood of scattering the tungstens all over with one misplaced tool or elbow. All valid points and a learning opportunity for me. Just didn't feel so great at the time to say, "look at this neat thing I just made" and feel slammed for it.

In the end, I still grin every time I see the tungsten holders I made. I will need to change the color of one, though...I think the red one is going to need a coat of blue.

Working on a really cool project right now...stay posted. I got a lot of the fabrication done this weekend and plan to get the aluminum brazing done this week and weekend. Hoping to have it completed by next week, so I can take it to the Santa Cruz Metal Meet this year.

I like to take at least one new project to show each year. It has been a busy year, with moving the house and setting up the new workshop. With most of my shop time focused on setting up the new workshop and practicing arc welding, I haven't really completed any portable projects this year.

I'll also be teaching riveting at the Metal Meet, so I'll have to get a little practice in before then.

Thanks for stopping by.

KDub
 
OP
M

machine_punk

Well-known member
Joined
May 14, 2011
Messages
2,540
Location
Napa Valley, California
I wasn't expecting to get anywhere near done with this project until this weekend. Got a couple of decent nights in the studio and made some huge progress.

I've been wanting a new stand for my portable bandsaw (Milwaukee ***********) for a while. You've seen this old bracket I made, out of plywood. It just wasn't cutting it (no pun intended). I think it was generally an elegant design, but it takes up SO MUCH room, wherever I clamp it...and sticks out into the walkway and generally just gets in the way. Whenever I clamp it somewhere, I usually need to use that space just a few minutes after I take the time to set it up. Even when I had the portable workbench you see it on here, it really got in the way and was easy to tip over.
View media item 24131
I've been wanting to upgrade this for a long time. Now that I have a little more room in the new studio, I wanted a freestanding saw...something I didn't have to clamp onto anything and something which did not take up any bench space. I've been noodling with the idea of using crutch legs for table legs for years and slowly collecting old metal crutches, for just such a time as this. Here, the frame is basically complete and I just set the saw on it, for the picture. I still have to add the attachment points and a couple of braces.
View media item 64665
I've been working on welding lately and recently got the aluminum spool gun set up. I wanted to try the spool gun on this project. Unfortunately, this crutch tubing is actually very thin, at 3/4" diameter, 0.048" wall (19mm diam, 1.2mm wall) and spool guns are infamous for not working on thin stuff (I certainly couldn't get it to weld this thin, without blowing through--but this was my first try with a spool gun). So, gas brazing was my next option. I am very comfortable with the oxy-acetylene torch, whether soldering, brazing or welding. After a lot of fabrication last weekend...cutting to length, coping the tubing and cutting the miters, I was ready to go with the brazing. This is the jig I put together, out of 2x4" lumber (40X90mm), to hold the legs in place as I brazed them. I set the leg at about a 5 degree angle (don't know what that is in metric), to add a little stability to the stand. The crutch tips easily soak up that 5 degrees.
View media item 64664
Overall, I was pleased with the results. I'd like my brazes to be a little cleaner, but they were looking pretty good, by the time I finished. The saw is rather heavy, so I am going to need some diagonal bracing, to keep the stand stable. I plan to get that done this weekend.

I've had this project in mind for a couple of years now...I'm very pleased with the results. The cool thing is that the crutch legs are adjustable for height. I set it up for 'sitting' height, with plenty of room to go taller.

KDub
 
Last edited:
OP
M

machine_punk

Well-known member
Joined
May 14, 2011
Messages
2,540
Location
Napa Valley, California
Thanks for the kind words. I try to translate all my measurements into metric, for the non-US-viewers. I seem to have quite a following in Australia...probably because I post late at night on the West coast and they are the first ones to see my post. Most of my posts are buried deep by the next morning in the US.

KDub.
 

TwoBytes

Well-known member
Joined
Mar 14, 2014
Messages
789
Location
Canberra, 'Stralia
I think the issue is that I see my self primarily as a designer who fabricates. Setting the design parameters, then meeting them in innovative ways, is the goal of most my projects. I like the fabrication well enough, but it is the solution-finding which is the most pleasing part of the process.

I like this approach. Reminds me of the discussion in Modern Jess' thread.

Doing something a bit different keeps it interesting.

Some didn't seem to change tungstens often and didn't see a need for it.

That's terrible reason to criticise somebody's project. I don't have a need for one either, but I still think it's great!

I love the crutch bandsaw table too. Very nice.

:bounce:
 

Fcvapor05

Well-known member
Joined
May 4, 2014
Messages
1,079
I actually like your little tungsten holders. In my shop I'd just keep them at the top of the bench to avoid them getting knocked around too much.

One thing you could do, if you were so inclined- there's a d-shaped 'hollow' in the bottom of each holder. Find (or machine..) a piece of solid mild steel or copper or whatever (you could use AL but you want as much weight as possible) with an OD that matches the ID of your PVC base. Cut it in half down the middle, glue your PVC holder on top, and now your holder is weighted and much harder to knock over.
 
OP
M

machine_punk

Well-known member
Joined
May 14, 2011
Messages
2,540
Location
Napa Valley, California
I like this approach. Reminds me of the discussion in Modern Jess' thread.

Doing something a bit different keeps it interesting.


That's terrible reason to criticise somebody's project. I don't have a need for one either, but I still think it's great!

I love the crutch bandsaw table too. Very nice.

:bounce:

Thanks. I went over to Modern Jess' thread and I agree. Oddly enough, I think he lives fairly close to me.

I appreciate the kind words. I've been wanting to build a crutch "anything," ever since I saw the stool in 98TJ's thread.

I'll post finished pics of the bandsaw table soon. I've finished a lot of details on it now.
 
OP
M

machine_punk

Well-known member
Joined
May 14, 2011
Messages
2,540
Location
Napa Valley, California
I actually like your little tungsten holders. In my shop I'd just keep them at the top of the bench to avoid them getting knocked around too much.

One thing you could do, if you were so inclined- there's a d-shaped 'hollow' in the bottom of each holder. Find (or machine..) a piece of solid mild steel or copper or whatever (you could use AL but you want as much weight as possible) with an OD that matches the ID of your PVC base. Cut it in half down the middle, glue your PVC holder on top, and now your holder is weighted and much harder to knock over.

That is not a bad idea. I think I'm going to head another way with this. I want to eventually put the tungsten holders on a welding cart. So that I can 'mount it on the wall (cart),' I'll mount the smaller pipes on the INSIDE of about 2/3rds of the larger pipe...with the larger pipe curling up. This will form, essentially, a 90-degree angle (well, OK, technically 90-degree arc), allowing me to keep the small pipes vertical and bolt the larger pipe to the cart.

Thanks for taking the time to post--it is much easier to take the time to post pictures and write a story, when folks are kind enough to comment.

KDub.
 
OP
M

machine_punk

Well-known member
Joined
May 14, 2011
Messages
2,540
Location
Napa Valley, California
I like the electrode holders.

Couple of suggestions you may find useful....
Lanthanated electrodes, one electrode for pretty much everything.
If you use a single colour electrode for all material you can sharpen both ends without having to worry about losing the colour banding.
Have a look on evilbay for a 3" diamond grinding wheel for your little 'tungsten only' grinder. I bought a 300 and 600 grit in cup shape. The 600 is a bit too fine, the 300 cuts with reasonable speed and leaves a very good edge. I'll probably look at a 100grit for roughing to speed things up a bit. Waaaaaayyyyyy less dust too.

FYI, I changed the red holder to blue (and bought some lanthanated tungstens) Thanks for the tip.

KDub
 
OP
M

machine_punk

Well-known member
Joined
May 14, 2011
Messages
2,540
Location
Napa Valley, California
Cutting Holes in Sheet Metal

I posted this as a reply on another thread about hole cutting. Thought I'd re-post it here, as Kevin's List-O-Solutions for cutting accurate holes in sheet metal:

If you want a one-step solution for the drill press, I'd go with something like a RotaBroach. These are 'fancy hole cutters.' They are the bees knees for clean holes in thin sheet stock. These are the go-to cutter I use for thin material now.

It looks like they do max out at 3" (76mm), search for "Hougen Holcutter 3 14284" It looks like they are sold individually, in the $30 USD range, online. I haven't used this exact brand, but the design of the tool makes it clear this is specifically for accurate holes in sheet metal.

With slightly thicker aluminum, I've had great results with wood router with a pattern-following router bit. If I were making 'hundreds' of the same cut, I'd make the pattern of 1/4" (6.5mm), or thicker aluminum. If I was making 'dozens' of the same cut, I'd make the pattern with MDF. You'll need to drill a fairly large hole in the waste area, to start the router bit. I like a uni-bit for this purpose.

For smaller holes in sheet metal, there are relatively-new mini hole saws, built for cordless impact wrenches, which have finer teeth than the generic hole saws. They only come in a very narrow range of sizes, about 3/4" to 1-1/4"(19-32mm). They do a really fantastic job on thin material, They have a little spring in the middle, to pop out the slug automatically, at the end of the cut. These are about $8 USD each from DeWalt, Bosch, etc. I keep several of the 3/4" impact hole saws on hand to cut the center hole for Greenlee punches, which I use to cut the hole in sheet metal for SWAG Offroad dimple dies.

For a wider range of sizes, with very accurate and clean holes, nothing beats the Blair Rotabroach set. These are mini super-accurate hole saws. They have a couple of master sets--one of 16 sizes up to 3/4" (19mm), one of a few larger sizes--which go for $150-175 USD. They do a stunning job in thin sheet metal.

I had great success with these for coping thin aluminum tubing this week, with no cleanup before brazing. Like I said, Rotabroach is now my go-to solution for accurate holes in sheet metal.

And, finally, the Greenlee-style punches do a really nice job, if they have the size you need. I've had great success with the HF version, with their hydraulic kit, which makes is SO much easier than the ratchet wrench by hand. I've actually upgraded to the air-over-hydraulic pump (the foot-pedal pump) with the HF hydraulic puller for the Greenlee punches. I had my local hydraulic shop make me a 12-foot (3.5 meter) hose for this setup. If you've got 'hundreds' to do, this is the way to go. The hydraulic puller also works with the SWAG Offroad dimple dies, which are sized to match the HF punches. I seem to remember they can dimple up to 3/16 material (5mm).

KDub
 
Last edited:

ScubaSteve

Well-known member
Joined
Dec 14, 2011
Messages
79
Location
New Bern, NC
Never heard of a rotabroach...thanks for the post. They resemble annular cutters with a pilot bit in the center. I'll have to pick some of these up!
 
OP
M

machine_punk

Well-known member
Joined
May 14, 2011
Messages
2,540
Location
Napa Valley, California
Never heard of a rotabroach...thanks for the post. They resemble annular cutters with a pilot bit in the center. I'll have to pick some of these up!

The 'pilot bit' in the Rotabroach is even better than a pilot bit. It is a spring-loaded center pin. The point alllows you to accurately place the circle on a center punch, but retracts as you drill. It has a very firm spring, so it does a great job of keeping the broach in place as you drill.

KDub.
 
OP
M

machine_punk

Well-known member
Joined
May 14, 2011
Messages
2,540
Location
Napa Valley, California
Went to the Metal Meet in Santa Cruz last weekend. I was an instructor on the last day. I taught them how to drive solid rivets and demonstrated the dimple dies from SWAG Offroad. Lotsa great names in metalworking there: Gene Winfield, Lazze Janssen, Ron Covell and a few very talented hobbyists.

This week, I built a mounting plate for a new flat-screen TV. It isn't huge (only 55". We most recently had the projector at the other house, which was set up for 100" in that room.)

We were given a very nice mounting bracket for the a TV, but the largest hole spacing was 200x200mm (7.8") and the TV uses a 400x400 hole spacing (15.75"). I was just going to make an adapter from 200x200 to 400x400, but as I looked at the bracket, there was a removable plate. So, I just replaced it with a sheet of 1/8" aluminum plate (0.125", 3.1mm).

I started with just a basic plate (the 3 bolts and rotating pin in the center), but soon figured out that all the critical connections would be covered up (signal for the TV and the power cord). So, back the drawing board. Now, how am I going to lay out the holes for access? That is a lot of measuring and transferring measurements!

I figured out that we actually had aluminum foil that was more than 400mm/16" wide. So, I tore off a sheet of it and taped it in the correct place on the back of the TV. I used my fingers to make impressions of the recesses which held the input and power jacks. Then, I took that piece of foil out to the aluminum plate and lined up the impressions of the mounting holes and used a center punch to transfer dimensions through the aluminum sheet to the aluminum plate.

I used the HF conduit punches to give me nice, round corners, then a wood-cutting blade in a jig saw to cut straight lines. A little touch up with an aluminum file and I was set. I was going to do some dimple dies on the plate, but nobody is ever going to actually see this, so I just bolted it to the mount, leveled it, then hung the TV. Now, there was just one last little issue.

The bottom mounting holes of the TV had the holes in the plastic casing, but no actual metal threads to bolt the bottom of the TV to the bracket. So, I ended up using double-sided tape for the bottom of the TV. Seems to be working so far.

I don't really watch a lot of TV. I'd rather be out in the shop, building something. But, we do have small groups come over to the house from church and we sometimes need a DVD player for the lessons. I also have all my British Comedies on DVD (Thin Blue Line, Red Dwarf, Are you Being Served, Yes Prime Minister, Mr. Bean, etc.) and I like to watch them, occasionally. The TV is also a Smart TV, so we can directly watch stuff on Amazon or YouTube.

KDub.
 

Attachments

  • TV Bracket 400x400mm.jpg
    TV Bracket 400x400mm.jpg
    55.5 KB · Views: 97
  • 2016 SCMM - Attendees 1.jpg
    2016 SCMM - Attendees 1.jpg
    106.8 KB · Views: 99
  • 2016 SCMM - Attendees 2.jpg
    2016 SCMM - Attendees 2.jpg
    106.5 KB · Views: 101
  • 2016 SCMM - Kevin teaching.jpg
    2016 SCMM - Kevin teaching.jpg
    94.8 KB · Views: 106
  • 2016 SCMM - Gene teaching.jpg
    2016 SCMM - Gene teaching.jpg
    98 KB · Views: 96
  • 2016 SCMM - Lazze teaching.jpg
    2016 SCMM - Lazze teaching.jpg
    117.2 KB · Views: 100
  • 2016 SCMM - Ron teaching.jpg
    2016 SCMM - Ron teaching.jpg
    94 KB · Views: 84
OP
M

machine_punk

Well-known member
Joined
May 14, 2011
Messages
2,540
Location
Napa Valley, California
And some more pictures...

a closeup of the tinfoil template I made to locate the holes on the bracket.

Several gas cylinders in my welding tank corral.

The completed bandsaw stand, made of old crutches.
 

Attachments

  • AeroCrutch Bandsaw Stand.jpg
    AeroCrutch Bandsaw Stand.jpg
    68.2 KB · Views: 73
  • Strut - Gas Cylinders.jpg
    Strut - Gas Cylinders.jpg
    36.5 KB · Views: 51
  • Tinfoil TV Template.jpg
    Tinfoil TV Template.jpg
    81.9 KB · Views: 55

ScubaSteve

Well-known member
Joined
Dec 14, 2011
Messages
79
Location
New Bern, NC
That's quite the shop...! I've looked at some of Lazze's machines, but they are just so expensive. I guess you get what you pay for, though.

Never thought I'd care much about another man's compressed gas cylinders, but it looks like you went all in! Again, I guess it's a buy once & cry once type of deal. I have one of the large ones that came as part of the deal on a used welder I bought on CL, but without "proof of ownership" I can't do anything with it, unless someone here knows something I don't. One of these days I may chop it up for a project.
 
To avoid these ads, REGISTER NOW!
OP
M

machine_punk

Well-known member
Joined
May 14, 2011
Messages
2,540
Location
Napa Valley, California
Thanks! I've only been in the new location for a couple of months now, but I really appreciate having room to work without having to move stuff out of the way constantly.

I got most of my cylinders from CL, for decent prices. My LWS (Local Welding Supply) doesn't have a problem with them. Your LWS might be different, though. I did go ahead and buy the large argon tank from the LWS (so I do have a certificate of ownership and it is definitely in-date). I got tired of watching deals on CL, then having to drive an hour to get the tanks and deal with the CL seller. For a little more, I just bought into the LWS tank pool. Most of the folks on CL around here think their tanks are made of gold. If I'm going to pay 75% of new price, I'm going to get it from the LWS.

The oxygen tank you see is smaller than I prefer, but I got a great deal on it. That is why I am using it first...as soon as I empty it, I will trade up to a larger tank size (220 CF, 6.1 cubic meters) like you see in the argon tank on the right, rear of the picture.

I like that size of acetylene tank, about 150 CF (4.2 cubic meters). It is a good match for the oxygen tank (you use O2 at about twice the rate of acetylene, with a neutral flame).

I have two other tanks you don't see. A 220 CF oxygen cylinder and another 150 CF acetylene cylinder. I like to have spares of each gas...because the LWS isn't open from Saturday afternoon through Sunday...and you know when you are most likely to run out of gas.

I'd love to have a smaller set of cylinders, to take to events and if I ever need to do work away from the shop. I'd like to have a B cylinder in acetylene and a couple of similar-sized oxygen tanks. I'm thinking about making a case to hold those, to make it a portable kit.

Lazze's machines are quite expensive, but after talking to him extensively, seeing the machines in person and watching his demonstrations, I'm convinced on most of them.

His bead roller is expensive, but it comes with a nice selection of dies...which are not included in other machines. Like many metalworking tasks, the tooling is the expensive part and quite a bit of tooling comes with Lazze's bead roller. I also like his foot pedal. Other machines require a flip of a switch to change direction...his just requires you to step on the other pedal. The motor and VFD is Dayton. The machine itself is built like a tank.

Some of the tools are a once-in-a-lifetime buy. The cost may sting for a few days, but I don't expect to ever have to buy that machine again. As you put it, 'buy once, cry once.'

KDub
 

Attachments

  • Strut - Gas Cylinders.jpg
    Strut - Gas Cylinders.jpg
    36.5 KB · Views: 29
Last edited:

ScubaSteve

Well-known member
Joined
Dec 14, 2011
Messages
79
Location
New Bern, NC
Have you shown that setup here? How does it work..I'm assuming the dies screw on from the underside? I have a H-frame shop press, but your setup looks like a real time/space saver.
 
OP
M

machine_punk

Well-known member
Joined
May 14, 2011
Messages
2,540
Location
Napa Valley, California
My boys got me an Amazon Tap a while ago and I use it out in the studio a lot. It is basically a voice-command web device. You press the button and tell it what you want it to do. I usually just need it to play whatever music I want to hear, but you can ask it the weather, have it add things to your shopping list, have it look up answers to questions, or even just have it tell you joke.

The Tap found a place in the studio pretty quickly. Unfortunately, that place was on the workbench [see picture below]. That's fine, I suppose, but pretty much every major project, I end up knocking it down behind a big, immovable bench and have to go digging for it. That got old quickly. As usual, I spent some time thinking about the design of the bracket.

I decided I wanted to build a little platform, with a lip around it. There are plenty of ways to do that. I usually try to use projects for the studio as ways to practice techniques I am trying to learn. It's been a while since I've welded, so I cut a circle out of a 1/4" (6.5 mm) steel plate and used stick welding to build up a lip around the top of the circle. I already had an adjustable bracket, from my photography supplies, which I wanted to incorporate into the design.

I had to laugh. About halfway through this project, I knocked the Tap off the workbench and had to fish it out with a broom handle [see pic]

Since I routinely build brackets for photography equipment, I keep the correct tap and die for camera equipment, 1/4-20 (6.5 mm, with a coarse thread). I drilled and tapped the platform and wall plate for the adjustable arm and drilled the wall plate for a 1/4" bolt to attach anywhere on the strut in my shop.

I liked the look of the weld bead on the lip of the platform so well that I decided to do a quick bead around the wall plate, just to make them match. I wanted to be able to move this platform whenever I wanted, so I built a thumbscrew to attach it to the strut nut. I used a normal 1/4" x 1" (6.5 x 25 mm) hex bolt, with a piece of flat steel welded to it.

I ended up really liking the look of this, once I hit it with a wire brush. Mrs. Machine_Punk seemed to think it has a bit of a medieval look to it and I agree. The shiny, black, new camera bracket looked out of place at this point. On a whim, I decided to just see what a wire wheel would do. Fortunately, pretty much the whole bracket was aluminum, so it matched pretty well, after a couple of minutes with a grinder with a wire wheel. [see pics of finished project below]

KDub.
 

Attachments

  • The new TAP Bracket 2.jpg
    The new TAP Bracket 2.jpg
    39.8 KB · Views: 106
  • The New TAP Bracket.jpg
    The New TAP Bracket.jpg
    43.5 KB · Views: 91
  • What usually happens.jpg
    What usually happens.jpg
    45.3 KB · Views: 73
  • Amazon Tap in the studio.jpg
    Amazon Tap in the studio.jpg
    40.3 KB · Views: 76
OP
M

machine_punk

Well-known member
Joined
May 14, 2011
Messages
2,540
Location
Napa Valley, California
Cleaning up the studio tonight and got all my grinders in one place.

I bought the two DeWalts first, a LONG time ago. I like them. Then, the LWS had a stack of the Porter-Cable PC60TAG at 2 for $80 and I decided to try them. They worked well. This became my standard grinder. I just picked up four more from Amazon and they are usually about $36 shipped, with Prime.

The Porter-Cables are only 6 amps, but I've never had a problem with bogging them down when I push hard. The only thing I don't like about the Porter-Cables is the guard which comes with them will not fit cut off discs (type 1). You have to order the correct guard separately (even though the picture usually shows the grinder with both guards). The extra guards are not that expensive and I only have 2 grinders set up with type 1 cutting wheels.

It is REALLY nice, not having to stop and change to a different disc, while working. In the past, I've had to stop and switch discs when I am moving from steel to aluminum and back. I solved that problem with my die grinders a long time ago and it was time to get enough angle grinders for all the tasks I normally do.

I think I'd like to add a couple of 6-inch grinders, for hogging metal off larger projects and cutting larger sections of steel.

Now, I need to figure out a stand to hold them, while I am working. I've got some ideas.

KDub

On the top row are the pneumatic die grinders.
Left: carbide burrs for aluminum
Middle: Roloc holders and cutoff tool
Right: carbide burrs for steel

On the bottom row are the electric angle grinders.

Left to right:
36-grit flap disc
stainless steel, knotted-wire wheel
grinding cone
stainless steel, knotted-wire cup
grinding disc for aluminum
grinding disc for steel
cut off disc for aluminum
cut off disc for steel
 

Attachments

  • A Few Grinders.jpg
    A Few Grinders.jpg
    56.2 KB · Views: 91
Last edited:
OP
M

machine_punk

Well-known member
Joined
May 14, 2011
Messages
2,540
Location
Napa Valley, California
You may have me beat in grinder count, but not by much.

I share your affliction.

I've seen others on GJ constantly watching eBay and other sites for used Metabos or other premium grinders. I'm finding I don't have as much time for that anymore and I'd rather be out in the studio, building things. So, I've transitioned to buying new, when I can. I'm glad my LWS had the special on the Porter Cables - opened my eyes to reasonably-priced machines which still get the work done.

It would seem excessive to any non-tool-user......but the truth is, this is how work gets one!

SCUBASTEVE...I haven't forgotten about showing you the punch and dimple die setup above. I'm actually working on a video of the process, which I will post on my YouTube channel.

*******

Cutting out a round piece of 1/4" (6mm) plate ended up being a job for the grinder the other day...it was just faster than any other process I had, for roughing out the shape. I was almost annoyed at the idea of having to stop and change out the cutting disc for a new cutting disc, as I used up the old one. That would be a bit excessive, though...having a new grinder for every new disc you use.

I recently went to the LWS to get the grinding discs and wheels I wanted to have grinders for. Instead of just installing them all at the same time, I just started working on the next project. As I needed a grinding tool I didn't already have set up, I pulled the next grinder of the box, installed the grinding tool I needed next, then continued working on the project, with the correct tooling on it's own grinder. It was a fun process.

I actually have a detailed plan of tools I add to the garage. While I DO have a regular budget for my hobby, it is still limited. What I DON'T want to do is buy tools and equipment which will sit there unused, because I don't have everything I need or that is not the direction I am going this year.

I keep an electronic document (actually a MS OneNote page) with all my plans for tools. If I run across a tool I am interested in, it goes on the list, along with a picture and approximate price. Annualy, I think about the work I am doing and where I want to go with it. As an example, last year I was focusing on continuing sheet metal and riveting work, while adding welding.

Since I already had an oxy-acetylene welding setup, That meant adding a LOT if different filler wire and fluxes, to increase the utility of that setup. It also meant looking for an electric welder of some sort. That took a lot of research and thinking about which way to go. Obviously stick welding is a great complement to gas welding, because I can do fine work with the gas and stick for heavier benches and structural welds (not to mention, I've always wanted to stick weld). TIG is just about as versatile as gas welding, but has a pretty steep learning curve (which I've already started on...just didn't have my own TIG machine). Flux Core/MIG is an obvious starting place, just for the convenience and reduced learning curve.

Oddly enough, I found a machine which would let me do it all. The Lincoln 210 MP came out at a decent price and multiple welding processes. So, I started saving my pennies. Fortunately, I came upon a deal for a used one, with all the toys (spool gun and TIG setup) for about the base price of the machine with just the MIG and stick accessories.

What is important about this story is what I did NOT spend my money on last year. I didn't buy a milling machine or upgrade my mini lathe. WHY? Because I had my priority list to go from--I knew where to focus my money this year. Buying a mill or larger lathe would have ended up with NOTHING going on in the workshop this year, as I spent a lot of time and money tooling up for a new machine and practicing basic skills, for work I don't really do a lot of (yet). So, "milling machine" and "larger lathe" are still on the list, at the bottome, with "Hold for now" in front of them.

Every couple of months, I go through my priority list and make sure it is still where I am going and it makes sense for the type of work I am doing. The top tools on the priority list are there for one of two reasons...
1. They make something I ALREADY do a LOT faster and easier.
2. They allow me to branch out into a new area I want learn and use to build functional art.

That is why grinders were "next." Having several grinding tools available at the same time makes what I do MUCH easier.

An electrical upgrade is the next step. I only have one 15-amp circuit in the garage for lights, outlets, compressor and welder. Planning to add a 240-volt, 50-amp circuit for the welder and two 120-volt, 20-amp circuits. One for the compressor and one for general use in the shop. That's not a lot, but it is what is available on the 200-amp main panel outside the garage. Anything more would require installing a new, 100-amp panel in the garage. If this was my final, 'dream' house, that would be worth it. For now, that level of electricity upgrade is just distracting from other priorities on my list.

KDub.
 
Last edited:
OP
M

machine_punk

Well-known member
Joined
May 14, 2011
Messages
2,540
Location
Napa Valley, California
SCUBASTEVE requested more information about the dimple die setup I use.

Details of the setup...
- I use the SWAG Offroad Dimple Die (5-piece pipe size set)
- These are built to work with the HF 5-piece hydraulic hole punch set.
- That came with an Enerpac-style hand pump, but I have never used it. I immediately added the foot-pedal, air-over-hydraulic pump.
- I had the local hydraulic shop make up a 12-foot (3.5 meter), 10,000 PSI (I don’t know the common metric pressure measurement, hopefully one of these two will make sense to our friends across the pond…70,000 kilopascals or 700 Kg/square centimeter).

All told, this setup is about $850 USD. You can get away with less than that, but the dimple dies are really the most expensive part. The air-over-hydraulic pump makes this an amazing setup. It takes more time to set up each part of the process than to actually punch the hole or press the dimple.

To show you the process, I’ll take you through a little project I completed today. I needed a stiffening plate and I decided dimpled steel was the way I wanted to go.

After laying out the pattern on a sheet of 18g (1.2mm) cold rolled sheet steel, I drilled a ¾” (19mm) hole for the center stud of the punch. The four largest punches use a ¾” (19mm) stud. The smallest uses a 3/8” (9.5mm) stud.

I use a mini hole saw for this. They are built like regular hole saws, but they are much smaller and have finer teeth, which makes them great for clean holes through sheet metal. They are sold for use with the new cordless impact drivers.

You see the larger, center hole is already punched and dimpled. I was filming this, for my YouTube channel, and decided to pictures for a GJ post, after I was done with filming.

The hydraulic cylinder in this setup is a ‘puller.’ When you push hydraulic fluid into the cylinder, it pulls the stud into the cylinder. I has a powerful return spring in the cap, to push the stud back out when you release the pressure.

You see the setup for punching the final hole size. Starting on the left:
- the hydraulic cylinder
- a ‘donut’ spacer, which comes with the punch kit
- the outer die of the punch set
- the 18g (1.2mm) sheet steel
- The inner die of the punch set (this has the same thread as the stud supplied with the punch kit)
- The threading of the stud is sticking out at the end

Once you punch the final hole diameter, you change to the dimpling setup. Again, from the left:
- the hydraulic cylinder
- the inner dimple die (I don’t know why, but I prefer to pull the dimple this direction)
- the 18g (1.2mm) sheet steel
- the outer dimple die
- the threaded, inner cutting die. You only need this because it acts as the ‘nut,’ for the dimpling setup, since there is no threading on either dimple die. Notice it is turned the opposite direction, so the ‘cutter’ is not doing anything.

(next post for more pictures and the end of the story)
 

Attachments

  • Dimple Die End of Stroke.jpg
    Dimple Die End of Stroke.jpg
    141.9 KB · Views: 56
  • Dimple Die Beginning of Stroke.jpg
    Dimple Die Beginning of Stroke.jpg
    98 KB · Views: 59
  • Hole Punch End View.jpg
    Hole Punch End View.jpg
    91.4 KB · Views: 59
  • Hole Punch Side View.jpg
    Hole Punch Side View.jpg
    98 KB · Views: 63
  • Air-Over-Hydraulic Pump.jpg
    Air-Over-Hydraulic Pump.jpg
    124.9 KB · Views: 61
  • Punch and Dimple Die Setup.jpg
    Punch and Dimple Die Setup.jpg
    88.5 KB · Views: 60
Last edited:
OP
M

machine_punk

Well-known member
Joined
May 14, 2011
Messages
2,540
Location
Napa Valley, California
With that you are done!
- Here is a picture of the front side
- A picture of the back side
- A picture of the stiffening plate in it’s final shape, painted yellow, with mounting holes drilled. I'll try to post a pic, when it dries and I install it.

I am still trying to figure out the best way to deburr the cut edge of the hole/dimple. It is rather sharp. A regular deburring tool doesn’t work well (the geometry is wrong for the angle of the edge. It is tough to get a power ‘anything’ in there to get at the sharp edge. I ended up just using a bit of 100 grit sandpaper.

Kdub

#swagoffroad
 

Attachments

  • Cut to Size and Painted.jpg
    Cut to Size and Painted.jpg
    53.8 KB · Views: 51
  • Dimples Complete Reverse Side.jpg
    Dimples Complete Reverse Side.jpg
    124.6 KB · Views: 47
  • Dimples Complete Front Side.jpg
    Dimples Complete Front Side.jpg
    109.5 KB · Views: 52
Last edited:

ScubaSteve

Well-known member
Joined
Dec 14, 2011
Messages
79
Location
New Bern, NC
Man, that is sooooo cool. The dies ARE expensive....I guess I can add this to my long list of stuff I want to save up for. :)
 
OP
M

machine_punk

Well-known member
Joined
May 14, 2011
Messages
2,540
Location
Napa Valley, California
...the project I just finished.

While a lot of the stuff I post on Garage Journal is simply "done in a garage," every once and a while, you need to stop and pay the price with a real, garage-related project. That doesn't mean it has to be a serious project, though.

The paint finally dried on the brace I built (usually takes about two days for spray paint to dry to the touch in the studio), so here it is.

I just installed a new garage door opener, to replace the old one, which died. Of course, the old brackets didn't fit and I needed to take them down and completely reinstall them. So that the next guy would have an easier time (you never know, it might be me!), I decided to build a solid 'base bracket' at the top. The beam running through the garage is in EXACTLY the wrong place for it to support either the front or back of the opener, so I needed a solid mounting point right in the middle of the beam.

I used the bracket material which came with the opener to hang the opener, but I ran out, before I was able to put in an angled cross brace. Rather than go buy another piece of bracing material (I don't mind buying a large piece of material and having plenty for the next project, but I hate having to run to the store in the middle of a project), I decided I'd let it sit for a few days and think about it.

At first I though, "I do sheet metal. At the least, I should be able to bend up a short strip of 18g (1.2mm) sheet steel into an L shape and use that." But, then nobody will look at it and go, "Hmmm, looks like he made that part of the bracket himself." Must think of something cooler than that.

Then, it hit me, I have a dimple die setup...what would be cooler than a dimpled brace for the garage door opener?. One month later, I finally got around to it. After about 3 hours of work, here we are. TOTALLY overkill for the situation, but the opener is ROCK SOLID now. Doesn't sway at all, from side to side. Best of all, NOBODY is going to look at it and say, "I'll bet he bought that at Home Depot."

By itself, probably not the coolest thing in the world. But, enough small details like this and it will keep visitors to the studio busy for a while, discovering new things. Really, though, no matter what anybody else thinks, when I pull into the garage, it makes me grin. That's worth all the effort I put into a silly little brace.

KDub
 

Attachments

  • GD Opener Brace Front.jpg
    GD Opener Brace Front.jpg
    118.3 KB · Views: 441
  • GD Opener Brace Reverse.jpg
    GD Opener Brace Reverse.jpg
    41.5 KB · Views: 70
Last edited:

Duker

Well-known member
Joined
Sep 25, 2010
Messages
10,861
Location
Livingston, TX
Kev, it's those little details that distinguish a builder and their project from average to craftsman. Sometimes it's not about the destination it's about the journey! Nicely done.


Sent from my iPhone using Tapatalk Pro
 
OP
M

machine_punk

Well-known member
Joined
May 14, 2011
Messages
2,540
Location
Napa Valley, California
Kev, it's those little details that distinguish a builder and their project from average to craftsman. Sometimes it's not about the destination it's about the journey! Nicely done.


Sent from my iPhone using Tapatalk Pro

Thanks. That means a lot...from the guy who has put so many details into an amazing welding table.

Kev
 

TwoBytes

Well-known member
Joined
Mar 14, 2014
Messages
789
Location
Canberra, 'Stralia
This...

attachment.php


is great!

And so is this...

Really, though, no matter what anybody else thinks, when I pull into the garage, it makes me grin. That's worth all the effort I put into a silly little brace.

Nice work Kev
 
OP
M

machine_punk

Well-known member
Joined
May 14, 2011
Messages
2,540
Location
Napa Valley, California
This...

is great!

And so is this...


Nice work Kev

Thanks!

Oh, as a side note. I posted this over on the Metal Meet forum and they suggested a simple solution to the deburring issue...simply deburr the hole BEFORE you press in the dimple.

The geometry of the deburring tool simply doesn't work well with the angled sides of the dimpled hole...so just deburr the material while it is still flat, then put the dimple in it.

Kev
 
OP
M

machine_punk

Well-known member
Joined
May 14, 2011
Messages
2,540
Location
Napa Valley, California
Rolling Grinder Stand

So, you've seen my small collection of grinders before. I think I posted that some time in January. While I like having a lot of grinders available, with different discs and wire wheels, my current storage method leaves a LOT to be desired.

I've been essentially storing these on shelves built into my the main workbench. The cords quickly become a rat's nest. You have to choose between seeing which grinder disc is on the grinder or being able to grab it quickly. I've seen a lot of folks simply weld a piece of angle iron on the fabrication bench and hang grinders there.

That doesn't really work for me. For one, my bench not in the center of the workshop. It is shoved up against the wall and has other benches shoved up on both sides. If I ran the piece of angle across the front, it would seriosly block most of the storage area on this bench and make it difficult to get to the power tools I store on those shelves. This bench is also wood--which isn't a huge deal, since I could just build a piece of angle with brackets to screw onto the bench. I don't expect to always fabricate in the actual workshop area. For big projects, I want to be able to pull the cars out and work in the two-car garage section of the garage. If all the fabrication tools are over at the workbench, then I need to grab them all and pile them on the floor, when I need them in the other part of the garage.

What to do? What to do?

I've actually been planning this project for a long time. I've got a couple of old, rolling office chairs I've kept for just such a time as this. I pulled the seat section off and cut off the seat-tilting mechanism and got it down to just the wheels and the upright cylinder, with enough metal on top to weld to and still use the height-adjustment mechanism.

I've been pondering the actual design of this project for a LOOONG time. I can think of a bunch of ways to attach the grinders to this rolling base. I even considered making a box column and angle shapes out of 18-gauge (1.2mm) sheet steel with dimples and other features. In the end, expediency won out. I just recently picked up another scrap bed frame. While bed frames are considered 'junk' metal, it is more than adequate for this project. I wasn't drilling any holes. All I needed to do was cut them to length and weld them in place. I've been teaching a friend to weld with the flux-core setup over the past couple of weeks, so I decided to try that for this project (this is a classic stick welding project, but I wanted to try out the flux core for myself).

This is the first project using the new DeWalt DW872 dry-cutting saw. Just a little present I got myself for Christmas. Once you figure out how to adjust the fence, the saw does a wonderful job. WAY better than a cutting disk on a grinder for straight and single-miter cuts. I still use the standard, wood-cutting miter saw for cutting aluminum shapes to length.

The next problem was, "how many grinders should this thing hold?" I've got ten so far, with a couple of those waiting for whatever I decide is the next "must-have" grinder disc. I know I already plan to get a couple of the wood grinding discs from King Arthur's Tools, for shaping wood and (possibly) aluminum. So I went ahead and designed the rack to hold twelve 4.5" (115mm) grinders.

I've seen a few other grinder racks and I really like those which store extra discs with the grinders and have cord control built in. I've gone a different route than most for storing spare grinding discs. I generally prefer the discs with built-in, threaded hubs (5/8"-11 threads per inch is the standard for this size of grinder in the US). Instead of just welding on a short section of rod to hold the spare discs, I thought it would be cool to actually use bolts, with the correct thread. Off to Tractor Supply Company we go. Of course they have 5/8-11 bolts (approximately 15mm diameter with a 2.5mm pitch), by the pound (0.5 kilogram). I picked the longest bolt which was threaded all the way to the head (2", 50mm) and bought a dozen. On a whim, I also bought a dozen hex nuts...no particular plan, but 'just in case.'

Welding the bolts onto the angle was a non-event. I sanded off the plating where I planned to weld, clamped them in place and hit them with three short welds each. They do a wonderful job of holding the discs which have a built-in, threaded hub. I can fit at least 3 spares on each bolt. The bolts even easily hold a spare threaded grinding cone (that would have been tough to do, with non-threaded rod).

The only issue is that the grinder tree spins and rolls. This is great for quickly accessing the spare discs and moving the rack to wherever I am working, but the non-threaded hubs easily fell off of the bolts. I knew I picked up the matching hex nuts for a reason! For now, you see the plain hex nuts doing a great job of holding the non-threaded discs on. I plan to weld little sections of rod onto those nuts, to make them into wing nuts. This will make it much easier to put them on and take them off, while wearing gloves.

There you have it. A rolling, spinning grinder tree. This is still a work in progress, though...

I'm still working on cord control. I originally thought I wanted to mount a couple of outlet strips on the base, and leave all the grinders plugged in and ready to go. The only issue is that the cords on the Porter-Cable grinders are not nearly long enough, at barely 4 feet (just over 1 meter). Even the DeWalt grinders only go so far (I think those cords are 6-8' feet long (2-2.5 meters). I've got some thoughts on what I will do, but still mulling that over.

I intentionally left the main, vertical support longer than needed. This rack is meant to hold all my commonly-used fabrication tools. I've got plans to add all of the pneumatic die grinders, along with bins to hold the common Roloc discs I use. I think I'm going to add a bracket to hold the cordless drill and impact driver, along with common drills and bits. I'm thinking this rack needs a few hammers and perhaps a few basic measuring tools, like a tape measure, roofing squares, a level and angle finder, etc. It also definitely needs a place for a few welding clamps.

Kev
 

Attachments

  • A Few Grinders.jpg
    A Few Grinders.jpg
    56.2 KB · Views: 59
  • Grinder Stand - Storage Side b.jpg
    Grinder Stand - Storage Side b.jpg
    53.5 KB · Views: 63
  • Grinder Stand - Working Side b.jpg
    Grinder Stand - Working Side b.jpg
    54.1 KB · Views: 75
Last edited:
To avoid these ads, REGISTER NOW!
Top Bottom