Wow! looks very good!
Could you write a short "how too"so I can copy cat.
Thom
Alright, but remember, you asked for it!
I don't claim to know anything about engine turning, this is just how I did this project. I'm sure others on here have done many more and better jobs than I.
I would recommend starting with a piece of scrap and trying different diameters of tools to get the look you're after. Typically, the larger the piece, the larger the tool you'll want to use.
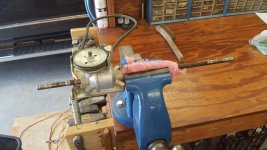
We'll start with the tool I used in this application. It's a 1.75" PSA arbor that I used double sided tape to affix a piece of scotchbrite to.
View media item 84212
View media item 84214
I then started in the right hand lower corner. You will want to always start your rows from the same side of your workpiece.
View media item 84215
I clamped a guide at the top of the workpiece and marked the lower edge of the piece.
View media item 84216
I then determined the spacing I wanted between rows and marked the measurements on the table.
View media item 84220
I finished the first row, stepping over half the diameter of the tool, eyeballing this distance.
View media item 84221
Then moved the guide to the next line.
View media item 84211
I then finished the second row positioning the swirls half way between the ones in the first row.
View media item 84209
Repeat as needed to finish your parts.
View media item 84208
Once you are set up, it goes very quickly and using the clamp and guide system, results are very repeatable.
Great thing is if you make a mistake, just scotchbrite the whole piece and start over.
I used about 6 of the scotchbright circles on the table cover, running the drill press at 350 rpm, no lube or coolant. It doesn't require very much pressure either.
Good Luck with your version and be sure to post some pictures!


")


.jpg")


