To avoid these ads, REGISTER NOW!

50x63x16 Shop Build

Nick in WI

Well-known member
Joined
Nov 6, 2012
Messages
129
I've always enjoyed reading build threads and finally have the chance to do my own and since my permit has been approved and the grading is to begin this week I figured now was the right time. Before getting too far into it here's a little background information.

For as long as I can remember I have always wanted my own shop. Being self employed I need a place to store my equipment, trailers and truck as well as a place to work on my vehicles and such. I currently rent half of a 40x72 pole barn and while it is economical and has worked out well I've always wanted a place of my own. Another driving factor is that the shop I rent is uninsulated/unheated and that's unacceptable, well because Wisconsin.

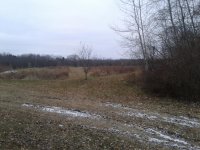
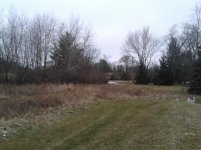
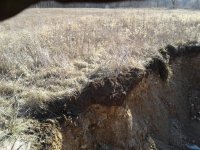
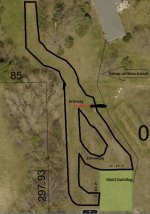
In our area outbuildings can only occupy 1% of the given lot size and since my dream building has always been a minimum of 40x60 my wife and I were searching for a place with at least 6 acres. We finally found something that met all of our requirements (aka, wife liked the house I liked the property) and it was just a hair under 10 acres allowing a hair over 4000 sqft out building.

The property is really nice with a creek running through it as well as an existing 2 story bank barn that was 24x26. I knew this was never going to meet my needs but I am still working towards turning it into a wood shop which can be found here: https://www.garagejournal.com/forum/showthread.php?t=405171

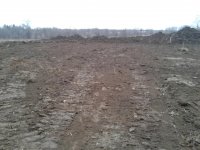
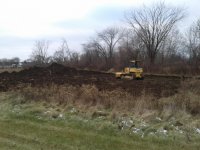
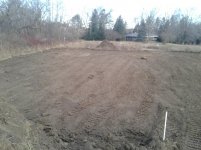
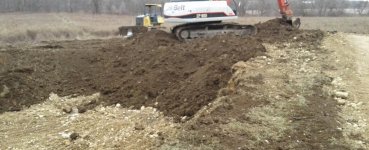
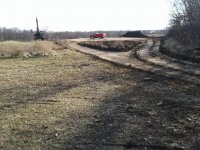
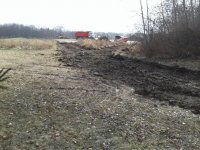
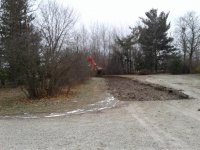
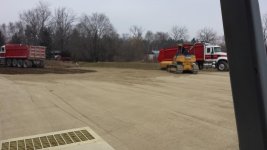
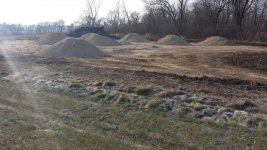
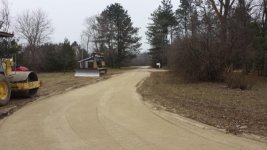
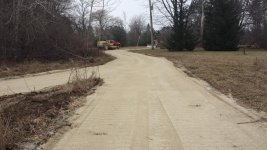
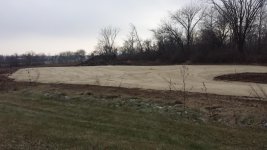
I decided on a pole barn because of the cost as well as the ability to construct it in stages. The overall build will take a few years as funds allow. The first stage will happen this winter which will consist of getting a driveway cut in, building pad laid and building up. Stage two will be bringing in utilities and concrete. Stage three will be building a partition wall down the middle and insulating/heating everything.

I plan to have the builder set the poles/truss's and install the roof sheets but from there I will finish off the walls, soffit, fascia gutters, windows, doors, etc. It's not a financially motivated decision but more because I just really take pride in doing things myself. In a perfect world I would build the whole thing but I don't have enough construction savvy friends to help and after factoring in the equipment rental costs this just seemed to be the most logical compromise.

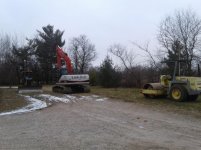
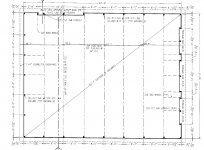
Attached are pictures of the building layout as well as a very rough site plan. The plan for the building is to have the half with 3 doors as a working/heated area and the back half more as a storage area for vehicles, equipment, pallets of product, etc. The 10x10 door nearest to the walk door will be a lift bay and the side wall opposite that will have the boiler, wash tub with yard hydrant, and electrical panel. The partition wall that will eventually be down the middle will have a 12' wide door in line with the main 12x12 door to accommodate any longer truck/trailer combo as well as provide a pass through for the forklift. I will be doing in floor heating divided into 2 zones for the front and back area. I don't have any immediate intentions of insulating/heating the back section but since it's not realistic to add tubing later it just makes sense to spend the extra few hundred dollars.

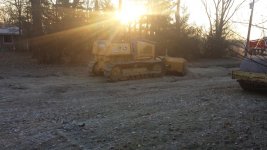
That's it for now and I'll update more when the grading begins.
 

Attachments

  • Framing Plan.jpg
    Framing Plan.jpg
    134.6 KB · Views: 349
  • Driveway outline 2.jpg
    Driveway outline 2.jpg
    108.4 KB · Views: 388
  • 3d Rendering.jpg
    3d Rendering.jpg
    72.6 KB · Views: 288
Last edited:
To avoid these ads, REGISTER NOW!
OP
N

Nick in WI

Well-known member
Joined
Nov 6, 2012
Messages
129
All the equipment is ready to go and grading should begin today. We had a lot of rain last weekend and now temps are hovering just below freezing. In talking with the excavator he said he'll be jumping around on pad prep, driveway prep and stone delivery while balancing ground that is frozen enough to drive on but not too frozen to move.

I have the 4 corners staked right now although they don't all show up well in the pictures. The area is relatively level with the 2 high corners about even, one corner 10 inches down and one corner 24 inches down so it shouldn't be too hard too level up. I've estimated about 600 ton of stone necessary for both the driveway and building pad. We also talked about just filling in the area between the building and driveway to the back garage door to provide extra parking and for easier maneuvering.
 

Attachments

  • 20181205_081745.jpg
    20181205_081745.jpg
    150.1 KB · Views: 214
  • 20181205_081841.jpg
    20181205_081841.jpg
    154.8 KB · Views: 200
  • 20181205_081932.jpg
    20181205_081932.jpg
    126.2 KB · Views: 193
  • 20181205_081949.jpg
    20181205_081949.jpg
    149.4 KB · Views: 182
  • 20181205_081955.jpg
    20181205_081955.jpg
    150.4 KB · Views: 183
OP
N

Nick in WI

Well-known member
Joined
Nov 6, 2012
Messages
129
It's amazing what an experienced operator can do in just a few hours. The excavator was here for about 3 and half hours and had most of the stripping done. He still has to finish the longer portion of the driveway but the majority of the driveway along with the building pad is all cleared.
 

Attachments

  • 20181205_154436.jpg
    20181205_154436.jpg
    150.9 KB · Views: 210
  • 20181205_144853.jpg
    20181205_144853.jpg
    150.8 KB · Views: 212
  • 20181205_130831.jpg
    20181205_130831.jpg
    153 KB · Views: 221
Last edited:
OP
N

Nick in WI

Well-known member
Joined
Nov 6, 2012
Messages
129
Today he went to work leveling the building pad. After the stripping was done the two back corners were down about 3 feet. He punched a hole next to the building and I got lucky because the gravel layer was 8-10 feet deep. He dug that out and spread it out on the building pad with the excavator and then used the dozer to smooth it out. Then he compacted everything, took out more gravel and doezed it smooth again. I was there taking a closer look at the compactor and he told me it was just like driving a lawn mower and to give it a shot. I went to work compacting everything while he started filling in the hole with the excess top soil. He didn't want to use all of the top soil for fill so he cut some dirt from the back side of the hole to use as additional fill. The grade slopes down in that direction anyhow so it will just be ever so slightly steeper than before. In total he was able to get probably 20-30 truckloads of gravel out of the hole which not only saves me a ton on trucking gravel in but also gets the building a little higher up in elevation than I would have otherwise done. Tomorrow the plan is to strip the remainder of the driveway and let the ground freeze up solid over the weekend so the gravel top coat for both the pad and driveway can be trucked in.
 

Attachments

  • 20181206_080250.jpg
    20181206_080250.jpg
    151.5 KB · Views: 239
  • 20181206_092445.jpg
    20181206_092445.jpg
    171.2 KB · Views: 251
  • 20181206_122056.jpg
    20181206_122056.jpg
    160.5 KB · Views: 256
  • 20181206_134742.jpg
    20181206_134742.jpg
    147.2 KB · Views: 244
  • 20181206_134811.jpg
    20181206_134811.jpg
    110.6 KB · Views: 233
Last edited:
OP
N

Nick in WI

Well-known member
Joined
Nov 6, 2012
Messages
129
Today the excavator was back to strip the top soil where the driveway is going with his son there to drive the dump truck. He used the excavator to peel up the top soil and load it into the dump truck which drove back and dumped it in the hole previously created next to the building pad. After the top soil was removed he leveled it off with the dozer and went over it with the compactor. He left me all of the top soil in the back and suggested keeping it for now until the project is done at which point he will level it out or buy it off me. Now it's all ready to bring in the stone early next week.
 

Attachments

  • 20181207_131107.jpg
    20181207_131107.jpg
    159.6 KB · Views: 197
  • 20181207_114924.jpg
    20181207_114924.jpg
    160.7 KB · Views: 190
  • 20181207_100703.jpg
    20181207_100703.jpg
    157.8 KB · Views: 192
  • 20181207_100902.jpg
    20181207_100902.jpg
    149.4 KB · Views: 204
  • 20181207_101120.jpg
    20181207_101120.jpg
    162.6 KB · Views: 207
  • 20181207_101225.jpg
    20181207_101225.jpg
    154.9 KB · Views: 199

rbrock

Well-known member
Joined
Feb 2, 2012
Messages
142
Location
Hills of Ohio
It looks like you and your excavator are doing it right, I am jealous you essentially have your own gravel pit on site. Keep up the posts and keep up the good work.
Ron
 

welder57

Well-known member
Joined
Feb 26, 2011
Messages
414
Great looking site. Wish you could get the hole dug before the freeze... Good luck..
 
OP
N

Nick in WI

Well-known member
Joined
Nov 6, 2012
Messages
129
It looks like you and your excavator are doing it right, I am jealous you essentially have your own gravel pit on site. Keep up the posts and keep up the good work.
Ron

Thanks for checking in. I am very happy with the excavator, not only is he a very competent operator but he really knows how and where to move dirt to be most effective. He's done a great job of saving money where possible without any quality sacrifices.
 

Duker

Well-known member
Joined
Sep 25, 2010
Messages
10,861
Location
Livingston, TX
Nick, great place and making great progress! I like your woodshop space as well. Looking forward to seeing what you do to the barn!
 
OP
N

Nick in WI

Well-known member
Joined
Nov 6, 2012
Messages
129
Great looking site. Wish you could get the hole dug before the freeze... Good luck..

Thanks!

The only hold up now is that the builder is booked until March when the frost will be pretty deep. My understanding is that they have a drill truck which will have no problem punching holes even when frozen. They only have issues with bigger boulders and I didn't see anything more than overgrown softball sized stones so we should be good.
 
OP
N

Nick in WI

Well-known member
Joined
Nov 6, 2012
Messages
129
Nick, great place and making great progress! I like your woodshop space as well. Looking forward to seeing what you do to the barn!

Thanks Duker, I'm still going to be whittling away at the little barn although progress may slow a bit as I try to balance the financial expenditures between the two projects. I did just unloaded a stack of 2x4's to finish up all of the rough framing inside though.

In the picture below you can see where the little barn is in relation to the future shop.
 

Attachments

  • 20181206_080247.jpg
    20181206_080247.jpg
    151.2 KB · Views: 155
Last edited:

jblnut

ALLIANCE MEMBER
Joined
Jan 17, 2015
Messages
7,068
Location
In the Middle of MN
I can't believe you're not frozen up yet. We've been frozen up here for a few weeks already. We quit doing tillage mid-november already because it was getting stiff.

I am hoping to build a 54x60x18 in the next year or so so you bet I'll be following along !!
 
OP
N

Nick in WI

Well-known member
Joined
Nov 6, 2012
Messages
129
I can't believe you're not frozen up yet. We've been frozen up here for a few weeks already. We quit doing tillage mid-november already because it was getting stiff.

I am hoping to build a 54x60x18 in the next year or so so you bet I'll be following along !!

Thanks for following along. It was an early year here too. We were froze up for most of November but thawed out last week when we had a few days in the mid 40's. There was probably 6-8 inches of frost this morning which worked out because that was the desired depth of the driveway being stripped.

Pretty similar size you're doing, I'm sure I'll wish I had the 18' height if I ever put a loft in. The height restriction where I'm at is only 20' and the inspector let me slide on my 26' peak height but I didn't want to push it. His justification was that no one can see the building anyhow which was reasoning that I was very grateful for.
 
Last edited:

rakane

Well-known member
Joined
Feb 8, 2018
Messages
175
Location
Warren, Oregon
I'm curious if you will lay down a fabric for the drive?

My builder tells me he uses a heavy road felt for the 12' drive to keep rock from sinking away in the mud/dirt.

Randy

Meanwhile is a 30' Grady White.
 
OP
N

Nick in WI

Well-known member
Joined
Nov 6, 2012
Messages
129
I'm curious if you will lay down a fabric for the drive?

My builder tells me he uses a heavy road felt for the 12' drive to keep rock from sinking away in the mud/dirt.

Randy

Meanwhile is a 30' Grady White.

I did ask the excavator about it early on and I was told it wasn't necessary. I believe it now especially because after stripping the top soil it's pretty much just gravel everywhere as seen below. It would really just be a waste as there really isn't anything for the rock to sink into.
 

Attachments

  • 20181206_102124.jpg
    20181206_102124.jpg
    162.6 KB · Views: 215
OP
N

Nick in WI

Well-known member
Joined
Nov 6, 2012
Messages
129
1% lot size? what about the main building?

By main building I assume you mean the house? Those are a separate set of restrictions. I believe in my municipality With my zoning the cumulative total of all structures can't exceed 8%. With outbuildings you can have no more than 2 and the cumulative total can't exceed 1% of the lot size.

This isn't the case for all municipalities in my area but the vast majority of them have the 1% rule or a chart that mimics it closely.
 

jblnut

ALLIANCE MEMBER
Joined
Jan 17, 2015
Messages
7,068
Location
In the Middle of MN
Boy am I glad that 1% rule doesn't exist here !!

With the barns and sheds I'm at almost 3% coverage on a 60 acre lot spread out over 11 structures.

20' height restriction ?? Are you in city limits somehow or does your county/township just have really strict regulations ??
 
OP
N

Nick in WI

Well-known member
Joined
Nov 6, 2012
Messages
129
Boy am I glad that 1% rule doesn't exist here !!

With the barns and sheds I'm at almost 3% coverage on a 60 acre lot spread out over 11 structures.

20' height restriction ?? Are you in city limits somehow or does your county/township just have really strict regulations ??

I'm about 20 miles outside of Milwaukee. It's very rural here, subdivisions are creeping in it but it's still largely farm country. It is just strict for anything zoned residential, I have the loosest of the residential zoning because of the large lot but it's still pretty strict. If you are lucky enough to have agriculture zoning the restrictions are much more relaxed. My old house was on .8 of an acre and I was allowed 1 outbuilding with no more than 705 sqft, hence the move. I've always been jealous of those of you who are building 2000+ sqft buildings with an acre. I could go another 15 miles further out and have virtually no restrictions but that wasn't something I was interested in doing and definitely not something my wife would go for.
 
To avoid these ads, REGISTER NOW!
OP
N

Nick in WI

Well-known member
Joined
Nov 6, 2012
Messages
129
Today the excavator finished up everything. He and his son started the day by spreading one load of stone to ease the drop off from the existing driveway to the excavated portion and then ran 2 quad axles on rotation dropping loads. Thankfully the quarry is only about a mile away so they were able to turn over as fast as the quarry could get them loaded and out.

After about 10 loads he stopped running the quad and started spreading them out with the dozer and put me to work running the compactor while his son was still running loads. He spread it out on the building pad and then checked it with the laser level while I compacted it. He then leveled it out a bit better with the dozer as I compacted the gravel around the building. After that I compacted the building pad once more and then he back dragged it with the dozer blade to smooth it out. He had me make one final pass with the compactor with the ******** off this time and it was good to go. All said and done it is within an inch of level which is way better than necessary at this point in the process.

At that point there were enough loads to start working on the driveway that runs back to the building. He smoothed it out with the dozer and when I finished up compacting around the building area I followed behind him. We ended the day at 19 loads which was quite a bit less than I was anticipating. The big contributing factor was that the building pad only needed a skim coat of crushed gravel instead of a foot like I was originally planning since there was enough gravel on site to bring up the low end. I still haven't received the final bill but it sounded like it will be quite a bit less than I had budgeted.
 

Attachments

  • 20181211_124156.jpg
    20181211_124156.jpg
    98.3 KB · Views: 217
  • 20181211_113741.jpg
    20181211_113741.jpg
    147.5 KB · Views: 204
  • 20181211_103401.jpg
    20181211_103401.jpg
    144.4 KB · Views: 215
  • 20181211_075528.jpg
    20181211_075528.jpg
    150.7 KB · Views: 212
  • 20181211_075424.jpg
    20181211_075424.jpg
    153.3 KB · Views: 206
Last edited:
OP
N

Nick in WI

Well-known member
Joined
Nov 6, 2012
Messages
129
Completed Building pad and driveway. It will really be nice to have the extra space to park and maneuver around.
 

Attachments

  • 20181211_145435.jpg
    20181211_145435.jpg
    130.9 KB · Views: 217
  • 20181211_145402.jpg
    20181211_145402.jpg
    149.2 KB · Views: 214
  • 20181211_145241.jpg
    20181211_145241.jpg
    98.1 KB · Views: 221
  • 20181211_145608.jpg
    20181211_145608.jpg
    147.6 KB · Views: 210
OP
N

Nick in WI

Well-known member
Joined
Nov 6, 2012
Messages
129
So it has been a while since I last updated this because there hasn't been anything going on but today the materials were delivered. The delivery was scheduled a few weeks ago and it worked out great because we had 40 degree weather over the weekend to melt all the snow but today dropped down into the teens so the ground was nice and solid. It would have been a mess if it was delivered yesterday. It's amazing that they fit the entire building on one truck but it worked out well.

20190205_084203_resized.jpg20190205_094632_resized.jpg

The start date is still up in the air because I'm having Walter's bring in their digger truck since it is only slightly more expensive than renting a skid loader/auger and the frost is pretty deep right now. I think we're shooting for early next week sometime.
 

Pronk

Member
Joined
Feb 6, 2019
Messages
12
Location
Mechanicsburg, Ohio
Great thread so far, appreciate all the detail and pictures. Looks like you've got a great foundation established

Tough time of year to build up north, but good luck!
 
OP
N

Nick in WI

Well-known member
Joined
Nov 6, 2012
Messages
129
Great thread so far, appreciate all the detail and pictures. Looks like you've got a great foundation established

Tough time of year to build up north, but good luck!

Thanks Pronk! It's funny you mention it, the first half of the winter was perfect. Temperatures were way above average and there was almost no snow but a few weeks before delivery mother nature took a nasty turn. Right now there is a quarter inch of ice covering everything, we'll get through it one way or another might just be take a little longer than hoped.
 
OP
N

Nick in WI

Well-known member
Joined
Nov 6, 2012
Messages
129
Yesterday I got out there, cleared some snow and set up the batterboards and strings. I used a laser level to set the batterboards up at the final finished grade which is 7 inches up from the high spot of the gravel. 7 inches because there will be 2 inches of foamboard and 5 inches of concrete and I don't want to raise the building up any more than it currently will end up.

20190214_140359_resized.jpg

I had to get a little creative with the batterboards in the far corner because I only had 24 inch stakes and really needed 36 inchers but it worked out fine.

20190214_140530_resized.jpg

Once I had all the strings squared up and ready I referenced the plans and listed all of the column location measurements from a given wall. Because the ground was so frozen I used screws to mark the hole locations and ran them in with my impact driver. Then I hit them with a little marking paint so I wouldn't lose them.

20190214_140432_resized.jpg

Tomorrow morning the building supplier is sending out their digger truck to auger the holes. It was only marginally more expensive to have them bring that out than it was to rent a skid loader with an auger and the digger truck won't be phased by the frozen ground.

I will be doing a lot of the work myself and am having a contractor come in to help me get the columns up, trusses on and roof sheets on. From that point on I'll take over. The cost for me to rent a telehandler for a month and do everything myself is more than half the cost the contractor will charge to help me get to the roof stage. As much as I like to do things on my own it just doesn't make sense for this project.
 
OP
N

Nick in WI

Well-known member
Joined
Nov 6, 2012
Messages
129
Today construction officially began. It started off with a load of clear stone to back fill the holes with in case the material removed froze before being back filled. The digger truck showed up shortly after that. The telehandler didn't want to start given the 5 degree temperatures this morning even with ether. We put some jumper cables on it and plugged in the block heater and got it started about 30 minutes behind schedule. Then the telehanlder lifted the auger off of the truck and placed it to mount on the drill.

20190215_095707_resized.jpg

We got started drilling the back wall. The driver would run the auger and then I'd hop in the truck and move it over to the next hole so he didn't have to jump on and off. I'd line him up with the mark and then he would drill down while me and another guy would shovel the fill away.

20190215_101224_resized.jpg20190215_101302_resized.jpg

After the back wall was done the lead guy started setting the columns and plumbing them up.

20190215_123306_resized.jpg

We continued drilling holes along the side wall. It was slow going with all of the frozen gravel but it never hesitated.

20190215_123350_resized.jpg

Luckily the clear stone wasn't needed which made things easier and leaves me with some gravel to fill in low spots in the driveway. By the end of the day we had 22 of the 30 columns set and back filled. Monday the digger truck will return and we'll finish up the rest of them. It's great to finally see progress.

20190215_170545_resized.jpg20190215_170621_resized.jpg
 
OP
N

Nick in WI

Well-known member
Joined
Nov 6, 2012
Messages
129
Woke up today to 6 inches of fresh fluffy snow so before the 2 guys showed up I plowed the driveway and blew off all of the materials. The foreman started the day by setting up a laser level the other guy and I marked off a level line around each of the columns. Then used a story pole to mark the location of each of the girts and got to work nailing them up. About mid afternoon the digger truck showed up and while they continued nailing the girts I shoveled the dirt from around the holes while they were being augered. I'm hoping it doesn't freeze too much before tomorrow when we set the final 8 columns in place. I didn't get any progress pictures but here is where we are at now.

20190218_172138_resized.jpg20190218_172209_resized.jpg20190218_172213_resized.jpg
20190218_172221_resized.jpg20190218_172353_resized.jpg
 

toyoguy81

Well-known member
Joined
Dec 16, 2013
Messages
229
Location
Missouri
Did you use perma-columns or anything like that for the poles in the ground or just traditional treated posts stabbed in the ground and back filled?
 
OP
N

Nick in WI

Well-known member
Joined
Nov 6, 2012
Messages
129
Did you use perma-columns or anything like that for the poles in the ground or just traditional treated posts stabbed in the ground and back filled?

Just traditional treated columns. I debated other options but Walters has a 50 year warranty on their columns and this was obviously the most cost effective way. Since all of the ground here is gravel I'm pretty confident that they will hold up well.
 
OP
N

Nick in WI

Well-known member
Joined
Nov 6, 2012
Messages
129
Not a whole lot to report today. We got to work setting the remaining columns, back filling them and then put the girts on. After that we put in the X bracing and then it was time to clean up. It doesn't seem like much but it all takes time. It's really starting to take shape and look like something.

20190219_171222.jpg20190219_171241.jpg20190219_171316.jpg
 

Duker

Well-known member
Joined
Sep 25, 2010
Messages
10,861
Location
Livingston, TX
Looking good! It’s exciting when it finally begins to take shape....


Sent from my iPad using Tapatalk Pro
 
OP
N

Nick in WI

Well-known member
Joined
Nov 6, 2012
Messages
129
Today we've had snow and freezing rain all day so the crew didn't show up since the next thing to do is swing trusses. I couldn't bring myself to do nothing though so I spent a few hours this afternoon framing out the walk door and one of the four windows. When I made the window box I put a 5 degree pitch on the lower sill so that any water that made it in would drain out. After they were framed out I added the necessary blocking to the outside.

20190220_152600.jpg20190220_152616.jpg
 
OP
N

Nick in WI

Well-known member
Joined
Nov 6, 2012
Messages
129
Today we swung the trusses. Before doing so the header above the side wall door had to be mounted. The foreman left the lift attached so they couldn't move overnight. Still a lot to do but should have the roof on within 2 working days so that I can finally take over.

20190221_171911_resized.jpg20190221_171941_resized.jpg

20190221_172006_resized.jpg20190221_172021_resized.jpg
 
OP
N

Nick in WI

Well-known member
Joined
Nov 6, 2012
Messages
129
The weather has been pretty crummy lately so the crew hadn't been showing up. In the mean time I had been taking care of little things to prep for the roof. Today we finally had a break in the weather and the crew came out and we finished the roof sheeting.

20190228_173633.jpg20190228_173727.jpg20190228_173824.jpg

Now that the roof sheets are on the crew is officially done and finishing off everything is all on me now. It's pretty nice to know that I'll never have to brush snow off my truck again, at least not at home.
 
OP
N

Nick in WI

Well-known member
Joined
Nov 6, 2012
Messages
129
Even though the contractor is done with his portion of the project he was nice enough to allow me use of his lift until he picks it up for the next job. Although I wasn't planning on doing the gable trim and ridge cap until the soffit and fascia was on I figured I should seize my opportunity while I had it since the gable trim would be really tough off of a ladder. I ran the sides of the gable trim long to hide the yet to be installed gutters. I used metal roof sealant on all of the overlapping seams even though everything is "shingled" to shed water.

20190301_091219.jpg20190301_091411.jpg

I ended up with a small gap on the lower end here but I've still got to slide the fascia trim in behind this gable trim so I'll make sure the wood is covered then.

20190301_104529.jpg

I also ran the ridge cap a little long with a point to provide some added protection to the seam directly below it.

20190301_153033.jpg

The roof is now officially complete and the shop has been claimed as a dog house.

20190301_160100.jpg20190301_160208.jpg
 
OP
N

Nick in WI

Well-known member
Joined
Nov 6, 2012
Messages
129
For the past week I've been working on the siding with my father in law. It's been interesting to do without a lift but we're getting done slowly but surely. I set up the laser level and used the receiver with a grade rod to install the base trim so that the sheets would run as smoothly as possible. Before putting the sheets up I would stack them all up and use an awl to punch the holes in the steel sheets. This ensured the screw holes would all run in consistent lines and made it easier to start the screws in the sheets.

We started with the house wrap and wainscot on the back side wall and then installed the windows. I used Zip stretch tape on the sill wrapped around the sides and then Zip flashing tape on the top and sides of the window opening before installing the window with a bead of sealant behind the sides and top of the nailing flange. Then we installed the Z trim above the wainscot, again with the laser level and receiver.

20190307_154356.jpg

The upper sheets ran very well and notching around the windows wasn't too bad. I laid out the windows so they would land in the middle of a full sheet making cutting and handling the sheets much easier.

20190309_133721.jpg

We ran the back end wall wainscoting just the same and got to work on the big sheets. My father in law doesn't do heights at all so it took an interesting setup but this worked out pretty well.

20190312_105112.jpg

Right now the 2 back walls are completed and I've now got to work on trimming out the garage doors before we can continue with the sheeting. I'm a big fan of symmetry and think it looks a little silly having just 1 window on the back end wall but the plan is to have pallet racking to the right of the big overhead door so I chose function over form.

20190312_155905.jpg20190312_155937.jpg

20190312_160040.jpg
 
To avoid these ads, REGISTER NOW!
Top Bottom