To avoid these ads, REGISTER NOW!

Above 1200 Sq/FT T.h.e...e…x….p…..a……n…….s……..i………o……….n

Wokspaces above 1200 squarefeet.

Jwyatt8171

Member
Joined
Jan 9, 2017
Messages
8
Location
Winston Salem, NC
First time reading this thread. Really nice. Subscribed.
I was going to suggest 200amp. The main reason with tomorrows electric cars, and quick chargers in 10 years your going to need 50amps to charge a car.

Good luck with the build.
 
To avoid these ads, REGISTER NOW!

mr47930

Active member
Joined
Aug 11, 2015
Messages
43
Location
Southern Maryland
:beer:
Small world. I live in Calvert, just across the bridge from you. Nice build, would be curious to know what contractor you went with so I know who to call when I start my build!
 
OP
M

MAYOR28

ALLIANCE MEMBER
Joined
Mar 22, 2010
Messages
786
Location
Southern MD
Before they start the roofing, I was considering adding some exhaust vents to the roof for future ideas. One of those ideas is a fume hood of sorts, which vent is the best for something like this?


Just a bathroom style one?

41HmYbIE96L._US500_.jpg


Or a turbine type one?

roof-vent-turbine.jpg


Or something else????


.
 
Last edited:

that-guy

Well-known member
Joined
Sep 6, 2012
Messages
603
Location
NoVA
not the turbine, have one of those on my garage currently and I hate it. am going to upgrade to one of these like I have on my house. its thermostatic, so it cuts on when the attic space gets too hot, but I'm also going to wire it to a switch, so I can override at any time

most important thing is keeping a tight guard on it to stop critters or weather to get into your building. my turbine allows a lot of weather in and is over all noisy when it spins. the first one you posted will allow things to stay out of it, but I assume there isn't a fan inside to pull air out of the building. the one attached creates the best of both worlds
 

Attachments

  • vent.JPG
    vent.JPG
    42.3 KB · Views: 43

Evan(CA)

Banned
Joined
Mar 3, 2013
Messages
996
I think I have decided to have the local electric co-op install 'new' service to the garage to ensure that we have enough power, now and forever. New 200 amp service will cost an additional ~$700 (delta from the house back-feed), but it should ensure that we have more than enough power for any future hopes and dreams.

I have been wrestling with this decision for most of the weekend, I was worried that the electrical company would charge us an extra $20 a month for the second service, but it looks like this is not the case.

100a is way more power than most people realize. You really already have 200 amps of 120v power available since each of the two legs is rated for 100 amps. 240v equipment tends to be more efficient than their 120v counter parts. I know professional cabinet makers with 100 amp services to their shop and run a business out of it without issue. It's your money, do as you please but IMHO you are wasting money on a new 200amp service. On the other hand depending on distance it might be cheaper than trenching to the main service.
 
OP
M

MAYOR28

ALLIANCE MEMBER
Joined
Mar 22, 2010
Messages
786
Location
Southern MD
not the turbine, have one of those on my garage currently and I hate it. am going to upgrade to one of these like I have on my house. its thermostatic, so it cuts on when the attic space gets too hot, but I'm also going to wire it to a switch, so I can override at any time

most important thing is keeping a tight guard on it to stop critters or weather to get into your building. my turbine allows a lot of weather in and is over all noisy when it spins. the first one you posted will allow things to stay out of it, but I assume there isn't a fan inside to pull air out of the building. the one attached creates the best of both worlds
I am wasn't going to get one with a fan, since I will install a 'blower' out of the fume hood. I have an old HVAC blower I intend to repurpose for this task. Should **** the air out of a small rattle can spray booth nicely.

Sent using The Garage Journal mobile app
 
OP
M

MAYOR28

ALLIANCE MEMBER
Joined
Mar 22, 2010
Messages
786
Location
Southern MD
100a is way more power than most people realize. You really already have 200 amps of 120v power available since each of the two legs is rated for 100 amps. 240v equipment tends to be more efficient than their 120v counter parts. I know professional cabinet makers with 100 amp services to their shop and run a business out of it without issue. It's your money, do as you please but IMHO you are wasting money on a new 200amp service. On the other hand depending on distance it might be cheaper than trenching to the main service.


Okay, well maybe I need to re-think this. I am trying to talk with a family friend electrician back home. Hopefully he can give me a no-bs answer.....
 

that-guy

Well-known member
Joined
Sep 6, 2012
Messages
603
Location
NoVA
100a is way more power than most people realize. You really already have 200 amps of 120v power available since each of the two legs is rated for 100 amps. 240v equipment tends to be more efficient than their 120v counter parts. I know professional cabinet makers with 100 amp services to their shop and run a business out of it without issue. It's your money, do as you please but IMHO you are wasting money on a new 200amp service. On the other hand depending on distance it might be cheaper than trenching to the main service.

this is basically the point I was trying to get at. being just one person 95% of the time, I can't even attempt to run enough stuff to even think about blowing my 100amps

I am wasn't going to get one with a fan, since I will install a 'blower' out of the fume hood. I have an old HVAC blower I intend to repurpose for this task. Should **** the air out of a small rattle can spray booth nicely.

Sent using The Garage Journal mobile app

understood, just putting in my .02 on the matter. I may put a small blower around my welding table for a future garage, as now the fumes just cloud the whole garage at times
 
OP
M

MAYOR28

ALLIANCE MEMBER
Joined
Mar 22, 2010
Messages
786
Location
Southern MD
this is basically the point I was trying to get at. being just one person 95% of the time, I can't even attempt to run enough stuff to even think about blowing my 100amps


understood, just putting in my .02 on the matter. I may put a small blower around my welding table for a future garage, as now the fumes just cloud the whole garage at times

I appreciate it. I think I am getting to the same realization, just takes my thick skull a while to get there......:lol_hitti
 

that-guy

Well-known member
Joined
Sep 6, 2012
Messages
603
Location
NoVA
I appreciate it. I think I am getting to the same realization, just takes my thick skull a while to get there......:lol_hitti

I remember the back and forth's we had about these kinds of discussions. pretty sure our office mates were tired of hearing it after a while hahaha
 
OP
M

MAYOR28

ALLIANCE MEMBER
Joined
Mar 22, 2010
Messages
786
Location
Southern MD
For the wall coverings, above the 'power rail,' I will (most likely) use plywood. I like the versatility of just hanging anything anywhere, the ease of installation, and the price. I am not sure what thickness to use (suggestions appreciated), but was considering 1/2" or 5/8". I plan on painting with high-gloss white.

I have been trying to decide how to avoid the minutely noticeable cracks between the plywood panels. However, today I had a realization, why not accentuate the 'cracks,' so not I am considering chamfering all of the edges so that the edges are more pronounced. Basically making the panels all look like industrial exterior paneling. Thoughts?


Shown below are a few of the paneling options. I like Option A the best, but am not opposed to Option B.

Option A:

attachment.php


Option B:

attachment.php


Option C:

attachment.php
 

Attachments

  • GARAGE_WALL_PLYWOOD_A.jpg
    GARAGE_WALL_PLYWOOD_A.jpg
    16.7 KB · Views: 1,161
  • GARAGE_WALL_PLYWOOD_B.jpg
    GARAGE_WALL_PLYWOOD_B.jpg
    16.2 KB · Views: 1,166
  • GARAGE_WALL_PLYWOOD_C.jpg
    GARAGE_WALL_PLYWOOD_C.jpg
    16.3 KB · Views: 1,165

GrantT

Active member
Joined
Jan 11, 2013
Messages
44
Location
Northumberland, UK
Great looking project!

For your paneling I really like option B, there's a TV show in the UK called Grand Designs which follows people building unique houses and one this season had someone do the exact same thing in their house, however they used a very small shadow gap around each one rather than a chamfered edge, makes for a very sleek looking install

Option B:

attachment.php
 

wasfast

Well-known member
Joined
Apr 10, 2014
Messages
874
Location
San Diego CA
If you plan on painting the plywood with high gloss white, you're in for some work if you expect it to be glass smooth. 1/2" is enough if you have straight framing (no bowed studs). You may consider something with either a veneer or perhaps a pre-finished panel if you're going to spend the money for plywood. It's expensive either way compared to drywall.
 
OP
M

MAYOR28

ALLIANCE MEMBER
Joined
Mar 22, 2010
Messages
786
Location
Southern MD
If you plan on painting the plywood with high gloss white, you're in for some work if you expect it to be glass smooth. ........ ........ It's expensive either way compared to drywall.

I don't expect it to be glass smooth, just a little easier to wipe spider webs off. :thumbup:


Everything I have read has said that plywood was a cheaper option than drywall. Drywall is cheaper per sheet, true, but the installation cost (or time, which =$$ to me), is much higher.

A local (trustworthy) contractor (friend) told me it costs $15-$20 a sheet for hanging, mudding, & taping labor. Add that to the cost of the sheet $10-$15 each, and you are more than sanded plywood.
 

Theruse

Well-known member
Joined
Aug 12, 2012
Messages
341
Location
Maryland
First time reading through your whole thread. i will be starting the same process this winter here in the "Republic" of Montgomery County. Our coding requirements are stricter than St. Marys. BTW, great thread.

A few quick questions. Did you consider poured concrete vs cinder block. My build will be below grade for the first 5ft. (I have a 5ft retaining wall and the garage will be beyond the wall. So either way, I will need 5 feet of concrete or cinder block. Not sure which is less expensive. Second question. I noticed you set the threaded studs into the block to secure the baseplate. How did they raise the finished wall over the stud?

Just heard on the news last night that since April Maryland has had only 5 weekends without rain!!!
 
OP
M

MAYOR28

ALLIANCE MEMBER
Joined
Mar 22, 2010
Messages
786
Location
Southern MD
First time reading through your whole thread. i will be starting the same process this winter here in the "Republic" of Montgomery County. Our coding requirements are stricter than St. Marys. BTW, great thread.

A few quick questions. Did you consider poured concrete vs cinder block. My build will be below grade for the first 5ft. (I have a 5ft retaining wall and the garage will be beyond the wall. So either way, I will need 5 feet of concrete or cinder block. Not sure which is less expensive. Second question. I noticed you set the threaded studs into the block to secure the baseplate. How did they raise the finished wall over the stud?

Just heard on the news last night that since April Maryland has had only 5 weekends without rain!!!


Theruse: Greetings from the Great People's Republic of (Southern) Maryland. Yes, the rain has really ruined my build schedule.


I did consider concrete, however, I did not give it a lot of thought since the house is on a block foundation. Block certainly seems to be the norm here for houses without basements. Not really sure why. I was told by a couple people that block was considerably cheaper, I think I paid something like $2.25 per block (laid).

I am no mason or concrete expert, but I think a block wall for 5' feet of dirt would need to be considerably stout, so concrete may be the only option. Have you watched the Essential Craftsman youtube where he installs a retaining wall on his Spec House site? Linky. (if you haven't found this channel, just sit down and watch everything he has produced :thumbup::thumbup::thumbup:


I am curious what codes are stricter up there? (also, it is stupid how greatly things change form County to County; wasn't like that where I grew up)

.
 
To avoid these ads, REGISTER NOW!
OP
M

MAYOR28

ALLIANCE MEMBER
Joined
Mar 22, 2010
Messages
786
Location
Southern MD
Well, I had to light a fire under my contractors' a$$, but it appears that it worked.

It went something like this:

(After no one showed up to work Monday, Tuesday, or Wednesday)

Me: We need to meet Thurs or Fri to discuss getting the garage finished.

GC: I am ******* both those days. You have to understand the weather, blah, blah blah.

Me: Well, I feel like getting the work done is not a priority. No work has gotten done in over 2 weeks.

GC: Let me check with excavator and roofer..........


(and a few text messages later)

GC: I will be there tomorrow morning to finish framing, excavator owner will stop by to see if they can work with the wet ground, roofer will show up around lunchtime to start the roof.

:beer: :thumbup: :beer: :thumbup: :beer:


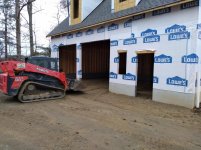
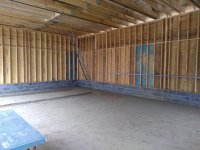
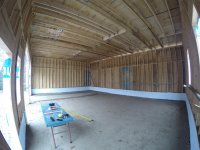
True to his word, he was there Thursday morning before 0700. Roofers showed up at 1130 and the excavator came by around 1300 to start but determined he couldn't work around the roofers. :confused: But they'd be back Friday.

.
 
Last edited:
OP
M

MAYOR28

ALLIANCE MEMBER
Joined
Mar 22, 2010
Messages
786
Location
Southern MD
Roofers didn't mess around. It took them all of 5 minutes to get on the roof!

IMG_20181213_123127_01.jpeg


More pictures to follow.......

.
 
OP
M

MAYOR28

ALLIANCE MEMBER
Joined
Mar 22, 2010
Messages
786
Location
Southern MD
The day after I had "the talk" (via text) with my GC, the ball really started rolling. He showed up before 0700 to finish the framing on the gable soffits and square away a few other roof details before the roofers showed up. He said the roofers would be there around 1200 and he suspected it would take them 4 hours to finish. He wasn't sure if they had enough materials :headscrat, but they would be close. Turns out they need like 2 more bundles.

10 minutes in, all the tar paper is cleanup up and edges polished:

attachment.php


This is also where they told me they were missing nails. Called my GC and he had left them in his trailer. So I ran out and grabbed a box. :thumbup: Good thing there is a decent hardware store nearby, and an 84 Lumber.


1/2 way:

attachment.php


And done!

attachment.php


attachment.php


These guys were fast, efficient, and way safer than I expected them to be. They tied ropes through the ridge, then each one had a climbers harness and a fancy ascender to move around on the roof.

Only thing they didn't get done in 3 hours was the ridge (no vent supplied), and the righ side of the right dormer (not enough shingles). But luckily, my GC showed up the next morning with the goods and knocked it out.


.
 

Attachments

  • IMG_20181213_115630441.jpg
    IMG_20181213_115630441.jpg
    152.2 KB · Views: 1,150
  • IMG_20181213_124709397.jpg
    IMG_20181213_124709397.jpg
    152.6 KB · Views: 1,148
  • IMG_20181213_145944155_HDR.jpg
    IMG_20181213_145944155_HDR.jpg
    154.4 KB · Views: 1,142
  • IMG_20181213_145918804_HDR.jpg
    IMG_20181213_145918804_HDR.jpg
    156.1 KB · Views: 1,144
OP
M

MAYOR28

ALLIANCE MEMBER
Joined
Mar 22, 2010
Messages
786
Location
Southern MD
It was BIG week. The next day the excavator showed up to complete the final grading! They actually showed up the same day the roofers did, but they couldn't really work around the roofers.

More on this tomorrow night, it is getting too late........


But they started with dueling demo saws:

attachment.php


Did all the work with this big boy:

attachment.php


The excavators have been top notch professionals throughout this build. True, they have been the most difficult to schedule, but that must mean they are in high demand. :thumbup:

.
 

Attachments

  • IMG_20181214_074210511.jpg
    IMG_20181214_074210511.jpg
    147.2 KB · Views: 1,148
  • IMG_20181214_151149472.jpg
    IMG_20181214_151149472.jpg
    145.4 KB · Views: 1,143
OP
M

MAYOR28

ALLIANCE MEMBER
Joined
Mar 22, 2010
Messages
786
Location
Southern MD
Since the excavators couldn't work around the roofers, they decided to come back the next day to complete the interior and exterior backfilling and final grading.


Inside getting worked:

attachment.php


Inside done:

attachment.php


As seen in the photo below, we needed to bring the grade up significantly in order to get the into the garage. This was due to a rather severe grade drop off (high side to the right), of nearly 8 inches.

attachment.php


And completed ramp/grade:

attachment.php


.
 

Attachments

  • GOPR6081.jpg
    GOPR6081.jpg
    145.2 KB · Views: 1,082
  • IMG_20181214_124058353.jpg
    IMG_20181214_124058353.jpg
    154.8 KB · Views: 1,084
  • IMG_20181214_151347579.jpg
    IMG_20181214_151347579.jpg
    153.7 KB · Views: 1,087
  • IMG_20181215_125250904.jpg
    IMG_20181215_125250904.jpg
    149.9 KB · Views: 1,083
OP
M

MAYOR28

ALLIANCE MEMBER
Joined
Mar 22, 2010
Messages
786
Location
Southern MD
During the backfilling of the interior, after they had cut in the left trench for the lift area, I talked with the one of the crew and I noticed that the floor was very spongy under the lift area. He agreed that that was no good, told me "it was pumpin', pumpin' real bad" and then promptly dug a giant hole in the middle of the area he had just backfilled.


Problem here:

attachment.php


Just a little deeper:

attachment.php


And all of the dirt that they pulled out of the spongy hole:

attachment.php


Mind you that this was the dirt that we paid extra for, since our original dirt was 'too soft.' :confused: It was wild, the owner of the excavation company stopped by to look, and said that the skid steer (very heavy) running over the patch probably acted to pump to draw water into some of the looser soil. They backfilled the entire hole with 2 truckloads of crushed recycled concrete mix, and not she is Chevrolet (like a rock).
 

Attachments

  • IMG_20181214_131303611.jpg
    IMG_20181214_131303611.jpg
    108.9 KB · Views: 1,101
  • IMG_20181214_134032207.jpg
    IMG_20181214_134032207.jpg
    146.4 KB · Views: 1,088
  • IMG_20181214_131940349.jpg
    IMG_20181214_131940349.jpg
    134 KB · Views: 1,090
OP
M

MAYOR28

ALLIANCE MEMBER
Joined
Mar 22, 2010
Messages
786
Location
Southern MD
I was encouraged to waterproof the block since the rear of the garage would be ever so slightly under grade (about 4") at the top of the concrete. I opted to take care of this before the concrete, since I wouldn't need to worry about getting paint on anything.

A few gallons of Drylok Extreme, and we have this:

attachment.php


Put on 2 coats, over 2 days. Have about 1/3 of the 5 gallons left. This stuff goes on THICK. It was like pancake batter, but still rolled on fine.
 

Attachments

  • GOPR6101.jpg
    GOPR6101.jpg
    147.8 KB · Views: 1,076
OP
M

MAYOR28

ALLIANCE MEMBER
Joined
Mar 22, 2010
Messages
786
Location
Southern MD
And then it rained.


Again..........

attachment.php


attachment.php


But all of the grading seems to work great. The swale in the rear and the driveway grade all filter the water towards the backyard. They put about 6" of fall over 10' on the back and sides. The corner nearest to the road has only 4", to make it the highest point. Seems to work well, but now the driveway is dirty and muddy.........


I had been considering getting the driveway paved as soon as possible. But the excavator and GC recommended I wait until spring. I need to call the paving company......I really don't want to have to deal with recycled concrete for the duration of winter.........:(


.
 

Attachments

  • GOPR6106.jpg
    GOPR6106.jpg
    148.3 KB · Views: 1,077
  • GOPR6104.jpg
    GOPR6104.jpg
    147.7 KB · Views: 1,081

C_F

ALLIANCE MEMBER
Joined
Jan 21, 2005
Messages
9,675
Location
Utah...SNOW BLOWS!
What caused that spongy area inside? I expected to see pooled water or something after he dug it out, but it looks like that wasn't the case. Was it just not compacted well enough?
 

wasfast

Well-known member
Joined
Apr 10, 2014
Messages
874
Location
San Diego CA
It's tough to see in the photos but is the fill inside the garage all gravel or a bunch of the exterior soil. If it's the exterior soil, and wet to boot, I'd not pour the floor. Just my $0.02.
 
OP
M

MAYOR28

ALLIANCE MEMBER
Joined
Mar 22, 2010
Messages
786
Location
Southern MD
It's tough to see in the photos but is the fill inside the garage all gravel or a bunch of the exterior soil. If it's the exterior soil, and wet to boot, I'd not pour the floor. Just my $0.02.
It is all CR6 (or something like that) recycled concrete. With the filings (powder/fines). No exterior soil at all.
 
Last edited:
OP
M

MAYOR28

ALLIANCE MEMBER
Joined
Mar 22, 2010
Messages
786
Location
Southern MD
What caused that spongy area inside? I expected to see pooled water or something after he dug it out, but it looks like that wasn't the case. Was it just not compacted well enough?
I suspect they had some trashy soil in the batch they brought in. Then with all the rain, the block wall kind of turned the inside into a swimming pool repeatedly. All that water had to percolate into the soil, hence it found the trash soil.

I too wondered if there was a spring or something there, but they said they didn't encounter anything while doing the original excavating. Nor did it have anything bubbling up when they dug it out again. In the end he got down to some good soil, and replaced it all with recycled concrete.


.
 
Last edited:
To avoid these ads, REGISTER NOW!
Top Bottom