To avoid these ads, REGISTER NOW!

Joe's Shop Build

OP
J

Joe_K

Well-known member
Joined
Jan 12, 2018
Messages
202
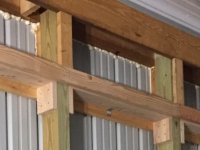
So with doing it the way you have it that makes it structural, Just not load bearing?

Yes, what I consider structural is the posts, which hold up the roof trusses. The bookshelf girts are there to hold the insulation and wall covering. They're not holding the building up, so there's no point in doing traditional framing.
 
To avoid these ads, REGISTER NOW!
OP
J

Joe_K

Well-known member
Joined
Jan 12, 2018
Messages
202
Stronger strength horizontally, especially in high winds.

Yes, that's a bonus. They're surprisingly strong, I can stand on them no problem. Once I hang plywood for the wall covering everything should be tied in nicely.
 
OP
J

Joe_K

Well-known member
Joined
Jan 12, 2018
Messages
202
Following.

I saw your question on how to insulate a pole building. I highly recommend Rockwool, it's easy to cut with an insulation knife. I can already tell a difference standing in the corner that's completely insulated. I can't wait to get the rest installed, work keeps getting in the way.
 

gutted72

Well-known member
Joined
Nov 22, 2012
Messages
266
Location
Jennings, OK
If you don't mind me asking, where did you purchase your rock wool from, and how many did you need of each size?

My pole barn is very close to the same size as yours and it would save me some time in measuring.

Thanks.
 

jvitez

Well-known member
Joined
Nov 30, 2009
Messages
2,429
Location
Big Sky Country, Canada
Great choice on the Rockwool, and excellent build, and trucks! Congrats!

I used Rockwool in 2 buildings and will never go back to fibreglass. It's amazing watching water pour off of it. You do need to wear a dust mask though. It's amazing the amount of black stuff that came out of my nose when I started using it without a mask.
 
OP
J

Joe_K

Well-known member
Joined
Jan 12, 2018
Messages
202
d93fcad74b8373fd950e11de3db4864b.jpg

Woke up early to install some more insulation. Time to go to work.


Sent from my iPhone using Garage Journal
 

Attachments

  • d93fcad74b8373fd950e11de3db4864b.jpg
    d93fcad74b8373fd950e11de3db4864b.jpg
    460.8 KB · Views: 16
OP
J

Joe_K

Well-known member
Joined
Jan 12, 2018
Messages
202
81e5dbc07c521e16c8e21ea6344f4e56.jpgf85dbd88eea516409e37ce9baf0711b2.jpg


Sent from my iPhone using Garage Journal
 

Attachments

  • 81e5dbc07c521e16c8e21ea6344f4e56.jpg
    81e5dbc07c521e16c8e21ea6344f4e56.jpg
    458 KB · Views: 8
  • f85dbd88eea516409e37ce9baf0711b2.jpg
    f85dbd88eea516409e37ce9baf0711b2.jpg
    486.6 KB · Views: 10
OP
J

Joe_K

Well-known member
Joined
Jan 12, 2018
Messages
202
Insulation is done. Time to put up a vapor barrier and install wall covering. Wish I could find sanded 1/2 in plywood for less than $28.50 a sheet.
 

penth2o

Active member
Joined
Dec 18, 2010
Messages
27
Thanks for tagging me Joe.
I’m following you footsteps to the tee only on a smaller scale. Mine is only 32x32.
Couple quick questions.... bear with my terminology as I restore vintage cars and not a builder.

The top large boards where it meets your ceiling...the two 12 inch boards.
Did you put insulation in them and cap them. And also, what is the purpose of adding another board strip just below it.
Thanks. I’ll try to load a pic
 

Attachments

  • B72D4BB1-BC0E-4971-BB2E-C51810D8B76F.jpeg
    B72D4BB1-BC0E-4971-BB2E-C51810D8B76F.jpeg
    22.1 KB · Views: 199

penth2o

Active member
Joined
Dec 18, 2010
Messages
27
This header board.
 

Attachments

  • F78D1670-F4C9-42A3-9AB1-02B3390AD2D5.jpeg
    F78D1670-F4C9-42A3-9AB1-02B3390AD2D5.jpeg
    37.2 KB · Views: 186

gutted72

Well-known member
Joined
Nov 22, 2012
Messages
266
Location
Jennings, OK
I've been meaning to ask, did you have to trim down your 2x6's to match the width of your posts?

And that insulation looks great.
 
OP
J

Joe_K

Well-known member
Joined
Jan 12, 2018
Messages
202
Thanks for tagging me Joe.
I’m following you footsteps to the tee only on a smaller scale. Mine is only 32x32.
Couple quick questions.... bear with my terminology as I restore vintage cars and not a builder.

The top large boards where it meets your ceiling...the two 12 inch boards.
Did you put insulation in them and cap them. And also, what is the purpose of adding another board strip just below it.
Thanks. I’ll try to load a pic

Yes, I filled the header boards with insulation. The top of the boards are covered with cardboard to prevent the ceiling insulation from falling down. Regarding the 2x4 strip, do you see the vertical 12" nailing block? I assume it's a support block for the header. If you have the builder finish your building, they nail 2x4's horizontally on the inside of the posts so you lose 1.5" per wall. I didn't want that, so I put bookshelf girts inside the posts. I put that 2x4 strip so I can step down the wall covering. Hope I explained that well.
 
OP
J

Joe_K

Well-known member
Joined
Jan 12, 2018
Messages
202
I've been meaning to ask, did you have to trim down your 2x6's to match the width of your posts?

And that insulation looks great.

Thanks. I didn't rip the 2x6's. My posts were 5.5", so are the 2x6's.
 
OP
J

Joe_K

Well-known member
Joined
Jan 12, 2018
Messages
202
ac9be520721c43d954bcb41a0eb849c4.jpg6f3db042d83007928b172e7134bec737.jpgdbd859afa3637970102827a5d6c75a73.jpg

I cleaned up a bit tonight.


Sent from my iPhone using Garage Journal
 

Attachments

  • 6f3db042d83007928b172e7134bec737.jpg
    6f3db042d83007928b172e7134bec737.jpg
    489.8 KB · Views: 5
  • ac9be520721c43d954bcb41a0eb849c4.jpg
    ac9be520721c43d954bcb41a0eb849c4.jpg
    562.3 KB · Views: 2
  • dbd859afa3637970102827a5d6c75a73.jpg
    dbd859afa3637970102827a5d6c75a73.jpg
    413.6 KB · Views: 3
To avoid these ads, REGISTER NOW!
OP
J

Joe_K

Well-known member
Joined
Jan 12, 2018
Messages
202
b98278f61844d92389fe659f6c793f61.jpgd8f075f7efe43c79de3f0173111b7dc0.jpg

Cold and windy outside, 73 in the shop. The insulation is paying off.


Sent from my iPhone using Garage Journal
 

Attachments

  • d8f075f7efe43c79de3f0173111b7dc0.jpg
    d8f075f7efe43c79de3f0173111b7dc0.jpg
    307.5 KB · Views: 2
  • b98278f61844d92389fe659f6c793f61.jpg
    b98278f61844d92389fe659f6c793f61.jpg
    451.4 KB · Views: 17
OP
J

Joe_K

Well-known member
Joined
Jan 12, 2018
Messages
202
IMG_3839.jpgIMG_3838.jpg56476980258__37C3EDB4-3120-41DE-A9D7-6E16D452B4D7.jpgIMG_3849.jpg

A little more progress. Vapor barrier and plywood.


Sent from my iPhone using Garage Journal
 
OP
J

Joe_K

Well-known member
Joined
Jan 12, 2018
Messages
202
cb64220cd322107497e7055c941bb859.jpg


Sent from my iPhone using Garage Journal
 

Attachments

  • cb64220cd322107497e7055c941bb859.jpg
    cb64220cd322107497e7055c941bb859.jpg
    439 KB · Views: 18

Andy9743

New member
Joined
Jul 5, 2016
Messages
3
in for updates. love the color and similar to what i have in mind for spring. looks great.
 
OP
J

Joe_K

Well-known member
Joined
Jan 12, 2018
Messages
202
44132689de3551c94c92959a80328f1d.jpg260c5664bfe75bd23bfc97a3d4711925.jpg


Sent from my iPhone using Garage Journal
 

Attachments

  • 44132689de3551c94c92959a80328f1d.jpg
    44132689de3551c94c92959a80328f1d.jpg
    474.6 KB · Views: 18
  • 260c5664bfe75bd23bfc97a3d4711925.jpg
    260c5664bfe75bd23bfc97a3d4711925.jpg
    490.5 KB · Views: 18

C_F

ALLIANCE MEMBER
Joined
Jan 21, 2005
Messages
9,675
Location
Utah...SNOW BLOWS!
Wish I could find sanded 1/2 in plywood for less than $28.50 a sheet.

It's crazy how expensive good plywood is these days! I would have probably gone with MDF board, 'cuz I am a tight *******. :D

Great looking build! When I looked at your first photos of you clearing the ground, it didn't look like the building would be very large. But the shots of the framed building looked a whole lot larger! :thumbup:
With all that insulation, I imagine your building is pretty much draft free, and nice-n-cozy this winter.

Looking forward to your continued progress updates. :)
 
OP
J

Joe_K

Well-known member
Joined
Jan 12, 2018
Messages
202
It's crazy how expensive good plywood is these days! I would have probably gone with MDF board, 'cuz I am a tight *******. :D

Great looking build! When I looked at your first photos of you clearing the ground, it didn't look like the building would be very large. But the shots of the framed building looked a whole lot larger! :thumbup:
With all that insulation, I imagine your building is pretty much draft free, and nice-n-cozy this winter.

Looking forward to your continued progress updates. :)

Thanks, it's a nice tight building now. Two small kerosene heaters bring it right up in the 60's.
 
To avoid these ads, REGISTER NOW!
Top Bottom