To avoid these ads, REGISTER NOW!

ZMotorsports Shop Projects 2.0

Finallygotit

ALLIANCE MEMBER
Joined
Jul 6, 2013
Messages
4,113
Location
Tucson, AZ
I have a confession to make.......

I broke my own cardinal rule when disassembling projects. 🤬

I will ALWAYS make a list of parts as I am tearing a project down so I know I have the parts when the project is going back together. I don't get nearly the shop time I want these days so I schedule my projects and time as efficiently as possible and nothing irritates me more than when I have a project going back together only to find out a small very specific bolt, shim, washer or something more major is holding up the project because of poor execution of my plan. I follow a very strict Seven "P" policy. Proper Prior Planning Prevents Piss Poor Performance. Well, I poorly executed this one.
OMG, Mike is human!!!! :willy_nil

:beer:
 
To avoid these ads, REGISTER NOW!

csp

Well-known member
Joined
Mar 23, 2010
Messages
5,720
Location
Franktown, CO
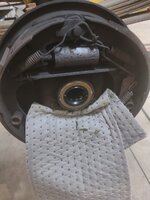
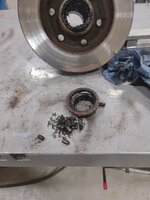
Driver's side bearing as I was removing the seal and bearing. Glad this failed in the shop rather than on the road. I think the cage was barely holding the rollers in the bearing.
k10f2.jpg

.
I have a '73 Super Jeep (CJ5) that I'm restoring and when I first started on the front outers and brakes the left front wheelbearing hub was only being retained by the snap ring on the end of the outer axleshaft. The wheel bearings were mostly gone, the spindle nuts were floating on the end of the spindle (the threads were almost non-existent) and the outershaft had a groove worn in it from bearing weight against the ID of the spindle. I had to replace the spindle, wheelbearing hub, spindle nuts and all of the bearings and seals. I was able to clean up the outer axleshaft enough to keep using it.

Luckily I only drove it onto my trailer at the place of purchase and up my 300' driveway once. It was obvious at that point that there were serious steering and brake issues to deal with.

I love those TruTracs, especially in snow.
 

4 FN 27

ALLIANCE MEMBER
Joined
Oct 19, 2015
Messages
4,635
Location
Minnesnowta
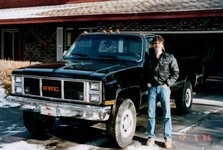
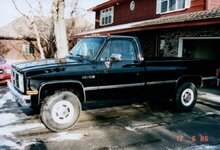
Speaking of Square Bodies. I bought this puppy brand new in Dec 1986. K3500 loaded up with all the options. One of the best trucks I have owned. Wish I still had it today. Ordered it earlier in the fall. The Sticker Price was something like $19K and I got it for $14-15k. I have the Window Sticker tucked away some where.

Bought it from the GMC Super Store when it was owned by Wally McCarthy. Wally stored all his collector cars at our Car Storage business back in the day.

Always took the time to talk with me and always gave me Vehicles at invoice. Great man.

PQTN3085.JPG


BKJM2065.JPG
 
OP
Z

zmotorsports

ALLIANCE MEMBER
Joined
Oct 20, 2009
Messages
21,564
Location
Northern Utah
I have a '73 Super Jeep (CJ5) that I'm restoring and when I first started on the front outers and brakes the left front wheelbearing hub was only being retained by the snap ring on the end of the outer axleshaft. The wheel bearings were mostly gone, the spindle nuts were floating on the end of the spindle (the threads were almost non-existent) and the outershaft had a groove worn in it from bearing weight against the ID of the spindle. I had to replace the spindle, wheelbearing hub, spindle nuts and all of the bearings and seals. I was able to clean up the outer axleshaft enough to keep using it.

Luckily I only drove it onto my trailer at the place of purchase and up my 300' driveway once. It was obvious at that point that there were serious steering and brake issues to deal with.

I love those TruTracs, especially in snow.

Thanks for the story and I too love the TrueTrac's. I have used them in many vehicles over the years, both my own personal ones as well as clients and never had an issue with one. They just flat work and don't require additives or any clutch adjustments over time. Simple and work as designed.
 
OP
Z

zmotorsports

ALLIANCE MEMBER
Joined
Oct 20, 2009
Messages
21,564
Location
Northern Utah
Speaking of Square Bodies. I bought this puppy brand new in Dec 1986. K3500 loaded up with all the options. One of the best trucks I have owned. Wish I still had it today. Ordered it earlier in the fall. The Sticker Price was something like $19K and I got it for $14-15k. I have the Window Sticker tucked away some where.

Bought it from the GMC Super Store when it was owned by Wally McCarthy. Wally stored all his collector cars at our Car Storage business back in the day.

Always took the time to talk with me and always gave me Vehicles at invoice. Great man.

PQTN3085.JPG


BKJM2065.JPG

Awesome truck Pat. My buddies dad bought a new 1986 3500 with the 7.4 liter big block/TH400 combination and had the big hub front outers. His was two-tone charcoal grey and black. He leveled it slightly in the front and ran dish aluminum wheels on it and other than that it was bone stock. Loved that truck. It was like a longer version of my 1984 shortbed that I put the big block/TH400 in to.
 
OP
Z

zmotorsports

ALLIANCE MEMBER
Joined
Oct 20, 2009
Messages
21,564
Location
Northern Utah
Bit more progress on the square body last night.


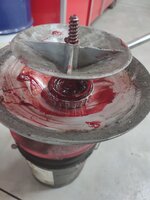
Started by removing the old outer axle seals and bearings. They were actually in decent shape considering how bad the oil was.
k101.jpg

New bearing installed.
k102.jpg

Seal installed.
k103.jpg

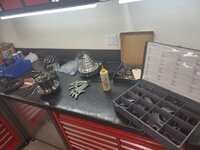
Shim drawer and setup bearings ready along with new ring and pinion and Eaton TrueTrac ready to be assembled.
k104.jpg

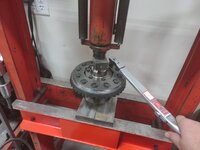
Ring gear pressed onto the new Eaton TrueTrac and bolts with red Loctite being snugged up.
k105.jpg

Ring gear bolts being torqued to spec.
k106.jpg

Thanks for looking.
 
OP
Z

zmotorsports

ALLIANCE MEMBER
Joined
Oct 20, 2009
Messages
21,564
Location
Northern Utah
Love your method of securing the diff assembly to torque the bolts. That's one I'll remember for future use.

Thanks. Yeah, no need to reinvent the wheel here just put some pressure on the carrier and it won't move. A little pressure goes a long way so don't get carried away with too much pressure on the carrier/case. What is even nice is if you have a substantial hydraulic press then you don't even have to hold the press from moving. Mine is quite heavy and solid so I can pull the torque wrench applying anywhere from 60-80 ft/lbs. of torque to the ring gear bolts that press doesn't move. My brother has a smaller Harbor Freight press and when I was helping him with a project last year I had to hold the press from sliding across the shop floor while he was torqueing fasteners.
 
OP
Z

zmotorsports

ALLIANCE MEMBER
Joined
Oct 20, 2009
Messages
21,564
Location
Northern Utah
Got home from work late yesterday and only had about an hour or so in the shop but was able to get the gears mocked up and test fit about 4 times so ready for final assembly.

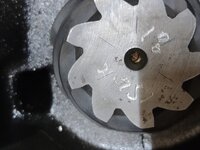
Spicer and Richmond used to engrave the pinion to center line dimension in their pinions but most oversees units these days do not mark them. They rely on you as the installer locating the perfect pinion depth based on tooth pattern readings. Time can be somewhat reduced if you know what the ideal pinion depth is supposed to be right out of the box. This is a Motive Gear set and they engraved the ideal pinion depth on the end of the pinion so that was a nice surprise.
k101.jpg


I have a couple of different pinion depth tools to locate center but sometimes simpler is better. My Kent Moore kit has a lot of pieces and measurements that must be taken and I have used it mostly when a client brought me a bare new housing and we had no starting point. This was more prevalent back in my racing days when a guy would bring me a bare shortened axle housing but I've also done some with Jeeps lately with getting either new Currie or Dynatrac bare housings brought to me.

A simple check is to use a precision ground bar and lay it across the bearing cap parting line as this is the axle shaft centerline. From there measure to the end of the pinion then subtract the thickness of the bar. My first test I used my setup bearings on the pinion with no shims.

That measurement indicated I needed to install the .025" shim that I had removed from the original pinion. This makes perfect sense because from my experience over the past 30+ years of building rear ends, I have found that the machining tolerances and manufacturing tolerances have been so close and held to such tight tolerances that carrier to carrier or ring and pinion to ring and pinion as well as just tearing down to replace bearings that most do not require any alterations or adjustments in very small increments. My experiences has been the bigger differences are in the housings themselves. I have found when working on a particular rear end housing there will be very very small dimensional changes in comparison to when a new housing in introduced into the equation.

Here I am merely using one of my .500 thick parallels from my milling machine as it is a precision ground tool.
k102.jpg


Laying it across the cap separation or parting lines then measuring to the pinion.
k103.jpg


3.251" is what I measured on all three attempts.
k104.jpg


This could easily be done in your head but for demonstration purposes plug that 3.251" dimension into your calculator.
k105.jpg


Measure the bar in which you used for taking the measurement. In this case .500" or 1/2".
k106.jpg


Subtract that .500" from the initial measurement.
k107.jpg


And this is what your measurement reads. This 2.751" is exactly what is engraved in the end of the Motive Gear pinion so it is spot on.
k108.jpg


At this point I went ahead and installed the pinion for the final time as I know the dimension is perfect and no need to test and remove to check for pinion depth like on a non-marked pinion. This is nice but the same results can be achieved by checking pinion depth by contact pattern it just takes a couple of times of installing and removing the pinion to swap shims as indicated by the contact pattern.

I apply a very, very thin layer of grease to hold the carrier shims in place while installing the carrier. This EP-65 grease is extremely tacky and a little goes a LONG way to hold these side shims in place.
k109.jpg


Initial installation of the carrier netted zero back lash so I didn't even put the bearing caps on as it had to come back out.
k1010.jpg


Stay tuned for more pictures.......
 
Last edited:
OP
Z

zmotorsports

ALLIANCE MEMBER
Joined
Oct 20, 2009
Messages
21,564
Location
Northern Utah
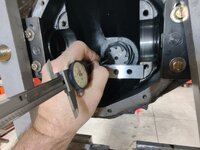
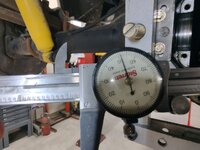
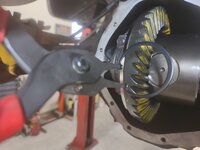
After torqueing the bearing caps on I set up the test indicator and zeroed it out.
k1011.jpg

Landed at a solid .006" backlash. Just a little tight according to the spec's but I like .006" as an overall target.
k1012.jpg

I painted up about a half dozen teeth for a pattern check.
k1013.jpg

This looks pretty good. The pattern face to flank indicates the pinion is centered on the axle centerline, which we set up by dimension and not trial and error on this one. The drive side shows just a hint that maybe a little more backlash would favor a more even contact pattern. This can be misleading at times because there is no torque being applied here. Overall this looks good though.
k1014.jpg

Coast side looks good and centered.
k1015.jpg


While those patterns are perfectly acceptable I think I may upon the final assembly move a couple thousandths from the left side to the right which may add maybe another thou or two to the back lash then check the pattern again.

Thanks for looking.
 
Last edited:

Seagoon

Well-known member
Joined
Jan 23, 2014
Messages
859
Location
Scunthorpe. UK.
Got home from work late yesterday and only had about an hour or so in the shop but was able to get the gears mocked up and test fit about 4 times so ready for final assembly.

Spicer and Richmond used to engrave the pinion to center line dimension in their pinions but most oversees units these days do not mark them. They rely on you as the installer locating the perfect pinion depth based on tooth pattern readings. Time can be somewhat reduced if you know what the ideal pinion depth is supposed to be right out of the box. This is a Motive Gear set and they engraved the ideal pinion depth on the end of the pinion so that was a nice surprise.
k101.jpg


I have a couple of different pinion depth tools to locate center but sometimes simpler is better. My Kent Moore kit has a lot of pieces and measurements that must be taken and I have used it mostly when a client brought me a bare new housing and we had no starting point. This was more prevalent back in my racing days when a guy would bring me a bare shortened axle housing but I've also done some with Jeeps lately with getting either new Currie or Dynatrac bare housings brought to me.

A simple check is to use a precision ground bar and lay it across the bearing cap parting line as this is the axle shaft centerline. From there measure to the end of the pinion then subtract the thickness of the bar. My first test I used my setup bearings on the pinion with no shims.

That measurement indicated I needed to install the .025" shim that I had removed from the original pinion. This makes perfect sense because from my experience over the past 30+ years of building rear ends, I have found that the machining tolerances and manufacturing tolerances have been so close and held to such tight tolerances that carrier to carrier or ring and pinion to ring and pinion as well as just tearing down to replace bearings that most do not require any alterations or adjustments in very small increments. My experiences has been the bigger differences are in the housings themselves. I have found when working on a particular rear end housing there will be very very small dimensional changes in comparison to when a new housing in introduced into the equation.

Here I am merely using one of my .500 thick parallels from my milling machine as it is a precision ground tool.
k102.jpg


Laying it across the cap separation or parting lines then measuring to the pinion.
k103.jpg


3.251" is what I measured on all three attempts.
k104.jpg


This could easily be done in your head but for demonstration purposes plug that 3.251" dimension into your calculator.
k105.jpg


Measure the bar in which you used for taking the measurement. In this case .500" or 1/2".
k106.jpg


Subtract that .500" from the initial measurement.
k107.jpg


And this is what your measurement reads. This 2.751" is exactly what is engraved in the end of the Motive Gear pinion so it is spot on.
k108.jpg


At this point I went ahead and installed the pinion for the final time as I know the dimension is perfect and no need to test and remove to check for pinion depth like on a non-marked pinion. This is nice but the same results can be achieved by checking pinion depth by contact pattern it just takes a couple of times of installing and removing the pinion to swap shims as indicated by the contact pattern.

I apply a very, very thin layer of grease to hold the carrier shims in place while installing the carrier. This EP-65 grease is extremely tacky and a little goes a LONG way to hold these side shims in place.
k109.jpg


Initial installation of the carrier netted zero back lash so I didn't even put the bearing caps on as it had to come back out.
k1010.jpg


Stay tuned for more pictures.......
For some reason the pictures didn't show. I just got k109.jpg or similar. Pictures have shown in every other post of yours so I just wondered if you did something different here.
 
OP
Z

zmotorsports

ALLIANCE MEMBER
Joined
Oct 20, 2009
Messages
21,564
Location
Northern Utah
For some reason the pictures didn't show. I just got k109.jpg or similar. Pictures have shown in every other post of yours so I just wondered if you did something different here.

Sorry about that. Not sure what happened but I reloaded them so hopefully they show up now.
 

Mr.zippy

Well-known member
Joined
Apr 27, 2020
Messages
2,224
Location
Wyoming
I got a kick out of that old calculator......I have one that is of that era. Very simple, not complicated and just will not die!
Thanks for the updates and Merry Christmas to you and your family Mike!
 
OP
Z

zmotorsports

ALLIANCE MEMBER
Joined
Oct 20, 2009
Messages
21,564
Location
Northern Utah
I got a kick out of that old calculator......I have one that is of that era. Very simple, not complicated and just will not die!
Thanks for the updates and Merry Christmas to you and your family Mike!

Yeah, that ole' calculator is about 35 years old. I got it when I worked mixing paint and selling auto parts just before I began my career as an Industrial Maintenance Mechanic and has been used a LOT. It now resides on top of my lathe where it is within easy reach. At the time it was cutting edge being solar and you're right, it won't die. Many things of that era just flat worked as designed and continue to work as designed.

Thanks for following along and a Merry Christmas to you and your family as well.
 
OP
Z

zmotorsports

ALLIANCE MEMBER
Joined
Oct 20, 2009
Messages
21,564
Location
Northern Utah
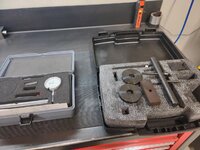
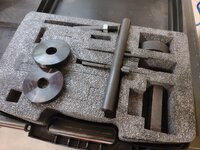
Thought I'd post up a couple pictures of my pinion depth checking tools that I have accumulated over the past several decades. These work well for the intended purposes but also the method above works just as well when it is possible.


The small gray box for kit on the left was the first one I bought. If memory serves this one was bought from Summit Racing. It works well for most GM axles and is a relatively inexpensive kit. I purchased it just as I was opening my speed shop back in 1997~ish and had a lot of rear ends coming into the shop. The kit on the right is a Kent Moore and one that most OEM's use. I bought this kit around 2010 when I was getting deeper in Jeep axles.
kit2.jpg

kit1.jpg

Here is a small adapter that I made for some specific application. Can't remember the exact rear end.
kit3.jpg

The fit and finish of the Kent Moore kit is exceptional. Just what one would expect from Kent Moore however, as they are very high quality tools.
kit4.jpg

I was hoping to get out in the shop and finish up the rear end assembly over the weekend but not sure if that will happen. Also, the owner brought by the new spindle and bearing parts for the front axle night before last as well so I can finish that up but I promised my wife I would relax and enjoy the weekend rather than work.


Thanks for looking and I hope everyone has a very Merry Christmas.
 
To avoid these ads, REGISTER NOW!
OP
Z

zmotorsports

ALLIANCE MEMBER
Joined
Oct 20, 2009
Messages
21,564
Location
Northern Utah
Thank you all for the warm wishes and for following along on my various projects.

It is nice to hear the content is appreciated but ultimately we are all here to learn from one another and I learn as much from you guys as I hope you pick up from following along here.

Thank you and I wish everyone a very happy and prosperous New Year.
 
OP
Z

zmotorsports

ALLIANCE MEMBER
Joined
Oct 20, 2009
Messages
21,564
Location
Northern Utah
Back to our normally scheduled program. I did take some time off to enjoy with the wife and kids but still had work in the shop that I wanted to get done so I could get this square body back to its owner.

Between Christmas Eve and yesterday afternoon I was able to get quite a bit done on the ole' square body Chev.


Christmas Eve I moved a few shims around in the carrier a couple of times and landed at .0065" back lash and a nice wear pattern so time to finish up the axle assembly by installing the axle shafts and diff. cover. Axle shafts installed with C-clips.
k101.jpg


The Eaton TrueTrac uses a pin to keep the axle shafts outboard and the C-clips engaged in their grooves.
k102.jpg


Center pin installed and end cap ready to install over the center pin.
k103.jpg


Retaining ring ready to install over the end cap.
k104.jpg


Differential fully assembled and ready for the gasket and diff. cover.
k105.jpg


Gasket installed.
k106.jpg


Differential cover installed as well as new extended brake line.
k109.jpg


Yesterday I went out and installed the new rear leaf springs and hardware for the lift kit.
k107.jpg


Teaser shot.
k108.jpg


It does need driveshafts as the originals are too short to connect to either the front or the rear axles due to the lift now. That is going to look sharp with that tire/wheel combination at that lift.

New shocks were dropped off last night and hopefully tonight I can start putting the front axle back together and buttoning last details up.
 

HEEP

Well-known member
Joined
Nov 20, 2007
Messages
121
Location
Chattanooga, TN
Mike, that is a good look on that truck. Also, as always, great work on your part. Thank you for sharing and teaching us how to truly do proper work.

Bill
 
OP
Z

zmotorsports

ALLIANCE MEMBER
Joined
Oct 20, 2009
Messages
21,564
Location
Northern Utah
Don’t forget the diff fluid….
(Didn’t see that step on the photo narrative)
The truck is looking great; like the stance.

No differential fluid yet. It's written down on my bench so I don't forget but I'm waiting to get the front axle shafts installed then I'll fill both front and rear at the same time.

Thanks.
 

jbmatth

Well-known member
Joined
Jun 3, 2013
Messages
5,695
Location
Northern Ok.
Mike, you seem to have a cool tool for everything, what do you use to pump in differential fluid? I've just used the cheap plastic hand pumps from the parts stores but "know" you have a much cooler solution. Oh and I've got to fill a trans and diff in the next few weeks so why not take the opportunity to get something better.

JB
 
OP
Z

zmotorsports

ALLIANCE MEMBER
Joined
Oct 20, 2009
Messages
21,564
Location
Northern Utah
Mike, you seem to have a cool tool for everything, what do you use to pump in differential fluid? I've just used the cheap plastic hand pumps from the parts stores but "know" you have a much cooler solution. Oh and I've got to fill a trans and diff in the next few weeks so why not take the opportunity to get something better.

JB

JB, sorry to disappoint ya. Nothing too awfully cool. I do have the Mityvac pressure pump that I have used on occasion for hard to fill components but it is kind of a PITA to clean afterwards so I weigh the options carefully before grabbing that and dumping in the fluids. I also have a large syringe type of canister (looks like a grease gun without the hand pump) for smaller projects. It is also a pain to clean from one type of fluid to another so I use it wisely as well. For fluid extractions I have a very nice shop air powered fluid extractor that has about a 5-gallon tank that works great with various attachments. I bought it years ago when I was working on those toys that float.

For axles I generally pour straight from the bottle. I do have a couple of various spouts and spout adapters that have hoses on them that I have made over the years to make the task less messy and easier but that's about it, nothing special in this scenario.
 
OP
Z

zmotorsports

ALLIANCE MEMBER
Joined
Oct 20, 2009
Messages
21,564
Location
Northern Utah
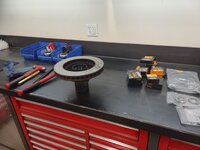
Only had about an hour or so last night to work but got all of the front outer axle parts ready for assembly.

Drove the old races out of the hubs, cleaned the hubs and reinstalled the new races.
k101.jpg

New spindles cleaned and ready to accept the inner bearings.
k102.jpg

New bearings, races and lock nuts ready.
k103.jpg

Grabbed my old Alemite bearing packer. Bought this about 20+ years ago and it has packed a **** ton of bearings over the years. Between front axles and trailer bearings it seems like this bearing packer was getting used several times a month. Now it has been several years since I have used it.
k104.jpg

It sure makes short work of packing bearings though.
k105.jpg

Races installed, bearings packed, inner bearings installed, seals installed and outer bearings packed and ready for installation.
k106.jpg

Moving over to the press to install the inner bearings in the spindles.
k107.jpg


One down, one to go.
k108.jpg

Installing the seals after packing the bearings with grease.
k109.jpg

Seal between the knuckle and spindle prepped and ready for installation.
k1010.jpg

That should be all of the front hub parts ready for installation.
 

OutlawDrifter

Well-known member
Joined
Jan 20, 2015
Messages
3,915
Location
KS
Mike, we had a large bearing packer at my last job, for doing big AG bearings on spindles. Sure made short work of it.

At home my stuff still gets the old fashioned "palm pack", my grandpa taught me how 30 years ago...always brings back a good memory when I do it!
 
To avoid these ads, REGISTER NOW!
Top Bottom