To avoid these ads, REGISTER NOW!

What did you do "IN" your garage today?

To avoid these ads, REGISTER NOW!

rayra

Well-known member
Joined
Dec 1, 2014
Messages
4,724
Location
Escaped from Los Angeles
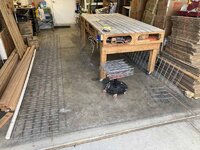
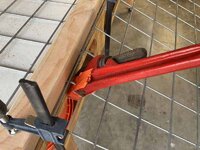
Did some mesh bending tests late this afternoon for the gabion baskets, mixed results. I'm probably going to have to buy a 3-4' black iron pipe and notch it very near the end to use as a bending handle. The giant pipe wrench sort of works but not enough clearance for its giant head, I'm wrecking the side of my workbench just making slight bends.
But the technique / idea is working overall. I need to bend it a full 90 but cannot. At most maybe a 30deg bend before I have to bend the other side. Then I'll have a really laid open \_/ shape. THen maybe I can flip it over and clamp the bottom to the table again and bend the sides inward with a lifting motion instead. AND due to the nature of the mesh, the bends have to be in small increments. 22LF of wire panel, a 6ga wire every 4", 7-10 bends of each wire, x two sides. That's 2500 bending motions. Yeesh
The 6' piece is longer than the distance between the table legs or I could bend it all way under the table. And I still have a 16'L piece that has to be bent as well.

Bending overall probably wasn't a good idea. I should have just diced the panels into their flat plane constituent parts and hog-ringed everything together. As it is now I have cut them down for bending and pretty much have to press on with bending, or else I need to spend another $130 to get another 16'L panel home.
 

Attachments

  • sparta gabion 026 small rock.jpg
    sparta gabion 026 small rock.jpg
    104.7 KB · Views: 125
  • sparta gabion 027 mesh bending.jpg
    sparta gabion 027 mesh bending.jpg
    89.5 KB · Views: 57
  • sparta gabion 028 mesh bending.jpg
    sparta gabion 028 mesh bending.jpg
    108.2 KB · Views: 42
  • sparta gabion 029 mesh bending.jpg
    sparta gabion 029 mesh bending.jpg
    68 KB · Views: 41

Mikeske

Well-known member
Joined
Apr 28, 2017
Messages
2,131
Location
Washington State
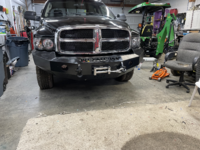
I ordered driving lights and a couple D-ring shackles Saturday and they came in. I also decided to pick up a wireless remote for the winch as the control box is below and behind the winch and the wired remote is hard to plug in at the location the control box. So I set about installing the items that arrived today. First was install the receiver box for the wireless remote and I install it next to the control box. I drilled 4 holes through the bumper and mounted it. I like the wireless remote it means a safer pull away from the cable.

Next up was install the D-rings. I quickly discovered the paint had to be first taken off the the D-rings a wire brushing and clean up the holes in the bumper with a file and they fit in tightly.

Finally to the driving lights I get the lights mounted easily and then I take on the wiring. I already had the switch, relay and high beam shutoff built in the truck and the lights had a complete kit with all the components. I chopped the wiring for the lights off at the red and black wires for the lights toss the **** splice and wired the lights into the factory driving light system. Then get the shrink wrap and soldering iron and soldered and wrap and protected the wiring.

I think I am done for a while on the used steel bumper project for nowtempImageJSHkaE.pngtempImageMsgwvE.pngtempImagehMfYTD.pngtempImageDF4nMl.png
 
Last edited:

kaymccampbell

Well-known member
Joined
Feb 27, 2015
Messages
29,608
Location
Upstate New York
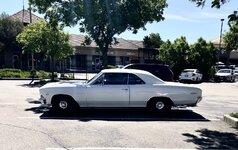
Took off the front bumper on the chevelle. I didn’t like the way it fit, working on getting it to align better. It may be a slightly bent bracket, slightly bent bumper (very subtle) and/or the bumper filler panel is slightly beat up too. Combination of all those make it look like it doesn’t fit correctly.
I was reading that as Chevette, and wondering WTF you'd care.
 

Reata210

Active member
Joined
Dec 8, 2020
Messages
42
Location
Home
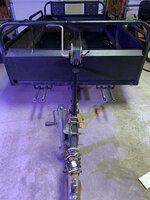
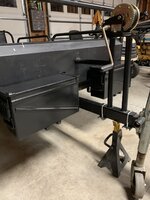
Welded on 1 inch tubing to mount 20mm ammo cans on my utility trailer.
 

Attachments

  • 8B3AC221-FC61-4203-AAA3-E4422B76515E.jpeg
    8B3AC221-FC61-4203-AAA3-E4422B76515E.jpeg
    288.7 KB · Views: 92
  • 7D984286-937F-4169-95AA-BB496557A87D.jpeg
    7D984286-937F-4169-95AA-BB496557A87D.jpeg
    343.8 KB · Views: 73
  • B8EABCBC-7AFD-4D16-B3EA-133B1D9030C3.jpeg
    B8EABCBC-7AFD-4D16-B3EA-133B1D9030C3.jpeg
    327.2 KB · Views: 75

619DioFan

Well-known member
Joined
Apr 9, 2013
Messages
3,617
Location
San Diego , Ca.
Did some mesh bending tests late this afternoon for the gabion baskets, mixed results. I'm probably going to have to buy a 3-4' black iron pipe and notch it very near the end to use as a bending handle. The giant pipe wrench sort of works but not enough clearance for its giant head, I'm wrecking the side of my workbench just making slight bends.
But the technique / idea is working overall. I need to bend it a full 90 but cannot. At most maybe a 30deg bend before I have to bend the other side. Then I'll have a really laid open \_/ shape. THen maybe I can flip it over and clamp the bottom to the table again and bend the sides inward with a lifting motion instead. AND due to the nature of the mesh, the bends have to be in small increments. 22LF of wire panel, a 6ga wire every 4", 7-10 bends of each wire, x two sides. That's 2500 bending motions. Yeesh
The 6' piece is longer than the distance between the table legs or I could bend it all way under the table. And I still have a 16'L piece that has to be bent as well.

Bending overall probably wasn't a good idea. I should have just diced the panels into their flat plane constituent parts and hog-ringed everything together. As it is now I have cut them down for bending and pretty much have to press on with bending, or else I need to spend another $130 to get another 16'L panel home.
Is that a standard 16 foot x 50 inch cattle panel ? 130 bucks ? around me they are 30.00 at tractor supply. you should get some 2x2 angle iron and fab up a bending brake. lots of vids on youtube how to make one.
 

Old Man Roger

Well-known member
Joined
Apr 6, 2017
Messages
17,808
Location
Palm Coast Florida
Took off the front bumper on the chevelle. I didn’t like the way it fit, working on getting it to align better. It may be a slightly bent bracket, slightly bent bumper (very subtle) and/or the bumper filler panel is slightly beat up too. Combination of all those make it look like it doesn’t fit correctly.
Pics of the Chevelle please! Love a 66.
 

rayra

Well-known member
Joined
Dec 1, 2014
Messages
4,724
Location
Escaped from Los Angeles
Is that a standard 16 foot x 50 inch cattle panel ? 130 bucks ? around me they are 30.00 at tractor supply. you should get some 2x2 angle iron and fab up a bending brake. lots of vids on youtube how to make one.
cattle and hog are $32+. 4" pattern 'utility' panel is $72. I have to rent a 12' open trailer to get the panel home. $42.
I'm familiar with press breaks, I have a small one for other uses. I have a 22' wall basket to make. 16' piece + 6' piece. Don't have the space or budget to make a 16' break, especially not for a one-time use. So I'm experimenting on the 6' piece, for a method that will let me bend a 16' piece on top of an 8' work table.
 

ycgoat

Well-known member
Joined
Mar 28, 2020
Messages
971
Location
S.E. Va
Well I saw the dog catch a roof rat, so I cut up some 2" PVC for some hopefully dog proof bait traps. Thought I was going to install my new Stedlin air hose fittings but my reel hose end is 3/8" and the new fitting is 1/4", so that is stalled until I get an adapter.
 

LeonardY

Well-known member
Joined
Apr 16, 2011
Messages
5,092
Location
Southern California
Tried to figure out what was wrong with the paper shredder. Couldn't figure out why the motor continued to run at slow speed after it should have shut off.
Got it apart except for one screw. Broke the plastic boss. Fixed the boss with a brass tube.
Cleaned it and couldn't figure out what was wrong.
Put it back together.
Done. Cured me of ever wanting to fix it again.
 

Boilerhouse

Well-known member
Joined
Mar 20, 2012
Messages
1,321
Location
Muskoka
Not a damn thing. Spent too much time tracking down a dead critter under the house.

Spoiler alert. Didn’t find it. Now it smells like absolute death in half the house when the HVAC is running. So I’m thinking it’s in the ductwork somewhere. I inspected the ductwork and besides old repairs and old breaks, there’s no new signs of entry. At least not for anything big enough to smell THIS bad!

Some of my shipment arrived today (shop towels). Waiting on a replacement hub bolt to arrive as well as more anti seize and blue loctite. (Blue loctite for hub bolts and anti seize for hub mating surfaces). Apparently I am out of both? Can’t find either bottle. Either I’m out, or those were taken too when they stole from me. But what odd **** to steal!
I tore my oil furnace half apart, finally discovering dead moussy right by the air filter, which is the lowest part of the system. So, the proper way I should have done this is; remove filter, pull dead mouse out with a hook.
 

Magnum440d100

Well-known member
Joined
Dec 2, 2018
Messages
3,581
Location
Indiana
I tore my oil furnace half apart, finally discovering dead moussy right by the air filter, which is the lowest part of the system. So, the proper way I should have done this is; remove filter, pull dead mouse out with a hook.
On mine, the filter is the highest part. I’ve checked and rechecked.

The smell only comes out on the half of the house that there is ductwork under the house in the crawl space that connects the two halves of the house. The main part of the house where the furnace is and where the ductwork directly connects to the furnace, does not smell.

I know there is a break in that duct work under there. I shoved the 2 halves together and secured it. But there is no evidence of it being disturbed. I also know that the ductwork is not air tight. And that a critter could have gotten in ANYWHERE.

I’m just gonna have to let it smell and wait for it to get better. Or tear out every piece of ducting under the house :/

As far as what I did in the garage today? I got the truck mostly back together. I’m still waiting on the ONE hub bolt. And NOW, a caliper bolt snapped. FFFFFUUUUUUUGGG ME! So now I’m going to order new caliper bolts. I found one that works, but isn’t correct (it’s Philips head vs hex). It’s the only thing I had in the correct thread length and pitch.

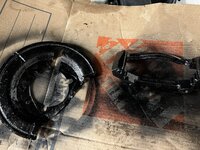
Before I assembled anything though, I chased threads, I wire wheeled EVERYTHING I could. Got the hub painted, dust shield painted, caliper bracket painted. I know it’s futile, but I want to try to stave off rust for a bit longer.

I was watching an Eric-O(?) video where he anti seized the hub bore and said “the next guy will thank you!” And here I’m thinking, the last guy didn’t do this for me! Why should I do it for him! Then I remembered. I’m wanting to keep this truck for a LONG time. As long as the rust will allow me! So. I AM THE NEXT GUY! Hahahaha So I put anti seize lol
 

Attachments

  • C3075A52-CD6C-4245-A201-E7994A00F154.jpeg
    C3075A52-CD6C-4245-A201-E7994A00F154.jpeg
    530.7 KB · Views: 54
  • EDE5690C-01D2-4871-9F04-37E2C29F840D.jpeg
    EDE5690C-01D2-4871-9F04-37E2C29F840D.jpeg
    581.2 KB · Views: 43
To avoid these ads, REGISTER NOW!

kaymccampbell

Well-known member
Joined
Feb 27, 2015
Messages
29,608
Location
Upstate New York
Modified the mortiser to cut further into a board. Made a second handle, so I can cut a mortise in sheet goods or wide boards. Mortised a few holes in a wide maple board for a friend. Fitted gas lifts to the jointer, so it swings up under power. Fixed the jointer blade guard, so it actually guards.
 

rayra

Well-known member
Joined
Dec 1, 2014
Messages
4,724
Location
Escaped from Los Angeles
Got some materials today to make come concrete casting molds for capstones for the patio walls. That starts in about a month.
I also got a length of black iron pipe and ground a notch in the side of it very near the end of the pipe to use as a bending tool for my gabion wire mesh project. It worked well enough be the whole process was going to be lengthy and complicated so ultimately today I dragged the wire panels into the driveway and diced them up into flat planes to make the cages. Will be putting them together with hog rings Thu/Fri.

Also got the 19'L pergola crossbeam stiched together. Took a lot of fiddly shim work to get the two 10'L halves aligned with each other, before driving the 8 big screws thru the glued half-lap joint. Probably finishing the pergola project tomorrow afternoon.
 

Attachments

  • sparta gabion 030 mesh bending.jpg
    sparta gabion 030 mesh bending.jpg
    44.3 KB · Views: 74
  • sparta gabion 031 mesh bending.jpg
    sparta gabion 031 mesh bending.jpg
    77.8 KB · Views: 52
  • sparta gabion 032 mesh diced.jpg
    sparta gabion 032 mesh diced.jpg
    73.8 KB · Views: 42
  • sparta gabion 033 mesh diced.jpg
    sparta gabion 033 mesh diced.jpg
    95.6 KB · Views: 44
  • sparta pergola beams 89 19ft.jpg
    sparta pergola beams 89 19ft.jpg
    63.4 KB · Views: 44
  • sparta pergola beams 90 glued and screwed.jpg
    sparta pergola beams 90 glued and screwed.jpg
    69.6 KB · Views: 63

bugnut

ALLIANCE MEMBER
Joined
Jul 14, 2012
Messages
3,995
Location
Central Ohio
Had a "hand me up" snow blower. Received from the daughter when they upgraded to electric. Knew nothing more than that. Tried to start when the snow piled up a couple days back. Jerked the string and absolutely nothing. So I started by checking spark, looked good, on to the gasoline, which is the most likely suspect. Low and behold a couple major deposits plugging the orifices. Twenty minutes in the ultrasonic with simple green and cleared out, reinstalled and ran through the tank of gas that was in it. Ready to go! Bring on the snow!!!
 

Attachments

  • 20220222_123043.jpg
    20220222_123043.jpg
    263.2 KB · Views: 54
  • 20220222_130128.jpg
    20220222_130128.jpg
    203.8 KB · Views: 70

HPRifleman

Member Emeritus
Joined
Nov 18, 2019
Messages
767
Location
Wayne, IL
Put the Corvette up on jack stands for the first time. It was a little nerve-wracking as I had to lift one side of the car, put two stands under, then lift the other side. Finding a place where the contour of the frame roughly matched the cradle of the jack stand didn't make the job any less stressful.
 

Magnum440d100

Well-known member
Joined
Dec 2, 2018
Messages
3,581
Location
Indiana
Zip. Zilch. Nada.

Had work to do inside. Shoved the shop vac hose through as much of the vents as I could. Whatever I did, it no longer smells like death in here. But there’s nothing dead in the shop vac. Nor remnants (fur/flesh/bones). Unless I’ve become nose blind? Might head out to the shop in a few to do some work on the Dakota. Got the drivers heat shield on, but was a ******* for 2 reasons. When I bought new nuts, I bought 4. Each manifold takes 4 lol. And when I put the passenger side manifold on, I installed the studs in every hole. I couldn’t find the bolts for the middle available. I bought bolts for it the other day ago, but have to head to the hardware store yet AGAIN for 4 more nuts, then pull the studs out of the middle cylinder and put bolts it. Reason I put studs in every hole, is that at that time, heat shields were not available. I checked Rockauto, eBay, Oreillys and such, dealer, etc and heat shields were just not available. I forget why. But I know had they been, I would have put them on.

That’s a next weekend project lol.
 

NUTTSGT

Super Moderator
Staff member
Joined
Sep 14, 2009
Messages
51,109
Location
Northern Central Ohio
I wheeled the air compressor out to fill up my wife's car tires.... Again.

I need one of the 6x6 army vehicles with auto tire inflate for her. Haha. Just kidding, but it's weird that her right front tire always gets low and it does not follow the tire during rotations. It's consistently the right front.
Ford with alloy rims ?
 

Outlawmws

Well-known member
Joined
Aug 9, 2011
Messages
39,321
Location
The Badlands
Monday I recharged the Dead battery in the Project van (need to find where the drain is...) an chased the battery cover hold down screw threads for the wing screw adn the hole...

Working too many hours to do more than search for the dang lantern fount, now I have the rest of the parts for the franken lantern. EDIT - Found it! Clearly marked box "Project lantern Founts" and not one but TWO! Of course the box wasn't where it should have been...
 
Last edited:

sweetk30

Well-known member
Joined
Jan 2, 2011
Messages
2,306
Location
finger lakes area upstate ,ny
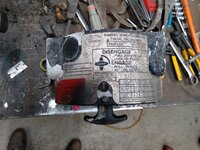
Tore down a ramsey RE- 8,000 12 volt winch . Seal went bad and the 20w non detergent motor oil drained to the worm box .

Looked up the seal and found a double lip seal rated to 50psi for replacement/ upgrade .

Tore it all the way down for a blast in the media box and prep for paint . Then she will be ready for service again .

She was hidding in this bumper since 1994 when installed .
 

Attachments

  • 20220222_163821.jpg
    20220222_163821.jpg
    344.2 KB · Views: 48
  • 20220219_145517.jpg
    20220219_145517.jpg
    621.2 KB · Views: 56

rayra

Well-known member
Joined
Dec 1, 2014
Messages
4,724
Location
Escaped from Los Angeles
Pergola 2nd tier beams are installed. Still need some better chain so I can get the lanterns put back over the table. I also have some plastic terra cotta -looking hanging pots to transplant geraniums into, to hang from the beams.
When I get the grill counter area dug up in the Spring and repurpose some landscape lighting conduit, I'll have some warm electric lights in the inner corners of the beams, centered on the table. Meantime it's 12 huge candles in 3 big lanterns.

Back to the gabion wire cage building.
 

Attachments

  • sparta pergola beams 91 up they go.jpg
    sparta pergola beams 91 up they go.jpg
    62.7 KB · Views: 46
  • sparta pergola beams 92 up they go.jpg
    sparta pergola beams 92 up they go.jpg
    108 KB · Views: 32
  • sparta pergola beams 93 up they go.jpg
    sparta pergola beams 93 up they go.jpg
    109.2 KB · Views: 30
  • sparta pergola beams 94 up they go.jpg
    sparta pergola beams 94 up they go.jpg
    69.4 KB · Views: 30

smackey05

Well-known member
Joined
Oct 21, 2009
Messages
792
Location
Massachusetts
Started shuffling things around for the pending winter storm. It was literally 68 degrees here in Massachusetts today and we will end up with about a foot of snow in the next 48 hours...
 

Outlawmws

Well-known member
Joined
Aug 9, 2011
Messages
39,321
Location
The Badlands
Knocked off a little early and cleaned the worst of the two founts. Measured for parts I need to make/modify...

This will be my stab at an "Apocalypse lantern". It won't be multi fuel , at least at first, but thinking about generators for that...
 
To avoid these ads, REGISTER NOW!
Top Bottom