OP
Nobody-named-Olli
Well-known member
Sounds like my kind of song, yeah. ")
Kind regards,
Olli
Kind regards,
Olli

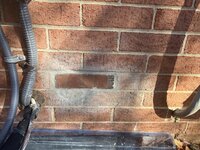
To update my post, I added this to the contractors punch list. He is getting my mother’s house ready to sell since she had to move into a retirement home. He replaced the missing bricks with similiar sized bricks.Olli,
The location is the back of the house, near the AC compressor and in direct sunlight from mid- morning until later afternoon.
It’s a 4” circle opening, so I’m thinking getting some cardboard and mark the circle and see what I can fit with brick pieces. Or I can just fill with mortar mix. I’m not comfortable enough to cut the remaining brick out to replace with full bricks
For some reason, the pic posted sideways.
To update my post, I added this to the contractors punch list. He is getting my mother’s house ready to sell since she had to move into a retirement home. He replaced the missing bricks with similiar sized bricks.


 Maybe the shipping gods have some mercy the second time.


Nice repair!
I had a chuckle reading the spray can.....


Merry Christmas! Fröliche Weihnachten!


 jacksonwheelbarrow.com

Hello Olli !! I’ve read through your thread this morning and have to say I wish I had half the motivation to be as thorough as you are !! Your projects look amazing once completed and should last a long time.I introduced the oil absorbent mat for my workbench in post #45 ( https://www.garagejournal.com/forum...e-recreation-lair.542090/page-2#post-11013010 )
Here’s why I really like that mat and can’t imagine going back to anything else.
Used chainsaw on.
Clean.
Aftermath.
Sweep it all up.
And all that is left is a few stains that are absorbed & dry out in no time and will not transfer.
Reassemble.
Kind regards,
Olli


think I'll have to look that one upApple Music’s “Country Caffeine”
definitely echoing this, good ideaI like how you set up a table where you are working.


Thank you very much @drivesitfar !
Birds: From our research it’s especially sparrows, **** & nuthatches. Especially of the first two we have very many around here.
Winter/ weather: It’s the second day with a high temperature of 18 °C/ 64.4 °F and the last two nights have been double digit as well. Low was 10 °C/ 50 °F.
It’s going to fall very little during the next days, everything is popping in both front and back garden, the air has changed from that crisp winter air to a more “loaded” spring/summer air. It’s not impossible for winter to make a full blown comeback for a day or three, we had one year with a “white easter“ … But as far as I’m concerned, spring has started around here.
December ‘25 and January ‘26 were actually really cold, colder than we normally get. But I think we better get used to these incredible swings.
Now for the product I used. It’s ready to use 1k/ single component mortar in a cartridge, especially made for mortar joint repairs & filling cracks. It’s not for any structural application/ this is not your 2k/ two components injection mortar/cement aka resin anchor. The product can be used in- as well as outdoor. A couple of hours after application its “weathertight“ and continues to cure. It’s not “elastic”.
There are multiple manufacturers offering a product like this, I decided to buy Fischer.
As usual with stuff like this, I start my research with the technical data sheets & safety information and take it from there. Typically it tells you pretty much everything you need to do, what the product can and can’t do.
With products like this the expiration date is of highest importance. It has a shelf life of 12 months, ideally you want to buy & use the product when it has at least another 6 months of shelf life left. Best case is obviously getting fresh stock from within the month that you’re purchasing it, but that rarely works out when buying this by the cartridge off the shelf. It’s also one of the many products that need a powerful press, and you absolutely want to keep all the threads for the nozzle intact when opening, as it requires some real pressure. Slow and steady, I run my Milwaukee M12 caulk gun not higher than “3” for stuff like this. It’s also a good example of where that cartridge knife I have shown before really shines.
Product information in English: https://www.fischer-international.c...ir-ac/534474-repair-ac-dec-cement-grey-310-ml
The big factor here is time. With a product like this a repair like the one I did is a fairly quick and straight forward job. Very clean, easy to do.
I mentioned this before on a different project, I do actually have a mortar press aka grout gun. If I was using that, I would have to first mix the mortar to a suitable consistency, then fill the gun, apply the mortar, and then have an hour of cleaning ahead of me. Mixer, bucket(s), grout gun, spatula for filling grout gun …)
Using such a grout gun makes sense for large jobs or, in case of the lair, were the adhesive/“mortar” product does not exist in cartridges, and if, would also be far too expensive in such small quantities at scale.
One cartridge of the Fischer Repair AC runs ten bucks all incl. - It’s a no brainer for a repair like this.
All that said, in modern buildings you can find very different products for such joints, even paired with classic clinker brick there are plastic/ resin based sealants available that are supposedly more durable and obviously elastic compared to classic mortar.
Kind regards,
Olli