OP

You are using an out of date browser. It may not display this or other websites correctly.
You should upgrade or use an alternative browser.
You should upgrade or use an alternative browser.
Below 265 SQ/FT Nobody’s tool storage, maintenance & recreation lair.
- Thread starter Nobody-named-Olli
- Start date
All workspaces below 265 squarefeet.
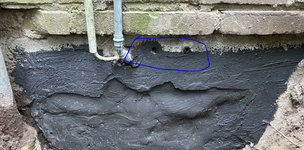
OP
Nobody-named-Olli
Well-known member
OP
Nobody-named-Olli
Well-known member
#Nobody’s Storage (building materials) & Boiler room
1. Small water issue.
1.13 Protective layer, back-filled & finished.
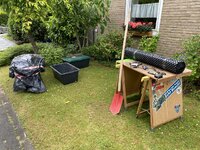
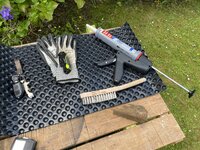
For the last time (for this project), setting up shop.
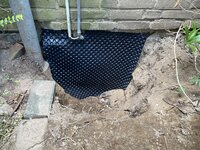
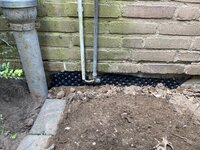
Fitting the protective layer. Those studs are approx. 1cm/ 0.39” and face the wall/ sealant. This way air can circulate/ moisture can dry. If you expect lots and lots of water, you’d install it the other way around, studs facing the soil.
Backfill.
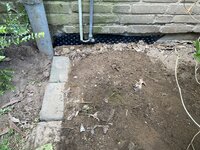
As you can see there is one damaged clinker brick, I found the missing piece and re-installed it.


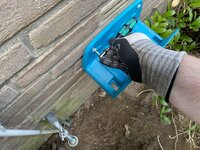
Re-mounting the hose reel.

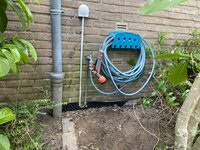
All done.
Thank you for being part of the journey!
Kind regards,
Olli
1. Small water issue.
1.13 Protective layer, back-filled & finished.
For the last time (for this project), setting up shop.
Fitting the protective layer. Those studs are approx. 1cm/ 0.39” and face the wall/ sealant. This way air can circulate/ moisture can dry. If you expect lots and lots of water, you’d install it the other way around, studs facing the soil.
Backfill.
As you can see there is one damaged clinker brick, I found the missing piece and re-installed it.
Re-mounting the hose reel.
All done.
Thank you for being part of the journey!
Kind regards,
Olli
drivesitfar
Well-known member
I’m guessing even though those two holes are above the soil line that you still filled them before finishing the job? Otherwise bugs and spiders and maybe a few other things can get inside your basement.
Very nice work with all the repairs and thought process and especially how you involved your neighbor and dealt with the professionals.
Well done sir!!
Very nice work with all the repairs and thought process and especially how you involved your neighbor and dealt with the professionals.
Well done sir!!
OP
Nobody-named-Olli
Well-known member
Thank you very much @drivesitfar ! Honestly, I didn’t fill the two holes. They go less than 4” into the concrete pad, it’s a dead end. I thought about filling them when I had my mortar mix ready, but then I didn’t want to get my injection gun for this. … And just some putty over it is still just some putty over it. …  Now the protective layer covers them and that’s it.
Kind regards,
Olli
Now the protective layer covers them and that’s it.Kind regards,
Olli
captain14
Well-known member
Olli,Thank you very much @captain14 !
Will you have to match an existing pattern, or will it be covered/cladded?
I had to match an existing pattern & color scheme once, that comes with its own set of challenges. In the end, it takes a bit more time & a little more effort/ attention to detail and then it will turn out great.
Kind regards,
Olli
The location is the back of the house, near the AC compressor and in direct sunlight from mid- morning until later afternoon.
It’s a 4” circle opening, so I’m thinking getting some cardboard and mark the circle and see what I can fit with brick pieces. Or I can just fill with mortar mix. I’m not comfortable enough to cut the remaining brick out to replace with full bricks
For some reason, the pic posted sideways.
Attachments

drivesitfar
Well-known member
I wa concerned that the upper two holes went thru to your basement so it sounds like your repair should work great.
As far as pics it might be your original pic was turned but there is a glitch in posting GJ pics occasionally so hope you figure it out.
As far as pics it might be your original pic was turned but there is a glitch in posting GJ pics occasionally so hope you figure it out.
OP
Nobody-named-Olli
Well-known member
Olli,
The location is the back of the house, near the AC compressor and in direct sunlight from mid- morning until later afternoon.
It’s a 4” circle opening, so I’m thinking getting some cardboard and mark the circle and see what I can fit with brick pieces. Or I can just fill with mortar mix. I’m not comfortable enough to cut the remaining brick out to replace with full bricks
For some reason, the pic posted sideways.
Am I correct in assuming those are non structural/ non load bearing clinker/ clinker bricks?
If so, you can absolutely try to mix & match and fill the circle best as possible. Layout upfront on cardboard will absolutely make your life easier.
Also filling with mortar will work.
You have that definitely covered/ thought through!
If I may, I would still suggest to replace the clinker brick. You don’t really have to cut. You just take a rotary hammer with chipping/ chiseling function and an old 1/4” sds-plus drill bit (maybe with a damaged head/ damaged cutters), with this you can “surgically” chip the mortar away, and you should then be able to take the “damaged” bricks out very easily. Then it’s just a matter of laying down mortar and putting the new bricks in. If I had to guess, I’d say this is going to be more straight forward and easier to pull off than trying to make that circle look nice.
If that is out of question, I’d probably fill it with mortar instead of puzzling brick pieces. Doesn’t seem to be a spot that is easily seen/ catches one eye. So filled is filled.
Kind regards,
Olli
OP
Nobody-named-Olli
Well-known member
#Nobody’s tool storage, maintenance & recreation lair, project workshop & storage/ boiler room.
0. Miscellaneous Stuff
0.1 Fire extinguisher
For many, many years we had a fire extinguisher in the basement, bought from a local fire prevention specialist and we were also signed up to their service/maintenance plan.
At some point the tech explained that - after this last maintenance - he wasn’t allowed to service our old fire extinguisher any longer, as it had reached the end of it’s serviceable life (25 years by law).
We kept that fire extinguisher for a couple of years - I think quite a bit longer than the usual period between two maintenance appointments would have been.
In 2019 I went to that same company to buy a new fire extinguisher but forgot asking about the service/maintenance plan. At home I put it in its place - and thankfully to this day, just like the one before, we never needed it.
A couple of days ago at the gas station one of their techs pulled out of the pump lane next to the one I was driving into. It took me a second, but I then realized it must have been “ages” since we had a tech over for maintenance of our fire extinguisher.
Back home I checked the fire extinguisher and was fairly surprised & shocked to see that it had never been serviced after the initial purchase. Checked the bank account, no payments to that company.
Since it fit my schedule, I took the fire extinguisher to the company for a service/ maintenance this morning, expecting to drop it off and then pick it up another day.
I got lucky, one tech who was there offered to do the service right there on the spot.
So to his car we went and he did the service, which I found interesting since I had never seen that in person. In the past the tech would ring the doorbell, I’d give him the fire extinguisher, and he brings it back a short while later.
So what they do is lock the fire extinguisher in a vise and open it at the silver collar.
Then the whole handle assembly with push button (to charge the fire extinguisher when needed), pressurized container, pipe and hose with trigger simply lifts out.
He tapped that carefully so the bit of powder sticking to that assembly would fall back down into the fire extinguishers body.
Visual inspection.
A tip on the bottom of the pipe that feeds the powder to the hose when charged was replaced.
The pressurized container weighed.
The gasket that sits inside the silver ring and seals against the body replaced.
The tech then asked me if I wanted to have a look at the powder level inside the body. It was pretty low. He then screwed a blind cap on the body, gave it a few taps with a rubber mallet and moved the fire extinguisher around.
The blind cap was unscrewed and he asked me to look again. Now the level of the powder was almost up to the opening. And as if he was performing a magic trick, he put the whole handle assembly back in. And the powder behaved almost like water, no resistance, it simply flowed around the pipe and pressurized container.
Very impressive/ interesting to see this.
When everything was back together, seals proving the service were affixed and that’s it.
He went to the office to get the paperwork done and signed us back up for the service/maintenance plan.
I didn’t take any pictures of the procedure, didn’t want to bother him with that.
Before:
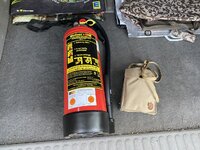
After:
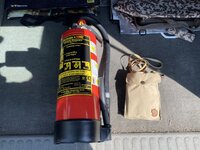


Why am I posting this? If only one person reads this and it served them as a reminder to either get a fire extinguisher serviced, replaced, bought or just to find out that a fire extinguisher believed to be “right there” is actually gone/ broken/ … it’s a win.
Kind regards,
Olli
0. Miscellaneous Stuff
0.1 Fire extinguisher
For many, many years we had a fire extinguisher in the basement, bought from a local fire prevention specialist and we were also signed up to their service/maintenance plan.
At some point the tech explained that - after this last maintenance - he wasn’t allowed to service our old fire extinguisher any longer, as it had reached the end of it’s serviceable life (25 years by law).
We kept that fire extinguisher for a couple of years - I think quite a bit longer than the usual period between two maintenance appointments would have been.
In 2019 I went to that same company to buy a new fire extinguisher but forgot asking about the service/maintenance plan. At home I put it in its place - and thankfully to this day, just like the one before, we never needed it.
A couple of days ago at the gas station one of their techs pulled out of the pump lane next to the one I was driving into. It took me a second, but I then realized it must have been “ages” since we had a tech over for maintenance of our fire extinguisher.
Back home I checked the fire extinguisher and was fairly surprised & shocked to see that it had never been serviced after the initial purchase. Checked the bank account, no payments to that company.
Since it fit my schedule, I took the fire extinguisher to the company for a service/ maintenance this morning, expecting to drop it off and then pick it up another day.
I got lucky, one tech who was there offered to do the service right there on the spot.
So to his car we went and he did the service, which I found interesting since I had never seen that in person. In the past the tech would ring the doorbell, I’d give him the fire extinguisher, and he brings it back a short while later.
So what they do is lock the fire extinguisher in a vise and open it at the silver collar.
Then the whole handle assembly with push button (to charge the fire extinguisher when needed), pressurized container, pipe and hose with trigger simply lifts out.
He tapped that carefully so the bit of powder sticking to that assembly would fall back down into the fire extinguishers body.
Visual inspection.
A tip on the bottom of the pipe that feeds the powder to the hose when charged was replaced.
The pressurized container weighed.
The gasket that sits inside the silver ring and seals against the body replaced.
The tech then asked me if I wanted to have a look at the powder level inside the body. It was pretty low. He then screwed a blind cap on the body, gave it a few taps with a rubber mallet and moved the fire extinguisher around.
The blind cap was unscrewed and he asked me to look again. Now the level of the powder was almost up to the opening. And as if he was performing a magic trick, he put the whole handle assembly back in. And the powder behaved almost like water, no resistance, it simply flowed around the pipe and pressurized container.
Very impressive/ interesting to see this.
When everything was back together, seals proving the service were affixed and that’s it.
He went to the office to get the paperwork done and signed us back up for the service/maintenance plan.
I didn’t take any pictures of the procedure, didn’t want to bother him with that.
Before:
After:
Why am I posting this? If only one person reads this and it served them as a reminder to either get a fire extinguisher serviced, replaced, bought or just to find out that a fire extinguisher believed to be “right there” is actually gone/ broken/ … it’s a win.
Kind regards,
Olli
drivesitfar
Well-known member
It’s the little to do’s that get easily forgotten so thanks for posting this.
On a prior post you did some work around the top of your basement steps. I know it was maybe a quick fix because I might have poured a new 5 inch concrete pad. That said I’ve never seen a mat inset frame before which is pretty cool cause we usually set our mats right on the concrete and it’s almost a trip hazard.
Keep up the great work
On a prior post you did some work around the top of your basement steps. I know it was maybe a quick fix because I might have poured a new 5 inch concrete pad. That said I’ve never seen a mat inset frame before which is pretty cool cause we usually set our mats right on the concrete and it’s almost a trip hazard.
Keep up the great work
Last edited:
OP
Nobody-named-Olli
Well-known member
@drivesitfar Thank you very much!
On the stairs top: If I had the access to our property that many here on GJ have to theirs, there would be a couple of things I would have done different on past projects. But it is what it is, and “pouring” on top of the old pad (that is stable) was the path of least resistance. Especially considering time vs. actual benefit.
If and when the stairs get a makeover, I’ll hire a company anyway - and they can price accordingly for dealing with the ****** access and long wheelbarrow/ mini-dumper runs. I’m not going to take on that myself anymore - for various reasons.
I got a top coat/ concrete floor paint that I will apply to the patch and I think instead of a classic floor mat, I’ll cut a piece of leftover light grid/ grating to size and fit that into the frame/ recess. Easier to clean & won’t wick full of water like a traditional floor mat would.
Kind regards,
Olli
On the stairs top: If I had the access to our property that many here on GJ have to theirs, there would be a couple of things I would have done different on past projects. But it is what it is, and “pouring” on top of the old pad (that is stable) was the path of least resistance. Especially considering time vs. actual benefit.
If and when the stairs get a makeover, I’ll hire a company anyway - and they can price accordingly for dealing with the ****** access and long wheelbarrow/ mini-dumper runs. I’m not going to take on that myself anymore - for various reasons.
I got a top coat/ concrete floor paint that I will apply to the patch and I think instead of a classic floor mat, I’ll cut a piece of leftover light grid/ grating to size and fit that into the frame/ recess. Easier to clean & won’t wick full of water like a traditional floor mat would.
Kind regards,
Olli
Last edited:
OP
Nobody-named-Olli
Well-known member
0. Miscellaneous Stuff
0.2 Cutting discs & “best before” dates
With my recent “floor mat made from grating” I wanted to take the opportunity of using two nearly identical cuts to be made to compare two cutting discs. Mainly because of personal interest.
But first, about the “best before” date. I don’t know if this is a thing with OSHA in North America as well, but In Germany, if you operate commercially and happen to fall under “jurisdiction” of the state owned “Accident Prevention & Insurance Association” (That is also almost generally the case when you are an employee.) you’re bound to their recommendations/rules. One of the many rules is to not use cutting/grinding/(…) discs that have expired/ are past the “best before” date.
The idea behind that is, that the bonding of these discs ages, especially when exposed to moisture and/or sunlight/ heat - thus the risk of these discs disintegrating when used is supposed to be significantly higher with time, improper storage and so on.
I don’t really want to discuss any of that, it’s just one piece to a puzzle, a bit of information for whatever it’s worth.
I generally don’t go through a lot of discs, so I still have a couple of, technically, expired discs. As well as some, again technically, not expired ones.
So here are the contenders.
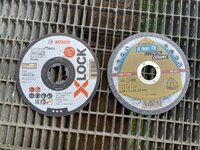
The Bosch is an inexpensive, common cutting disc. The Klinspor a little pricier and said to feature ceramic media.
The Bosch is, technically, expired for two years to date. The Klingspor is good through January, 2027.
The Bosch is made in China, the Klingspor made in Poland.
Per specification both are the same size.
Putting the new/unused Klingspor disc on top of the new/unused Bosch disc, you can see that the Bosch disc is marginally larger.

Doing the same after the first cross cut.

Now the new/unused Bosch discs is clearly visible underneath.
After making the same cut with the Bosch disc and placing it on top of the Klingspor disc.
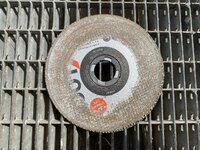
You can now see that the Bosch that started out as being marginally larger than the Klingspor has lost quite a bit more material during that cut. Also the now partly clearly visible webbing/bonding and very rough edge is not going to help with durability.
Now if I hadn’t used the Bosch discs before, when they were, technically, not expired I might have been inclined to say that partly is because of the boding loosing it’s strength/ having aged. But I have seen that before, when the discs were still, technically, not expired - and it’s one reason I switched to the Klingspor discs. (+ they are easy to obtain through one of my suppliers, as I really don’t care much about brands/ I’m not particular to one when it comes to consumables like cutting discs. Also don’t go through a lot of them, so price doesn’t matter at all to me, since with these 1mm cutting discs the difference is marginally in the end.)
I did this out of personal curiosity, not for scientific research. …
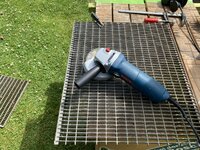
Kind regards,
Olli
0.2 Cutting discs & “best before” dates
With my recent “floor mat made from grating” I wanted to take the opportunity of using two nearly identical cuts to be made to compare two cutting discs. Mainly because of personal interest.
But first, about the “best before” date. I don’t know if this is a thing with OSHA in North America as well, but In Germany, if you operate commercially and happen to fall under “jurisdiction” of the state owned “Accident Prevention & Insurance Association” (That is also almost generally the case when you are an employee.) you’re bound to their recommendations/rules. One of the many rules is to not use cutting/grinding/(…) discs that have expired/ are past the “best before” date.
The idea behind that is, that the bonding of these discs ages, especially when exposed to moisture and/or sunlight/ heat - thus the risk of these discs disintegrating when used is supposed to be significantly higher with time, improper storage and so on.
I don’t really want to discuss any of that, it’s just one piece to a puzzle, a bit of information for whatever it’s worth.
I generally don’t go through a lot of discs, so I still have a couple of, technically, expired discs. As well as some, again technically, not expired ones.
So here are the contenders.
The Bosch is an inexpensive, common cutting disc. The Klinspor a little pricier and said to feature ceramic media.
The Bosch is, technically, expired for two years to date. The Klingspor is good through January, 2027.
The Bosch is made in China, the Klingspor made in Poland.
Per specification both are the same size.
Putting the new/unused Klingspor disc on top of the new/unused Bosch disc, you can see that the Bosch disc is marginally larger.
Doing the same after the first cross cut.
Now the new/unused Bosch discs is clearly visible underneath.
After making the same cut with the Bosch disc and placing it on top of the Klingspor disc.
You can now see that the Bosch that started out as being marginally larger than the Klingspor has lost quite a bit more material during that cut. Also the now partly clearly visible webbing/bonding and very rough edge is not going to help with durability.
Now if I hadn’t used the Bosch discs before, when they were, technically, not expired I might have been inclined to say that partly is because of the boding loosing it’s strength/ having aged. But I have seen that before, when the discs were still, technically, not expired - and it’s one reason I switched to the Klingspor discs. (+ they are easy to obtain through one of my suppliers, as I really don’t care much about brands/ I’m not particular to one when it comes to consumables like cutting discs. Also don’t go through a lot of them, so price doesn’t matter at all to me, since with these 1mm cutting discs the difference is marginally in the end.)
I did this out of personal curiosity, not for scientific research. …
Kind regards,
Olli
Ford52PU
Well-known member
Very interesting. I usually buy whatever is on sale and always use safety protection. I try to use them up as much as possible just because I’m cheap and it makes it a challenge, my go to brand is from Harbor freight. I have had them explode into pieces that will give you a **** puckering feeling for sure.
Enjoy your posts
Thanks
Enjoy your posts
Thanks
OP
Nobody-named-Olli
Well-known member
Ford52PU
Well-known member
Usually its something stupid like I used too much and the edge was fractured then I tried to push a little bit more and then boom.
OP
Nobody-named-Olli
Well-known member
That’s understandable. Thanks for clarifying that for me.
Kind regards,
Olli
Kind regards,
Olli
OP
Nobody-named-Olli
Well-known member
0. Miscellaneous Stuff
0.3 Facing a new reality & “Emergency cabinet“
For a couple of years now this seems to become the new norm.
Hottest day of the year - so far. Exceeding 40 degree celsius on the loggia. Thunderstorms forecasted/ warnings broadcasted for the afternoon.

Lawn looks like this

In between we lost power on and off for about two hours, no cause/ explanation given by now.
Afternoon arrives and paints some beautiful colors, but I already know what that means.

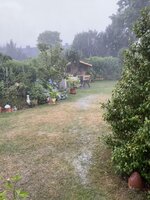
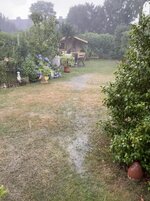
About 15 minutes, give or take, later the lawn looks like this & puddles form. These are stills from a video, because we’ve had damage from these weather events before. Now I always film a short clip so I can show the insurance what went on exactly at/ on our property if necessary/ as a precaution.
It’s also these events, that made me go after the water issues the way I did and have shown here before. Because I know it would have been only a matter of time before it would have come back to bite me during one of these events, if it wasn’t done the right way.

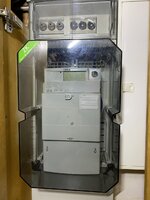
“Emergency cabinet” - Always ready & fully charged work light & drain/sump pump kit.

Tomorrow I‘ll get the pump out and test that it works.
Kind regards,
Olli
0.3 Facing a new reality & “Emergency cabinet“
For a couple of years now this seems to become the new norm.
Hottest day of the year - so far. Exceeding 40 degree celsius on the loggia. Thunderstorms forecasted/ warnings broadcasted for the afternoon.
Lawn looks like this
In between we lost power on and off for about two hours, no cause/ explanation given by now.
Afternoon arrives and paints some beautiful colors, but I already know what that means.
About 15 minutes, give or take, later the lawn looks like this & puddles form. These are stills from a video, because we’ve had damage from these weather events before. Now I always film a short clip so I can show the insurance what went on exactly at/ on our property if necessary/ as a precaution.
It’s also these events, that made me go after the water issues the way I did and have shown here before. Because I know it would have been only a matter of time before it would have come back to bite me during one of these events, if it wasn’t done the right way.
“Emergency cabinet” - Always ready & fully charged work light & drain/sump pump kit.
Tomorrow I‘ll get the pump out and test that it works.
Kind regards,
Olli
drivesitfar
Well-known member
Congrats on getting your repairs in before this storm.
I’m guessing 40 Celsius is about 100 degrees and then rain storm isn’t something we have around here and I bet it was pretty muggy with maybe steam happening in the puddles.
It’s definitely good to be prepared but unexplained power outages are just not something any of us can endure for long periods. When I was in Capetown a few years ago they had scheduled power outages daily called load shetting that was very difficult especially for the business owners who had to shut down sometimes in the middle of the day.
I hope they figure out soon why power outages are happening in Europe or it could put a real damper on any travel plans for everyone.
I’m guessing 40 Celsius is about 100 degrees and then rain storm isn’t something we have around here and I bet it was pretty muggy with maybe steam happening in the puddles.
It’s definitely good to be prepared but unexplained power outages are just not something any of us can endure for long periods. When I was in Capetown a few years ago they had scheduled power outages daily called load shetting that was very difficult especially for the business owners who had to shut down sometimes in the middle of the day.
I hope they figure out soon why power outages are happening in Europe or it could put a real damper on any travel plans for everyone.
OP
Nobody-named-Olli
Well-known member
Let me put it this way @drivesitfar , power outages - like this - are absolutely uncommon and unheard of here - that is until now. And when it happened in the past, maybe once in ten to fifteen years, it lasted from ten seconds to three minutes - until someone from the PoCo noticed it and flicked it back on.
It happened once before to our main feed in ‘23, but the problem was identified and rectified within hrs of giving notice to the PoCo. A very pleasant experience all in all.
What worries me about todays power outage is the fact that it did not last seconds to minutes, but for two hours & with on/off phases in between. And it was not a single feed failing as in our case in ‘23. And I have a suspicion, that it was also not caused by an “excavator accident”, because from the map of the outage I have seen by now, it was a whole part of the city.
And while a two hour power outage is nothing compared to what people in other parts of world go through in that regard, it still simply is a very ugly forecast for the future. This will not get better until it got a lot worse.
Just like our bridges that have been neglected for decades and so many other stuff, it’s all coming back to bite us now.
Kind regards,
Olli
It happened once before to our main feed in ‘23, but the problem was identified and rectified within hrs of giving notice to the PoCo. A very pleasant experience all in all.
What worries me about todays power outage is the fact that it did not last seconds to minutes, but for two hours & with on/off phases in between. And it was not a single feed failing as in our case in ‘23. And I have a suspicion, that it was also not caused by an “excavator accident”, because from the map of the outage I have seen by now, it was a whole part of the city.
And while a two hour power outage is nothing compared to what people in other parts of world go through in that regard, it still simply is a very ugly forecast for the future. This will not get better until it got a lot worse.
Just like our bridges that have been neglected for decades and so many other stuff, it’s all coming back to bite us now.
Kind regards,
Olli
drivesitfar
Well-known member
while power outages are rare here too and mainly caused by weather and trees and limbs falling on above ground lines (usually when it's below freezing temps too for the long outages of more than a few hours or days) we do have the strange ones that happen on a perfectly sunny day that could either be a contractor digging in the wrong place or for some other reason we never hear about. with all the talk and new legal laws trying to eliminate gas cars and turn our part of the world into electric I know our electricity will have more issues. unfortunately it's not the 70's where we didn't depend on computers, cell phones and just about everything so crossing my fingers they don't eliminate the use of natural gas and oil/gas run machines and cars anytime soon. at my age I probably won't get to see it, but I do love our grandkids and would love to leave them a world that functions.
keep doing what you can do to stay ahead of issues as will I.
here's to another grand day on the best side of grass.
keep doing what you can do to stay ahead of issues as will I.
here's to another grand day on the best side of grass.
OP
Nobody-named-Olli
Well-known member
0. Miscellaneous Stuff
0.3 Facing a new reality & “Emergency cabinet“
0.3.1 Pump test
The pump test today was successful. I do think I’m going to get a different hose for the pump, as the textile hose kinks far to easily and is thus not easy to handle/ use. It’s the second test since buying it in ’20.



Kind regards,
Olli
0.3 Facing a new reality & “Emergency cabinet“
0.3.1 Pump test
The pump test today was successful. I do think I’m going to get a different hose for the pump, as the textile hose kinks far to easily and is thus not easy to handle/ use. It’s the second test since buying it in ’20.
Kind regards,
Olli
OP
Nobody-named-Olli
Well-known member
0. Miscellaneous Stuff
0.4 ”Guardian” for the small shed & garden.
Spent Saturday in the garden, taking care of a few things. Run across this happy little guy that used to sit in our living room - but got evicted. Threw together a small stand and now he can watch over the small shed & garden.
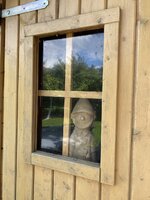
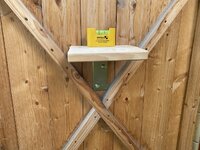
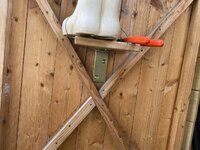
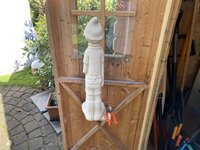
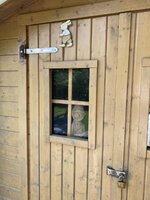
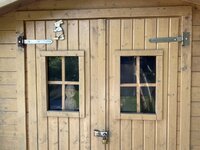
Kind regards,
Olli
0.4 ”Guardian” for the small shed & garden.
Spent Saturday in the garden, taking care of a few things. Run across this happy little guy that used to sit in our living room - but got evicted. Threw together a small stand and now he can watch over the small shed & garden.
Kind regards,
Olli
Ford52PU
Well-known member
Looks good hope you secured him to his shelf don’t want him to fall and get hurt
littlebean
Well-known member
- Joined
- Mar 7, 2018
- Messages
- 780
Great thread, great read, great details, great results - in fact great all round
OP
Nobody-named-Olli
Well-known member
OP
Nobody-named-Olli
Well-known member
0. Miscellaneous Stuff
0.5 Another headache once spring comes around.
This is basically the prequel to this post/ the reason I found the suction line/ hose leak on our garden irrigation pump. https://www.garagejournal.com/forum/threads/nobodys-project-corner.542125/page-3#post-11336930
So for the past 10 years or so, this convenient, programable & remote controllable switch box has been taking care of distributing and switching power for various consumers in and around the garden & patio.

The last time I used it to switch on the irrigation pump (fully within electrical spec. of the switch box) the relay switched, display on the switch box went black, started back up and triggered a long cycle of these re-boots. Mainly because it always tried to re-instate its previous state, and thus automatically trying to power the irrigation pump - as that was what was in its “memory”. Since that was at the same time cause of the problem, it seemed to endlessly cycle - and after 7 or 8 of these, I was just about to cut power to it, it completed the re-boot and switched with no issues. On the unfinished cycles it did give a message that made no sense to me.
Got in contact with the company that sells these, after I found out they are not selling them anymore, talked to one of their techs and he said it’s highly likely the electrolytic capacitor. Behavior of the unit + the message I was getting would be the main indicators for that, and he is like 99% sure that’s it.

At this point in time - if it is the capacitor - it’s not fully gone. I have ordered a new one.
When I did my inspection, there was no obvious smell present. Also no “discharge”, discoloration. If I’m being picky it could be a tiny bit out of shape, but that would be splitting hairs.
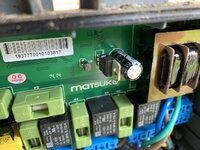
So I’m reluctant to replace the capacitor just yet. Because it would be a complete tear down, take the circuit board out and then some soldering.

Since the switch box is working, the irrigation pump won’t be re-installed before spring and the suction line/ hose needs to be replaced anyway, I decided to put this on the ”spring list”. This way I can monitor it some more, see if it happens again on other circuits and since I can’t get an replacement if it turns out unrepairable, I can make amendments to my other plan of overhauling some of the big shed’s electrics and build my own ”switch box”. The bad news is, I wanted to do the electrical overhaul in October, because I have some structural repair to do on the shed anyway and I would have best access then, with everything out. But that‘s on hold now and we shall see.
Kind regards,
Olli
0.5 Another headache once spring comes around.
This is basically the prequel to this post/ the reason I found the suction line/ hose leak on our garden irrigation pump. https://www.garagejournal.com/forum/threads/nobodys-project-corner.542125/page-3#post-11336930
So for the past 10 years or so, this convenient, programable & remote controllable switch box has been taking care of distributing and switching power for various consumers in and around the garden & patio.
The last time I used it to switch on the irrigation pump (fully within electrical spec. of the switch box) the relay switched, display on the switch box went black, started back up and triggered a long cycle of these re-boots. Mainly because it always tried to re-instate its previous state, and thus automatically trying to power the irrigation pump - as that was what was in its “memory”. Since that was at the same time cause of the problem, it seemed to endlessly cycle - and after 7 or 8 of these, I was just about to cut power to it, it completed the re-boot and switched with no issues. On the unfinished cycles it did give a message that made no sense to me.
Got in contact with the company that sells these, after I found out they are not selling them anymore, talked to one of their techs and he said it’s highly likely the electrolytic capacitor. Behavior of the unit + the message I was getting would be the main indicators for that, and he is like 99% sure that’s it.
At this point in time - if it is the capacitor - it’s not fully gone. I have ordered a new one.
When I did my inspection, there was no obvious smell present. Also no “discharge”, discoloration. If I’m being picky it could be a tiny bit out of shape, but that would be splitting hairs.
So I’m reluctant to replace the capacitor just yet. Because it would be a complete tear down, take the circuit board out and then some soldering.
Since the switch box is working, the irrigation pump won’t be re-installed before spring and the suction line/ hose needs to be replaced anyway, I decided to put this on the ”spring list”. This way I can monitor it some more, see if it happens again on other circuits and since I can’t get an replacement if it turns out unrepairable, I can make amendments to my other plan of overhauling some of the big shed’s electrics and build my own ”switch box”. The bad news is, I wanted to do the electrical overhaul in October, because I have some structural repair to do on the shed anyway and I would have best access then, with everything out. But that‘s on hold now and we shall see.
Kind regards,
Olli
OP
Nobody-named-Olli
Well-known member
#Nobody’s Big Shed
2. Rotted corner repair.
2.1 Explanation, picking up floor & side board to make full damage visible, cutting.
Back in July, during regular shed cleanup, I spotted a corner that had rotted through. I had to fix the side and flooring in that area before, that was because of poor rain water management and too much soil close to the shed. I rectified that back then and it has held up very good. But now the corner was affected. I do know why, the spout draining the gutter into the flower bed next to the shed gets blocked too easily, then the water has not enough force to literally spout out, but it drizzles and then runs back to the shed/ drizzles down the corner - forming puddles at times. (This will be another little project, remove the spout and install a down pipe …)
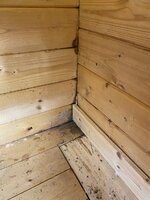
So, yesterday I did the corner repair.
Yours truly, getting started.

With the shelving removed, time to pick up the floor & side board from the original fix.

Now the full damage is visible.

Removing the outside side board/ seal from the original fix.

Time to cut out the rotted parts.


Will continue in 2.2
2. Rotted corner repair.
2.1 Explanation, picking up floor & side board to make full damage visible, cutting.
Back in July, during regular shed cleanup, I spotted a corner that had rotted through. I had to fix the side and flooring in that area before, that was because of poor rain water management and too much soil close to the shed. I rectified that back then and it has held up very good. But now the corner was affected. I do know why, the spout draining the gutter into the flower bed next to the shed gets blocked too easily, then the water has not enough force to literally spout out, but it drizzles and then runs back to the shed/ drizzles down the corner - forming puddles at times. (This will be another little project, remove the spout and install a down pipe …)
So, yesterday I did the corner repair.
Yours truly, getting started.
With the shelving removed, time to pick up the floor & side board from the original fix.
Now the full damage is visible.
Removing the outside side board/ seal from the original fix.
Time to cut out the rotted parts.
Will continue in 2.2
Last edited:
OP
Nobody-named-Olli
Well-known member
#Nobody’s Big Shed
2. Rotted corner repair.
2.2 Substructure fix, cutting replacement boards, glueing with polyurethane based adhesive & adding tie plates. Re-installing floor and side board.
Fixing a small part of floor/side substructure with construction adhesive and pressure treated lumber.

Time to make the replacement pieces. I used the same type of tongue & groove profiled board I used for the shed’s patio/rail repair.

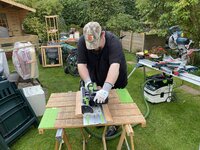
Now to make this a structurally sound & weatherproof repair, I decided to use a polyurethane based adhesive that will expand a bit to set my replacement parts and in addition to that also add some tie plates.
Adhesive prep. And yes, that brush attachment is waste afterwards.

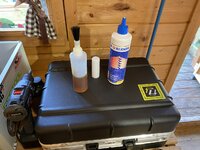
Adhesive applied to first part.

And that’s where the detailed pictures stop, as all of this has to be buttoned up in roughly 20 minutes from here, because of the adhesive’s setting/ curing time.
Made it in time. And already applied additional sealant. (The same construction adhesive used for the floor/side substructure repair.)
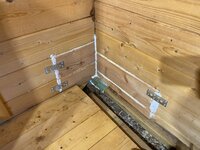
This is what it looks like from the outside at this point.

And the inside with some additional tie plates after the floor and side board were re-installed.

Will continue in 2.3
2. Rotted corner repair.
2.2 Substructure fix, cutting replacement boards, glueing with polyurethane based adhesive & adding tie plates. Re-installing floor and side board.
Fixing a small part of floor/side substructure with construction adhesive and pressure treated lumber.
Time to make the replacement pieces. I used the same type of tongue & groove profiled board I used for the shed’s patio/rail repair.
Now to make this a structurally sound & weatherproof repair, I decided to use a polyurethane based adhesive that will expand a bit to set my replacement parts and in addition to that also add some tie plates.
Adhesive prep. And yes, that brush attachment is waste afterwards.
Adhesive applied to first part.
And that’s where the detailed pictures stop, as all of this has to be buttoned up in roughly 20 minutes from here, because of the adhesive’s setting/ curing time.
Made it in time. And already applied additional sealant. (The same construction adhesive used for the floor/side substructure repair.)
This is what it looks like from the outside at this point.
And the inside with some additional tie plates after the floor and side board were re-installed.
Will continue in 2.3
OP
Nobody-named-Olli
Well-known member
#Nobody’s Big Shed
2. Rotted corner repair.
2.3 Re-installing outside sideboard, sealing and finished project.
Inside finished.

Outside finished. (Side board & seal installed, bead of sealant laid down. (Again the same construction adhesive used for that.))

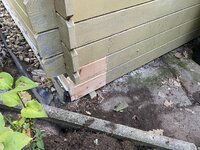
And that’s the whole corner repair buttoned up.
Shelving back in.


And now, for something completely different. I present to you, His Majesty King Polyurethane:

Can’t help it, clearly see a “face” in here. Just like with those super old statues ….

That’s another project finished. Thank you very much for the continued interest and “see you” on the next one.
Kind regards,
Ollli
2. Rotted corner repair.
2.3 Re-installing outside sideboard, sealing and finished project.
Inside finished.
Outside finished. (Side board & seal installed, bead of sealant laid down. (Again the same construction adhesive used for that.))
And that’s the whole corner repair buttoned up.
Shelving back in.
And now, for something completely different. I present to you, His Majesty King Polyurethane:
Can’t help it, clearly see a “face” in here. Just like with those super old statues ….
That’s another project finished. Thank you very much for the continued interest and “see you” on the next one.
Kind regards,
Ollli
Upstater57
ALLIANCE MEMBER
Mets, Giants, and scotch. Those items add a nice finishing touch to your work space.Hi everyone!
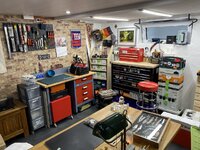
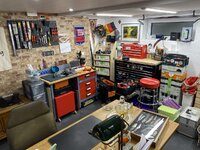
Before diving into the rest of the forum, I’d like to introduce myself and show the first, completed, part of my little lair. It is only missing some trim on the ceiling, that I wasn’t able to install yet because other projects needed completion first.
My name is Olli, will be 39 this year, and I’m first and foremost a DIY’er with a primary focus on house & garden. But have a interest in (and do quite a bit of) other stuff as well.
As per the title, this is where I keep most of my tools, do maintenance on tools that require it, do office work & relax. I do have two more rooms, one for project work and one for storage. These are currently still undergoing remodel - so not to be shown yet.
I outfitted/build this room basically from scratch. Meaning that after tearing everything out that was in this room before, it was down to 4 rough brick walls & some pipes (heating) that needed to stay. 3 walls and the ceiling mounted piping were cladded by placing metal studs/framework and drywall. The fourth wall was cladded with mineral materials only, since it is an outside wall that had some humidity issues and I didn’t want to risk anything - although the underlying issues were rectified in the whole process of building this room. The materials used are calcium silicate boards, corresponding mineral based adhesive/plaster and mineral based silicate paint.
It has it‘s own electrical distribution panel that is fed from the main line.
Kind regards,
Olli

OP
Nobody-named-Olli
Well-known member
#Story time
1. Police in our garden. Spoiler: Nothing exciting happened - FULL STOP.
It’s 3:10 AM as of starting this post, since I promised my better half to stay up for this night.
Normal day yesterday, we had finished dinner & were drinking coffee - in the midst of discussing some stuff the doorbell rang, it was about a quarter past 9 PM. Neighbor’s wife, she wanted to let us know that there had been an attempted burglary at the house on the corner. And allegedly there were two persons involved.
Letting her finish the story, I learned that another neighbor had allegedly seen two persons snooping around at the house on the corner, and informed the actual home owners, who were home at the time, but hadn’t noticed anything. Allegedly the home owners then somehow “spooked” the would-be burglars and one took off in direction of the public street, the other one ran for the really small ”farm road” that basically leads to no where and ends in our garden. Her last sentence was, that the police had been called.
I thanked her, went back inside and lit up the garden. Not just the ambient lighting, but the “I mean business flood lights”. Checked the cameras — nothing. Surefire is always in my pocket anyway, grabbed my means of personal protection/defense and then took a stroll through our garden. As kind of expected, everything was undisturbed, and there would have been many options to jump fences before making it into our garden anyway. When I was sure that nobody had entered our property - or was still on it, I went back inside. Closed all shutters, killed all the lighting in the garden.
Went to the first floor to go about the rest of our day, when I noticed that now the corner house owner/ neighbor, the husband of the neighbor that let us know, and the neighbor to the other side, were now all in that garden to check. Nothing happened for another 20 to 30 minutes after that.
I then noticed flashlights on the “very small farm road” coming towards our garden, they get closer and one step on our property they get lit up by a floodlight that is activated by motion detector. Certain parts/ writing on their uniforms light up and it was clear that was the police, followed by the corner house owner/ neighbor. Who then signaled in my direction. I answered. A minute or two later, police leading, they are heading back onto the ”farm road”, and the neighbor signals in my direction one more time, I answer.
All of them went then, again, into the garden of our other neighbor to continue their “search”. As I said, that “very small farm road” ends in our garden, and if they wanted to get on our neighbors property from there, they would have had to jump the fence. …
I’m quite surprised and impressed that the police actually showed up for that call. And by the looks of it, they considered it a curtesy visit/ serving the people.
Personally, I won’t rule out an attempted burglary completely. But at the same time, it could have been literally anything. From two drunk idiots, to a couple looking for an “romantic adventure” behind some sheds …
What I like is the fact that neighbors are obviously paying attention/ noticing people that are not neighbors and communicate.
It was also good “dry practice” as I will be adding another camera and making a small change to one of the flood lights.
Now it’s 4:04 AM, so still a couple of hours to go for me.
Kind regards,
Olli
1. Police in our garden. Spoiler: Nothing exciting happened - FULL STOP.
It’s 3:10 AM as of starting this post, since I promised my better half to stay up for this night.
Normal day yesterday, we had finished dinner & were drinking coffee - in the midst of discussing some stuff the doorbell rang, it was about a quarter past 9 PM. Neighbor’s wife, she wanted to let us know that there had been an attempted burglary at the house on the corner. And allegedly there were two persons involved.
Letting her finish the story, I learned that another neighbor had allegedly seen two persons snooping around at the house on the corner, and informed the actual home owners, who were home at the time, but hadn’t noticed anything. Allegedly the home owners then somehow “spooked” the would-be burglars and one took off in direction of the public street, the other one ran for the really small ”farm road” that basically leads to no where and ends in our garden. Her last sentence was, that the police had been called.
I thanked her, went back inside and lit up the garden. Not just the ambient lighting, but the “I mean business flood lights”. Checked the cameras — nothing. Surefire is always in my pocket anyway, grabbed my means of personal protection/defense and then took a stroll through our garden. As kind of expected, everything was undisturbed, and there would have been many options to jump fences before making it into our garden anyway. When I was sure that nobody had entered our property - or was still on it, I went back inside. Closed all shutters, killed all the lighting in the garden.
Went to the first floor to go about the rest of our day, when I noticed that now the corner house owner/ neighbor, the husband of the neighbor that let us know, and the neighbor to the other side, were now all in that garden to check. Nothing happened for another 20 to 30 minutes after that.
I then noticed flashlights on the “very small farm road” coming towards our garden, they get closer and one step on our property they get lit up by a floodlight that is activated by motion detector. Certain parts/ writing on their uniforms light up and it was clear that was the police, followed by the corner house owner/ neighbor. Who then signaled in my direction. I answered. A minute or two later, police leading, they are heading back onto the ”farm road”, and the neighbor signals in my direction one more time, I answer.
All of them went then, again, into the garden of our other neighbor to continue their “search”. As I said, that “very small farm road” ends in our garden, and if they wanted to get on our neighbors property from there, they would have had to jump the fence. …
I’m quite surprised and impressed that the police actually showed up for that call. And by the looks of it, they considered it a curtesy visit/ serving the people.
Personally, I won’t rule out an attempted burglary completely. But at the same time, it could have been literally anything. From two drunk idiots, to a couple looking for an “romantic adventure” behind some sheds …
What I like is the fact that neighbors are obviously paying attention/ noticing people that are not neighbors and communicate.
It was also good “dry practice” as I will be adding another camera and making a small change to one of the flood lights.
Now it’s 4:04 AM, so still a couple of hours to go for me.
Kind regards,
Olli
Last edited:
littlebean
Well-known member
- Joined
- Mar 7, 2018
- Messages
- 780
eventful evening - sounds like you've got a great community spirit going on there as well
OP
Nobody-named-Olli
Well-known member
@littlebean , yeah definitely not business as usual. In events like this, the community stands, no doubts about that.
—
Some additional information: I learned today that it was in fact a burglary. And the two persons did even make it inside the corner house, via climbing the annex and entering through a tilted window on the first floor. Which means they were actually spooked while inside and only then made the run.
It is also clear now, that the person that run off via the “very small farm road” jumped fences much earlier to get onto an actual public street as I already expected. They most likely new their way/ had staked that out prior to the hit.
Now I understand why the police did show up, and I’m no longer surprised they did. As it was clearly a crime being committed.
I must say I’m very glad they decided to run and the neighbor was not physically harmed. Also they were not successful in taking anything at that point. Hopefully the neighbor can cope with it mentally, as that is a whole different story.
Police also said most likely “organized crime” from abroad, one night, one town/city - and then they move on.
We’ll see. Stuff around here will definitely change. It’s a pity, used to be very different.
Kind regards,
Olli
—
Some additional information: I learned today that it was in fact a burglary. And the two persons did even make it inside the corner house, via climbing the annex and entering through a tilted window on the first floor. Which means they were actually spooked while inside and only then made the run.
It is also clear now, that the person that run off via the “very small farm road” jumped fences much earlier to get onto an actual public street as I already expected. They most likely new their way/ had staked that out prior to the hit.
Now I understand why the police did show up, and I’m no longer surprised they did. As it was clearly a crime being committed.
I must say I’m very glad they decided to run and the neighbor was not physically harmed. Also they were not successful in taking anything at that point. Hopefully the neighbor can cope with it mentally, as that is a whole different story.
Police also said most likely “organized crime” from abroad, one night, one town/city - and then they move on.
We’ll see. Stuff around here will definitely change. It’s a pity, used to be very different.
Kind regards,
Olli
OP
Nobody-named-Olli
Well-known member
#Nobody’s Big Shed
2. Rotted corner repair.
2.4 Removing the spout and installing stack/ down pipe.
Welcome to an other little episode on a rather cloudy and rainy day.

This is the ”culprit” and it has to go.
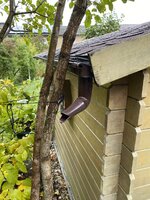
Easy job for Bosch’s “Carbide MultiWheel”.

Cleaning, drying & keeping it dry.

Cutting the stack/ down pipe.
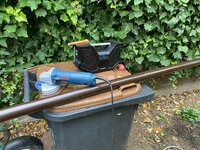
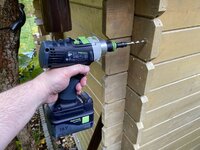
Drilling & countersinking for my fixings. First coupling already glued in & cured. (Again, highly time sensitive with this type adhesive.)

Putting the stainless hardware & pipe clamps together.

Stack/ down pipe in, tightening the pipe clamps.

Finished.

Kind regards & thank you for your interest!
Olli
2. Rotted corner repair.
2.4 Removing the spout and installing stack/ down pipe.
Welcome to an other little episode on a rather cloudy and rainy day.
This is the ”culprit” and it has to go.
Easy job for Bosch’s “Carbide MultiWheel”.
Cleaning, drying & keeping it dry.
Cutting the stack/ down pipe.
Drilling & countersinking for my fixings. First coupling already glued in & cured. (Again, highly time sensitive with this type adhesive.)
Putting the stainless hardware & pipe clamps together.
Stack/ down pipe in, tightening the pipe clamps.
Finished.
Kind regards & thank you for your interest!
Olli
Last edited:
OP
Nobody-named-Olli
Well-known member
0. Miscellaneous Stuff
0.5 Another headache once spring comes around.
For 0.5.1 -> #147 https://www.garagejournal.com/forum...e-recreation-lair.542090/page-4#post-11350126
0.5.2 - The switch box is dead/ on an endless boot-loop.
So a few nights ago, we wanted to switch on the ambient garden lighting - and that was it. Switch box went on an endless boot-loop. Cut power, waited until the next day, restored power - endless boot-loop again. Cut power again.
Yesterday‘s weather forecast was no rain until late night, so as good as is gets during fall for some work in the garden.
Priority was to disconnect the 5 circuits powered by the switch box, bag the plugs & remove the switch box while keeping everything as dry as possible.

Once I had the switch box inside and all plugs bagged & weathertight. I went to work in both the front and back gardens.
Finishing with giving the mower a good clean.

Later in the evening, I proceeded on the switch box.
Giving it a good clean.
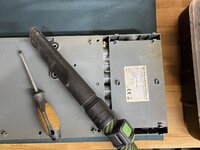
Time to disconnect the circuit board. Yes I went a little overboard with marking the wires, but this might have been a wise move, considering what I discovered later.
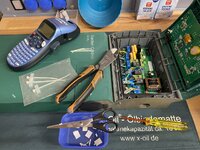
Removing the circuit board. Great job to use the insulated/composite ultra low-torque Snap-On drivers for once. … (Buying not recommended!)
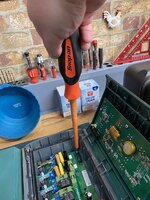
The supposedly broken capacitor. And I still think, it could be broken. But wait, why is that circuit board showing discoloration close to the transformer?
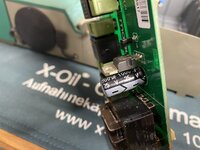
Closer look:
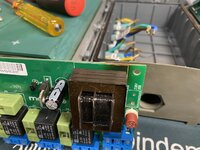

I’m now in communications with both the manufacturer as well as a buddy well versed in electronics to see if it makes sense to proceed with any kind of repair attempt.
This damage wasn’t really visible before I removed the circuit board.
Now the biggest issue is that everything ambient lighting, Christmas/ party lighting and irrigation pump depends on this switch box and was wired/connected accordingly.
Will have to do some thinking, once I know if this can be repaired or not. And then decide how to proceed from there.
Kind regards & thank you for your continued interest in my postings.
Olli
0.5 Another headache once spring comes around.
For 0.5.1 -> #147 https://www.garagejournal.com/forum...e-recreation-lair.542090/page-4#post-11350126
0.5.2 - The switch box is dead/ on an endless boot-loop.
So a few nights ago, we wanted to switch on the ambient garden lighting - and that was it. Switch box went on an endless boot-loop. Cut power, waited until the next day, restored power - endless boot-loop again. Cut power again.
Yesterday‘s weather forecast was no rain until late night, so as good as is gets during fall for some work in the garden.
Priority was to disconnect the 5 circuits powered by the switch box, bag the plugs & remove the switch box while keeping everything as dry as possible.
Once I had the switch box inside and all plugs bagged & weathertight. I went to work in both the front and back gardens.
Finishing with giving the mower a good clean.
Later in the evening, I proceeded on the switch box.
Giving it a good clean.
Time to disconnect the circuit board. Yes I went a little overboard with marking the wires, but this might have been a wise move, considering what I discovered later.
Removing the circuit board. Great job to use the insulated/composite ultra low-torque Snap-On drivers for once. … (Buying not recommended!)
The supposedly broken capacitor. And I still think, it could be broken. But wait, why is that circuit board showing discoloration close to the transformer?
Closer look:
I’m now in communications with both the manufacturer as well as a buddy well versed in electronics to see if it makes sense to proceed with any kind of repair attempt.
This damage wasn’t really visible before I removed the circuit board.
Now the biggest issue is that everything ambient lighting, Christmas/ party lighting and irrigation pump depends on this switch box and was wired/connected accordingly.
Will have to do some thinking, once I know if this can be repaired or not. And then decide how to proceed from there.
Kind regards & thank you for your continued interest in my postings.
Olli
littlebean
Well-known member
- Joined
- Mar 7, 2018
- Messages
- 780
always enjoy your posts - interesting and well detailed - good luck with the repair/replacement
OP
Nobody-named-Olli
Well-known member
0. Miscellaneous Stuff
0.6 Installing a Shelly smart switch.
First time installing a Shelly smart switch for me. I want to play with this for a while to see if it might be a retrofitting solution for some other circuits as well.
Testing on the bench.
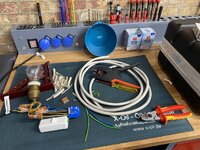
Then for real.
Regular switch out.
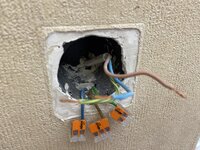
Then an “interesting” minor obstacle, a bit to much mantle/sheathing left on one cable. Used to be no issue with only the regular switch, but adding the smart switch, larger Wago terminals and some additional wires - I need all the space I can get.
So out comes a different type of “Electrical installation pliers”, one that can remove mantle/sheathing inside a recess. Now some Jokari tools can do that as well, but these pliers offer better visibility and better control while manipulating. I don’t use these pliers often, they work best on NYM type cable, because that mantle/sheathing is easier scored and broken than others and doesn’t need to be actually cut that deep. In this instance it was a different type cable, and still doable with this tool. (These type of pliers are available from different manufacturers and in different shapes/forms.)
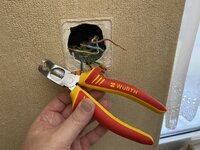
Grab & twist.
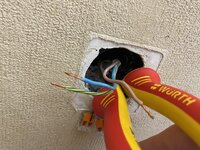
Mantle/ sheathing comes off.
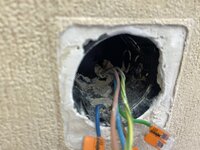
Then it was just crimping & connecting all wires. The two that are not connected go into the regular switch, to keep that as well.

Regular switch back in. (Before faceplate.)
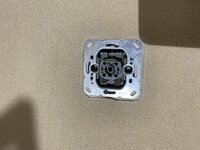
I’m very happy with how the Shelly smart switch works, now it’s time to evaluate it over a couple of months.
Kind regards & thank you for your continued interest in my projects.
Olli
0.6 Installing a Shelly smart switch.
First time installing a Shelly smart switch for me. I want to play with this for a while to see if it might be a retrofitting solution for some other circuits as well.
Testing on the bench.
Then for real.
Regular switch out.
Then an “interesting” minor obstacle, a bit to much mantle/sheathing left on one cable. Used to be no issue with only the regular switch, but adding the smart switch, larger Wago terminals and some additional wires - I need all the space I can get.
So out comes a different type of “Electrical installation pliers”, one that can remove mantle/sheathing inside a recess. Now some Jokari tools can do that as well, but these pliers offer better visibility and better control while manipulating. I don’t use these pliers often, they work best on NYM type cable, because that mantle/sheathing is easier scored and broken than others and doesn’t need to be actually cut that deep. In this instance it was a different type cable, and still doable with this tool. (These type of pliers are available from different manufacturers and in different shapes/forms.)
Grab & twist.
Mantle/ sheathing comes off.
Then it was just crimping & connecting all wires. The two that are not connected go into the regular switch, to keep that as well.
Regular switch back in. (Before faceplate.)
I’m very happy with how the Shelly smart switch works, now it’s time to evaluate it over a couple of months.
Kind regards & thank you for your continued interest in my projects.
Olli
Last edited:
OP
Nobody-named-Olli
Well-known member
#Nobody’s Storage (building materials) & Boiler room
1. Small water issue.
1.14 ”I will be back.”
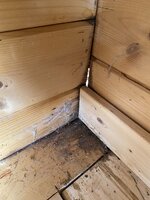
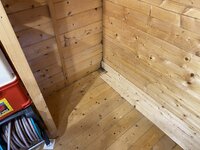
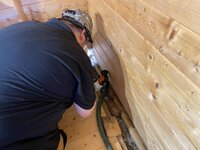
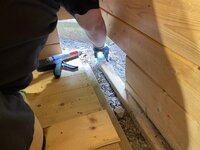
So I have a couple of projects going on, and yesterday I was stashing away shop supplies when my eyes fell on a new spot damaged by moisture/water. This is a bit further down from the corner, and it means there must still be water building up between ours and the neighbor’s house.
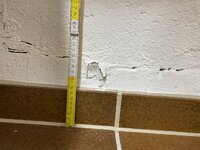


Red circle marks the area. That picture was taken months ago when the whole saga started, clearly no damage back then.

Now I’ll have to decide how to proceed. As I have enough on my plate as is, without this additional project, I think this is something for ‘26. Not going to deal with it over the holidays if I can help it.
But this nicely illustrates that opinions, experience and even measurements/data are just that.
Kind regards,
Olli
1. Small water issue.
1.14 ”I will be back.”
So I have a couple of projects going on, and yesterday I was stashing away shop supplies when my eyes fell on a new spot damaged by moisture/water. This is a bit further down from the corner, and it means there must still be water building up between ours and the neighbor’s house.
Red circle marks the area. That picture was taken months ago when the whole saga started, clearly no damage back then.
Now I’ll have to decide how to proceed. As I have enough on my plate as is, without this additional project, I think this is something for ‘26. Not going to deal with it over the holidays if I can help it.
But this nicely illustrates that opinions, experience and even measurements/data are just that.
Kind regards,
Olli
Last edited:
captain14
Well-known member
Just goes to show you, when you finish one project there’s 2 or 3 that decide to show up to get fixed too!