To avoid these ads, REGISTER NOW!

Jake's Projects ...... or, .... How I waste my time

OP
J

jakemac

Well-known member
Joined
May 21, 2013
Messages
9,035
Location
New England
Thanks to a fortunate find by alinc100, and a quick and easy negotiation, I now have the socket box to a 3/4dr set that I've slowly been assembling for some time now.

No big restoration on this box, just a clean-up and waxing.
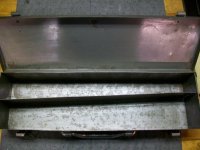
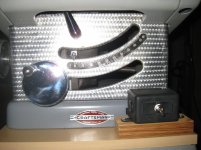
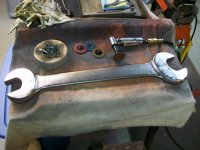
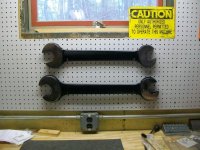
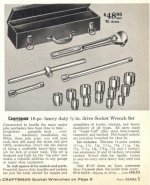
I forgot to take before pictures, so I've included the picture that alinc100 posted from the Garage Sale thread "as found" (pic 1). The second picture is after the cleaning (pic 2). I also included a clipping from the 1960 catalog of the set that it was originally included from (pic 7).

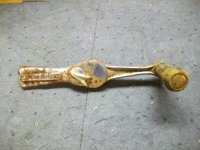
The bottom of the box had flaky rust, but was still solid. I gave it a light scrub with a scotchbrite pad and 3 heavy coats of Butcher's Wax (pic 3, after). The handle and supports had plenty of rust and flaking chrome. I ended spending some time rubbing it by hand with Nevr-Dul to clean it up (10min rubbing, walk away for a while, repeat until fed up). It looks better in the picture than in person
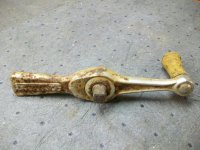
(pic 4, after). One of the corners has popped it's spot welds (pic 5), it will need to be re-welded, but it can wait until I have a spot welder. It's fine for now. After a quick cleaning, the rest of the box, including the inside, got a coating of Butcher's Wax and a rubdown after it had dried (more pictures in the next post).

This box was for a 1960's 3/4dr set that included 13 sockets, a sliding T-bar, and an extension. I, unfortunately have OCD and couldn't leave it at just that. I'm working on finding all 21 sockets (8 more to go) offered in the 1960 catalog, as well as both extensions, t-bar, breaker bar, and ratchet. The other extension and the ratchet (which I intentionally over-paid for) were found on ebay this week and haven't arrived yet. Pic 6 is of the set I've assembled so far. I'm not sure how I'll fit the extra pieces in this box when I get them; but when there's a will, there's a way. :bounce:
 

Attachments

  • 384.JPG
    384.JPG
    99.7 KB · Views: 123
  • 100_1567.jpg
    100_1567.jpg
    131.4 KB · Views: 117
  • 100_1572.jpg
    100_1572.jpg
    135.3 KB · Views: 114
  • 100_1578.jpg
    100_1578.jpg
    144.2 KB · Views: 113
  • 100_1573.jpg
    100_1573.jpg
    138.4 KB · Views: 109
  • 100_1576.jpg
    100_1576.jpg
    136.7 KB · Views: 134
  • 1960p5.jpg
    1960p5.jpg
    82.1 KB · Views: 115
Last edited:
To avoid these ads, REGISTER NOW!
OP
J

jakemac

Well-known member
Joined
May 21, 2013
Messages
9,035
Location
New England
If I had a good source for a dark gray hammered paint that matched the old Craftsman color, I might have thought about a full restoration. I needed to hammer out a few minor dings. But most of the box is in good shape, and shows character, so I'm leaving it as is and just cleaning and waxing to stop it from deteriorating further.

A few more pictures of the box.
 

Attachments

  • 100_1570.jpg
    100_1570.jpg
    136.7 KB · Views: 73
  • 100_1569.jpg
    100_1569.jpg
    134.4 KB · Views: 68
  • 100_1568.jpg
    100_1568.jpg
    135.2 KB · Views: 61
Last edited:

taumac

Well-known member
Joined
Aug 30, 2011
Messages
8,104
Location
Brooksville, Fl
Jake try this.
1dddad8f6bc0abbde5999f31e75b334c.jpg

258996d4cb5c3952a6c0f6a51b9d42d4.jpg

This is what I used on all the silver and red craftsmans.
Here's the match the right is original and left is painted.
1f604dfa214670357c08134282df67ea.jpg
 
OP
J

jakemac

Well-known member
Joined
May 21, 2013
Messages
9,035
Location
New England
That color looks great for a match to the lighter hammered paint that Cman used, but the box(es) that I have are the darker color that they used in the late 50's and early 60's.

Still, I may have to find a can so I can do some samples in case I need it for other projects.
Thanks. :thumbup:
 
Last edited:

taumac

Well-known member
Joined
Aug 30, 2011
Messages
8,104
Location
Brooksville, Fl
IMO it looks to same color than again pics can make colors look different.
Check theses out.
With all my lights on in garage.
ab50517e2bd4c31c956a56afd64f6cc9.jpg

With single light with flash going working.
7f0596eaf4428c83e5c702053b51dbf9.jpg

I do admit I didn't get full effect of the hammered paint when I sprayed opting for more even color. Best thing like you said is try it.
 

drivesitfar

Well-known member
Joined
Oct 23, 2013
Messages
35,999
Location
Pacific Northwest
Jake: that old 3/4 inch socket set tool box is awesome. i think that is the first time I've seen a socket inside a socket which might help me get a little more space in my little Craftsman heritage tool box that i use almost daily.

so i don't run across old Craftsman 3/4 inch sockets much, but in case i do are you looking for the V or VV or which series? what sizes do you need to fill your set?

hopefully your shop is high and dry again and looks like your good spirits were never shaken by that issue after seeing your posts.

Taumac: that paint you picked to match original matches pretty good. if you want to get more of a hammered effect using that paint on other items just paint with temps in the 60's to 70's and spray on a bit thicker coats. you have to find that happy medium between too light a spray and just before it starts to run and drip.
 

Outlawmws

Well-known member
Joined
Aug 9, 2011
Messages
39,137
Location
The Badlands
Jake, I have a similar Socket set box that was also likely for a 3/4" set Not craftsman adn older than '42 if craftsman going by the catalogs. only has a hasp and used a leather handle originally. (only the D rings were left...) Maybe made by the supplier to Sears? :dunno:

Yours came out nice after cleanup!

Mine was NOT in nearly as good shape though!

Before:
attachment.php


After:
attachment.php


it's in the Vintage boxes thread:

http://www.garagejournal.com/forum/showthread.php?t=49743&page=52
 

drivesitfar

Well-known member
Joined
Oct 23, 2013
Messages
35,999
Location
Pacific Northwest
Outlaw: i like the rubber stops to keep those hand tools in place. how thick are the rubber pieces and when you carry that box, if you do, do they stay put or still move around? nice restoration by the way and i like the cork at the bottom of the box too.
 

Outlawmws

Well-known member
Joined
Aug 9, 2011
Messages
39,137
Location
The Badlands
Drives, it is just med. density foam packing cut to be snug. if it were about 1/2" thicker, then the lid would ensure the blocks didn't move, but the limited amount I've moved it, it works fine. With that gap though, it probably wouldn't work so well for truck transport, at least on its side.
 

bluebolt

Well-known member
Joined
Dec 28, 2008
Messages
5,435
Location
Benton LA
Jake:
so i don't run across old Craftsman 3/4 inch sockets much, but in case i do are you looking for the V or VV or which series? what sizes do you need to fill your set?

As Drivesitfar says post up what youa re looking for I have a whole box full of extra 3/4 sockets. I assume you want =V= without part number sockets.

And nice job bringing that box back to life!
 
OP
J

jakemac

Well-known member
Joined
May 21, 2013
Messages
9,035
Location
New England
The set I've been assembling is all double line V (=V=).
The missing pieces I'm still looking for are :

Breaker Bar
Sliding T-bar
Sockets :
________7/8
________15/16
________1-3/16
________1-1/2
________1-3/4
________2
________2-3/16
________2-3/8

Drivesit and Bluebolt, Thank you for thinking of me.
I'm in no rush. The hunt is the real fun. :D

EDIT -
As of now, the set is complete. YAY !!!!
 
Last edited:

drivesitfar

Well-known member
Joined
Oct 23, 2013
Messages
35,999
Location
Pacific Northwest
Jake: when i get a chance i'll see what i have and have a version of my own hunting going on. Like i said i don't have many Craftsman 3/4 inch, but i'll keep my eye out for some in the wild now for you while i'm looking for other things for me. i live in Craftsman country because i bet every Boeing worker got a Sears gift card in his paycheck every month.

by the way because i don't have Outlaw's Craftsman thread or Craftsman makers memorized in all their tools can you tell me who made the V series and is the double line older than the V's? i'm guessing Proto, but not sure.
 
OP
J

jakemac

Well-known member
Joined
May 21, 2013
Messages
9,035
Location
New England
The double line V predates the single line V (with some overlap). They were made by Moore Drop Forge, which became Easco/Danaher/Apex throughout the years.
 

dakotart1984

Well-known member
Joined
Jul 31, 2013
Messages
236
Jake, that motor is about to inspire me to do something.. I have an OLD cman table saw that I picked up from a guy for cheap. Its a mountain of a project in its current condition. Im going to go take some pics of it..
 
Last edited:

dakotart1984

Well-known member
Joined
Jul 31, 2013
Messages
236
Here it is.. The motor works, Before I cut the plug off it (Was a hack job extension cord attached) It needed help every few power cycles. I saw it working before I took the throat plate off. I have a new Ridgid R4510, but Im not sure what to do with this thing.
 

Attachments

  • phpR7QAoMPM.jpg
    phpR7QAoMPM.jpg
    73.4 KB · Views: 72
  • php0hSer0PM.jpg
    php0hSer0PM.jpg
    71.1 KB · Views: 68
  • php13RRTFPM.jpg
    php13RRTFPM.jpg
    61.7 KB · Views: 67
  • phplo0PAAPM.jpg
    phplo0PAAPM.jpg
    88.3 KB · Views: 76
  • php6urShFPM.jpg
    php6urShFPM.jpg
    74.8 KB · Views: 80
OP
J

jakemac

Well-known member
Joined
May 21, 2013
Messages
9,035
Location
New England
Nice saw dako, go for it !

I used to have one like it, but I got rid of it before I had a clue. :sad:

The best way I've found to de-rust the table is to put some EvapoRust in a spray bottle, lay down some paper towels on the table (I like the blue shop towels), and soak the towels with the spray bottle. Remove any air bubbles and keep the towels wet. Check it often. After a day, remove the towels and wipe the table down. Check to see if you need to soak it more. Once the rust has been converted and removed, clean the table well to remove all the residue. Then give it a final rinse with clean water and dry thoroughly to prevent flash-rust. Finally, use a paste wax, or butchers wax to seal the table top. Give it 2 or three thin coats, letting each coat dry overnight and buff with a clean cloth between applications.

Several choices for paint to match the Cman Power Bronze that other members have used are.

Krylon Brushed Metallic Satin Caramel Latte
XO Rust #XOP-35 Bronze
Rustoleum Hammered Gold #7210

Good luck, and keep us posted. :thumbup:
 

drivesitfar

Well-known member
Joined
Oct 23, 2013
Messages
35,999
Location
Pacific Northwest
Jake: is all the information on the history of who made Craftsman's hand tools prior to the 1970's in Outlaw's Craftsman thread or do you just know the makers? i think there were Blackhawk and SK? did Proto make any or Indestro because i have a couple ratchets that look exactly like thiers?


Dako: besides the saw Jake restored, i have this one i bought from a very talented client a few months ago before he moved into a condo. it sounded like mine looked like yours before he started his restoration. good luck
 

Attachments

  • IMG_2708.jpg
    IMG_2708.jpg
    136.7 KB · Views: 78
  • IMG_2704.jpg
    IMG_2704.jpg
    140.4 KB · Views: 88
  • IMG_2703.jpg
    IMG_2703.jpg
    138.1 KB · Views: 90

dakotart1984

Well-known member
Joined
Jul 31, 2013
Messages
236
As you can see, the right side of the table has had some rust work attempted. I used scotch brite and steel wool just to see how bad it was. The rail the fence slides on is what I can imagine would be a pain to get clean. I don't have a table, the motor mount is incomplete. I was thinking of just building a box for it but I really don't have a use for it.
 
OP
J

jakemac

Well-known member
Joined
May 21, 2013
Messages
9,035
Location
New England
Jake: is all the information on the history of who made Craftsman's hand tools prior to the 1970's in Outlaw's Craftsman thread or do you just know the makers? i think there were Blackhawk and SK? did Proto make any or Indestro because i have a couple ratchets that look exactly like thiers?

For info on Craftsman date codes, I always refer to the first post in this thread by lauver :

http://www.garagejournal.com/forum/showthread.php?t=84807
 
To avoid these ads, REGISTER NOW!

Scimonetti

Well-known member
Joined
Aug 25, 2014
Messages
431
Location
VT
The first restore I ever did was a similar saw. It was a really fun project and me with my very limited tools did it in 2 weeks. There's not much mechanical to do and compared to a drill press there's not many parts
 

twertsy

Well-known member
Joined
Jan 5, 2014
Messages
6,726
Location
Reedville, VA
As requested, here are pictures of

1 - The latest batch of clamps.
2 - All my winged clamp duckies in a row (notice the upgraded arbor adapters and spacers on the wire wheel)
3 - some of my other clamps

Sorry, I don't have any before pictures. All were rusted up pretty good, and a few were seized. One needed a little bit of gentle beating with my biggest hammer to free it up, even after soaking in PB Blaster for a week.

I think I'm good on 4" and 6" clamps, but I still would like to pick up a few 8" and 12" ones to round out. Maybe a couple 5", 2" and 3" would be nice. A few larger than 12" would be handy. Hmmmmmmmmmm .................... something tells me I'm not done yet :lol_hitti
My daughter tells me I have a "clamp fetish."
 

drivesitfar

Well-known member
Joined
Oct 23, 2013
Messages
35,999
Location
Pacific Northwest
Jake: thanks for the link to the Craftsman tool history. that is overwhelming and not easy to figure out. i probably need a video with somebody showing the tools with each of those stampings on them to really get a handle on who made which versions and when.

i'm not sure if it was you, Outlaw or just GJ members in general, but I think I've bought up all the clamps in the PNW the past year that i could find. i can hardly wait to get "organized" and see what it is that i actually own once they are in only one place.

by the way does that little ring on the latch of the 3/4 inch sockets tool box act as sort of a safety to keep the box from opening?

cheers
 
OP
J

jakemac

Well-known member
Joined
May 21, 2013
Messages
9,035
Location
New England
Well, I finally had a break-through on a project I started back in October. I found a rusted lump in the shape of a 1960 Craftsman Speeder Ratchet at a YS back in Oct. for the grand sum of a few pennies. It had spent some time at the bottom of a wet bucket and was fused solid. This is the only one I've ever seen out in the Wild, so even though it was useless, I had to have it.

After about a month of soaking in Simple Green, CLR, and PB Blaster; I was finally able to remove the anvil cover and anvil (that's the part that holds the socket), but the selector and pawl were still fused together and the retaining clip was too rotted to be removed. After another month and a half of soaking and futzing, last night I was able to remove it (a plastic tipped hammer might have been involved, repeatedly, but I'm sure that I can come up with an alibi if it goes to court). A little more persuasion with a knife and the same hammer (I swear I wasn't even in the same state, Your Honour), and I was able to separate the fused pawl and selector.

Then, it was just a matter of an hour or so at the wire wheel, the dremel, and the polishing wheel to get it ready for re-assembly. SuperLube may be your friend when it comes to lubing a ratchet, but it's a ***** when you're trying to hold small pieces and stuff them into a small space.

Even though the Anvil, Pawl, Selector, and Cover are pitted; I still reused them. I didn't see any sense in wasting new pretty parts when the handle is deeply pitted as well and the old parts still work (now that the crudy rust is gone). The only parts that needed to be replaced were the ball bearing for the pawl, and the two retaining clips that had rotted away. I got those from a stash of parts I've been hoarding (I need more retaining clips).

So, now I have another Speeder Ratchet for my box (I paid collector's prices on ebay for the first one). :wtf:
Now I have a user, and a show-er. :D

Pictures :
the first three are the ratchet as found
#4 is the parts after cleaning (I forgot to take a pic of the parts in their un-reserected state)
the last three are the restored ratchet.


I also finally got the big wrench done. Pictures after the paint dries.
.
 

Attachments

  • 100_1409.jpg
    100_1409.jpg
    138.6 KB · Views: 257
  • 100_1410.jpg
    100_1410.jpg
    144 KB · Views: 226
  • 100_1411.jpg
    100_1411.jpg
    140.2 KB · Views: 210
  • 100_1596.jpg
    100_1596.jpg
    140.2 KB · Views: 251
  • 100_1597.jpg
    100_1597.jpg
    138.7 KB · Views: 258
  • 100_1598.jpg
    100_1598.jpg
    135 KB · Views: 247
  • 100_1599.jpg
    100_1599.jpg
    133.6 KB · Views: 244
Last edited:
OP
J

jakemac

Well-known member
Joined
May 21, 2013
Messages
9,035
Location
New England
You can't see it in the pictures, but there's a lot more pitting and missing chrome than the photo's show. But it's usable, and now that it's packed with lube, it's super smooth for a 24 tooth sprocket.
 

Faisal

Well-known member
Joined
Oct 18, 2014
Messages
282
Location
Saudi Arabia
:thumbup:I like the precision and the professionalism in your projects

great job i will keep my eyes open in your thread
 

drivesitfar

Well-known member
Joined
Oct 23, 2013
Messages
35,999
Location
Pacific Northwest
Jake: nice save on that interesting tool. you might want to post it over on Ryan's thread about these along with your humorous posts.

that said don't change and i always enjoy reading your posts and have bellied laugh more than a couple times this past year reading one of yours.

here's to a great 2015 and wishing you and all our GJ friends a great year of learning and teaching and fixing.
 

jpmmilner

Active member
Joined
Dec 21, 2014
Messages
33
Jake: Thank you for explaining to me what I found! I found one of these at a GS about a year ago and paid about $1 for it. Had never seen anything like it, but my main set of tools for the shop is collected generations of craftsman that I have been collecting piece by piece since I was 16 by haunting pawn shops and garage sales for years. The in I found was in good shape. Needed requisite lube and care, but works well. I still have not found the "killer app" for it in my typical weekend project workings, but it still holds a place of honor in my box! Thanks for your pictures and explanations of the proper care and feeding of a rusted up mess.


Sent from my iPhone using Tapatalk
 
OP
J

jakemac

Well-known member
Joined
May 21, 2013
Messages
9,035
Location
New England
Thanks All ! I'm feeling all warm and fuzzy.

jpm- You found a real gem out in the wild, at a "you extremely ****" price. Ebay prices run between $50 and $200. These ratchets were only offered between 1960 and 1963. Then, they disappeared. Herbrand also offered a similar, but different ratchet. There may have been another company that offered one, but I don't recall. All were short lived.
Check out this thread :
http://www.garagejournal.com/forum/showthread.php?t=247030

The clipping below is from the 1960 Craftsman hand tool catalog. Page 7.
 

Attachments

  • 1960craftsmanP7.jpg
    1960craftsmanP7.jpg
    121.4 KB · Views: 104
Last edited:
OP
J

jakemac

Well-known member
Joined
May 21, 2013
Messages
9,035
Location
New England
As promised, here are the pictures of the large wrench that I finally finished yesterday.

I started on it about a month ago, but water in the shop and then the holidays put things on hold.

It's a Billings #1160, size 50 DOE. 2-3/16" - 2-9/16"

De-rust
Sand and Polish the faces
Mask and Paint

.
 

Attachments

  • 100_1531.jpg
    100_1531.jpg
    131.9 KB · Views: 104
  • 100_1540.jpg
    100_1540.jpg
    139.6 KB · Views: 111
  • 100_1600.jpg
    100_1600.jpg
    133.9 KB · Views: 99
  • 100_1601.jpg
    100_1601.jpg
    131.6 KB · Views: 104
  • 100_1602.jpg
    100_1602.jpg
    139.2 KB · Views: 130
Last edited:

jpmmilner

Active member
Joined
Dec 21, 2014
Messages
33
Awesome! My first "you ****!" I figured it would be some time before I got one! :)


Sent from my iPhone using Tapatalk
 
OP
J

jakemac

Well-known member
Joined
May 21, 2013
Messages
9,035
Location
New England
Well, it's been some time since I've been able to spend any time in the shop. Since the end of January, we've been hammered with snow every few days. 12" or more at a time. By the time I get my place and then my Grandparent's place cleaned up, we get hit again and it starts all over again (I even snowblow the streets on my property line because our town plow guy only makes a one lane pass and I live on the corner. The schoolbus was getting stuck trying to turn around.). I've had to re-tune my snowblower twice in one month, replace two cables, and I wore out one of the shoes. The blower is only 6 years old. Usually I tune it at the beginning of the season and that's it.

So, now that we're only getting nuisance snow (2"-4" at a time every few days), I've had a little time to catch up on one of my projects in-between emptying buckets due to ice dams leaking into the house.

At the end of January, just before Snowmaggedon commenced, Marty in NJ sent up a pair of c-clamps as a thank you for helping him smuggle a 5197 across state lines in a mad dash to freedom. We used the GJ Underground Railroad both ways.

I know that I've posted a lot of these clamps in this thread, but I wanted Marty to see that they have finally gotten the love they deserved. One is a 10" Cincinnati (Hargrave), and the other is an un-named 8".

Before and Afters -
 

Attachments

  • 100_1620.jpg
    100_1620.jpg
    131.9 KB · Views: 110
  • 100_1646.jpg
    100_1646.jpg
    142.1 KB · Views: 144
Last edited:

nine4gmc

Well-known member
Joined
Mar 24, 2012
Messages
14,357
Location
Dallas
Snow, still? Holy **** it's got to ****, we just get near freezing temps and then back up to the 80's the next day...

Great job on the clampers Jake!!
 
To avoid these ads, REGISTER NOW!
Top Bottom