To avoid these ads, REGISTER NOW!

Craftsman Drill Press

OP
F

FrankLee

Well-known member
Joined
Sep 13, 2010
Messages
3,547
Location
seMI, 48317
Craftsman 103.9770 Combination Kit (dp#86)

I went and fetched this Craftsman 103.9770 Combination Kit this morning.

It includes:
  • a large 45" x 26" heavy duty power tool bench
  • a nice 3/4 hp, 1750 rpm motor, model 115.19790
  • a 1/4 hp, 1750 rpm Kenmore motor
    This was not original to the combo kit. It runs, but I still need to determine just how good this is yet.
  • some of an 8" table saw
    It's missing one extension, the miter guide, the blade guard(?), the elevator/tilt knob and the oe table insert.
  • a disk sander assembly, complete
  • a Craftsman 80-ish drill press (dp#86)
    I have a motor mount and a floor standing base and column to make this a stand-alone drill press.

Oddly, it's missing the 4-1/8" jointer. The way it's set-up in the seller's photo is totally incorrect.

This combo kit was Sears answer to the Shopsmith.


7/13/2020

Included with this kit was a Craftsman 8" table saw, model 103.22161. There were too many missing parts and pieces to make this a refurb project, so I decided to part it out. If you're familiar with the 8" saws, you know that the tilt gears often go bad. This one is in excellent condition.

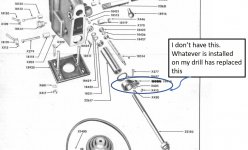
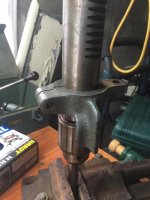
When I flipped it over, I saw new bolts attaching the frame to the table. That's odd. I continued dismantling the frame and then discovered this custom repair:


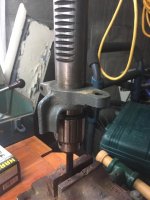
The friction ball on the elevator screw was replaced with a 12mm socket!


Here's an oe part next to the repaired part.


I'm torn between wtf and that's ingenious!


8/11/2020

Painting begins on dp#86... Rustoleum 353091 Gunmetal Gray.


8/18/2020

Major progress on dp#86. The base and column are from dp#81.


8/19/2020

For some unknown reason, the original feed handle on the drill press with this Combo Kit was replaced with this too small (3/8"), and too short (10") steel rod.


To remedy that, I fabricated a new feed handle from the 1/2" x 11-1/2" stud (part #66) from an old Craftsman jig saw and two Craftsman stubby screw drivers. This is very close to the original handle size. Perfect!


8/21/2020

DP#86 is complete.

 
Last edited:
To avoid these ads, REGISTER NOW!

CJnCincy

Member
Joined
Feb 20, 2018
Messages
11
Location
Cin. O
Help..what is this and how do I remove it?

Ref. pictures attached......

I purchased a 1950-ish Model 80 about a week ago. I'm currently disassembling it for cleaning. mounted to the spindle assembly is what looks like half of a mortising chisel housing (see picture from 1950 catalog). Whats funny about this is it is half of one (or looks to be), but it doesn't look like Bubba sawed this off. The matching paint and lack of machining/Bubba marks makes this appear to made this way.

My first question is what is this?
My second question is, how do I remove it, as it won't slide upwards over the quill?

The reason I ask the second question, is that I do not know how Im going to get a spanner wrench in over the thrust collar nut with this thing in place.

Looking for suggestions.

Thanks in advance.
 

Attachments

  • Picture1.jpg
    Picture1.jpg
    70.3 KB · Views: 34
  • Picture2.jpg
    Picture2.jpg
    136.7 KB · Views: 32
  • IMG_1051.jpg
    IMG_1051.jpg
    77.9 KB · Views: 40
  • IMG_1050.jpg
    IMG_1050.jpg
    81 KB · Views: 37
  • IMG_1049.jpg
    IMG_1049.jpg
    74.3 KB · Views: 37

ProJay

Member
Joined
Jun 27, 2020
Messages
13
Location
California
Re: DP#85, Craftsman #2432 Milling Vise

Well, I have partial success with my ‘49 100. The DP has been reassembled with no issues. The freeze/heat method worked great for the new quill and spindle bearings. Everything went together pretty easily with your instructions, FrankLee.

The motor, however, might be a lost cause. During disassembly I saw the wiring for the 115.3962 was pretty bad. The cloth insulation was brittle and cracked, many exposed wires, and some indications of melted wire. I tried to save her by rewiring everything I could coming out of the motor. Saw the original bearings were done, so those were also replaced. New capacitor wouldn’t fit (cylinder) so had to go back to the original flat format unit. New power cord and ground as well. First bench on went well. Passed the blue smoke test. Everything was smooth running. However, first start after installing onto the press with the belt was not so. Got a good spin but immediate arcing seen at the terminal end.

I’ll get a pic or two up of the press later, but a little wind was taken out of my sails with the motor situation. Not sure if more troubleshooting is going to help or if I should just start looking for a replacement
 
Last edited:

lafester

Well-known member
Joined
Mar 1, 2017
Messages
2,191
Location
Northern CO
Re: Craftsman 103.9770 Combination Kit (dp#86)

Hey that looks familiar.
I can't believe anyone would run a belt that way, but I suppose it is cheaper then two motors.

I have seen a couple of these pop up lately and they are always missing something, usually the drill press. I do like those big benches and thought about grabbing one but so far the right deal has not come up.... Well one did but it was right at the beginning of the shut down. It also had one of those 3/4 1750 motors that are not very common.

I went and fetched this Craftsman 103.9770 Combination Kit this morning.

It includes:
  • a large 45" x 26" heavy duty power tool bench
  • a 3/4 hp, 1750 rpm motor
  • a 1/4 hp, 1750 rpm Kenmore motor
    This was not original to the combo kit.
  • some of an 8" table saw
    It's missing one extension, the miter guide, the blade guard(?), the elevator/tilt knob and the oe table insert
  • a disk sander assembly, complete
  • a Craftsman 80-ish drill press (dp#86)
    I have a motor mount and a floor standing base and column to make this a stand-alone drill press.

Oddly, it's missing the 4-1/8" jointer. The way it's set-up in the seller's photo is totally incorrect.

This combo kit was Sears answer to the Shopsmith.
 
OP
F

FrankLee

Well-known member
Joined
Sep 13, 2010
Messages
3,547
Location
seMI, 48317
Re: Help..what is this and how do I remove it?

Ref. pictures attached......

I purchased a 1950-ish Model 80 about a week ago. I'm currently disassembling it for cleaning. mounted to the spindle assembly is what looks like half of a mortising chisel housing (see picture from 1950 catalog). Whats funny about this is it is half of one (or looks to be), but it doesn't look like Bubba sawed this off. The matching paint and lack of machining/Bubba marks makes this appear to made this way.

My first question is what is this?
My second question is, how do I remove it, as it won't slide upwards over the quill?

The reason I ask the second question, is that I do not know how Im going to get a spanner wrench in over the thrust collar nut with this thing in place.

Looking for suggestions.

Thanks in advance.
I'm thinking that's a mortising chisel housing that was cut in half. I've seen it a couple times before.

Are you also missing the feed stop rod? Or was that attached to the mortising chisel housing?

If that housing turns on the quill, you may be able to use it for leverage. Insert the largest allen wrench possible into the safety collar hole and turn it with the housing.
 
OP
F

FrankLee

Well-known member
Joined
Sep 13, 2010
Messages
3,547
Location
seMI, 48317
Re: DP#85, Craftsman #2432 Milling Vise

Well, I have partial success with my ‘49 100. The DP has been reassembled with no issues. The freeze/heat method worked great for the new quill and spindle bearings. Everything went together pretty easily with your instructions, FrankLee.

The motor, however, might be a lost cause. During disassembly I saw the wiring for the 115.3962 was pretty bad. The cloth insulation was brittle and cracked, many exposed wires, and some indications of melted wire. I tried to save her by rewriting everything I could coming out of the motor. Saw the original bearings were done, so those were also replaced. New capacitor wouldn’t fit (cylinder) so had to go back to the original flat format unit. New power cord and ground as well. First bench on went well. Passed the blue smoke test. Everything was smooth running. However, first start after installing onto the press with the belt was not so. Got a good spin but immediate arcing seen at the terminal end.

I’ll get a pic or two up of the press later, but a little wind was taken out of my sails with the motor situation. Not sure if more troubleshooting is going to help or if I should just start looking for a replacement
Been there, done that... more than once. I hate working on motor wiring.

It is frequently difficult to stuff the wiring and capacitor into the base and attach the bottom plate. One time after I buttoned up a motor, the cap contacts both contacted the bottom plate and sparks flew on start-up.

Another time, I soldered a too-heavy gauge wire to the capacitor switch. It prevented the cap circuit from opening when it was supposed to. It started smoking after a few seconds of running.

Just yesterday, I forgot to solder a wire to the capacitor. I had it attached to the terminal loop, but not soldered. The motor hummed when switched on, and started when I turned the pulley; both symptoms of a bad cap.

After that, I bit the bullet and ordered a new six pack of six different colored spools of wire. In the future, I'll be snipping all wires close enough to the stator to solder on new color coded wires.
 
OP
F

FrankLee

Well-known member
Joined
Sep 13, 2010
Messages
3,547
Location
seMI, 48317
Re: Craftsman 103.9770 Combination Kit (dp#86)

Hey that looks familiar.
I can't believe anyone would run a belt that way, but I suppose it is cheaper then two motors.

I have seen a couple of these pop up lately and they are always missing something, usually the drill press. I do like those big benches and thought about grabbing one but so far the right deal has not come up.... Well one did but it was right at the beginning of the shut down. It also had one of those 3/4 1750 motors that are not very common.
Yeah, that dp belt is 100" long!

Those large benches are very heavy duty. The cross members are twice as big as the smaller benches and heavier gauge steel.
 

CJnCincy

Member
Joined
Feb 20, 2018
Messages
11
Location
Cin. O
Re: Help..what is this and how do I remove it?

I'm thinking that's a mortising chisel housing that was cut in half. I've seen it a couple times before.

Are you also missing the feed stop rod? Or was that attached to the mortising chisel housing?

If that housing turns on the quill, you may be able to use it for leverage. Insert the largest allen wrench possible into the safety collar hole and turn it with the housing.

Well if you seen these cut in half before then that must be what it is. The cut looks very clean though, and the paint matches the orig paint job so whoever did this wasn't a knucklehead....looks OEM to me.

I do have the Feed Stop Rod...it was attached to this mystery metal, in lieu of the missing Feed Stop Bracket.

I have the quill sub-assembly already detached, so I can't pry on the "half - mortising chisel housing" as it spins freely around the quill, but I'll definitely try your suggestions if I need to reassembly everything just to get the chuck free.

Thanks for the feedback and advice.
 
OP
F

FrankLee

Well-known member
Joined
Sep 13, 2010
Messages
3,547
Location
seMI, 48317
Re: Help..what is this and how do I remove it?

Well if you seen these cut in half before then that must be what it is. The cut looks very clean though, and the paint matches the orig paint job so whoever did this wasn't a knucklehead....looks OEM to me.

I do have the Feed Stop Rod...it was attached to this mystery metal, in lieu of the missing Feed Stop Bracket.

I have the quill sub-assembly already detached, so I can't pry on the "half - mortising chisel housing" as it spins freely around the quill, but I'll definitely try your suggestions if I need to reassembly everything just to get the chuck free.

Thanks for the feedback and advice.
Please post a couple pictures when you're able.

Here's one from earlier in this thread:
https://www.garagejournal.com/forum/showthread.php?p=6717993
 

Smokeshow69

Well-known member
Joined
Dec 7, 2012
Messages
8,366
Location
Pacific Northwest
Re: The Classic Craftsman 100/150 Drill Press

Yes, wondering how many people would spot the base and understand what it was. Had plenty of room in the back of the Outback...

Sent from my Phone 2 using The Garage Journal mobile app


As soon as I saw that picture I knew what it was and I am not even to the end of the thread. Floor model Mohawk [emoji15][emoji41]


Sent from my iPhone using The Garage Journal mobile app
 

ProJay

Member
Joined
Jun 27, 2020
Messages
13
Location
California
Re: DP#85, Craftsman #2432 Milling Vise

Another time, I soldered a too-heavy gauge wire to the capacitor switch. It prevented the cap circuit from opening when it was supposed to. It started smoking after a few seconds of running.

Figured out the arcing, which was caused by a centrifugal switch wire that had come loose. After soldering on a lead and reassembly, it operated smooth on the bench. Installed on the press and got about 5 minutes of operation before it shutdown.

After reading your comment, I'm thinking the gauge of wire I used may be the culprit. The original cloth-covered wires coming out of the windings and routing to the switch and cap appear to be 18 AWG ( I measured the strand bundle at 1.02 mm diameter). That seemed a bit on the small side, but I'm no motor expert. Does that match up with your experience, FrankLee?

Meanwhile, I've shifted over to the machinist vise disassembly. How did you go about removing the handles from the rotary table? It looks like a spanner and castle nut combo. Figured I'd ask before forcing anything... although it looks like the PO might have attempted something. Pic below.

View media item 105252
 
OP
F

FrankLee

Well-known member
Joined
Sep 13, 2010
Messages
3,547
Location
seMI, 48317
Re: DP#85, Craftsman #2432 Milling Vise

Figured out the arcing, which was caused by a centrifugal switch wire that had come loose. After soldering on a lead and reassembly, it operated smooth on the bench. Installed on the press and got about 5 minutes of operation before it shutdown.

After reading your comment, I'm thinking the gauge of wire I used may be the culprit. The original cloth-covered wires coming out of the windings and routing to the switch and cap appear to be 18 AWG ( I measured the strand bundle at 1.02 mm diameter). That seemed a bit on the small side, but I'm no motor expert. Does that match up with your experience, FrankLee?
Not exactly. Whenever my motors failed after reassembly, it was always in the first few seconds.

I'm not sure about wire gauge either. I was always scrounging around for pieces of wire and used what I could find. This past Saturday, I ordered a six pack of different color spools of wire for future refurbs. I guessed on 16 gauge. I'm still waiting for that to arrive. I'll report back when I have some experience using it.

Meanwhile, I've shifted over to the machinist vise disassembly. How did you go about removing the handles from the rotary table? It looks like a spanner and castle nut combo. Figured I'd ask before forcing anything... although it looks like the PO might have attempted something. Pic below.
It looks like the square and round milling vises are very different. The handles on mine have hex nuts on both sides and slots for woodruff keys. They were easy to remove. Both woodruff keys were stubborn, but they did pry out.


ProJay

Member
Joined
Jun 27, 2020
Messages
13
Location
California
Here are some updated photos of my '49 project. Still waiting on wire and tools to attempt getting the motor operating again. However, the DP itself and the vise have been put back into working order.

I'm searching for a hub and lock handles that are in better condition along with the missing table. If I can get a replacement engine-turned head panel I'd probably do that, but haven't ruled out the adhesive-backed film route. However, I'll have to learn how to remove the dents and dings before doing so.

Anyway, here ya go.

View media item 105418
View media item 105419
View media item 105421
View media item 105420
 

Smokeshow69

Well-known member
Joined
Dec 7, 2012
Messages
8,366
Location
Pacific Northwest
Here are some updated photos of my '49 project. Still waiting on wire and tools to attempt getting the motor operating again. However, the DP itself and the vise have been put back into working order.


I'm searching for a hub and lock handles that are in better condition along with the missing table. If I can get a replacement engine-turned head panel I'd probably do that, but haven't ruled out the adhesive-backed film route. However, I'll have to learn how to remove the dents and dings before doing so.


Anyway, here ya go.


View media item 105418


View media item 105419


View media item 105421


View media item 105420


That turned out great! Can’t wait to see it completed


Sent from my iPhone using The Garage Journal mobile app
 
OP
F

FrankLee

Well-known member
Joined
Sep 13, 2010
Messages
3,547
Location
seMI, 48317
Here are some updated photos of my '49 project. Still waiting on wire and tools to attempt getting the motor operating again. However, the DP itself and the vise have been put back into working order.

I'm searching for a hub and lock handles that are in better condition along with the missing table. If I can get a replacement engine-turned head panel I'd probably do that, but haven't ruled out the adhesive-backed film route. However, I'll have to learn how to remove the dents and dings before doing so.

Anyway, here ya go.
Very nice!
 
Last edited:

ProJay

Member
Joined
Jun 27, 2020
Messages
13
Location
California
Very nice!

Are you a purist... do you want period correct handles, or just nicer handles?

Hmm, that's a good question. I think I'm probably closer to a purist. If I were completely missing a piece of hardware, I'd be fine with replacing it with something functional, but would probably continue searching until I found the 'right' part.

I'm definitely going to give a shot at removing the dents from my trim panel. Really appreciate the insights there, FrankLee. Corrosion got to mine pretty good, so the engine turned elements are pretty much gone on the front end. Flipping it over and using the film is probably the best option short of replacement.

Thanks!
 
OP
F

FrankLee

Well-known member
Joined
Sep 13, 2010
Messages
3,547
Location
seMI, 48317
Hmm, that's a good question. I think I'm probably closer to a purist. If I were completely missing a piece of hardware, I'd be fine with replacing it with something functional, but would probably continue searching until I found the 'right' part.

I'm definitely going to give a shot at removing the dents from my trim panel. Really appreciate the insights there, FrankLee. Corrosion got to mine pretty good, so the engine turned elements are pretty much gone on the front end. Flipping it over and using the film is probably the best option short of replacement.

Thanks!
Nothing wrong with sticking with original parts. I have accumulated a handful of the tapered-end handles if needed.

One thing I always recommend though, is to swap out the cast lock cylinder and nuts with the all steel cylinders on the table and quill locks. They are far less prone to sticking and jamming. The head frame lock is not an issue because it is set and forget as it rarely gets loosened.
 

whateg01

Well-known member
Joined
Mar 13, 2006
Messages
11,191
Location
doo dah, kansas, usa
Nothing wrong with sticking with original parts. I have accumulated a handful of the tapered-end handles if needed.

One thing I always recommend though, is to swap out the cast lock cylinder and nuts with the all steel cylinders on the table and quill locks. They are far less prone to sticking and jamming. The head frame lock is not an issue because it is set and forget as it rarely gets loosened.

Are you referring to the split cotter?

Dave
 
OP
F

FrankLee

Well-known member
Joined
Sep 13, 2010
Messages
3,547
Location
seMI, 48317
Are you referring to the split cotter?

Dave
I dunno, maybe. The Craftsman drill press owners manuals refer to these parts as the lock (with internal threads or nut) and the lock sleeve (with thru hole). I've never seen these referenced otherwise in Craftsman literature.

 
Last edited:
To avoid these ads, REGISTER NOW!

ProJay

Member
Joined
Jun 27, 2020
Messages
13
Location
California
Hmm. Maybe I'm not quite a purist then. If a later upgrade can be swapped in that fixes a design flaw, I'd lean going that direction. At the moment, I intend to make this my primary machine to replace my old HF press.

I have accumulated a handful of the tapered-end handles if needed.

Do you mean this style?

16416298958_3fe3b8668d_q.jpg
 
OP
F

FrankLee

Well-known member
Joined
Sep 13, 2010
Messages
3,547
Location
seMI, 48317
Hmm. Maybe I'm not quite a purist then. If a later upgrade can be swapped in that fixes a design flaw, I'd lean going that direction. At the moment, I intend to make this my primary machine to replace my old HF press.

Do you mean this style?
Yes, but the older cast lever handle and bolt will work with the newer steel lock cylinders. So, you could stay with the original look.
 

sheltonfilms

Well-known member
Joined
May 28, 2014
Messages
157
Re: The Classic Craftsman 100/150 Drill Press

99.999% wont know they aren’t correct.

All it takes is one time having deformed pot metal locks, and that purist mentality goes right out the window.

On the table lift I got, I had to get an air hammer out to get the pot metal locks out as they were seized up.


Sent from my iPhone using Tapatalk
 

Craptain

Well-known member
Joined
Apr 18, 2013
Messages
4,027
Location
Tampa Bay FL
Re: The Classic Craftsman 100/150 Drill Press

99.999% wont know they aren’t correct.

All it takes is one time having deformed pot metal locks, and that purist mentality goes right out the window.

On the table lift I got, I had to get an air hammer out to get the pot metal locks out as they were seized up.


Sent from my iPhone using Tapatalk
LOL. I just did the same thing with a Duro dp. Actually hammer and chisel but same idea.

Sent from my ONEPLUS A6013 using Tapatalk
 

ProJay

Member
Joined
Jun 27, 2020
Messages
13
Location
California
Re: The Classic Craftsman 100/150 Drill Press

Yes, but the older cast lever handle and bolt will work with the newer steel lock cylinders. So, you could stay with the original look.

All it takes is one time having deformed pot metal locks, and that purist mentality goes right out the window.

LOL. I just did the same thing with a Duro dp. Actually hammer and chisel but same idea.

Thrice warned, I'm not going to ignore that advice.

FrankLee, if you have some of those steel-based cylinders about, I'd welcome a price to make that swap. Please PM me.
 

11b30b4

Well-known member
Joined
Jul 16, 2020
Messages
1,028
Location
GA
Frank, thank you for all the hard work you put into this. I have found it extremely helpful.
 
OP
F

FrankLee

Well-known member
Joined
Sep 13, 2010
Messages
3,547
Location
seMI, 48317
Re: DP#85, Craftsman #2432 Milling Vise

Not exactly. Whenever my motors failed after reassembly, it was always in the first few seconds.

I'm not sure about wire gauge either. I was always scrounging around for pieces of wire and used what I could find. This past Saturday, I ordered a six pack of different color spools of wire for future refurbs. I guessed on 16 gauge. I'm still waiting for that to arrive. I'll report back when I have some experience using it.
....
My wire order finally arrived yesterday, and today I finally finished the 3/4 hp, 1725 rpm motor model 115.19790. Not much on looks, but it books! It's a little different than the model 115.6962 that is so common on these drill presses.


Below is the wire I ordered. A good size/gauge. It worked very well and I recommend.
https://www.amazon.com/gp/product/B073SD6LZ8/?tag=atomicindus08-20


10/12/2020

I bought the wiring kit above because I could never find scraps of the correct wire to refurbish Craftsman motors and grinders. I wish I could have found a source for smaller quantities of wiring and I think many others are in the same situation.

So, I put a kit together with six 12" pieces of wire, one in each color, and two 6" pieces of 3/16" diameter, adhesive-lined, heat shrink tubing. I believe there is enough wire in this kit to repair two motors or grinders.

The wire is "Remington Industries 16UL1015STRKIT 16 AWG Gauge Stranded Hook Up Wire Kit, 25 feet Length Each, 0.0508" Diameter, UL1015, 600 Volts". Additional wire specs can be found in the Amazon link.


I'm making these kits available for $7.80 shipped.

 
Last edited:

cclfn

Well-known member
Joined
Jul 31, 2012
Messages
308
Location
NW
Re: Table Lift, DP#15

8/21/2015:


Head and Table Adjusting Mechanism for Drill Presses and the Like

a.k.a., Table Lift


Frank,

What kind of value would you place on one of these. I have located one on a 150 that needs work but I have no experience nor have I seen one of these Atlas lifts. I have a Walker Turner lift on a floor model 900 that I like and know they are in high demand ($200 range). I am trying to get a response from the owner to meet just wanted your thoughts as there are other items I am interested in as well.
Thanks,
Wes
 

sheltonfilms

Well-known member
Joined
May 28, 2014
Messages
157
Re: Table Lift, DP#15

8/21/2015:


Head and Table Adjusting Mechanism for Drill Presses and the Like

a.k.a., Table Lift


Frank,

What kind of value would you place on one of these. I have located one on a 150 that needs work but I have no experience nor have I seen one of these Atlas lifts. I have a Walker Turner lift on a floor model 900 that I like and know they are in high demand ($200 range). I am trying to get a response from the owner to meet just wanted your thoughts as there are other items I am interested in as well.
Thanks,
Wes


The going rate (and sold rate) I’ve seen is $600 on eBay. I paid a guy $150 to ship one to me and it was well worth it.

The only thing I would change is the pot metal locks, change them out or the steel ones.

Also, unless you have it in your hands don’t mention one being available near you (or at least hide your location), as there are some hawks on here. I found the listing and I would buy it at that price.


Sent from my iPhone using Tapatalk
 

cclfn

Well-known member
Joined
Jul 31, 2012
Messages
308
Location
NW
Re: Table Lift, DP#15

Thanks for the heads up I have a meeting set up as of 5 minutes ago lol
 
OP
F

FrankLee

Well-known member
Joined
Sep 13, 2010
Messages
3,547
Location
seMI, 48317
Re: Table Lift, DP#15

8/21/2015:


Head and Table Adjusting Mechanism for Drill Presses and the Like

a.k.a., Table Lift
Frank,

What kind of value would you place on one of these. I have located one on a 150 that needs work but I have no experience nor have I seen one of these Atlas lifts. I have a Walker Turner lift on a floor model 900 that I like and know they are in high demand ($200 range). I am trying to get a response from the owner to meet just wanted your thoughts as there are other items I am interested in as well.
Thanks,
Wes

The going rate (and sold rate) I’ve seen is $600 on eBay. I paid a guy $150 to ship one to me and it was well worth it.

The only thing I would change is the pot metal locks, change them out or the steel ones.

Also, unless you have it in your hands don’t mention one being available near you (or at least hide your location), as there are some hawks on here. I found the listing and I would buy it at that price.

Thanks for the heads up I have a meeting set up as of 5 minutes ago lol

Good deal!
Like most things, prices will fluctuate. I do recall that $600 sale, but I think that's the extreme.

The last one I sold locally via craigslist went for $380... and that took a while.

Even though the locks on these lifts are normally set-and-forget, I strongly agree with Sheltonfilms comment about replacing cast lock cylinders in ALL drill press applications; the table lift and head, table and quill lock cylinders.

You probably saw it in my quoted post, but one more thing to watch for is that some sellers advertise head lifts as head and table lifts. They are different. Head only lifts have only one lock and they are not designed to be installed upside-down.
https://www.ebay.com/itm/VINTAGE-AT...LE-LIFT-ASSIST-2-3-4-034-COLUMN-/164197937213
 
Last edited:

cclfn

Well-known member
Joined
Jul 31, 2012
Messages
308
Location
NW
Re: Table Lift, DP#15

Like most things, prices will fluctuate. I do recall that $600 sale, but I think that's the extreme.


You probably saw it in my quoted post, but one more thing to watch for is that some sellers advertise head lifts as head and table lifts. They are different. Head only lifts have only one lock and they are not designed to be installed upside-down.
https://www.ebay.com/itm/VINTAGE-AT...LE-LIFT-ASSIST-2-3-4-034-COLUMN-/164197937213


Frank,

It appears to be the head/table version from the photos I have seen. I will let you know when I see it in person.
 
OP
F

FrankLee

Well-known member
Joined
Sep 13, 2010
Messages
3,547
Location
seMI, 48317
Re: Table Lift, DP#15

Frank,

It appears to be the head/table version from the photos I have seen. I will let you know when I see it in person.
Another thing I forgot... bring a 7/16" wrench. If possible, remove the gear housing cover and inspect the bevel gears. I've had at least one lift that wouldn't budge. I didn't force it and luckily the bevel gears were very good.
 

cclfn

Well-known member
Joined
Jul 31, 2012
Messages
308
Location
NW
Frank,

I"ll have tools with me and I meant to ask what you use for stuck feed handles. I don't know that these are but I told a guy those should just unscrew to clean up but they were stuck and we didn't want to mar them up with vise grip teeth. Any suggestions on removing those?
Thanks
Wes
 
OP
F

FrankLee

Well-known member
Joined
Sep 13, 2010
Messages
3,547
Location
seMI, 48317
Frank,

I"ll have tools with me and I meant to ask what you use for stuck feed handles. I don't know that these are but I told a guy those should just unscrew to clean up but they were stuck and we didn't want to mar them up with vise grip teeth. Any suggestions on removing those?
Thanks
Wes
Yes, jam nuts.

If the rod does not unscrew from the hub, the knob should unscrew from the rod. Two 5/16-18 nuts threaded onto the knob threads and tightened against each other. Remove the rod from the hub with a wrench on the inboard nut.

Use caution though... especially on the earlier rods with the smaller 3/8-16 threads. You never know what previous owners have done. There could be thread locker on the hub threads that will require heat to remove.

I've seen plenty of rods with plier/vise grip marks.

 
Last edited:

cclfn

Well-known member
Joined
Jul 31, 2012
Messages
308
Location
NW
Frank,

Once again I thank you for your quick and thorough sharing of valuable tips!!!!
 
To avoid these ads, REGISTER NOW!
Top Bottom