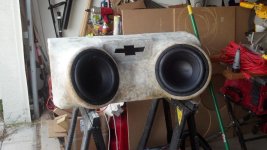
Slow progress I slipped a couple times on my cuts but I don't think it's anything major and it can be fixed. Unfortunately it's not even across the logo I'll have to sand some down but I'll also have to build a little up. I just need to figure out the best way to smooth around the edges of the logo since it's a little bigger than needed to it'll fit in.

You are using an out of date browser. It may not display this or other websites correctly.
You should upgrade or use an alternative browser.
You should upgrade or use an alternative browser.
Anyone good with fiberglass?
- Thread starter tegguy
- Start date
superspec
Well-known member
As promised here are the photos of the back (top) looking at it today I think it's good I just need to do some more cleanup work on it. Let me know what you guys think.
the next time you do this stretch and staple the fleece on the top edge all the way around, cut the excess, resin and call it a day. no more ugly sides to try and cover up. you have to use filler on the face anyway so you can fix and low spots from the staples at that time.
the next time you do this stretch and staple the fleece on the top edge all the way around, cut the excess, resin and call it a day. no more ugly sides to try and cover up. you have to use filler on the face anyway so you can fix and low spots from the staples at that time.
Ya it was stapled along the top of the back edge but we forgot to trim it good before glassing it'll take some work but I'll clean it up it'll just take some work.
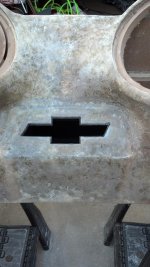
Alright I need some more advice. I started sanding the fiberglass today and I quickly realized I don't know how to tell when I have sanded enough. Do I sand untill it feels smooth or untill all the high spots are out or just scuff the surface? Any advice? I have attached a few photos the logo area I sanded pretty good it's almost smooth to the touch but there are highs and lows in it (some pretty big) the area in the middle of the speakers I just lightly sanded.
Attachments


Tribalvision
Well-known member
dont worry about getting it too smooth yet. just worry about making it even. try to get all the main bumps level. Once you do that coat the whole box with bondo. Then sand that smooth and finish. I'm assuming you will be painting the box?
Ya the end goal is to paint the box I plan to get it semi done and then let the body shop finish the prep work. I'm worried about sanding too much to get everything even I have some big dips across some areas and i guess the question is how much can bondo fill? (My biggest dip is on the top where no body will see)
Tribalvision
Well-known member
you dont want the bondo to be too thick, but then again, you dont want to remove too much of the fiberglass. If the low spot is too low, I mix up a little fiberglass ,mat concoction. cut a ton of little strips of mat, real small like 1/4-1/2" and put them in a cup. Add some prepared resin and stir it up. Kinda like making bondo, but with the mat/resin. Just keep adding shreds of fiberglass until it's more like a paste than a liquid. Then apply it with a squeegy applicator and fill in the low spots. Try to make it all level so you can decrease your sanding later.
Alright unfortunately the only resin I have is the horrible 3M stuff. The biggest low spot is where I mentioned an area that will never be seen I'm debating either a) leaving it or b) trying to build it up with bondo I don't try this 3m resin and don't want to buy more. Everything else came out pretty good.
I am nervous with this step cause I don't want to mess it up and I've never done it before. So basically i just want to scuff up the top surface and take out and high spots? Will it look like the area between the subs? how it's white but not all white?
I am nervous with this step cause I don't want to mess it up and I've never done it before. So basically i just want to scuff up the top surface and take out and high spots? Will it look like the area between the subs? how it's white but not all white?
Tribalvision
Well-known member
Let me guess, the big dip is where the fleece sagged when it was saturated? If you think no one will see it, it's up to you if you want to fix it. If it were me, I would fix it. Just because I'm picky like that. Home depot and Lowes both sell quart cans of Resin so you dont have to buy a whole gallon
Let me guess, the big dip is where the fleece sagged when it was saturated? If you think no one will see it, it's up to you if you want to fix it. If it were me, I would fix it. Just because I'm picky like that. Home depot and Lowes both sell quart cans of Resin so you dont have to buy a whole gallon
I honestly don't know what happened the fleece was super tight all the way around. Yeah I know no one will see it basically the box is almost too tall to fit where it is going right now. Most of what I'm doing won't be seen. I'll take a look at it closer when I get a chance and see what I'll do. It'll be fixed but it might be fixed with bondo. I have a local paint supply store that has good prices and I think they sell resin in the quart (the gallon was only 20 bucks)
retrobuilder
Well-known member
What weight material are you using. I'd check for lighter finer weave cloth with epoxy resins. Less sanding and smoother results.
Marine and aircraft suppliers are good source.
Marine and aircraft suppliers are good source.
What weight material are you using. I'd check for lighter finer weave cloth with epoxy resins. Less sanding and smoother results.
Marine and aircraft suppliers are good source.
The fiberglass was 1.5oz mat as recommended by Tribal
For dips at this stage I would fill with kitty hair.

It is basically resin, chopped mat, and bondo mixed together.
After that I would bondo and sand, then "milkshake" followed by a slight sanding. By that time you can do a high build primer and sand and it will be perfect. The advantage of doing it this way is gravity does a lot of the smoothing with the milkshake so you don't have to put so much elbow grease into sanding quite as much.
It is basically resin, chopped mat, and bondo mixed together.
After that I would bondo and sand, then "milkshake" followed by a slight sanding. By that time you can do a high build primer and sand and it will be perfect. The advantage of doing it this way is gravity does a lot of the smoothing with the milkshake so you don't have to put so much elbow grease into sanding quite as much.
For dips at this stage I would fill with kitty hair.
It is basically resin, chopped mat, and bondo mixed together.
After that I would bondo and sand, then "milkshake" followed by a slight sanding. By that time you can do a high build primer and sand and it will be perfect. The advantage of doing it this way is gravity does a lot of the smoothing with the milkshake so you don't have to put so much elbow grease into sanding quite as much.
Thanks for the advice I'm really trying to not buy much more stuff for this project. I think I will attempt it with a quart of resin and the gallon of bondo I have (hope it's enough). I am going to try to start the bondo work this weekend and I've never done this before either so I am nervous to do it. If I put resin in this one low spot is there anyway to make it cure fast or stop smelling? I really don't want to put it in my garage because of fumes but I don't want to leave it outside because of weather.
Well the weather cooperated today so I got the fiberglass sanding on the box done (I think) and I was able to cut my access hole for my back lighting. I wanted to see how it was looking for here are a couple proof of concept photos
Attachments


Does anyone have any Bondo advice? I know Tribal gave me a little earlier. Should I hand sand or is it ok to use an air sander? What stages of grit should I go in? Do I need one of the sanding "bars" they use on cars? How do I know when it's ok to start sanding?
If you have a sander that can follow the contours by all means use it, I wind up hand sanding a lot of my fiberglass projects.
Just be sure the bondo is fully dry/cured it will sand much easier. If it is too "wet" it will clog up the sandpaper and can leave nasty marks on the box.
Just be sure the bondo is fully dry/cured it will sand much easier. If it is too "wet" it will clog up the sandpaper and can leave nasty marks on the box.
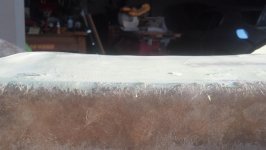
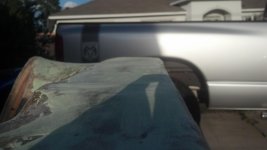
Well time for more advice. I made my first attempt at body filler today (see below) I was focusing on the middle section trying to get it smooth because it had the big dip in it. I had the following questions while I was doing it
1) how do I know if I'm putting on too much or too little?
2) How do I know when I've waited long enough to start sanding? It wasn't really sanding it was more clumping when I started (I assume I wasn't waiting long enough)
1) how do I know if I'm putting on too much or too little?
2) How do I know when I've waited long enough to start sanding? It wasn't really sanding it was more clumping when I started (I assume I wasn't waiting long enough)
Attachments



ThreePointedStar
Well-known member
After looking through your build up to this point, everything looks pretty good. You have got a lot of glass on this box so sanding is what you should focus on. A long block sander would be your friend right now in order to work on that dip.
When it comes to sanding, there shouldn’t be a particular “focus” point as you said. It can be dangerous, because you may lose sight of other peaks and valleys that are surrounding the focused area. The result could be a really nice center section, but now there is a bad transition into that area.
My suggest for the top of that box is to use a long block had or machine sander. The sanding stroke would go the whole length of the top of the box, which will make it all uniform. That large valley you have will eventually start taking care of itself. From my POV, you shouldn't need too much more bondo up there. Just enough to fill whats left of that valley after some decent sanding.
When it comes to sanding, there shouldn’t be a particular “focus” point as you said. It can be dangerous, because you may lose sight of other peaks and valleys that are surrounding the focused area. The result could be a really nice center section, but now there is a bad transition into that area.
My suggest for the top of that box is to use a long block had or machine sander. The sanding stroke would go the whole length of the top of the box, which will make it all uniform. That large valley you have will eventually start taking care of itself. From my POV, you shouldn't need too much more bondo up there. Just enough to fill whats left of that valley after some decent sanding.
Thanks ThreePointedStar I probably said the focus thing wrong. I was just trying to build up the major dip to be closer to level and next I was going to focus on the whole top. I have a small palm sander about 6" long that I was using at the end would this be ok or should I go get one of the long long ones? I was using the 6" on angle lines like you do with body work. The middle section is going to be higher than everything else and there isn't anything i can do about it I messed up when I build the box so I was simply trying to shape a gentle curve on the sides to go up into it.
ThreePointedStar
Well-known member
Ok I have a better picture of what you are trying to accomplish now. I retract what I said about the long block sander now. It seems like you don’t have any flat planes so a long sander is not the solution. Basically anytime that you there are continues curves, its typically best to be hand sanding in order to avoid flat spots.
It looks like the glass matt you used still has a lot of work to be done on it. Are you using a flexible flat blade to smooth the bondo on?
It looks like the glass matt you used still has a lot of work to be done on it. Are you using a flexible flat blade to smooth the bondo on?
I went ahead and bought a bigger block sander becuase it will be useful on a couple parts. But I know there will be a ton of hand sanding on this project.
I am using one of the yellow blades to put on the bondo which is pretty flat. As I mentioned before I have zero knowledge of what I'm doing so the matt felt to be pretty flat with the exception of the small dips between the layers but I don't know how far I was supposed to go with sanding it. This is one reason I started on the top was because if I wasn't prepped enough with the glass I was working in an area no on will see.
I am using one of the yellow blades to put on the bondo which is pretty flat. As I mentioned before I have zero knowledge of what I'm doing so the matt felt to be pretty flat with the exception of the small dips between the layers but I don't know how far I was supposed to go with sanding it. This is one reason I started on the top was because if I wasn't prepped enough with the glass I was working in an area no on will see.
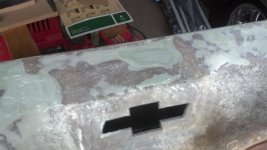
Well I did some more work on the top middle again today (about an hour and a half worth) and I have it pretty smooth and level there are a couple low spots I need to fill again though. I've been using a straight edge to check for low and high spots and it seems to be helping. I did find a couple spots I missed on the fiberglass sanding I had to go back and fix. Below are two pictures from today. My hand got tired so I ended up breaking out the random orbital sander and the die grinder with the sanding disc. As you can see i ended up sanding a lot off my first attempt at this because I ended up feeling high spots and the whole thing was a high spot (oops)
Attachments

I need advice guys. I was thinking today I'm not going to be able to afford paint on this project for a little while (probably after I graduate college) is it worth it to do the body work now or should I just install it as it and wait till later to do the body work?
Tribalvision
Well-known member
I would do Carpet in the trunk. It's a little more forgiving if you have to piece it. Vinyl can be difficult to cover around contours if you've never done it before. If you're going to carpet, get carpet without a backing. It will curve/flex better
I was thinking carpet for the panels in the trunk but wasn't sure on the enclosure. You think carpet would look better on the enclosure? Do you think it would look right? I really dont' know whats going to give it the best look since it's going to be surrounded with carpet.
Tribalvision
Well-known member
if you carpet it to match your panels it will blend in and look like it belongs there. Remember, no backing
Tribalvision
Well-known member
well fiberglass/painted is a modern type modification. I feel Carpet is old school and will compliment your classic car. I'm not a big fan of vinyl unless its covering pods in the interior. But in the trunk, I would make the panels for the sides and carpet the box to match. Carpet is fairly reasonable if you buy online. Buy more than you need just so you have some spare to use for later projects. (no backing)
Ya I was going to have the interior shop do it when they did the whole car. I'm torn cause the car is a mix of modern and classic I'm leaning towards carpet cause you right it would blend in but paint would match the exterior of the car
I don't think carpet would look right on that abstract of a box. I would do a body color paint job. It would tie the trunk in with the rest of the car.
Not that you will see the top if the box, but a belt sander would remove some material fast to help straighten that top line. Plus a DA would help around all the edge. It's hard to tell from the pic but it looks like there are hours of sanding before paint
Not that you will see the top if the box, but a belt sander would remove some material fast to help straighten that top line. Plus a DA would help around all the edge. It's hard to tell from the pic but it looks like there are hours of sanding before paint
I don't think carpet would look right on that abstract of a box. I would do a body color paint job. It would tie the trunk in with the rest of the car.
Not that you will see the top if the box, but a belt sander would remove some material fast to help straighten that top line. Plus a DA would help around all the edge. It's hard to tell from the pic but it looks like there are hours of sanding before paint
There is a lot of hours of sanding and body filler before it would be ready for paint. I decided to stop where I was at and install the box as is until I can afford the paint (Probably be around a year since I don't graduate school until May) This way I can focus on getting the car drive-able and possibly drive the car for the first time ever (I've owned it since January 2011 and have never driven it)
Another option that would save a lot of body work would be to get one of the u-pol sprayable liner kits and spray a pebble finish over the abstract shapes, then paint it to match car. The high gloss on top of the textured finish is a bit different look but IMHO it looks pretty good.
Another option that would save a lot of body work would be to get one of the u-pol sprayable liner kits and spray a pebble finish over the abstract shapes, then paint it to match car. The high gloss on top of the textured finish is a bit different look but IMHO it looks pretty good.
Thanks for the suggestion but I hate those pebble finish texture shapes.
muibubbles
Well-known member
paint is a lot more labor (tons of sanding) but i think would looks better to enhance the abstract shape and to really show off your hard work. if you wrap it, you can get away with just sanding it a little more but will look kinda generic and loose its wow factor dude to loosing a lot of its lines in the fabric. If you have no experience with upholstery id recommend using the carpet. im no pro, but i've done a few projects, and theres nothing more frustrating when the fabric doesnt contour how you want it to...