
You are using an out of date browser. It may not display this or other websites correctly.
You should upgrade or use an alternative browser.
You should upgrade or use an alternative browser.
BEFORE & AFTER....A Tool Polisher's Haven
- Thread starter JMLangford
- Start date


Dan in Pasadena
Well-known member
^^Oh man, that vise is gorgeous. I’d have to put it on the coffee table as a work of art to be discussed with company!
Of course my girlfriend might have something to say about that but it’s THAT exceptional to me.
Of course my girlfriend might have something to say about that but it’s THAT exceptional to me.
johno
Well-known member
I'm very impressed with all this polished stuff, I really am.
But I just don't see the point of polishing a hammer or vise that I'm just going to pound on, or pound with.
Unless of course they're just for looking at.
But I just don't see the point of polishing a hammer or vise that I'm just going to pound on, or pound with.
Unless of course they're just for looking at.
trijeff
Well-known member
Thanks Dan! Similar story at my house, but it's wife not gf, so it's even more set in stone lol
Johno, I hear ya ... you should see my daily user, omg what a mess. But these are for sale and people will pay top dollar. My guess is that they largely sit unused.
Johno, I hear ya ... you should see my daily user, omg what a mess. But these are for sale and people will pay top dollar. My guess is that they largely sit unused.
Housebroke
Member
- Joined
- Apr 1, 2018
- Messages
- 14


1/2 Cup
Member Emeritus
Housebroke, top job..
Housebroke
Member
- Joined
- Apr 1, 2018
- Messages
- 14
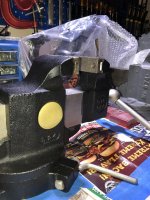
A Craigslist find.
johno
Well-known member
Thanks Dan! Similar story at my house, but it's wife not gf, so it's even more set in stone lol
Johno, I hear ya ... you should see my daily user, omg what a mess. But these are for sale and people will pay top dollar. My guess is that they largely sit unused.
O, now I get it, thanks.
PelicanPines
ALLIANCE MEMBER
Hello here a restro of mine last month

That is beautiful Housebroke... had to rotate it to realize... It's in a vehicle
Housebroke
Member
- Joined
- Apr 1, 2018
- Messages
- 14
I'm in a motorhome, this machine is pretty rare.
Housebroke
Member
- Joined
- Apr 1, 2018
- Messages
- 14
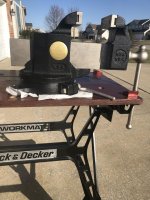
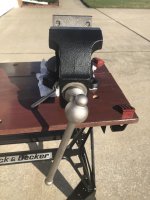
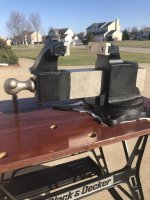
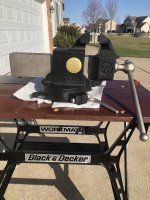
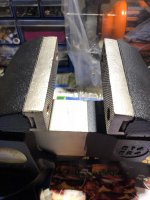
It's a benchstar dated 1970.
Housebroke
Member
- Joined
- Apr 1, 2018
- Messages
- 14
This thing got tons of polishing.
Housebroke
Member
- Joined
- Apr 1, 2018
- Messages
- 14
I'm actually seeking some history on this round column drill mill.
KMinAF
Well-known member
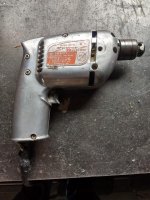
My first attempt, a $5.00 drill bought at a garage sale. It looks a million times better but what am I missing to get it to a glassy shine? I cleaned it then "smoothed" it with 0000 steel wool. I am using a HF bench top buffer with brown polishing compound.
Attachments
![IMG_20180416_183327881[1].jpg](/forum/data/attachments/653/653752-4bd67a45500f1877d302cee48da7af06.jpg)
leshyi
Well-known member
Show me the tools and materials with which you do it!
drivesitfar
Well-known member
KM: i'm guessing you just need to keep polishing and using more elbow grease, but i'll watch to see what others say.
Housebroke: great looking old drill press and since you didn't get any answers to your question about the drill press you might post it over on the show your drill press in the vintage section and maybe one of the members that watch that thread might be able to give you some information.
here's the link:
https://www.garagejournal.com/forum/showthread.php?t=116677&highlight=drill+press
great work on your drill press BTW!!!
ALL: keep posting up those great tools you spent more than a little time to spiff up and please tell us how you did it if you have some time to.
don long
Well-known member
My first attempt, a $5.00 drill bought at a garage sale. It looks a million times better but what am I missing to get it to a glassy shine? I cleaned it then "smoothed" it with 0000 steel wool. I am using a HF bench top buffer with brown polishing compound.
When I polish up my aluminum tools I don't use steel wool I go through a sand paper process. Depending on the original condition of the tools surface. I start with a course paper to remove any deep scratches or imperfections. 80 or 120 grit
If the piece is pretty clean and smooth I will start with 220 dry paper and sand it til the finish is dull. moving up to 400 grit then 600 grit (still dry paper)
next I sand with 800 paper and the piece starts to have a dull shine.
Next I hit the piece with 1200 paper and work out any left over scratches before moving on to the buffer.
My buff wheel is a tight sewed wheel and I use the brown rouge sparingly and when the piece is real shiny I move over to the soft wheel with no polish and buff up the piece to its final shine.
Hope that helps.
Don
drivesitfar
Well-known member
Don: thanks for the detailed post about the way you shine up your amazing things that are lucky enough to find their way to your hands. I know you've got some amazing tools too and if you get a chance to post up yours and maybe how you organize them I bet others would love to see how you set it up.
cheers
ALL: one of our members just nickel plated an old 100 year old Prentiss vise and then powdercoat painted the main portions of it so it has a sort of wrinkled finish and I hope he posts it on this thread or maybe i'll let him know he needs to if he has time.
cheers
ALL: one of our members just nickel plated an old 100 year old Prentiss vise and then powdercoat painted the main portions of it so it has a sort of wrinkled finish and I hope he posts it on this thread or maybe i'll let him know he needs to if he has time.
leshyi
Well-known member
Don: Thank you for the details! Perhaps you have some tricky tips for hard-to-reach places? I would like to learn more about the nuances of polishing complex shapes
KMinAF
Well-known member
I have gained a new appreciation for what you guys are doing here. I figured how hard can it be? A little steel wool, a bit of polishing compound and presto one glassy smooth, super shiny master piece.
After 2 hours of "hard" work not getting the results that I had hoped for I started over. First wet sanding with 800 grit, then a LOT more than 2 hours polishing. Now that I'm addicted I can't wait to check out the thrift stores to find more "diamonds in the rough"!
After 2 hours of "hard" work not getting the results that I had hoped for I started over. First wet sanding with 800 grit, then a LOT more than 2 hours polishing. Now that I'm addicted I can't wait to check out the thrift stores to find more "diamonds in the rough"!
Attachments

gman007
Well-known member
Hi All
Here are some before photos of a 1930s Prentiss Bull Dog 524 , I will post some after photos below.
Here are some before photos of a 1930s Prentiss Bull Dog 524 , I will post some after photos below.
Attachments
-
 Prentiss Bull Dog 524 profile IMG_2295.jpg100 KB · Views: 145
 -
 Prentiss Bull Dog 524 profile 2 IMG_2303.jpg138.7 KB · Views: 127
 -
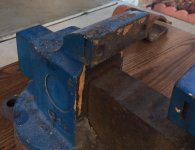 Prentiss Bull Dog 524 jasw inserts IMG_2301.jpg127.5 KB · Views: 119
 -
 Prentiss Bull Dog 524 jaw inserts IMG_2304.jpg142.5 KB · Views: 120
 -
 Prentiss Bull Dog 524 top view IMG_2294.jpg85.3 KB · Views: 106
 -
 Prentiss Bull Dog 524 back IMG_2300.jpg101.9 KB · Views: 134
gman007
Well-known member
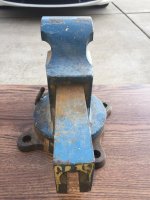
The vise was bead blasted, completely nickel plated, and then certain parts were powder coated. Here are some after photos.
Attachments
-
 Prentiss restored 16.jpg116.3 KB · Views: 312
 -
 Prentiss restored 12.jpg125.4 KB · Views: 273
 -
 Prentiss restored 9.jpg129 KB · Views: 261
 -
 Prentiss restored 10.jpg92 KB · Views: 267
 -
 Prentiss restored 11.jpg112.2 KB · Views: 255
 -
 Prentiss restored 15.jpg124.1 KB · Views: 258
 -
 Prentiss restored 7.jpg107.5 KB · Views: 250
Last edited:
gman007
Well-known member
Here are a few more after photos
Attachments
-
 Prentiss restored 6.jpg101.4 KB · Views: 151
 -
 Prentiss restored 4.jpg146.6 KB · Views: 133
 -
 Prentiss restored 14.jpg111.5 KB · Views: 136
 -
 Prentiss restored 8.jpg107.7 KB · Views: 135
 -
 Prentiss restored 3.jpg122.5 KB · Views: 132
 -
 Prentiss restored 1.jpg116.3 KB · Views: 122
 -
 Prentiss restored 2.jpg118.1 KB · Views: 134
jhn9840
Well-known member
Great job on the Prentiss Bull Dog 524. It’s good for at least another 88 years.
jhn9840
John
jhn9840
John
drivesitfar
Well-known member
KM: can the phrase "PRACTICE MAKES PERFECT WITH SOME EXTRA ELBOW GREASE" is maybe the difference between your first attempt at shining up that old drill and your latest attempt? WELL DONE
good to hear more of the old school tools are going to be saved cause they are certainly better built than most of the new ones.
007: nice work spiffing up your almost 100 year old Prentiss bench vise. VERY WELL DONE!!!
did you pay to have it all done or did you blast it and send it to get nickle plated and painted?
loving the wrinkled paint look a lot!!
gman007
Well-known member
Great job on the Prentiss Bull Dog 524. It’s good for at least another 88 years.
jhn9840
John
Thanks much.
007: nice work spiffing up your almost 100 year old Prentiss bench vise. VERY WELL DONE!!!
did you pay to have it all done or did you blast it and send it to get nickle plated and painted?
loving the wrinkled paint look a lot!!
Drives Thanks much, I am glad that you like the look. It also functions flawlessly, it turns with one finger, movements are smooth and there is no play or backlash.
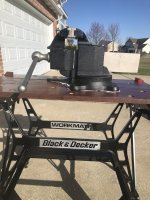
I did the disassembly and that turned out to be a challenge (which is not unusual for old vises) as many nuts, bolts and jaw inserts were rusted and ceased. The bead blasting, nickel plating and powder coating (which included baking at 450 F for about 40 min) were done by Pros.
Last edited:
OP
JMLangford
Well-known member
If you polish your tool too much it will grow a toenail on the end of it. Don't ask how I know this [emoji39]
Sent from my Pixel 2 using Tapatalk
No toenail yet....I just looked
I've always heard it'll make you go blind......I'll just polish my tool until I need glasses.....

.
OP
JMLangford
Well-known member
The Tale of Two Ratchets......
I found these two Snap-On ratchets at my flea a couple of weeks back.....They're both dated 1952 and look pretty good for a pair of 66 yr olds, but they were in need of some TLC.....
Ready for their SPA Treatment.....

These 66 yr old gals had a pretty good dental plan, cause their teeth are in great shape.....(my teeth aren't that good lookin' and I'm a year younger )
)

Here's the Before & Afters......One gal was a bit rough, but the other gal was well kept......


It was a bit hard to read the date code.....I think I might need glasses
.
I found these two Snap-On ratchets at my flea a couple of weeks back.....They're both dated 1952 and look pretty good for a pair of 66 yr olds, but they were in need of some TLC.....
Ready for their SPA Treatment.....
These 66 yr old gals had a pretty good dental plan, cause their teeth are in great shape.....(my teeth aren't that good lookin' and I'm a year younger
)Here's the Before & Afters......One gal was a bit rough, but the other gal was well kept......
It was a bit hard to read the date code.....I think I might need glasses
.
Last edited:
WarrenJ
Well-known member
Some great looking work on all these pages.
Looking forward to checking back often.
Looking forward to checking back often.
The Tale of Two Ratchets......
I found these two Snap-On ratchets at my flea a couple of weeks back.....They're both dated 1952 and look pretty good for a pair of 66 yr olds, but they were in need of some TLC.....
Ready for their SPA Treatment.....
These 66 yr old gals had a pretty good dental plan, cause their teeth are in great shape.....(my teeth aren't that good lookin' and I'm a year younger
Here's the Before & Afters......One gal was a bit rough, but the other gal was well kept......
It was a bit hard to read the date code.....I think I might need glasses
.
Speaking of ratchets...any new photos of our project?
OP
JMLangford
Well-known member
Speaking of ratchets...any new photos of our project?
That's coming up soon.....
I took a ton of pics and I'm having to resize them and put them in some kind of order......these two ratchets snuck in during the process and I couldn't stand to see them suffer......
.
drivesitfar
Well-known member
JM: I got lucky and found a way around re sizing pics if that might help. i download one or two at a time to get up to 7 pics per post. if you try to download 3 or more at a time that security token kicks them out. sometimes it kicks it out with two and in a rare event it will kick out just one so try it and see if it might save you from resizing all your pictures.
feel free to PM me if you might need a bit more information and I use the PAPERCLIP just above where we write our posts to click on and attach pics to GJ sort of like attaching pics to an email.
nice work on the ratchets!!
feel free to PM me if you might need a bit more information and I use the PAPERCLIP just above where we write our posts to click on and attach pics to GJ sort of like attaching pics to an email.
nice work on the ratchets!!
OP
JMLangford
Well-known member
Driives, I always take pics with my phone in large format (for detail) and then downsize them in IrFanView .....for uploading here.
I also have to resize to put two pics together like the above Before & After pics......dem suckers was HUGE!!!
.
I also have to resize to put two pics together like the above Before & After pics......dem suckers was HUGE!!!
.
milwaukeephil
Well-known member
Speaking of polishing... I have a box of old Ping putters that I've accumulated over the years for a few bucks each. I've been restoring them for myself and as gifts for friends. I start with an old putter and sand the bag chatter off them by hand, then they go in the bead blaster. After 20 seconds in the blaster, I sand the face up to 3000 grit and fill-and-wipe paint the logos with Testors enamel. Then they get a $7 60s reproduction Ping grips I buy on eBay.


Oh, and my early 80s Clark forklift. "I distinctly ordered the Antarctic Blue Super Sports Wagon with the C.B. and optional rally fun pack."


Oh, and my early 80s Clark forklift. "I distinctly ordered the Antarctic Blue Super Sports Wagon with the C.B. and optional rally fun pack."
Last edited:
drivesitfar
Well-known member
Milwaukee: I'd love to see your ping putters so try to post pics again if you have time to. also just an FYI you might want to check the AS IS value on some of them before polishing them up cause a few players still use the anser on the PGA or Champions PGA tours and they are valuable.
I've got a few bags of putters and discovered that if i would have had a loft and lie putter bender it would have saved me a lot of money and improved my game.
JM: before you resize try downloading one picture on GJ. then after that downloads try another one until you get up to the 7 picture max per post. or keep resizing if you like doing that.
ALL: well while i'm Getting Organized i'm not getting any time to polish stuff, but thought i'd post a pic of my front yard that is looking ok.
cheers and have a great day!!
Attachments

milwaukeephil
Well-known member
OK, I tried a new image host. Apparently Imgur doesn't work here (at least for everyone else -- the images were viewable on my browser).
I understand there are purists who say don't touch the patina but I'm never going to sell one anyway. Plus, after I play them a few times the patina starts to come back.
I understand there are purists who say don't touch the patina but I'm never going to sell one anyway. Plus, after I play them a few times the patina starts to come back.
drivesitfar
Well-known member
Milwaukee: if you plan on keeping them for your pleasure and use then shine them as you please. Take off the s on your imagur link https and see if that helps. Or just post directly to go using the paper clip method just above where we write our posts sort of like attaching a picture to an email. Good luck.
Dan in Pasadena
Well-known member
ALL: well while i'm Getting Organized i'm not getting any time to polish stuff, but thought i'd post a pic of my front yard that is looking ok.
cheers and have a great day!!
Looks a lot better than "ok" - beautiful. Congrats on being such a good gardener.
I too love to garden. I can be out there a few hours and at the end I can't remember a single thought. I just zone out, no stress, no cares.
I just retired and will try to get my garden back to what it was a few years ago
Attachments


paulm12
Well-known member
M-Phil: good one on the Clark reference, I got it right away with the quote. Love that movie.