To avoid these ads, REGISTER NOW!

Above 1200 Sq/FT Blue Bomber's Garages

Wokspaces above 1200 squarefeet.
OP
B

BlueBomber

Well-known member
Joined
Sep 14, 2013
Messages
3,201
Location
Outside Boston, MA
I hit everything on my punch list needed for the final inspection this coming week.

For those of you following this thread, you'll recall I removed the bottom two factory feet from the garage door tracks to get max width in my door openings. The doors were going up and down without any problems, but I felt the bottoms of the tracks should be anchored. So, I recycled some of the removed brackets and drilled new mounting holes. I used pop rivets from inside the tracks to avoid any protrusion that would gack up the door rollers.
20180528_110700.jpg20180528_110720.jpeg
20180528_142154.jpeg

The top bracket was just barely long enough to reach the tracks. New mounting holes were right at the edge of the bracket. To avoid ruining the bit on the concrete after drilling through the metal, I stuck some scrap wood between the two.
20180528_110744.jpeg20180528_112650.jpeg

The lower brackets were a little tricky. My first set of holes went easy...too easy. After pulling out the bracket, I confirmed I had failed to miss the existing holes, which are too big for rivets.
20180528_113139.jpg

Then I broke my 1/8" drill bit by pushing too hard. I switched to a 1/4" bit and larger rivets.
20180528_124222.jpg

Here's one track all done. I drilled into the foundation with a masonry bit and secured the brackets with Tapcons.
20180528_142145.jpg


Sent from my SM-G950U using Tapatalk
 
Last edited:
To avoid these ads, REGISTER NOW!
OP
B

BlueBomber

Well-known member
Joined
Sep 14, 2013
Messages
3,201
Location
Outside Boston, MA
Next, I trimmed the shingles with a guide string and an old, nasty carbide blade on the trusty circular saw.
20180528_181809.jpeg

I foam sealed the man door inside jam spaces and all gaps along the outside doors down along the foundation.
20180528_181815.jpg

The utility pipe got a sheet metal collar to cover the oversized hole through the sheathing, which also received foam from the outside.
20180528_190124.jpg

Finally, I used some scraps from cutting down the garage door trim boards to cover the ugly foam filler. The vinyl scraps were too small to nail, so I decided to glue them in place.
20180528_182711.jpg

If your spouse ever asks you why you keep buying clamps when you have so many already, show him/her this picture. Bar clamps, spring clamps, carpenter clamps and even C-clamps were hauled out to serve clamping duty. Many of these clamps were estate sale finds, so I'm sure a bunch of dead guys are smiling down from heaven over the sight of their old tools continuing to be of good use!
20180528_190148.jpeg

I'll call for the final inspection on Monday--wish me luck!
 
Last edited:

BB Sig

Well-known member
Joined
May 16, 2018
Messages
139
Location
Florida
I've spent the last three evenings reading your thread. Great ideas and execution. Good luck tomorrow!
 
OP
B

BlueBomber

Well-known member
Joined
Sep 14, 2013
Messages
3,201
Location
Outside Boston, MA
A little over nine months after I broke ground, my baby is done!
20180530_184902.jpg

Here are a few shots around the inside and outside of my new palace.
20180530_184956.jpeg20180530_185054.jpeg20180530_185016.jpeg
20180530_185145.jpeg

By the way, a big Thank You to my GarageJournal family for all the encouragement and advice along the way. It really helped knowing that there were folks on a web forum (who I've mostly never met!) who appreciated what I was doing. SWMBO tolerated it--you all actually like it!

The ride's not over yet. Watch the space below for a new workbench, storage mezzanine and a two-post lift in the coming months. Once those are done, I'll clean up both garages and get started on the Impala in the above picture.

20180530_185237.jpeg

Cheers!
20180530_185608.jpeg

Sent from my SM-G950U using Tapatalk
 
Last edited:

Striker-7

Active member
Joined
May 12, 2017
Messages
35
Location
Seaford, DE
That's one clean looking building, sir! Been following this for months, nervously watching those shingles hanging over the eaves and awaiting that anguished cry about a windstorm ripping tabs off, but you beat the odds! :-D

Cheers!
 

Jayman17

Well-known member
Joined
Feb 6, 2017
Messages
3,797
Location
Seattle, Wa
I hit everything on my punch list needed for the final inspection this coming week.

For those of you following this thread, you'll recall I removed the bottom two factory feet from the garage door tracks to get max width in my door openings. The doors were going up and down without any problems, but I felt the bottoms of the tracks should be anchored. So, I recycled some of the removed brackets and drilled new mounting holes. I used pop rivets from inside the tracks to avoid any protrusion that would gack up the door rollers.
20180528_110700.jpg20180528_110720.jpeg
20180528_142154.jpeg

The top bracket was just barely long enough to reach the tracks. New mounting holes were right at the edge of the bracket. To avoid ruining the bit on the concrete after drilling through the metal, I stick some scrap wood between the two.
20180528_110744.jpeg20180528_112650.jpeg

The lower brackets were a little tricky. My first set of holes went easy...to easy. After pulling out the bracket, I confirmed I had failed to miss the existing holes, which are too big for rivets.
20180528_113139.jpg

Then I broke my 1/8" drill bit by pushing to hard. I switched to a 1/4" bit and larger rivets.
20180528_124222.jpg

Here's one track all done. I rolled into the foundation with a masonry bit and secured the brackets with Tapcons.
20180528_142145.jpg


Sent from my SM-G950U using Tapatalk

Hey BB, pretty slick job mounting those brackets. Your place is looking good!
:thumbup:
Jay
 

BUGTHUG

Well-known member
Joined
Nov 12, 2010
Messages
2,960
Location
Kansas
Very nice.:thumbup: What is the blue tube going thru the wall? It looks like a air line , or is it electrical?
I ran my air line underground and was curious if that's what you did? BUG:thumbup:
 

C_F

ALLIANCE MEMBER
Joined
Jan 21, 2005
Messages
9,675
Location
Utah...SNOW BLOWS!
By the way, a big Thank You to my GarageJournal family for all the encouragement and advice along the way. It really helped knowing that there were folks on a web forum (who I've mostly never met!) who appreciated what I was doing. SWMBO tolerated it--you all actually like it!
I don't know about the rest of these guys, but I'm just living vicariously through you. :D


Congrats on passing your inspection, I'm sure that's a relief.
 
OP
B

BlueBomber

Well-known member
Joined
Sep 14, 2013
Messages
3,201
Location
Outside Boston, MA
Bugthug,

The blue tubing is in fact my compressed air line, run thru my utility pipe from the the other building. Posts #s 193 and 202 detail my installation and remotely activated ball valve design.

Sent from my SM-G950U using Tapatalk
 
Last edited:
OP
B

BlueBomber

Well-known member
Joined
Sep 14, 2013
Messages
3,201
Location
Outside Boston, MA
All those late nights in the dark on the roof laying shingles when it’s cold.

That’s dedication. It’s over and enjoy it!

I don't know about the rest of these guys, but I'm just living vicariously through you. :D


Congrats on passing your inspection, I'm sure that's a relief.


Thanks, captain14 and C_F. You've both been a source of encouragement from the first few posts!

Sent from my SM-G950U using Tapatalk
 
Last edited:

jakemac

Well-known member
Joined
May 21, 2013
Messages
9,035
Location
New England
Glad to see you got the paper.
Now you can start installing all the things you don't ever want an inspector to see. :lol_hitti
 

BUGTHUG

Well-known member
Joined
Nov 12, 2010
Messages
2,960
Location
Kansas
you think you could take pictures of your air tank with all the accessories you attached? Also any other Max line installment of the business end of the airline. I'm in the process of trying to hook up my Max air. Thanks, BUG
 

Mr. Roboto

Well-known member
Joined
Dec 11, 2012
Messages
2,160
Location
New Hampshire
I just came across your thread, and read through the whole thing. Love it! You did a really nice job. Thanks for documenting it all so well so we could follow along. What a nice sense of accomplishment getting that final inspection signed off was I'm sure. Looking forward to see the rest of it come together.

You're not far from where I grew up in MA. I jumped the border and live in NH now, though.
 
OP
B

BlueBomber

Well-known member
Joined
Sep 14, 2013
Messages
3,201
Location
Outside Boston, MA
Glad to see you got the paper.
Now you can start installing all the things you don't ever want an inspector to see. [emoji38]_hitti

It's not that I don't want him to see...I just don't want to have to ask permission.

you think you could take pictures of your air tank with all the accessories you attached? Also any other Max line installment of the business end of the airline. I'm in the process of trying to hook up my Max air. Thanks, BUG

I'll take few more pics, but I haven't finished the business end yet in the new garage. That'll probably come in conjunction with the new workbench.

I just came across your thread, and read through the whole thing. Love it! You did a really nice job. Thanks for documenting it all so well so we could follow along. What a nice sense of accomplishment getting that final inspection signed off was I'm sure. Looking forward to see the rest of it come together.

You're not far from where I grew up in MA. I jumped the border and live in NH now, though.

Thanks for working your way through the whole thread! I'm gratified others have found it useful and entertaining. And yes, I am proud that I did much of it myself. Cheers, my fellow New Englander!

Sent from my SM-G950U using Tapatalk
 

drivesitfar

Well-known member
Joined
Oct 23, 2013
Messages
36,008
Location
Pacific Northwest
BB: great to see and read that you've got your final inspection so now the real fun begins doesn't it.

I hope you've maybe drawn out a plan of how you want to set up the inside of your shop cause more than not I see and hear guys filling up their shops and then it's too hard to move everything later to get it ORGANIZED.

If you have access to commercial racking it's my personal favorite for using the height of a big shop or storage and if you have a cool car to just store in the garage and want to use the space above it like I did when I had my 4x8 aluminum trailer parked under my 12 foot tall, 8 foot wide and 4 foot deep racks turned to their sides. I put the first beams at 6 foot above my trailer and kept hitting my noggin so I raised them to 7 foot. if you don't have to use it as a walk through you can lower the beams to the height of the top of a car or trailer.

also as you can see from this picture these racks can hold a ton if you look at the second and third shelves full of steel.

take care and keep up the great work!!
 

Attachments

  • WP_20150327_005.jpg
    WP_20150327_005.jpg
    73 KB · Views: 121
  • steel on racking shelves.jpg
    steel on racking shelves.jpg
    93.4 KB · Views: 123
OP
B

BlueBomber

Well-known member
Joined
Sep 14, 2013
Messages
3,201
Location
Outside Boston, MA
BB: great to see and read that you've got your final inspection so now the real fun begins doesn't it.

I hope you've maybe drawn out a plan of how you want to set up the inside of your shop cause more than not I see and hear guys filling up their shops and then it's too hard to move everything later to get it ORGANIZED.

If you have access to commercial racking it's my personal favorite for using the height of a big shop or storage and if you have a cool car to just store in the garage and want to use the space above it like I did when I had my 4x8 aluminum trailer parked under my 12 foot tall, 8 foot wide and 4 foot deep racks turned to their sides. I put the first beams at 6 foot above my trailer and kept hitting my noggin so I raised them to 7 foot. if you don't have to use it as a walk through you can lower the beams to the height of the top of a car or trailer.

also as you can see from this picture these racks can hold a ton if you look at the second and third shelves full of steel.

take care and keep up the great work!!

Drives,

Thanks--a great idea, and one I considered. Your storage solutions are great, as is your Getting Organized thread. What I ultimately decided to buy lumber for is a 17-foot long workbench topped by a mezzanine with storage shelves up to the ceiling. I posted a sketch back around the New Year in Post 143. The workbench top will be made from salvaged oak fence boards from my parents' property down in Virginia. I expect to get to construction of the whole contraption over the five days starting on the 4th of July holiday.
 
To avoid these ads, REGISTER NOW!
OP
B

BlueBomber

Well-known member
Joined
Sep 14, 2013
Messages
3,201
Location
Outside Boston, MA
No updates for nearly a month, but not for lack of activity. We spent most of the month of June planning and last weekend executing my parents' 51st wedding anniversary in Culpeper, Virginia. It was a big hit! My parents are not "limelight" kinda people, and we completely missed that last year was their 50th. So this year we threw a big party at their church and brought in all the aunts and uncles from as far away as Alaska and Romania!

dddd65a1c746995fe8d728a2863fa728.jpg

We got my Dad's '33 back on the road again with the 327 tripower operating pretty well. Still a few gremlins to chase down (no dash lights!) but I was able to give my aunt from Alaska a ride.

7457cffdc595d42c81eebd937ff9d779.jpg

This weekend, my daughter and I worked on getting the first garage's upstairs storage room finished. See the before pictures below for a refresh...

Starting point:
deffeab83d390ffb6608854f6fbe1830.jpg

Drywall hung and mudded:
d80194ab4326cdca49abeb5d653461cf.jpg

Since the above two pics, we hung a door and primed and painted the walls. My wife asked me to put the floor trim down so my daughter could get our camping gear back in there, but like most projects, it was more complicated than just putting down trim.

First, we needed a light in there. I scratched around and found this old light fixture I had saved from a rental property we lived in back in 2003. I liked the vintage feel of it--probably 1950s. Four moves and fifteen years later, I cleaned it up, replaced the socket structure and gave it a fresh coat of glossy white.
f68b56da9c89f9c1106c651c98f69242.jpgd72dcfd566336f6d64098154f2a1374b.jpgdf97faa28271dd2ed8bd4adc27f2f535.jpg

Then, while I was installing a light switch and receptacle, I might as well install the breaker subpanel I've been meaning to... Here's the downstairs panel before I started moving circuits.
f14bb39da53ecdd461c44ac723012436.jpg

Another thing I fixed was the feeder for the new garage. The electricans just tacked it to the top of the wall rather than drilling holes in the floor joists and keeping it in the ceiling. I did it the right way.
f3f6b344e0bec016a0b019d8debb21b8.jpg

Here's the finished subpanel for the upstairs. While I had the wall open, I stubbed in wires for future circuits in the kitchen and bathroom, when we build them.
a2b2bc6306db063061343be29e4a42f7.jpg

Finished storage room, with vintage light...and baseboard trim. :)
7c53138ce826835b075ebc2bd25f9188.jpg

Today, I braved the 106-degree heat index in the new garage to start unpacking and assembling the lift. I intend to install it over the days after 4th.
b705b5b2c451722654078a9ddcce4947.jpgee00b2937ba01bee060eda31f1189e5d.jpg

SWMBO's calling me for dinner. Look for more progress in the coming week!
 

Attachments

  • 7457cffdc595d42c81eebd937ff9d779.jpg
    7457cffdc595d42c81eebd937ff9d779.jpg
    97.5 KB · Views: 8
  • deffeab83d390ffb6608854f6fbe1830.jpg
    deffeab83d390ffb6608854f6fbe1830.jpg
    95 KB · Views: 5
  • ee00b2937ba01bee060eda31f1189e5d.jpg
    ee00b2937ba01bee060eda31f1189e5d.jpg
    72.9 KB · Views: 4
  • d80194ab4326cdca49abeb5d653461cf.jpg
    d80194ab4326cdca49abeb5d653461cf.jpg
    64.2 KB · Views: 4
  • f68b56da9c89f9c1106c651c98f69242.jpg
    f68b56da9c89f9c1106c651c98f69242.jpg
    76.4 KB · Views: 4
  • df97faa28271dd2ed8bd4adc27f2f535.jpg
    df97faa28271dd2ed8bd4adc27f2f535.jpg
    64.1 KB · Views: 4
  • f14bb39da53ecdd461c44ac723012436.jpg
    f14bb39da53ecdd461c44ac723012436.jpg
    73.2 KB · Views: 4
  • d72dcfd566336f6d64098154f2a1374b.jpg
    d72dcfd566336f6d64098154f2a1374b.jpg
    59.8 KB · Views: 4
  • f3f6b344e0bec016a0b019d8debb21b8.jpg
    f3f6b344e0bec016a0b019d8debb21b8.jpg
    40.6 KB · Views: 4
  • a2b2bc6306db063061343be29e4a42f7.jpg
    a2b2bc6306db063061343be29e4a42f7.jpg
    23.4 KB · Views: 4
  • b705b5b2c451722654078a9ddcce4947.jpg
    b705b5b2c451722654078a9ddcce4947.jpg
    75.1 KB · Views: 4
  • dddd65a1c746995fe8d728a2863fa728.jpg
    dddd65a1c746995fe8d728a2863fa728.jpg
    121.2 KB · Views: 4
  • 7c53138ce826835b075ebc2bd25f9188.jpg
    7c53138ce826835b075ebc2bd25f9188.jpg
    25.5 KB · Views: 4
Last edited:
OP
B

BlueBomber

Well-known member
Joined
Sep 14, 2013
Messages
3,201
Location
Outside Boston, MA
Temperatures have been unseasonably high here in New England (or as the locals say, it's wicked hot!). Yesterday I rose with the sun to get started on the lift install. Both offspring are home from college this week, but not similarly motivated to rise early.

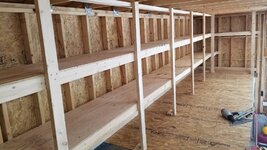
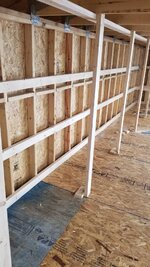
Here's the view from the moment I opened the garage door. First task was to clear the bay. I moved the lumber to the back wall and rolled the Impala out into the driveway.

ccecf65b59f65e7c0382438f0918eff4.jpg

Space cleared, now to layout the lift!

181574b597ade811484c3e4c34895642.jpg

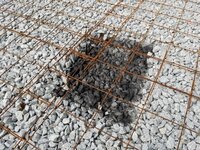
I had dug out some spaces in the gravel before the slab was poured to get a little more concrete thickness where the columns would sit. Here are some shots from earlier in this thread:

242d00e9e0ddd7dfc5dc1f6c756ee268.jpg
0b45045926810f234a49264b52c327da.jpg

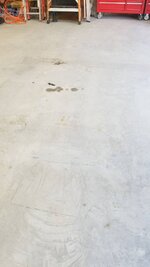
I did some reconstructive surveying (looked and guessed) and sketched out the footprints of the columns using a cardboard template. You can just see the spots on the slab.

968ae6f962681da5da7ebe303792b761.jpg

Next we moved the columns around to their spots using the cherry picker and a floor jack. Yes, I said "we". At this point (9AM) my kids had been roused and joined me.

d27ca66af34d3c9502bb8cb8b701ca17.jpg

No pics of the actual column standup, as it was all-hands-on-steel, but we got both columns hefted and positioned without incident. The next step was to bolt on the crossbar. I only have one 13-ft step ladder, so I put the legendary toughness of my Snap-On tool chest to test and made it a workstand for my 250-lb son. It didn't even flex!

a6fafe72d5d007c020e5af747299b6dd.jpg

With the cross bar on, and the final position of the two columns established, now it was time to drill the anchor holes. At this point, my daughter left us (without getting into a single picture) and my son and I drilled the twelve anchor holes. We used a 3/4-inch masonry bit designed to cut both concrete and steel. It was hard, dirty work and took us about two hours.

173ca8f232ad542d2b8edfb979843186.jpg

The recommended technique is to drill one hole on one column, level that column with shims (supplied by the lift comany) and then install and torque that anchor. Then, move to the next column, plumb it, drill one hole, shim it and install that anchor. This process fixes both columns where they need to be BEFORE you drill the remaining holes. The last thing you want is for the columns to walk around on you as you are drilling and find yourself with some holes that line up and some that don't!

6f73e6193495c73fbb889af44ff63a55.jpg

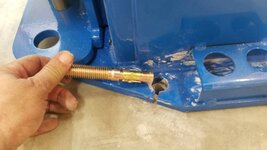
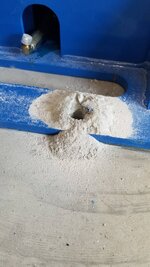
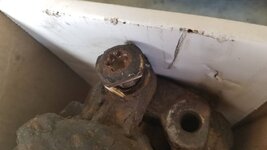
We used tape in the bit to mark the 4-1/2" depth point (four inch anchors plus 1/2" steel base plate) and then drilled another inch deeper for good measure. Here's what a finished hole looks like.

f54fe69318b5aa22813fc858e7b40b9e.jpg

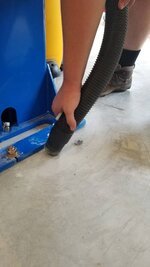
We cleaned up with a ShopVac...

349fd8f9c5ae9aba6ad238a48f476760.jpg

...to include using a water-bottle straw to get the dust out of the bottom of the hole.

a085c341842b98ddadcfb382f1338700.jpg

Next, the anchor went in the hole...

d01cb6994419091c0239b8f802b10b91.jpg

...and got pounded down to within a nut's-width of the base plate. This is too deep to use the lock washer, but that was a trick I picked up from a Youtube video. These anchors will pull up a half-inch or so as you set the anchor cone, so you put it as deep as you can, set the anchor, then remove the nut, install the lockwasher and then torque it down. This maximizes the depth of your anchor and thus the amount of concrete contributing to the holding power.

aecc4fdff118c59f66c82eb142f0dead.jpg

The very first anchor refused to set--the bolt just kept rotating with the nut. There were two factors that contributed to this. First, I used some JB Weld epoxy on this first anchor, which added lubrication on the anchor cone. Second, I hammered the anchor in with the nut installed on the first few threads of the bolt. This goobered the threads a bit, causing the nut to bind and grab the bolt threads. We had to use an angle grinder to cut a slot in the top of the bolt and put a screwdriver on top and a box end wrench below to get the anchor to set. After this anchor, I didn't use any epoxy, and I pounded them in without the nut on top.

55bd35db733c1e6beca351092a92152d.jpg

It was plenty hot, and we kept well hydrated.

3b3e05791bfa26aadc575ee9a795efc6.jpg

At this point, I lost offspring #2 to schoolwork, and soldiered on alone.

c345719a663942782304757d50a255b0.jpg

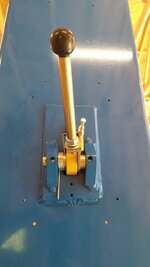
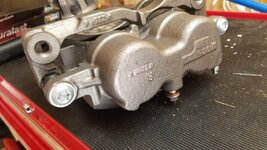
Here's a shot of one of the lock-and-release levers. This lift has a cable (not yet installed in this pic) that runs up and over the top to allow one person to open both locks at once while standing next to and running the pump controls.

c2bea10b38238da06419520f34db9ad9.jpg

I like this lift, but the instruction left a few things out. For example, at this step, the manual says "Install the cables according to the illustration" but neglects to tell you that you need to unbolt the bottom pulley in order to route the cable end under it. Not a big deal--everywhere the instructions were lacking, I was able to figure things out.

5c52fa2d67156c1c584ec1a3da0d0563.jpg

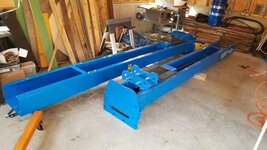
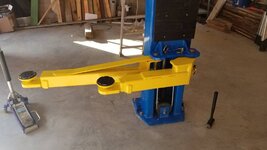
Next came the lift arms. This lift is an asymmetric design, allowing you to optimally adjust the vehicle between the arms to keep the CG of the vehicle between the posts (think pick-up truck). Once you drive the vehicle in, the shorter arms rotate forward to lift the front of the car.

eaef958c4457926417f0fbce30221714.jpg

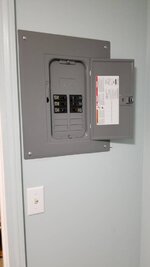
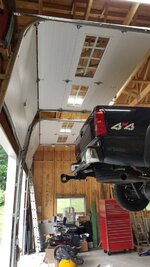
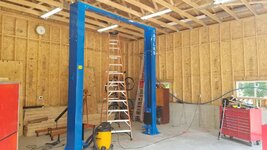
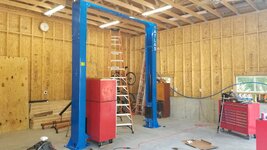
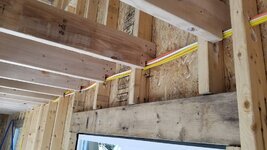
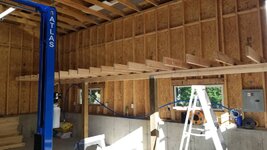
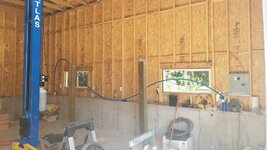
Two other PITAs not pictured took place as I was wiring up the 240-V circuit. First, I fed the 10-gauge wire through the wall, and then estimated how much I would need to go up the wall, across the rafter, and then down to the pump. Guess what? Yep, too short by about a foot. So, I had to add a junction box next to the pump, and then run an 18-inch stringer to the controller. The second PITA was after geting everything wired and adding oil, I flipped the breaker for the first test run...and the lights dimmed and the breaker immediately tripped. At this point, 9:45PM, I disconnected the wires from the breaker and called it a night. Coming back with fresh eyes the next morning, I found that the metal cable connector on the breaker box had pinched the Romex just enough to cause a short to the breaker box!! After fixing that, everything worked just fine. Here's the finished lift installation from this morning.

21a373dfd819bf8947fcb4cfbbcf6ee8.jpg

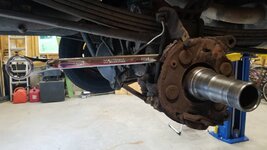
I tested it with the heaviest thing I plan to lift regularly, my 3/4-ton Chevy truck. It went all the way up and down, no problem.

da4a559adb32ccf2320db7abac97f7a9.jpg

In this shot, you can make out the limit bar at the top, which cuts power to the pump if a vehicle goes too high.

691e28233891728ded076777179215a2.jpg

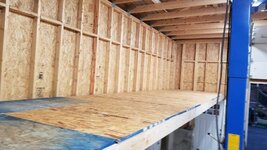
All my work with the garage door highlift kits paid off. I have plenty of clearance even for a van!

1611f4f2986d725fee5308a5ab5e994a.jpg

Woot! I now have a lift in my garage capable of hoisting a car six feet in the air!

Sent from my SM-G950U using Tapatalk
 

Attachments

  • 968ae6f962681da5da7ebe303792b761.jpg
    968ae6f962681da5da7ebe303792b761.jpg
    36.9 KB · Views: 3
  • 0b45045926810f234a49264b52c327da.jpg
    0b45045926810f234a49264b52c327da.jpg
    157.2 KB · Views: 3
  • 242d00e9e0ddd7dfc5dc1f6c756ee268.jpg
    242d00e9e0ddd7dfc5dc1f6c756ee268.jpg
    209.2 KB · Views: 3
  • 181574b597ade811484c3e4c34895642.jpg
    181574b597ade811484c3e4c34895642.jpg
    86.4 KB · Views: 2
  • ccecf65b59f65e7c0382438f0918eff4.jpg
    ccecf65b59f65e7c0382438f0918eff4.jpg
    98.8 KB · Views: 2
  • d27ca66af34d3c9502bb8cb8b701ca17.jpg
    d27ca66af34d3c9502bb8cb8b701ca17.jpg
    79.6 KB · Views: 2
  • a6fafe72d5d007c020e5af747299b6dd.jpg
    a6fafe72d5d007c020e5af747299b6dd.jpg
    78.7 KB · Views: 2
  • 1611f4f2986d725fee5308a5ab5e994a.jpg
    1611f4f2986d725fee5308a5ab5e994a.jpg
    77.5 KB · Views: 2
  • 691e28233891728ded076777179215a2.jpg
    691e28233891728ded076777179215a2.jpg
    71.1 KB · Views: 2
  • da4a559adb32ccf2320db7abac97f7a9.jpg
    da4a559adb32ccf2320db7abac97f7a9.jpg
    78.1 KB · Views: 2
  • 21a373dfd819bf8947fcb4cfbbcf6ee8.jpg
    21a373dfd819bf8947fcb4cfbbcf6ee8.jpg
    76.6 KB · Views: 2
  • eaef958c4457926417f0fbce30221714.jpg
    eaef958c4457926417f0fbce30221714.jpg
    51.7 KB · Views: 2
  • 5c52fa2d67156c1c584ec1a3da0d0563.jpg
    5c52fa2d67156c1c584ec1a3da0d0563.jpg
    52.2 KB · Views: 2
  • c2bea10b38238da06419520f34db9ad9.jpg
    c2bea10b38238da06419520f34db9ad9.jpg
    35.5 KB · Views: 2
  • c345719a663942782304757d50a255b0.jpg
    c345719a663942782304757d50a255b0.jpg
    88.4 KB · Views: 2
  • 3b3e05791bfa26aadc575ee9a795efc6.jpg
    3b3e05791bfa26aadc575ee9a795efc6.jpg
    88.5 KB · Views: 2
  • 55bd35db733c1e6beca351092a92152d.jpg
    55bd35db733c1e6beca351092a92152d.jpg
    56 KB · Views: 2
  • aecc4fdff118c59f66c82eb142f0dead.jpg
    aecc4fdff118c59f66c82eb142f0dead.jpg
    65.6 KB · Views: 2
  • d01cb6994419091c0239b8f802b10b91.jpg
    d01cb6994419091c0239b8f802b10b91.jpg
    48.5 KB · Views: 2
  • a085c341842b98ddadcfb382f1338700.jpg
    a085c341842b98ddadcfb382f1338700.jpg
    51.7 KB · Views: 2
  • 349fd8f9c5ae9aba6ad238a48f476760.jpg
    349fd8f9c5ae9aba6ad238a48f476760.jpg
    43.4 KB · Views: 2
  • f54fe69318b5aa22813fc858e7b40b9e.jpg
    f54fe69318b5aa22813fc858e7b40b9e.jpg
    90.2 KB · Views: 2
  • 6f73e6193495c73fbb889af44ff63a55.jpg
    6f73e6193495c73fbb889af44ff63a55.jpg
    67.3 KB · Views: 2
  • 173ca8f232ad542d2b8edfb979843186.jpg
    173ca8f232ad542d2b8edfb979843186.jpg
    84.9 KB · Views: 3
Last edited:
OP
B

BlueBomber

Well-known member
Joined
Sep 14, 2013
Messages
3,201
Location
Outside Boston, MA
Today, I built the storage balcony over the right side of the garage where my workbench will go.

I started by drilling two anchor holes for the brackets that will secure the 6x6 columns. Well, actually, three holes, because the first anchor bolt snapped off when I apparently over-torqued it. I slide one inch to the right and drilled another hole. This time I stopped tightening sooner.

14bd2c36aa983d60b0b79a11ad3eab01.jpg

Next up was cutting the two columns to the correct height. My garage floor has a front-to-back slope of about two inches over 26 feet, so I set the height of the column at the back of the garage at just above my noggin and used my level and a string to get the correct measurements at the column locations.

b1dda7f949ecde6f1dead74c963e5619.jpg

The beam was made of tripled 2x6s, with the unions offset. For the front face of the beam, I made the unions overlapping 45-degree angles that lined up at the tops of the columns. The idea was to avoid a gap at random spots among the face.

f179fa833acb495de9ba814e02d09748.jpg

The balcony's floor joists are 6-ft 2x6s, nailed to the wall studs and cantilevered out beyond the beam by about 3-1/2 ft.

fe70a02ef0705be4016229b05c2911bb.jpg

Each joist got a Simpson bracket to tie it to the beam. These brackets were leftovers from a previous project, so it was good to finally use them.

8831085de154327d88d9a03247853d0e.jpg

Some of the joists had to be notched to clear the wiring in the wall.

cbcc0f3c660091847893f2d55f0efd6e.jpg

I put a 2x6 face board to close up and stabilize the joists, and then moved on to flooring. I used 3/4 inch tongue-and-groove OSB, and managed to finish the floor with the number of sheets I had estimated would be needed. Nice when that happens. :).

5011bd861d775fb07111eb0d46d1780d.jpg

My balcony is 25' x 5'10". Tomorrow I'll add 2' wide shelving along the wall. I also hope to fabricate a railing and a ladder or folding steps that lift up out of the way. That will probably be much further down the road...

b3a3c82b9629ae63cf9caa3827f12ccc.jpg

Sent from my SM-G950U using Tapatalk
 

Attachments

  • b3a3c82b9629ae63cf9caa3827f12ccc.jpg
    b3a3c82b9629ae63cf9caa3827f12ccc.jpg
    79.3 KB · Views: 3
  • f179fa833acb495de9ba814e02d09748.jpg
    f179fa833acb495de9ba814e02d09748.jpg
    60.4 KB · Views: 3
  • cbcc0f3c660091847893f2d55f0efd6e.jpg
    cbcc0f3c660091847893f2d55f0efd6e.jpg
    75.1 KB · Views: 3
  • 8831085de154327d88d9a03247853d0e.jpg
    8831085de154327d88d9a03247853d0e.jpg
    71 KB · Views: 3
  • fe70a02ef0705be4016229b05c2911bb.jpg
    fe70a02ef0705be4016229b05c2911bb.jpg
    77.3 KB · Views: 3
  • 5011bd861d775fb07111eb0d46d1780d.jpg
    5011bd861d775fb07111eb0d46d1780d.jpg
    82.5 KB · Views: 3
  • b1dda7f949ecde6f1dead74c963e5619.jpg
    b1dda7f949ecde6f1dead74c963e5619.jpg
    77.9 KB · Views: 3
  • 14bd2c36aa983d60b0b79a11ad3eab01.jpg
    14bd2c36aa983d60b0b79a11ad3eab01.jpg
    64.9 KB · Views: 3
Last edited:

fdrunner

Active member
Joined
Apr 2, 2017
Messages
42
BlueBomber,

I'm thinking of building a 36x28x14 garage here soon. I plan on putting a lift in down the road. I'm curious what Atlast lift model do you have? How far back did you put the columns from the front wall and how much space do you have in front of the truck to the front wall and space between your tailgait to the garage door when its down?
 
OP
B

BlueBomber

Well-known member
Joined
Sep 14, 2013
Messages
3,201
Location
Outside Boston, MA
BlueBomber,

I'm thinking of building a 36x28x14 garage here soon. I plan on putting a lift in down the road. I'm curious what Atlast lift model do you have? How far back did you put the columns from the front wall and how much space do you have in front of the truck to the front wall and space between your tailgait to the garage door when its down?

Hey, fd!

I bought a PV-10P 10,000-pound lift. I initially went in to buy an Elite 9K-OH, but once I got to the showroom, the Elite's steel thickness looked positively scrawny next to an Atlas. They were having a sale at the time, so for another $600, I was ready for the Atlas PV-9P. Then I noticed the 10P was only about $200 more, and I'd have a lift with enough oomph to lift anything I planned to put on it without worry.

I've got the columns a little more than nine feet from the foundation wall. That leaves me with about two or three feet between the bumper and the wall. Around the back, I'd guess about the same clearance, maybe a little less on to the garage door. My garage is 26 feet deep (outside dimensions), so you'll have a bit more room to play with.

Sent from my SM-G950U using Tapatalk
 
OP
B

BlueBomber

Well-known member
Joined
Sep 14, 2013
Messages
3,201
Location
Outside Boston, MA
The shelving is done! Either that, or I'm set to open a hostel with space for nine!

I started with a 2x4 rail along the trusses as my reference. The shelves are 24 inches deep and on 24 inch intervals for height, to keep the carpentry easy. That also puts the front 2x4s directly over the beam below.

d11d7dc36eac91708099cb3b30503ab9.jpg

Each post is attached to a shoe which is in turn anchored to a floor joist below.

ad90f8e779750731450763b88379f48f.jpg

I put the shelf horizontals on the wall first. I also put a row down at the bottom to keep stuff from getting pushed into the stud spaces and falling down the wall.

0ab221fded02ef217a9fbb37d0b8cb7c.jpg

Next came the front horizontals and then the front-to-backs for shelf support.

c65f508cad344bee801dc48564b89557.jpg

I used 15/32" plywood for the shelves and lined up three sheets to split them down the middle long-ways. I initially tried putting them in as 8-ft pieces, but couldn't get them to slide in between the verticals. I had to bring them back down and cut them to 2' x 4' sections, then everything fell into place.

74466fbad743b6857a2245fdfb82cb18.jpg

Here's done and blown clean.

a9993c782c5c96ac985a7ff237db64a2.jpg

I left the lower shelf out of the end unit to allow space for bulkier items.

e1239b4614c7f946320289a305c2ae9b.jpg

My next thoughts are to storage methodology. I could just start piling stuff in, but will probably get some storage bins with lids that will fill the space more efficiently. Bins are expensive though, in the quantities I would need. Maybe I'll start with a few and see how well they work.

55e1ea19f0d2edcc32013f9abbc8644a.jpg

Prudence dictates a railing, eventually. I have some ideas for steps and ladders, though, that will delay that for a bit until I get them designed and built. I also plan to have a gate that will allow me to use the lift for heavy or bulky objects.

Sent from my SM-G950U using Tapatalk
 

Attachments

  • 55e1ea19f0d2edcc32013f9abbc8644a.jpg
    55e1ea19f0d2edcc32013f9abbc8644a.jpg
    78.6 KB · Views: 3
  • e1239b4614c7f946320289a305c2ae9b.jpg
    e1239b4614c7f946320289a305c2ae9b.jpg
    73.2 KB · Views: 3
  • a9993c782c5c96ac985a7ff237db64a2.jpg
    a9993c782c5c96ac985a7ff237db64a2.jpg
    91.4 KB · Views: 2
  • 74466fbad743b6857a2245fdfb82cb18.jpg
    74466fbad743b6857a2245fdfb82cb18.jpg
    65.4 KB · Views: 2
  • c65f508cad344bee801dc48564b89557.jpg
    c65f508cad344bee801dc48564b89557.jpg
    90.2 KB · Views: 2
  • 0ab221fded02ef217a9fbb37d0b8cb7c.jpg
    0ab221fded02ef217a9fbb37d0b8cb7c.jpg
    102.2 KB · Views: 2
  • ad90f8e779750731450763b88379f48f.jpg
    ad90f8e779750731450763b88379f48f.jpg
    93.3 KB · Views: 2
  • d11d7dc36eac91708099cb3b30503ab9.jpg
    d11d7dc36eac91708099cb3b30503ab9.jpg
    61.9 KB · Views: 2
Last edited:
OP
B

BlueBomber

Well-known member
Joined
Sep 14, 2013
Messages
3,201
Location
Outside Boston, MA
Happiness is working on your daughter's car with your daughter, and knowing she has both the mechanical "knack" and a passion for classic cars. :)0e695f0032fbcd31af3bc1b665a6528a.jpg

Sent from my SM-G950U using Tapatalk
 

Attachments

  • 0e695f0032fbcd31af3bc1b665a6528a.jpg
    0e695f0032fbcd31af3bc1b665a6528a.jpg
    61.4 KB · Views: 3

C_F

ALLIANCE MEMBER
Joined
Jan 21, 2005
Messages
9,675
Location
Utah...SNOW BLOWS!
I imagine happiness is also having a brand-new bitchin' lift to get that classic car way up in the air! :D

Nice progress you've been making. Your new storage balcony looks large enough to store lots of goodies, which will sure help keep clutter off the floor below.
 

BUGTHUG

Well-known member
Joined
Nov 12, 2010
Messages
2,960
Location
Kansas
That all looks great. I was thinking about your safety wall. How about using cow panels, I think they are 4' tall and 16" long, the spacing are 4 X 6". This will make a very nice and safe wall. Plus you can cut in to what ever height you desire. Also you could make a sliding gate where it will open for the heavy stuff brought up by the lift. My .02cents worth. :thumbup:
 
OP
B

BlueBomber

Well-known member
Joined
Sep 14, 2013
Messages
3,201
Location
Outside Boston, MA
I imagine happiness is also having a brand-new bitchin' lift to get that classic car way up in the air! :D

Nice progress you've been making. Your new storage balcony looks large enough to store lots of goodies, which will sure help keep clutter off the floor below.

That all looks great. I was thinking about your safety wall. How about using cow panels, I think they are 4' tall and 16" long, the spacing are 4 X 6". This will make a very nice and safe wall. Plus you can cut in to what ever height you desire. Also you could make a sliding gate where it will open for the heavy stuff brought up by the lift. My .02cents worth. :thumbup:

Thanks, gents. The lift is pretty nice to have. I'm gonna try to put some time in on my truck today.

Now that the balcony storage is complete, I've been walking around both garages contemplating what I want to put up there. Everything I come across that I haven't touched in a while, I think "I should install that!" or "I should sell that!" THis will be more difficult than I expected.

Bugthug: great idea on the cattle fencing--I hadn't even considered that option! I'ts not terribly expensive, nor does it block the view. I'll look into that!
 
OP
B

BlueBomber

Well-known member
Joined
Sep 14, 2013
Messages
3,201
Location
Outside Boston, MA
What is that '60 Chevy in one of the other pics?
I've got two '60 Chevy's. The white one is a recently acquired Impala 2-dr hardtop car with a totally rotted bottom side. The other is a 4-dr Bel Air that I've had for 30+ years. It was restored and made a daily driver in 1992, but now needs a total restore again. Rather than do that on a 4-dr sedan, I'm going to make it a parts donor for the Impala. Once I get the new garage infrastructure complete, I'll start on the Impala this fall.

Sent from my SM-G950U using Tapatalk
 

RSr

Well-known member
Joined
Jul 20, 2010
Messages
155
Location
Pittsburgh, PA
Nice job on the lift install, I've been there before putting a baseplate 2 post lift up with my brother. We had to rock paper scissor to see whose ride was the guinea pig.

Was that a virginia tech hat I saw in one of your pictures?
 
OP
B

BlueBomber

Well-known member
Joined
Sep 14, 2013
Messages
3,201
Location
Outside Boston, MA
Thanks, RSr! Yes, I am a proud Hokie, Class of '93. Neither of my offspring chose to follow me at my alma mater, but both are doing well at their respective schools. My wife's a former Penn State student.

Cheers!
 
OP
B

BlueBomber

Well-known member
Joined
Sep 14, 2013
Messages
3,201
Location
Outside Boston, MA
I spent the last two days throwing a bunch of parts at the '06 Silverado 2500HD. I only managed to fix some of the problems.

The main driver for the big maintenance weekend was the brakes on the truck were dragging--front and rear. I had recently replaced the brake pads and rotors on the front (both sides) and the left rear, as well as the left rear disc brake shield. After I was all done, the back brakes kept making noises ( a "wooo, wooo, wooo" that would stop when I applied the brakes). I figured I had done something wrong with the parking brake (on GM's of this vintage, its a drum brake inside the rear disc hub). I parked the truck except for occasional hauling of loads around town until I could make time to work on it. The last straw was a slightly longer hauling trip two weeks ago to a destination a few towns over. On the way back, I could smell hot brakes. So, after getting the truck up on the lift and disassembling the brakes, I decided maybe my calipers were sticking, so I bought reman'd calipers for all four corners.

While I was at it, I also planned to:
- replace right rear pads and rotor (it needed it--the pads had gone down to bare metal)
- replace right rear disc brake shield (had disintegrated from rust like the left)
- replace transmission pan (rusty and leaking--I was afraid rust had compromised its integrity) and filter
- re-replace the exhaust pipe gasket ahead of the muffler (the last one blew out the top and failed)
- replace left and right rear emergency brake cables (right was worse than left, but since I was in there...)
- recharge the a/c system (wasn't blowing very cold)
- change the oil and filter
- replace wipers
- install trailer brake I've had rattling around the garage for the last year

This picture isn't even all the parts!
fa95226f0fb1182257a4186ed7876130.jpg

Here's the before picture of the right rear disc brake shield replacement. It was completely gone. Pictured is the 24mm x 27mm deep offset DBE I had to buy because I couldn't get a socket on two of the nuts that retain the disc brake bracket to the axle tube. The leaf spring bracket was too tight against the end of the bolt.

f78ce077981814747cea25ba2684864d.jpg

Here's "done" on the shield. You can also see the old compromised e-brake cable housing in the bottom left. The parking brake cables were SOBs to get off. I ended up cutting the e-brake cable with a cut off saw on both sides so I could get tension off the various retaining springs and clips.

4121f573031298122a27ab48486db1cc.jpg

The right rear pads were grinding on bare metal. This almost certainly explain the noises I was hearing. I felt pretty stupid when I saw this.

25cf26ab862916373bc1758c22a5a9d9.jpg

The reman'd calipers also come with a refreshed caliper bracket. However, that meant getting the old ones off. Whoever the ***** was who spec'd size 55 Torx bolts for the caliper slides obviously wasn't from Detroit. The salty winter roads up north are not nice to the little Torx fingers inside the opening. Once again, I had to break out the cutoff angle grinder to cut two the shoulders off opposite sides of the bolts to give the ViceGrips something to bite on.

9a0a07abb01ca4e7461905f81e35d92e.jpg

All but one of the reman'd calipers had hex-headed caliper slide bolts--much more sensible. However, the odd ball pictured below still had Torx-headed slides. Fortunately, my existing front caliper bolts were hex headed, so I swapped out the new ones for the existing. I also wasn't able to get the right front caliper bracket off. One of the bolts just laughed at my biggest Earthquake impact gun and was starting to deform under the hammering. I know I could have tried heat or some such, but I just surrendered and left the factory bracket on the truck.

0eaac138965b2d6308af72a0e501a1bd.jpg

Here's the before picture of the old trans oil pan. This turned into a giant mess for a lot of reasons:
- rear pan bolts tucked up under rear trans mount, so could only turn a sixteenth at a time with a box end
- three bolt heads tried to strip on me with the impact wrench
- the two piece vertical tube on my brand new oil drain can be installed two ways, and one causes way allows oil to drip out of the joint where the two pieces come together--guess which way I had assembled it...
- the catch funnel at the top is a good 14" across...but the trans crossmember spread the fluid from the back of the pan over an 18" width and made a big mess on the floor
- the trans continued to drip fluid on the floor and on my head long after I'd moved the drain out of the way.

955b75243d61ec4242d52e77c9c53589.jpg

I quit taking pictures at this point and just slogged on through. The old pan actually looked decent--I saw no obvious rust penetrations. But I replaced it anyway, and hit the new pan with spray-on undercoating. At least the new pan has a drain plug!

I got everything done except the trailer brake and the wipers. After all that brake work, I took the truck out for a test drive and...the daggum brakes are still dragging! After a little googling when I returned, I learned that I should have also replaced the rubber brake hoses while I was under there. Some of you reading this probably knew that as soon as you started reading....oh well. I'll pick up the parts tomorrow and maybe get them installed after work sometime this week. Fingers crossed I'll get my truck back in working order.

Overall, I really enjoyed having the lift to put the truck where it was most convenient to work on whatever was my focus. Chest level for the brakes, up over my head for the trans work. I learned that working with your arms raised over your head can be tiring after a surprisingly short time and that the lift arms, despite being painted yellow, can still be banged into with the ol' noggin. I also learned that I really want a tool cart when I'm working on a vehicle on the lift, as I need someplace other than the lift arms, the truck frame, or the floor to set down my tools. Going back and forth to the tool chests was a time waster.

More work to follow in the next week!
 

Attachments

  • 25cf26ab862916373bc1758c22a5a9d9.jpg
    25cf26ab862916373bc1758c22a5a9d9.jpg
    41.2 KB · Views: 3
  • fa95226f0fb1182257a4186ed7876130.jpg
    fa95226f0fb1182257a4186ed7876130.jpg
    75.3 KB · Views: 3
  • f78ce077981814747cea25ba2684864d.jpg
    f78ce077981814747cea25ba2684864d.jpg
    59.9 KB · Views: 3
  • 9a0a07abb01ca4e7461905f81e35d92e.jpg
    9a0a07abb01ca4e7461905f81e35d92e.jpg
    34.6 KB · Views: 3
  • 0eaac138965b2d6308af72a0e501a1bd.jpg
    0eaac138965b2d6308af72a0e501a1bd.jpg
    91.7 KB · Views: 3
  • 955b75243d61ec4242d52e77c9c53589.jpg
    955b75243d61ec4242d52e77c9c53589.jpg
    85.8 KB · Views: 3
  • 4121f573031298122a27ab48486db1cc.jpg
    4121f573031298122a27ab48486db1cc.jpg
    58.1 KB · Views: 3
Last edited:

RSr

Well-known member
Joined
Jul 20, 2010
Messages
155
Location
Pittsburgh, PA
Thanks, RSr! Yes, I am a proud Hokie, Class of '93. Neither of my offspring chose to follow me at my alma mater, but both are doing well at their respective schools. My wife's a former Penn State student.

Cheers!

Nice, I was a decade behind you at tech but my brother did his time at state college PA.
 
To avoid these ads, REGISTER NOW!
Top Bottom