To avoid these ads, REGISTER NOW!

Above 1200 Sq/FT Blue Bomber's Garages

Wokspaces above 1200 squarefeet.

drivesitfar

Well-known member
Joined
Oct 23, 2013
Messages
35,988
Location
Pacific Northwest
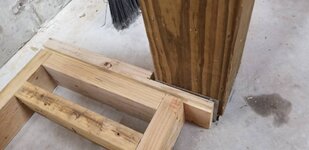
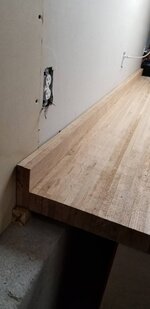
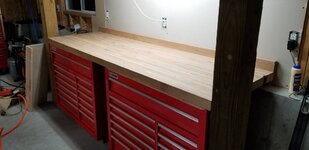
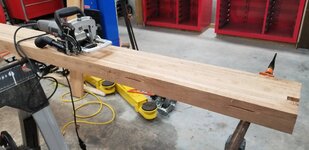
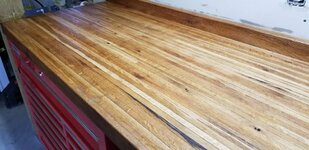
BB: I like your GET R DONE attitude and looks like you are making great progress on your new oak workbench.

while I don't have a BEST answer for you on the gaps I bet if you post up your questions over on the Woodworking 101 thread in general tools section one of those guys might have some proven method.

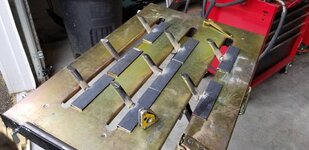
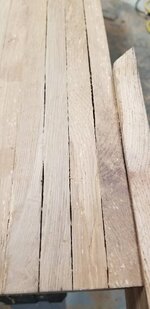
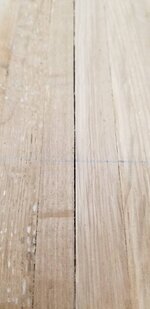
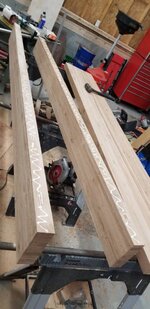
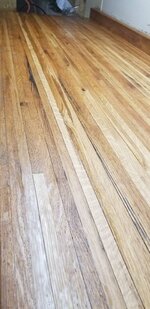
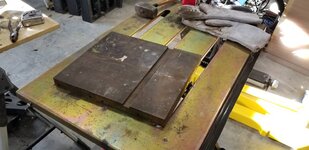
I like the glue and sawdust from the planer method mentioned. or maybe epoxy or maybe just let your finish fill in the gaps and guessing you might be using poly or varathane or some other clear product so the grain of the oak can shine.

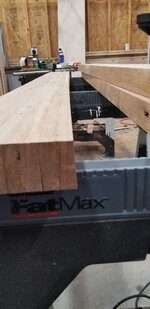
i've got more than a few feet of cedar I bought from a local mill to plane for my fence and deck so i'm watching what you are doing and learning a lot. i'm guessing the rule is you can not own enough clamps isn't it. i've seen clamp storage options that seem to work with others, but since i have such a limited space in my garage i'm thinking i can't use a cart and i'll have to maybe hang several of mine on the back of the man door which is dead space anyway. I tried to find my pictures of clamp storage on the back of a door, but didn't have one handy so posting few i did have saved and there are more on this thread if you'd like to post up your oak clamping on it here's the link:

https://www.garagejournal.com/forum/showthread.php?p=6914103&highlight=clamp+door#post6914103

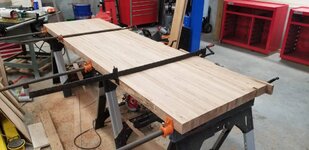
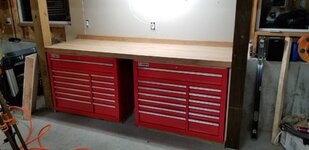
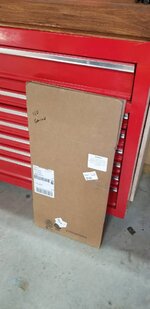
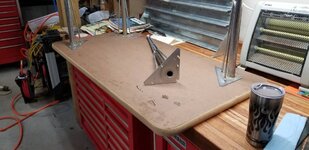
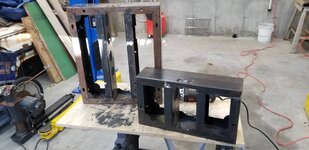
i'm looking forward to seeing how your oak top goes together and do you already have a plan for the legs or are you putting this butcherblock oak top on some metal or wood cabinets?

good luck
 

Attachments

  • sN64YYil.jpg
    sN64YYil.jpg
    41.3 KB · Views: 170
  • clamp stand on casters1.jpg
    clamp stand on casters1.jpg
    26.8 KB · Views: 167
  • clamp stand on casters.jpg
    clamp stand on casters.jpg
    25.9 KB · Views: 156
To avoid these ads, REGISTER NOW!
OP
B

BlueBomber

Well-known member
Joined
Sep 14, 2013
Messages
3,201
Location
Outside Boston, MA
Finally got a chance to get back to workbench construction. Here's the starting point. The workbench will be about 30" deep, from the wall to the front of the 6x6 columns, and stretch between them, a total of eight feet long. The two tool chests are Harbor Freight 44's and theyll be built in. Therefore, the first thing to do was remove the drawers and lay one down to...

bb920536c88a6613a4a3f20c740fbe22.jpg

...remove the wheels. These are pretty impressive rollers, fully greasable and with robust brakes. I'll definitely keep them around for a future project.

e683671464533316f0afe620bdafc936.jpg

The next task was figuring what to do with the wall at the back of the bench. I decided I didn't want to stare a bare studs behind a my butcherblock, so I sheetrocked it with some sheets given to me for helping as friend to move. Plus, they were cluttering up my other garage, so win-win.

fdc891dc9ca8b882fff7d6483b81fd07.jpg

First, I insulated with an extra roll from another project.

ad5a749a24045b8f5c9e63986227f0c5.jpg

Then the sheetrock. My mezzanine was exactly four feet above the stem wall, so a full width sheet fit with only cutting for outlets.

2477448074e47341838a2a1d3682a7cf.jpgefd50fda86254d95bbb8678a2c5389d4.jpg

Next was the cabinet base. I priced out metal tubing like a lot of other folks on here have done, but the bill was more than I could stomach. I turned once again to my leftovers pile and found enough pressure treated 2x4s to do the trick.

06221834d44b35367843e000b09b78f3.jpg

My garage floor slopes back to front as most do for drainage, so I puzzled a while on how to get the base level. I settled on using spacers to level the platform, then I used a spacer to trace the floor height onto the edge of the platform. After disassembling the individual pieces, I ripped them on the table saw and then put the base back together. This technique worked perfectly.

b943e5911d69f6bc15337a58afc39367.jpg1c95461f46fd80c534bf71774469da12.jpg

The tool chests will help hold up the bench top, but the primary support will come from 3/4" plywood salvaged from shipping fixtures for my wife's new office furniture.

0fdb02a60105e81bb47402eaba259653.jpg

A ripped 2x piece of pressure treated board established the correct height along the wall for the back of the bench.

79bdf3cfc10caf78d7b4a579e6154b20.jpg

This little spacer will help support the plywood end and protect it from water/fluid damage.

ab2177c267dc33a95ee9b464b75c489b.jpg

The plywood is also nailed to the 6x6 column.

09273eba894d5146911a888aa4027669.jpg

That's as far as I got. I probably won't get back to it for a while unless I sneak in some week night work. The next two weekends are claimed by SWMBO for setting up furniture and fittings in her new office.
 

Attachments

  • efd50fda86254d95bbb8678a2c5389d4.jpg
    efd50fda86254d95bbb8678a2c5389d4.jpg
    34.4 KB · Views: 4
  • ad5a749a24045b8f5c9e63986227f0c5.jpg
    ad5a749a24045b8f5c9e63986227f0c5.jpg
    54.4 KB · Views: 1
  • 2477448074e47341838a2a1d3682a7cf.jpg
    2477448074e47341838a2a1d3682a7cf.jpg
    32.9 KB · Views: 1
  • fdc891dc9ca8b882fff7d6483b81fd07.jpg
    fdc891dc9ca8b882fff7d6483b81fd07.jpg
    73.2 KB · Views: 1
  • b943e5911d69f6bc15337a58afc39367.jpg
    b943e5911d69f6bc15337a58afc39367.jpg
    34.2 KB · Views: 1
  • 06221834d44b35367843e000b09b78f3.jpg
    06221834d44b35367843e000b09b78f3.jpg
    50.6 KB · Views: 1
  • 09273eba894d5146911a888aa4027669.jpg
    09273eba894d5146911a888aa4027669.jpg
    58.3 KB · Views: 1
  • ab2177c267dc33a95ee9b464b75c489b.jpg
    ab2177c267dc33a95ee9b464b75c489b.jpg
    46.2 KB · Views: 1
  • 0fdb02a60105e81bb47402eaba259653.jpg
    0fdb02a60105e81bb47402eaba259653.jpg
    51.8 KB · Views: 1
  • e683671464533316f0afe620bdafc936.jpg
    e683671464533316f0afe620bdafc936.jpg
    35.1 KB · Views: 1
  • 1c95461f46fd80c534bf71774469da12.jpg
    1c95461f46fd80c534bf71774469da12.jpg
    37 KB · Views: 1
  • bb920536c88a6613a4a3f20c740fbe22.jpg
    bb920536c88a6613a4a3f20c740fbe22.jpg
    80.5 KB · Views: 1
  • 79bdf3cfc10caf78d7b4a579e6154b20.jpg
    79bdf3cfc10caf78d7b4a579e6154b20.jpg
    47.2 KB · Views: 1
Last edited:
OP
B

BlueBomber

Well-known member
Joined
Sep 14, 2013
Messages
3,201
Location
Outside Boston, MA
A few activities over the last two weeks...

First, SWMBO asked me to install some high-dollar displays in the front window of her new office. The display is a set of clear acrylic boxes attached to cables suspended from the ceiling and tensioned at the floor. With a drop tile ceiling and concrete floors to deal with, I puzzled a while before deciding to weld up some brackets to attach to the aluminum window frames.

5eff56677c6accbbbdb1d109cabd1c6c.jpg68ce02161d9acae154d49e9a1c31aea7.jpg
abd2b1d0218a1bfe981ca32b7d9c5c66.jpg

Here's the installed display...

1d44f94ecdc1ba6440d42db9709e5b4e.jpg

...and here's the finished bracket. One thing that's unusual about this display is that power for the LED lights flows down the unshielded steel cables. Apparently, it's okay to expose the public to low-voltage, low current wires. Just to be sure, I licked my fingertips and touched both wires--I felt no significant tingle.

d23127483d33a55f889f0fb23c2c5d11.jpg

SWMBO had me install just the first one to decide if she liked it. She's not totally thrilled with the shelf (dust shows up very easily), but thinks the front window looks unbalanced without the other one. I agree, so I'll be installing the second shelf in the near future.

While I had the welder out, I also worked on repairing some folding tables for the church that sponsors our Boy Scout troop. I've had these for a couple of months, so I'm glad to finally get to them.

0bcac9a2286a62aedef4d0e6b667e094.jpg

Sent from my SM-G950U using Tapatalk
 

Attachments

  • 5eff56677c6accbbbdb1d109cabd1c6c.jpg
    5eff56677c6accbbbdb1d109cabd1c6c.jpg
    63.3 KB · Views: 1
  • 68ce02161d9acae154d49e9a1c31aea7.jpg
    68ce02161d9acae154d49e9a1c31aea7.jpg
    72.3 KB · Views: 1
  • abd2b1d0218a1bfe981ca32b7d9c5c66.jpg
    abd2b1d0218a1bfe981ca32b7d9c5c66.jpg
    70.6 KB · Views: 1
  • 1d44f94ecdc1ba6440d42db9709e5b4e.jpg
    1d44f94ecdc1ba6440d42db9709e5b4e.jpg
    63.6 KB · Views: 1
  • 0bcac9a2286a62aedef4d0e6b667e094.jpg
    0bcac9a2286a62aedef4d0e6b667e094.jpg
    72.8 KB · Views: 1
  • d23127483d33a55f889f0fb23c2c5d11.jpg
    d23127483d33a55f889f0fb23c2c5d11.jpg
    53.9 KB · Views: 1
Last edited:
OP
B

BlueBomber

Well-known member
Joined
Sep 14, 2013
Messages
3,201
Location
Outside Boston, MA
SWMBO opened her new office last Monday, and it looks beautiful! Everything worked pretty much as expected, so this Saturday we took a break from the family business, giving me a chance to get back to the workbench build.

First step was to cut and fasten the second 3/4" plywood end leg to the far column, with the same type of pressure treated support block underneath. No pictures of that, so below is what it looked like with the second chest emptied out and in place.

f365ac52858022d19dea4a0025d7bbe3.jpg

This space between the chests will hold a hose reel, if there's enough width (it'll be close).

29943cbb32ea9f98670248c6a7cf0b42.jpg

This space will be storage for long materials. I have a Jack Olsen-esque plan for how to make it accessable. That will probably be quite a bit in the future.

0333c67be9ef79d0c162da5c1608affd.jpg

I next turned to gluing the slabs of oak butcherblock together. One of the four ended up with about a half inch warp along its length, so I used one of the other slabs as a straight edge and then straightened the edges very carefully with a circular saw.

d62238b6afb9110fb03a89c03861f928.jpg

With that done, on to bench top assembly. I used the biscuit joiner to help ensure the surfaces of the slabs stayed aligned through the assembly.

40c58f826aa1df397daac391fddd3f19.jpg

After getting the first one in place, I noticed glue was dripping onto the floor from the first seam. Not wanting to waste glue or make a bigger mess than was already there, I prepped the next two and then clamped the whole shebang at once.

af7d6ebf83a8b97d0c13c299701b9043.jpg91ac3b7baa89d75d09b1ae3fe468b3fb.jpg

Here's the finished product the next morning. Overall, better than I had feared. There were still a number of gaps between boards, both along the seams as well as already present ones in each slab.

4c2f30235b860bc9d56c2a7a35acccf6.jpgd9549d790140bbaab3b1b2b7d1f4ee31.jpg68360bddc1ab79c69daef69063f8ee79.jpg3967bf717c03ac4e003b9a038cf2803f.jpg

By the end of the day, I had attached a pair of full size fence boards to the back of the slab, notched the front of the slab by 1/2" on either side to clear the two columns and enlisted my visiting daughter and her boyfriend to help me maneuver it into place.

e146ccbb4974268b6192059adabd8ca2.jpgbf2405a05eb0731b2ab2de42df61f3a7.jpg

Dead level from left to right. That felt pretty good!

3904a944da7ffb745180d32b3df688d0.jpg

I'm going to add more plywood legs between the two cabinets to support the middle, but I also wanted to help spread the load across the front of the tool chest as well as clean up the gap. I cut two more pieces of oak and glued them to the bottom of the work bench slab.

eba73b39d1cfd5f3d30ecfbe6174bbe6.jpgad190d89af3f0451c6f2f6c5c8b597fc.jpg

Finally, I reinstalled the drawers to get a "money shot" for tonight's thread entry. Unfortunately, here's where I discovered my two Harbor Freight 44" tool chests were different part numbers and the drawers were not interchangable between the two. It seems the back drawer lock is in different positions on the double deep drawers and that the slides and slide release locks are mirror imaged. What the means is that you can install all the drawers into the wrong chest and not realize what've you've done until you get to the bottom double deep drawer. No problem, I thought, just pull it out and put it in the other chest. Yeah, this is where the mirrored slides bit me in the ***. The slide retainers don't release properly in this situation and I broke several of them before I realized what was happening and found a way to get them out without breaking the plastic clips. Overall, what should have been a quick install turned into an hour long ordeal. Nevertheless, here's the money shot:

3fcd9bd4784a22be5238b716ced7dea7.jpgf1b398b9f4494f173d08dab941b12e21.jpg03fde8a1af7e7f35b33a8fd6ddc68785.jpg

The next step will be to fasten the slab to the support structure around it, install the central legs and seal the surface with boiled linseed oil. Still a lot of work to go, but this was a major milestone!
 

Attachments

  • 68360bddc1ab79c69daef69063f8ee79.jpg
    68360bddc1ab79c69daef69063f8ee79.jpg
    49.6 KB · Views: 1
  • bf2405a05eb0731b2ab2de42df61f3a7.jpg
    bf2405a05eb0731b2ab2de42df61f3a7.jpg
    37.7 KB · Views: 1
  • 3904a944da7ffb745180d32b3df688d0.jpg
    3904a944da7ffb745180d32b3df688d0.jpg
    36 KB · Views: 1
  • eba73b39d1cfd5f3d30ecfbe6174bbe6.jpg
    eba73b39d1cfd5f3d30ecfbe6174bbe6.jpg
    46.2 KB · Views: 1
  • f1b398b9f4494f173d08dab941b12e21.jpg
    f1b398b9f4494f173d08dab941b12e21.jpg
    47.5 KB · Views: 1
  • d9549d790140bbaab3b1b2b7d1f4ee31.jpg
    d9549d790140bbaab3b1b2b7d1f4ee31.jpg
    38.2 KB · Views: 1
  • 4c2f30235b860bc9d56c2a7a35acccf6.jpg
    4c2f30235b860bc9d56c2a7a35acccf6.jpg
    59.2 KB · Views: 1
  • e146ccbb4974268b6192059adabd8ca2.jpg
    e146ccbb4974268b6192059adabd8ca2.jpg
    53.1 KB · Views: 1
  • f365ac52858022d19dea4a0025d7bbe3.jpg
    f365ac52858022d19dea4a0025d7bbe3.jpg
    52.5 KB · Views: 1
  • 29943cbb32ea9f98670248c6a7cf0b42.jpg
    29943cbb32ea9f98670248c6a7cf0b42.jpg
    38.6 KB · Views: 1
  • 0333c67be9ef79d0c162da5c1608affd.jpg
    0333c67be9ef79d0c162da5c1608affd.jpg
    43.3 KB · Views: 1
  • d62238b6afb9110fb03a89c03861f928.jpg
    d62238b6afb9110fb03a89c03861f928.jpg
    48.9 KB · Views: 1
  • 40c58f826aa1df397daac391fddd3f19.jpg
    40c58f826aa1df397daac391fddd3f19.jpg
    61.5 KB · Views: 1
  • af7d6ebf83a8b97d0c13c299701b9043.jpg
    af7d6ebf83a8b97d0c13c299701b9043.jpg
    69 KB · Views: 1
  • 91ac3b7baa89d75d09b1ae3fe468b3fb.jpg
    91ac3b7baa89d75d09b1ae3fe468b3fb.jpg
    67.7 KB · Views: 1
  • 03fde8a1af7e7f35b33a8fd6ddc68785.jpg
    03fde8a1af7e7f35b33a8fd6ddc68785.jpg
    55 KB · Views: 1
  • 3967bf717c03ac4e003b9a038cf2803f.jpg
    3967bf717c03ac4e003b9a038cf2803f.jpg
    46.8 KB · Views: 1
  • ad190d89af3f0451c6f2f6c5c8b597fc.jpg
    ad190d89af3f0451c6f2f6c5c8b597fc.jpg
    43.7 KB · Views: 1
  • 3fcd9bd4784a22be5238b716ced7dea7.jpg
    3fcd9bd4784a22be5238b716ced7dea7.jpg
    55.1 KB · Views: 1
Last edited:

C_F

ALLIANCE MEMBER
Joined
Jan 21, 2005
Messages
9,675
Location
Utah...SNOW BLOWS!
That bench top turned out looking great! Bummer that the tool boxes turned into a bunch of extra time for you, though.
 

drivesitfar

Well-known member
Joined
Oct 23, 2013
Messages
35,988
Location
Pacific Northwest
BB: awesome work on your new bench top and your toolbox bench in general. I'm wondering if you might just put on a little wider trim piece on the front of your new bench top to cover the little gap on the top of your toolboxes?

also did you make that little gap/cut on the side for a wire or do tell?

I also like the long storage behind your bench idea cause that's always tough to find spots for. another option is hanging lofts, but putting heavy stuff up there can be a pain or dangerous.

keep up the great work!!
 
OP
B

BlueBomber

Well-known member
Joined
Sep 14, 2013
Messages
3,201
Location
Outside Boston, MA
Thanks, gents!

Drives: I did cover the gap above both tool chests with another bit of oak, just like in the second pic. Good eyes spotting the little notch in one end. It was not planned--I just missed getting an eight foot length in one slab by an inch on two boards.

This coming weekend, I hope to get a belt sander on it as well as finish installation and sealing.

Sent from my SM-G950U using Tapatalk
 
OP
B

BlueBomber

Well-known member
Joined
Sep 14, 2013
Messages
3,201
Location
Outside Boston, MA
I did some more sanding this weekend. Unfortunately, I didn't control the 36-grit belt sander well enough and put some gouges in the work surface. After doing some touch up sanding with 120-grit paper on a vibrating sander, I reminded myself that this was a workbench and not a coffee table. I routered a 1/4" round on the leading edges of the bench and the backsplash. Then, I filled the gaps between boards with saw dust, wiped down the surface with a tack cloth and laid down a thick coating of boiled linseed oil. After making sure it flowed down into the cracks, I waited a few minutes and then wiped off the excess. The color came out a little darker than I really wanted, but not much more. I let it dry overnight and ran my fingers across it this morning.....smooooooth!

I also added the middle legs and secured the bench to the side legs with pocket screws. I failed to take an pictures of those steps, and will try to document them retroactively in the coming days.

The next major task will be cleaning, sorting, and putting stuff away between the two garages. They are both a wreck right now. I have a number of other side projects that will fold into the clean up, as time permits.7c154785f04811806f7568dd1e22e0c8.jpg933255d4021aa87cf4aaed7f0ef0ecdc.jpgc74bb10434454f4d389885e7f0cfac24.jpgb5b0a62c70ce564e323f7065dc442d35.jpgd362a010e879d7415e5f50cdcef3c582.jpgc273ae18a2cb5bc34a0f9d7ff0c7ca48.jpg714b3b8e4e95f9a8d597aa3f1013a1db.jpg

Sent from my SM-G950U using Tapatalk
 

Attachments

  • c74bb10434454f4d389885e7f0cfac24.jpg
    c74bb10434454f4d389885e7f0cfac24.jpg
    52.5 KB · Views: 1
  • b5b0a62c70ce564e323f7065dc442d35.jpg
    b5b0a62c70ce564e323f7065dc442d35.jpg
    44.8 KB · Views: 1
  • d362a010e879d7415e5f50cdcef3c582.jpg
    d362a010e879d7415e5f50cdcef3c582.jpg
    83.7 KB · Views: 1
  • c273ae18a2cb5bc34a0f9d7ff0c7ca48.jpg
    c273ae18a2cb5bc34a0f9d7ff0c7ca48.jpg
    88.6 KB · Views: 1
  • 714b3b8e4e95f9a8d597aa3f1013a1db.jpg
    714b3b8e4e95f9a8d597aa3f1013a1db.jpg
    76.4 KB · Views: 1
  • 933255d4021aa87cf4aaed7f0ef0ecdc.jpg
    933255d4021aa87cf4aaed7f0ef0ecdc.jpg
    49.6 KB · Views: 1
  • 7c154785f04811806f7568dd1e22e0c8.jpg
    7c154785f04811806f7568dd1e22e0c8.jpg
    47.7 KB · Views: 1
Last edited:

jakemac

Well-known member
Joined
May 21, 2013
Messages
9,035
Location
New England
Looks good.
I’d do at least 2 more coats of BLO before using the bench. You’ll want it sealed up tight before the weather has it going between expansion/contraction cycles.
 

drivesitfar

Well-known member
Joined
Oct 23, 2013
Messages
35,988
Location
Pacific Northwest
BB: looks great from my chair. I might tend to put on a couple more light coats too of BLO and get a little heat on it even if only a lamp/light.
 
OP
B

BlueBomber

Well-known member
Joined
Sep 14, 2013
Messages
3,201
Location
Outside Boston, MA
The workbench turned out great and is in service. I'm now out of excuses for not getting things cleaned and not starting using the space. The clutter is a little overwhelming but I was determined to make some progress today and get at least one thing up off the floor. The wall-mounted vacuum canister I scored at a storage sale was the target. The vac did not come with the wall bracket, so I found some 7/16" rod in my stash that fit the upper bracket and cut it to fit between the studs on the back wall. I then notched two scrap 2x4 blocks and nailed them into the studs. The vac dropped right into place and I gave it a test run with the 30-ft hose I bought off Amazon. It worked great! Now, i need to plumb and wire in an outlet that will let me use the remote switch at the end of the hose. Progress!ef6ecb446315958c9a6f2a9775d6840c.jpge3bfbd77c10128b298ebc3240656ed6e.jpg3a97ba68d136108282886ddd87fcbbdf.jpg69451b02b45d4c1888dec3e027b15814.jpgf2b78f6d0436ffd3fcb561f48da24849.jpgc8cbe1966f88662970b3374746036c86.jpg

Sent from my SM-G950U using Tapatalk
 

Attachments

  • c8cbe1966f88662970b3374746036c86.jpg
    c8cbe1966f88662970b3374746036c86.jpg
    76.1 KB · Views: 1
  • ef6ecb446315958c9a6f2a9775d6840c.jpg
    ef6ecb446315958c9a6f2a9775d6840c.jpg
    55.4 KB · Views: 1
  • e3bfbd77c10128b298ebc3240656ed6e.jpg
    e3bfbd77c10128b298ebc3240656ed6e.jpg
    52.2 KB · Views: 1
  • 3a97ba68d136108282886ddd87fcbbdf.jpg
    3a97ba68d136108282886ddd87fcbbdf.jpg
    51.4 KB · Views: 1
  • 69451b02b45d4c1888dec3e027b15814.jpg
    69451b02b45d4c1888dec3e027b15814.jpg
    65.3 KB · Views: 1
  • f2b78f6d0436ffd3fcb561f48da24849.jpg
    f2b78f6d0436ffd3fcb561f48da24849.jpg
    70.8 KB · Views: 2
Last edited:
OP
B

BlueBomber

Well-known member
Joined
Sep 14, 2013
Messages
3,201
Location
Outside Boston, MA
Thanks, Drives!

The vacuum is for general purpose duty in the garage, from cleaning up sawdust to vacuuming out the cars I hope the soon be able to get into said garage again.

I plumbed up a formal inlet connection for the hose last weekend. I'll try to get some pics up Saturday.

Sent from my SM-G950U using Tapatalk
 

BUGTHUG

Well-known member
Joined
Nov 12, 2010
Messages
2,960
Location
Kansas
you have to lift the vac up to dump it out? or does the bottom part open? looks good
 

Unruh

Well-known member
Joined
Aug 12, 2017
Messages
1,431
Location
Silverdale, Washington
Great job on that work bench! I appreciate the pictures and explanations. I’m terrible at remembering to take before and during pics.
 
To avoid these ads, REGISTER NOW!
OP
B

BlueBomber

Well-known member
Joined
Sep 14, 2013
Messages
3,201
Location
Outside Boston, MA
Great job on that work bench! I appreciate the pictures and explanations. I’m terrible at remembering to take before and during pics.
I still am! I finished last weekend a project adapting a universal grass catcher to my riding mower deck and then realized I hadn't taken any pics. You just get in the zone and forge ahead with the creation process. Especially hard when you only have a few hours in the shop to get something done.

I really need to document the state of disarray of both garages and some progress toward cleaning and organizing them. Maybe that'll motivate me to actually get it done and keep it that way.

Sent from my SM-G950U using Tapatalk
 
OP
B

BlueBomber

Well-known member
Joined
Sep 14, 2013
Messages
3,201
Location
Outside Boston, MA
you have to lift the vac up to dump it out? or does the bottom part open? looks good

Bug, I meant to go grab a picture to help answer your question, but then forgot.

The canister opens at the top, and you lift out a bag to empty it.

Sent from my SM-G950U using Tapatalk
 

bj383ss

Well-known member
Joined
Sep 29, 2011
Messages
3,166
Location
TX
Man your work/toolchest bench came out great. I like the glued up top. If it were me I would put a couple of coats of Polyurethane over the BLO once it dries for a couple of days.

Looking forward to seeing the cars in there.

Bret
 
OP
B

BlueBomber

Well-known member
Joined
Sep 14, 2013
Messages
3,201
Location
Outside Boston, MA
Thanks, Bret. I know poly would better seal up the gaps between the boards, but I'm worried about ruining it if I were ever to get chemicals spilled on it. We'll see--right now it's way too cold to put down polyurethane.

Sent from my SM-G950U using Tapatalk
 
Last edited:
OP
B

BlueBomber

Well-known member
Joined
Sep 14, 2013
Messages
3,201
Location
Outside Boston, MA
For the last several weeks, I've been walking into the new garage and seeing this:ecdda122fe3b7f208d72db296f98300e.jpg

...a messy garage with junk everywhere. You know it's too cluttered when you've got to turn sideways to move around the building. It was time to clean up.

First, I needed to finish the projects that were causing the clutter. This table lost its leg when yours truly lost his balance while unloading it. Turns out the leg of an upside down particle board table will not stop a falling 200-lb man before the screws rip out. So, I drilled new holes for slightly larger, longer screws and got the table back in service.

35f83bcbd939effc4bc61e1049a2ad10.jpg963d3d6f167fc698f19b82abe37f460a.jpg

Next, I've been scrapping Craftsman radial arm saws that I bought to turn in for the recall. I found six for between $50 and free around my town and five of them are worth $100 if I send in the motor and carriage to Emerson. However, I decided I could not destroy the beautiful Power Bronze era one. I did, however, marry it up to a base cabinet from the same era that was attached to another saw that didn't match. The cabinet came with a vintage Craftsman wheel kit that's pretty trick. I tuned up the wheel axles, lubing and adjusting the pivots until everything worked smoothly.

4d324da6d87b5d57757f151dbdd3eb35.jpg

I also swapped the bent up front trim piece for a pristine one from another saw. The trim is held in by that looks like a rivet, but it's actually more like a push pin. You can tap it from the back and get it to pop out enough to get a screwdriver under it and finish removing it.
4010026cd2e278501f5c0f8e19fec9b4.jpg03160c3b8cdd70c7f4d0ad048aefe9c7.jpgc096fef7ebc129536ba38859d8015ff4.jpg878ffd28f6efacb87b33a2b52dfc50c1.jpgf7d0aaf6e3beef15a056f10b2a730ca6.jpga1c87a85134e4b453dbc7bd1c74363a8.jpg

I finished rendering the RAS carcasses, saving bolts, nuts, screws, rods shafts, knobs, and pretty much anything I might want for projects down the road.

9ae71ad99c03cdfe3fae9caceafee4be.jpg
1e44a9dbfd5a70c2f53d421b8476f0ad.jpg
3f0c559485a0805826cc95128b8f98a4.jpg

For anyone curious about the recall, here's the part of the saw that they want. Once you decide to participate, you order a box from the website (radialarmsawrecall.com) and get this flattened box within a few weeks. Inside is a postage paid return label, two pieces of packaging tape and instructions for how to remove the motor. Once the box is together. I usually put some scrap plywood inside to help prevent any sharp edges from poking through. Once I fill the empty space with whatever debris I have laying around, I seal the box and drop it off at s nearby FedEx store.

42262d7fbe9670e81469c1e9b5a9c608.jpg
afdcf6d51c1f7430b083cb2e8e3b4f35.jpg90d066ec696308d5c6558bc9d0d6088e.jpg4d4c28b5c08a9b6f3b1c3ccf64e619e0.jpgbe15020f9006a967f3d16a1fe7b82507.jpg

SWMBO brought home some glass cabinet doors from her office, so I whipped up some brackets to store them safely in the overhead shelving.
5a9fbcecbbe8026739d72dcacbfddff7.jpg


Finally, I installed a parts bin rack I picked at a sale earlier this year. The rack is designed to sit on the workbench surface, but I didn't want to give up that much of my new butcher block. So, I removed the feet and bolted it to the wall. The weight of the rack and whatever its holding is carried on top of the backsplash.0d712e6aa563aca4f5fc49a376142340.jpg27c30242ae052304d5ba0740f30f74a7.jpg68e8d7cb876d5025639da62786b792c4.jpg

Finally, I moved and found homes for everything else cluttering up the floor. Here's how it looked when I closed the door tonight, after two weekends of work.

0288a481236550f4f4989f9c5f7b1c02.jpg
 

Attachments

  • 3f0c559485a0805826cc95128b8f98a4.jpg
    3f0c559485a0805826cc95128b8f98a4.jpg
    77.3 KB · Views: 1
  • 03160c3b8cdd70c7f4d0ad048aefe9c7.jpg
    03160c3b8cdd70c7f4d0ad048aefe9c7.jpg
    53 KB · Views: 1
  • c096fef7ebc129536ba38859d8015ff4.jpg
    c096fef7ebc129536ba38859d8015ff4.jpg
    70.2 KB · Views: 1
  • 878ffd28f6efacb87b33a2b52dfc50c1.jpg
    878ffd28f6efacb87b33a2b52dfc50c1.jpg
    62.1 KB · Views: 1
  • f7d0aaf6e3beef15a056f10b2a730ca6.jpg
    f7d0aaf6e3beef15a056f10b2a730ca6.jpg
    45.3 KB · Views: 1
  • a1c87a85134e4b453dbc7bd1c74363a8.jpg
    a1c87a85134e4b453dbc7bd1c74363a8.jpg
    83.7 KB · Views: 1
  • 90d066ec696308d5c6558bc9d0d6088e.jpg
    90d066ec696308d5c6558bc9d0d6088e.jpg
    37 KB · Views: 1
  • 9ae71ad99c03cdfe3fae9caceafee4be.jpg
    9ae71ad99c03cdfe3fae9caceafee4be.jpg
    79.2 KB · Views: 1
  • afdcf6d51c1f7430b083cb2e8e3b4f35.jpg
    afdcf6d51c1f7430b083cb2e8e3b4f35.jpg
    47.8 KB · Views: 1
  • 42262d7fbe9670e81469c1e9b5a9c608.jpg
    42262d7fbe9670e81469c1e9b5a9c608.jpg
    48.3 KB · Views: 1
  • 4010026cd2e278501f5c0f8e19fec9b4.jpg
    4010026cd2e278501f5c0f8e19fec9b4.jpg
    71.8 KB · Views: 1
  • 4d324da6d87b5d57757f151dbdd3eb35.jpg
    4d324da6d87b5d57757f151dbdd3eb35.jpg
    46.7 KB · Views: 1
  • ecdda122fe3b7f208d72db296f98300e.jpg
    ecdda122fe3b7f208d72db296f98300e.jpg
    161.7 KB · Views: 1
  • 35f83bcbd939effc4bc61e1049a2ad10.jpg
    35f83bcbd939effc4bc61e1049a2ad10.jpg
    72.5 KB · Views: 1
  • 963d3d6f167fc698f19b82abe37f460a.jpg
    963d3d6f167fc698f19b82abe37f460a.jpg
    44.9 KB · Views: 1
  • 4d4c28b5c08a9b6f3b1c3ccf64e619e0.jpg
    4d4c28b5c08a9b6f3b1c3ccf64e619e0.jpg
    74.3 KB · Views: 1
  • be15020f9006a967f3d16a1fe7b82507.jpg
    be15020f9006a967f3d16a1fe7b82507.jpg
    56.9 KB · Views: 1
  • 0d712e6aa563aca4f5fc49a376142340.jpg
    0d712e6aa563aca4f5fc49a376142340.jpg
    62.3 KB · Views: 1
  • 27c30242ae052304d5ba0740f30f74a7.jpg
    27c30242ae052304d5ba0740f30f74a7.jpg
    66.8 KB · Views: 1
  • 68e8d7cb876d5025639da62786b792c4.jpg
    68e8d7cb876d5025639da62786b792c4.jpg
    70.6 KB · Views: 1
  • 0288a481236550f4f4989f9c5f7b1c02.jpg
    0288a481236550f4f4989f9c5f7b1c02.jpg
    78.5 KB · Views: 2
Last edited:
OP
B

BlueBomber

Well-known member
Joined
Sep 14, 2013
Messages
3,201
Location
Outside Boston, MA
Thanks, Bob! It feels so good to go out there now and actually have space for a car. I did a couple of smaller projects this afternoon, namely cleaning the dust from the reflectors of my small electric heater, fixing my homemade cord reel LED light, welding up a bracket to hang it on the wall, and installing a cover and a few remaining hose brackets on the lift.

I think it may be time to start planning the disassembly of the Impala. I'm about out of excuses.

Sent from my SM-G950U using Tapatalk
 

Squashfest81

Well-known member
Joined
Jan 14, 2012
Messages
1,475
Location
MA
I’m liking the combined eras on the Craftsman stand. Power Bronze and Craftsman Red, nice!
 

drivesitfar

Well-known member
Joined
Oct 23, 2013
Messages
35,988
Location
Pacific Northwest
BB: not sure how much you drive by industrial shops and warehouses, but they usually are tossing good commercial racking or maybe some that had a small dent that is still too good to be scrapped cause having a few of these racks in your shop will really open up more floor space. auctions are another good place to maybe buy some.

while I own a ton of racking I can tell you they are all not interchangable and if the upright or beam has been bent or tweeked a bit they are a PITA to get set up. i've set up all the racks in the pictures except I don't own that big LUMBER rack (I have the one standard one full of Cedar though) which is on my radar.

to take advantage of some of that ceiling height you might consider putting racks sideways so you can store your project cars under racking sort of what I did at my storage with my trailer under 3 8 foot wide racks that are 12 foot tall and 3 of them are 4 foot deep each.

congrats on finding some floor space in the meantime.

here's to you and your family to have a Merry Christmas and a great 2019.
 

Attachments

  • 00n0n_fmXYcTvWGiG_1200x900.jpg
    00n0n_fmXYcTvWGiG_1200x900.jpg
    130.6 KB · Views: 79
  • racking set up over fridge now level (2).jpg
    racking set up over fridge now level (2).jpg
    108.9 KB · Views: 74
  • moving cedar off of small galvanized rack to tall rack 2 (2).jpg
    moving cedar off of small galvanized rack to tall rack 2 (2).jpg
    148.4 KB · Views: 78
  • took down 10 foot tall rack and moved big steel bench to Seahurst 2.jpg
    took down 10 foot tall rack and moved big steel bench to Seahurst 2.jpg
    153.6 KB · Views: 71
  • 00y0y_9MlxsVVJiIy_1200x900.jpg
    00y0y_9MlxsVVJiIy_1200x900.jpg
    143.1 KB · Views: 74
  • aluminum trailer under 12x8x4 racking.jpg
    aluminum trailer under 12x8x4 racking.jpg
    73 KB · Views: 77
  • cleaned up 10x20 today 1.jpg
    cleaned up 10x20 today 1.jpg
    151.8 KB · Views: 75
Last edited:
OP
B

BlueBomber

Well-known member
Joined
Sep 14, 2013
Messages
3,201
Location
Outside Boston, MA
Drives: great suggestion, I'll certainly consider it. I haven't yet filled up the storage mezzanine over the workbench. If I do, your method would be a good solution. Thanks for posting pics!

Sent from my SM-G950U using Tapatalk
 
OP
B

BlueBomber

Well-known member
Joined
Sep 14, 2013
Messages
3,201
Location
Outside Boston, MA
Wow, exactly a month since my last entry! Well, I didn't spend a lot if time out there over the holidays but I did make some new additions.

I hit a sale just before Christmas last year and picked up this nice 1/2HP Craftsman block grinder, circa 1974 for $30.

7a3841a9ce435cd1aaf5908903dc218a.jpg

I found this 1957 Craftsman Power Bronze radial arm saw, with cabinet, a bunch of blades and some accessories, for $75. My dilemma now is that I already own a 1960 C-man Power Bronze RAS that's in better shape. One of them is getting scrapped for the recall, so I may just combine the best of both saws into one.

4ed6ab209c3deca2de13c38151eda4eb.jpg

This Mousehole 148-lb anvil was made between 1820 and 1830. It's working surface is in terrible shape, but I got it for only five dollars, so I'm not complaining. This anvil is now the oldest thing I own, by a wide margin!

e94ce6bd783bc455bdb941bb8e35d62e.jpg

The same guy I bought the RAS and anvil from sold me his massive Greenerd 3-ton arbor press for just $50.

454b72bd38255244ab9e7a3d8614ded3.jpg

Finally, while out of town on business, I opened up Facebook Marketplace and scored another Craftsman RAS for $40. I hope they keep the recall up, because these saws come up for cheap all the time!

5caaf07687bedc130f32929d8829f268.jpg

Sent from my SM-G950U using Tapatalk
 

Attachments

  • 4ed6ab209c3deca2de13c38151eda4eb.jpg
    4ed6ab209c3deca2de13c38151eda4eb.jpg
    71.4 KB · Views: 2
  • 7a3841a9ce435cd1aaf5908903dc218a.jpg
    7a3841a9ce435cd1aaf5908903dc218a.jpg
    66.1 KB · Views: 2
  • e94ce6bd783bc455bdb941bb8e35d62e.jpg
    e94ce6bd783bc455bdb941bb8e35d62e.jpg
    45.5 KB · Views: 1
  • 454b72bd38255244ab9e7a3d8614ded3.jpg
    454b72bd38255244ab9e7a3d8614ded3.jpg
    72.2 KB · Views: 1
  • 5caaf07687bedc130f32929d8829f268.jpg
    5caaf07687bedc130f32929d8829f268.jpg
    96.8 KB · Views: 1
Last edited:
OP
B

BlueBomber

Well-known member
Joined
Sep 14, 2013
Messages
3,201
Location
Outside Boston, MA
So, what's a guy to do with all of the parts leftover from scrapping a bunch of Craftsman radial arm saws? Well, I decided to build a stand for the block grinder, using only spare parts I'd picked from sales over the years. After all, what's the point of saving stuff if you don't use it for something?

First, I decided to cut down the table frame to make a base for the stand. I wanted to keep the radial arm structure, to include the functionality to raise and lower the vertical column. I marked and cut it at 9 inches, and then cut the front panel off and then welded it on.

59f8ef8b48dda7008c51668443218919.jpgbc135a0aaa9976328b04d2c7031440a3.jpg
a304e935f8a0f900d092ce8e0beadd7e.jpg

Here you see the base next to an uncut table for comparison.

0754de402038de6e36493236d7f1c1b9.jpg

This project was also a way for me to dust off and improve my welding skills, as I build up the nerve to start repairing rust on my Impala. I used my Eastwood 175 MIG with .035 flux core wire for all of the welding on the project. Some of the welds were better than others. With this relatively thick gauge metal, I managed to lay down some decent beads without blowing too many holes through. Penetration was a little shallow, so I still need to keep working on settings.

8141f94a5ac40da557031472ebfacdb7.jpg
8ab53d44b5e3eb9d02f5847f50b9009a.jpg

I then welded a second column on top of the first to give me the standing height I wanted. I had to trim about three inches off one end of the second column to eliminate a large pair of holes in the side of the column.

e54f8116bddecd2ad67d95d466a1622d.jpg

For the table top, I reached into the darkness under one of my workbenches and found these two cast saw table extensions for a very early Craftsman table saw. Although I hesitated in repurposing them, I decided 1) they didn't have any real collector value, 2) I was never going to set up the saw and use it myself and 3) they'd probably end up going for scrap one day.

687802095688bc2a7b6e78c4e227bb42.jpg

I used the locking collar for the arm as the flange to mount the table to the column. Readers should note that not all years of Craftsman RAS's have a completely circular locking collar. It may be only the early ones do. I cut the central ridge out so I could weld the collar directly to the cast base. The welds seemed to take and stick very well to the cast iron. Unfortunately, I got into a groove and neglected pictures of the welding process.

0aca3873ca4fbf8418e6a2dafc639079.jpg

Here's the trial fit of the table and the grinder to the column. I thought for a bit I might have enough room for my grinder and my Eastwood buffer, but alas, no. I ended up rotating the table 90-degrees from this picture for mounting purposes.

fc9b070f2d37fb7974ede059a831940b.jpg
37781b7188bcfd92310d6c47095b6128.jpg

Back on the welding table, I welded up all the side holes and ground off all the surface corrosion. Again, my welds are a work in progress.

cab527a2751d4462a3c03434a35f8e2b.jpg
b6167b53d7be5140d3b2efe064307de4.jpg

Next up was a set of adjustable feet. I reached into the pile of stuff that came with the '57 RAS and found these four feet. I screwed three nuts onto each shaft and then ran a bead down each side to lock the nuts to the base.

8cdc880720f4b40bdb26e6d787e4734e.jpg
763c34e19bb7c90d201bc5b203fbfd38.jpg

I also added two casters on one side to make the stand easier to move around.

4eee476a44d492b020660d8d5a029265.jpg
c74aba453c5f27e7ff01631c5eecf347.jpg

After drilling four holes in the top plate to mount the grinder, it was time to bang the table and collar down onto the column. A few taps with the rawhide hammer and...

D'oh!

328c9eba8402a9a040d83360932d61ea.jpg
fe0ff514e186e08d6e49ca96654d27da.jpg

My welds into the cast iron weren't as deep as I'd thought. Also, I know cast is very hard to weld to if you don't preheat it (I didn't). I took the tabletop back to the welding bench and added some thicker, deeper beads around the collar and along the joint. I also put bolts through two holes along the central spine and snugged them together.

Here it is, mostly done, with the grinder bolted down to the plate.

6235e4b7edd96b1960a4c998055b25f2.jpg

I say mostly done, because I want to mount a small electric motor to the base to operate the column screw. Overkill, for sure, but I already have a motor, pulleys, wire and buttons. Why not? Then, I'll need to blow it apart and paint everything. More to come later this weekend, I hope.

Sent from my SM-G950U using Tapatalk
 

Attachments

  • 4eee476a44d492b020660d8d5a029265.jpg
    4eee476a44d492b020660d8d5a029265.jpg
    75.2 KB · Views: 1
  • cab527a2751d4462a3c03434a35f8e2b.jpg
    cab527a2751d4462a3c03434a35f8e2b.jpg
    47.9 KB · Views: 1
  • b6167b53d7be5140d3b2efe064307de4.jpg
    b6167b53d7be5140d3b2efe064307de4.jpg
    63 KB · Views: 1
  • 8cdc880720f4b40bdb26e6d787e4734e.jpg
    8cdc880720f4b40bdb26e6d787e4734e.jpg
    69.6 KB · Views: 1
  • 763c34e19bb7c90d201bc5b203fbfd38.jpg
    763c34e19bb7c90d201bc5b203fbfd38.jpg
    43.8 KB · Views: 1
  • c74aba453c5f27e7ff01631c5eecf347.jpg
    c74aba453c5f27e7ff01631c5eecf347.jpg
    50.3 KB · Views: 1
  • 328c9eba8402a9a040d83360932d61ea.jpg
    328c9eba8402a9a040d83360932d61ea.jpg
    64.4 KB · Views: 1
  • fe0ff514e186e08d6e49ca96654d27da.jpg
    fe0ff514e186e08d6e49ca96654d27da.jpg
    44.4 KB · Views: 1
  • 6235e4b7edd96b1960a4c998055b25f2.jpg
    6235e4b7edd96b1960a4c998055b25f2.jpg
    63.4 KB · Views: 1
  • 37781b7188bcfd92310d6c47095b6128.jpg
    37781b7188bcfd92310d6c47095b6128.jpg
    45.3 KB · Views: 1
  • fc9b070f2d37fb7974ede059a831940b.jpg
    fc9b070f2d37fb7974ede059a831940b.jpg
    52.7 KB · Views: 1
  • 0aca3873ca4fbf8418e6a2dafc639079.jpg
    0aca3873ca4fbf8418e6a2dafc639079.jpg
    69.6 KB · Views: 1
  • 59f8ef8b48dda7008c51668443218919.jpg
    59f8ef8b48dda7008c51668443218919.jpg
    57.2 KB · Views: 1
  • bc135a0aaa9976328b04d2c7031440a3.jpg
    bc135a0aaa9976328b04d2c7031440a3.jpg
    53.4 KB · Views: 1
  • a304e935f8a0f900d092ce8e0beadd7e.jpg
    a304e935f8a0f900d092ce8e0beadd7e.jpg
    62.5 KB · Views: 1
  • 0754de402038de6e36493236d7f1c1b9.jpg
    0754de402038de6e36493236d7f1c1b9.jpg
    66.8 KB · Views: 1
  • 8141f94a5ac40da557031472ebfacdb7.jpg
    8141f94a5ac40da557031472ebfacdb7.jpg
    57.4 KB · Views: 1
  • 8ab53d44b5e3eb9d02f5847f50b9009a.jpg
    8ab53d44b5e3eb9d02f5847f50b9009a.jpg
    42.5 KB · Views: 1
  • e54f8116bddecd2ad67d95d466a1622d.jpg
    e54f8116bddecd2ad67d95d466a1622d.jpg
    38.7 KB · Views: 1
  • 687802095688bc2a7b6e78c4e227bb42.jpg
    687802095688bc2a7b6e78c4e227bb42.jpg
    65.8 KB · Views: 1
Last edited:
OP
B

BlueBomber

Well-known member
Joined
Sep 14, 2013
Messages
3,201
Location
Outside Boston, MA
Here's a shot of the new garage from the second floor of the house. SWMBO and I are cleaning nside this morning, waiting for the sleet and rain to stop before going out the clear the snow later today.b67f453a109b979065ae486c8a537055.jpg

Sent from my SM-G950U using Tapatalk
 

Attachments

  • b67f453a109b979065ae486c8a537055.jpg
    b67f453a109b979065ae486c8a537055.jpg
    51.5 KB · Views: 1

captain14

Well-known member
Joined
Dec 19, 2012
Messages
7,013
Location
Near College Park Maryland 20740
Here's a shot of the new garage from the second floor of the house. SWMBO and I are cleaning nside this morning, waiting for the sleet and rain to stop before going out the clear the snow later today.b67f453a109b979065ae486c8a537055.jpg

Sent from my SM-G950U using Tapatalk

You built a new garage and the truck has to live outside in the cold and snow?

Nice shot. Maybe take a night photo sometime and post in the thread
“ GJ garages at Night”
 

Attachments

  • b67f453a109b979065ae486c8a537055.jpg
    b67f453a109b979065ae486c8a537055.jpg
    50.3 KB · Views: 4

Fisherguy

Well-known member
Joined
Oct 31, 2011
Messages
191
Location
150 Mile House BC
You built a new garage and the truck has to live outside in the cold and snow?

Nice shot. Maybe take a night photo sometime and post in the thread
“ GJ garages at Night”

If that garage is 25 feet wide and has a man door on the front I'm guessing the overheads are only 7 ft wide, might be tough to get the truck in there with the plow on..?
My shop is 25 feet wide, has 2 - 10 ft doors, my man door is on the side, wish it was 30 feet wide but it came with the house.
 
OP
B

BlueBomber

Well-known member
Joined
Sep 14, 2013
Messages
3,201
Location
Outside Boston, MA
You built a new garage and the truck has to live outside in the cold and snow?

Nice shot. Maybe take a night photo sometime and post in the thread
“ GJ garages at Night”

If that garage is 25 feet wide and has a man door on the front I'm guessing the overheads are only 7 ft wide, might be tough to get the truck in there with the plow on..?
My shop is 25 feet wide, has 2 - 10 ft doors, my man door is on the side, wish it was 30 feet wide but it came with the house.

The garage is 32 feet wide across the front and the garage doors are 9 feet square. The truck is outside because even with new garage, all but one bay has a car in it and the last one has the riding mower in it.

:headscrat:headscrat:dunno:

Honestly, if I had thought about it a bit harder, I could have made them all fit. The problem is that the non-running Impala is in the end bay of the new garage and that's really the perfect place for the truck to sit. The Malibu is in the lift bay next to the Impala, and I could have put it in the air and parked the truck underneath. However, that would require a hard right or left turn after clearing the doorway, not easy when the snow is deep (but probably doable in this 6-8" storm).

One day, when all my junk is running, I'll pre-position the truck and plow in the far bay for a straight out run down the driveway. As is, at least the truck collects snow in the bed that helps to counterweight the blade hanging off the nose.
 
Last edited:

smalltown

Well-known member
Joined
Jul 9, 2015
Messages
985
Location
Western Maine
I read that it's worse to have the vehicle inside a heated garage up here where they salt the roads. In the heated garage the salt stays active all the time.
 
OP
B

BlueBomber

Well-known member
Joined
Sep 14, 2013
Messages
3,201
Location
Outside Boston, MA
It is true that rust slows down in cold weather. My new garage doesn't have heat yet, so that's not a factor for now. However, working out there in these below freezing temps has me looking at and thinking about a natural gas-fired heater....

Sent from my SM-G950U using Tapatalk
 
To avoid these ads, REGISTER NOW!
Top Bottom