To avoid these ads, REGISTER NOW!

Above 1200 Sq/FT Blue Bomber's Garages

Wokspaces above 1200 squarefeet.
To avoid these ads, REGISTER NOW!
OP
B

BlueBomber

Well-known member
Joined
Sep 14, 2013
Messages
3,201
Location
Outside Boston, MA
More than a month since my last post doesn't mean no garage activities.
Its been a busy winter out there.

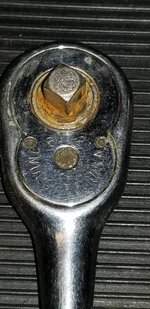
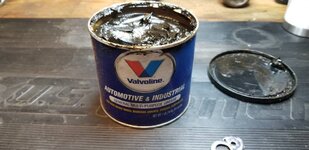
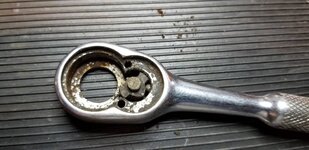
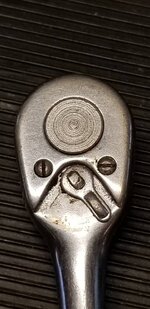
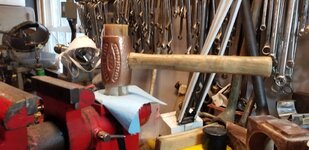
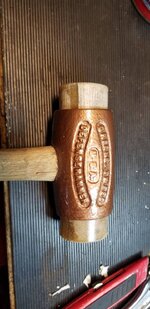
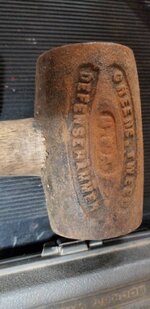
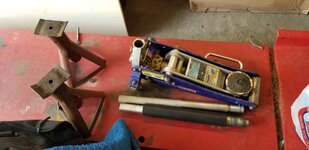
I spent one particularly cold winter Saturday in the heated garage rebuilding an Indestro 6672 1/4" ratchet.
fd95069456350444bd1805392b3e0b64.jpgc145a1e3939766bc75e4225ba223f993.jpgbfd42fe598e398c4d72253a2b06240de.jpg

This one was pretty easy to disassemble, and there were no sneaky springs that went sproinging out across the workbench.

37ad92c1c7cd00a23d19776a531cb504.jpgd312642322df4cf192931a7136d951d8.jpg

The parts were not worn out, just gummed up with old grease, so I just cleaned and re-lubed everything.

c2c42f7cf265d59e3d89efa6a065d535.jpg

After re-assembly, it definitely worked better, but still not as smoothly as others I have.

Another long-time goal of mine has been to install a powder coating oven in one of my garages. Over the years, I have saved two different kitchen stoves from rental properties, but never got around to putting them in. However, while home over Christmas, my Dad let me bring back the vintage GE double wall oven he had bought with the same purpose in mind and with the same lack of completion. It has been cluttering up a corner of his shop for several years and now that Parkinson's has deprived him of his shop time, he was happy to see it put to use.

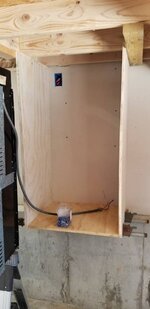
I decided to tuck it into the far end of the storage mezzanine, opposite the entry door.

7f140f25f062b9028222aaa220fc8279.jpg

Just like behind the workbench, I insulated and sheetrocked the wall, but not before adding a junction box to the 240V circuit running to the welder outlet. I wanted to keep the floor below clear, so I made a partially hanging box from scrap 3/4" plywood to enclose the built-in wall oven.

c1c1081704184e12eb6d4043cd9fcaa2.jpgc2815d44e37ca38c9d15fdba0c8a9524.jpg44b2cb89e709ffde2dcc903564af120e.jpg

Here's the oven after final install. Note the 2x trim piece on the front--it serves several purposes: 1) my scrap plywood wasn't wide enough to allow the oven to slide all the way in, so I needed to cover the remaining 2 inches, 2) the screw holes on the front face of the oven (that prevent the oven from falling forward out of the hole) were too far in to allow screws to bite into the vertical plywood. So, I spent some time on the table saw shaping a 2x4 to the dimensions needed to fill the gap.

469556e7b155a01ed447f8fafb5d6d7d.jpg54e7a62e57c6f68f84b0c2c32e3f5e4b.jpg

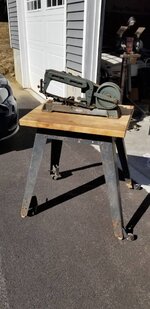
The space to the right of the oven will eventually get turned into a powder coating station. I'll probably use some of the remaining oak boards I have to assemble another butcherblock work surface.

896eb75aee21c12302e5ec2780a91e9a.jpg

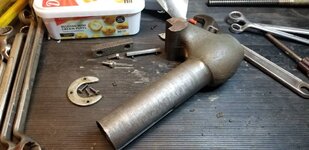
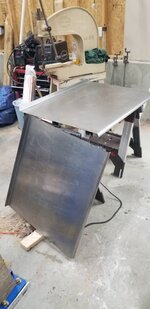
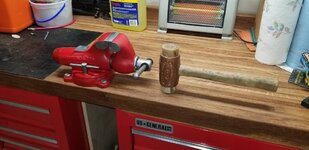
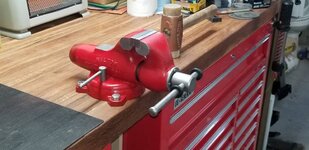
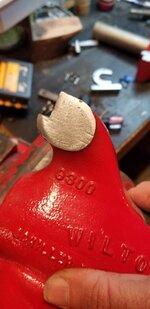
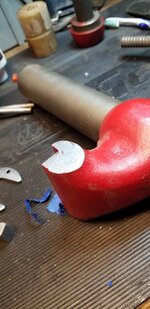
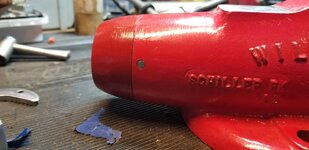
But, being the impatient person I am, I couldn't wait to try out my new equipment. I disassembled this 1978 Wilton bullet vise that will eventually be mounted on the new garage butcherblock bench.

f910db434265a504af4ca4ae54ee3365.jpg57e694c291bcec7fdc0b6789c759feaf.jpg

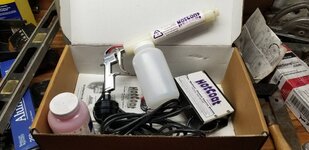
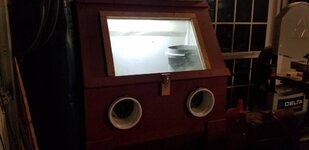
After some bead blasting in the blast cabinet, it was ready to go. I cracked open the yard-sale-found Eastwood powder coating kit I've had for a few years. All of the original receipts were in the box--this kit was bought back in 2006 and never used.

a0570f5db860987066a2933d03aa0ea4.jpg

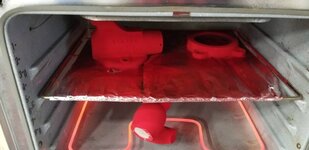
I wrapped the oven grate in aluminum foil and selected Mirror Red from the powders that came with the kit. I sprayed down the parts with degreaser and after letting them dry, hit 'em with the powder gun. It worked okay, but despite Youtube video warnings about the difficulties in getting into tight spaces, I still managed to miss a few key areas under the static portion of the vise. I also had a few areas where the powder didn't stick, probably due to contamination. A recommended technique that I skipped is to bake the part before putting the powder on to drive out any trapped oils. Maybe next time.

fec8318416f58cf1e87220ba9a2e7fd1.jpgac51c51f570b29eb5105af33ddfb3182.jpg366d1c11317e030f82a7e5eeef644511.jpgb6b473f09b399e761889212ed1c4db74.jpgdab6f449468c1efd8774e28ca04c4f9e.jpg4e3c96f255aaca61b5d1ed71884702e2.jpg

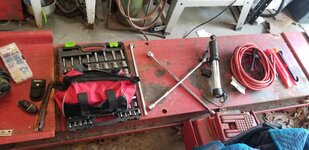
Finally, since I put my lift into service, I've been wanting a tool cart to set wrenches and parts on as I work under the car. After haunting Craigslist and looking at carts on Harbor Freight, I recalled that--duh, I already own a Hazet-imitation cart that was tucked under a bench in the other building gathering dust. I pulled it out...and remembered why I had tucked it under there in the first place: one of the latches was broken. Nevertheless, since I had it out, I decided to repair it.

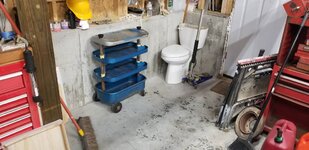
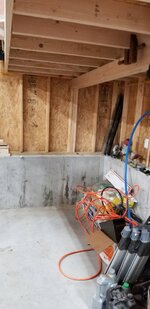
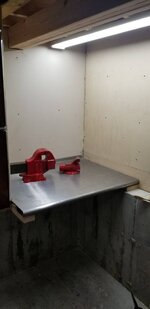
Here's the corner where the cart will live. Of course, the first step was to clean out the junk already there. Oh and no, the toilet is not functional--it was salvaged from another renovation and will eventually go upstairs in old garage as part of an efficiency apartment upgrade.

a4cac699527ad6afa94076fc13f5a2c3.jpg

The problem with the latch is that the cheap sheet metal finger grip had pulled off of the locking pin. That fix was easy: I tapped the sheet metal back onto the pin and swedged the pin metal to re-grip and capture the sheetmetal. I then needed to take the entire bracket off of the shelf to get the clearance to reinstall the repaired part. That task involved drilling out the blind rivets, punching them through, installing the part, re-installing the blind rivets, and the swedging what was left of the ends to capture the bracket again. I was doubtful the repair would work, but so far it is holding.

f7fb4ec45c3e026e2477fbebd4718ad9.jpg8790fecf8035b5f37007f21dd9358559.jpg35ec4adc11fa5ccc2834a985cca998c5.jpg
2da5360ac6dc02e1dc5725884f9d06f6.jpg

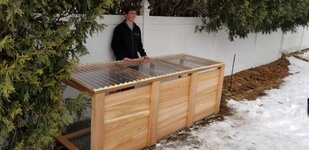
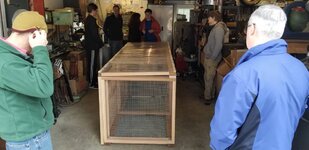
I have more projects underway, to include helping Life Scout finish up his Eagle project that currently occupies a bay in the heated garage. That's part of today's fun.
 

Attachments

  • 896eb75aee21c12302e5ec2780a91e9a.jpg
    896eb75aee21c12302e5ec2780a91e9a.jpg
    80.3 KB · Views: 0
  • fd95069456350444bd1805392b3e0b64.jpg
    fd95069456350444bd1805392b3e0b64.jpg
    88 KB · Views: 0
  • c145a1e3939766bc75e4225ba223f993.jpg
    c145a1e3939766bc75e4225ba223f993.jpg
    103.1 KB · Views: 0
  • 366d1c11317e030f82a7e5eeef644511.jpg
    366d1c11317e030f82a7e5eeef644511.jpg
    48.2 KB · Views: 0
  • ac51c51f570b29eb5105af33ddfb3182.jpg
    ac51c51f570b29eb5105af33ddfb3182.jpg
    79.2 KB · Views: 0
  • fec8318416f58cf1e87220ba9a2e7fd1.jpg
    fec8318416f58cf1e87220ba9a2e7fd1.jpg
    44.8 KB · Views: 0
  • a0570f5db860987066a2933d03aa0ea4.jpg
    a0570f5db860987066a2933d03aa0ea4.jpg
    73.8 KB · Views: 0
  • b6b473f09b399e761889212ed1c4db74.jpg
    b6b473f09b399e761889212ed1c4db74.jpg
    59.2 KB · Views: 0
  • dab6f449468c1efd8774e28ca04c4f9e.jpg
    dab6f449468c1efd8774e28ca04c4f9e.jpg
    74.8 KB · Views: 0
  • 4e3c96f255aaca61b5d1ed71884702e2.jpg
    4e3c96f255aaca61b5d1ed71884702e2.jpg
    75.9 KB · Views: 0
  • 2da5360ac6dc02e1dc5725884f9d06f6.jpg
    2da5360ac6dc02e1dc5725884f9d06f6.jpg
    75.5 KB · Views: 0
  • 35ec4adc11fa5ccc2834a985cca998c5.jpg
    35ec4adc11fa5ccc2834a985cca998c5.jpg
    74.6 KB · Views: 0
  • 8790fecf8035b5f37007f21dd9358559.jpg
    8790fecf8035b5f37007f21dd9358559.jpg
    76.4 KB · Views: 0
  • f7fb4ec45c3e026e2477fbebd4718ad9.jpg
    f7fb4ec45c3e026e2477fbebd4718ad9.jpg
    67.3 KB · Views: 0
  • a4cac699527ad6afa94076fc13f5a2c3.jpg
    a4cac699527ad6afa94076fc13f5a2c3.jpg
    79.2 KB · Views: 0
  • 7f140f25f062b9028222aaa220fc8279.jpg
    7f140f25f062b9028222aaa220fc8279.jpg
    57.9 KB · Views: 0
  • c2c42f7cf265d59e3d89efa6a065d535.jpg
    c2c42f7cf265d59e3d89efa6a065d535.jpg
    63.7 KB · Views: 0
  • d312642322df4cf192931a7136d951d8.jpg
    d312642322df4cf192931a7136d951d8.jpg
    66.6 KB · Views: 0
  • 37ad92c1c7cd00a23d19776a531cb504.jpg
    37ad92c1c7cd00a23d19776a531cb504.jpg
    67.3 KB · Views: 0
  • bfd42fe598e398c4d72253a2b06240de.jpg
    bfd42fe598e398c4d72253a2b06240de.jpg
    74.6 KB · Views: 0
  • c1c1081704184e12eb6d4043cd9fcaa2.jpg
    c1c1081704184e12eb6d4043cd9fcaa2.jpg
    41.1 KB · Views: 0
  • c2815d44e37ca38c9d15fdba0c8a9524.jpg
    c2815d44e37ca38c9d15fdba0c8a9524.jpg
    42.6 KB · Views: 0
  • 44b2cb89e709ffde2dcc903564af120e.jpg
    44b2cb89e709ffde2dcc903564af120e.jpg
    50.7 KB · Views: 0
  • 57e694c291bcec7fdc0b6789c759feaf.jpg
    57e694c291bcec7fdc0b6789c759feaf.jpg
    65.7 KB · Views: 0
  • f910db434265a504af4ca4ae54ee3365.jpg
    f910db434265a504af4ca4ae54ee3365.jpg
    79.6 KB · Views: 0
  • 54e7a62e57c6f68f84b0c2c32e3f5e4b.jpg
    54e7a62e57c6f68f84b0c2c32e3f5e4b.jpg
    51.2 KB · Views: 0
  • 469556e7b155a01ed447f8fafb5d6d7d.jpg
    469556e7b155a01ed447f8fafb5d6d7d.jpg
    43.6 KB · Views: 0
Last edited:

realvc

Well-known member
Joined
Jan 7, 2011
Messages
394
Location
Lake Norrell, AR
I was going to ask why you installed a double oven in your shop but by the end of the pictures I figured it out. Way cool post.
I've got a Wilton similar to yours on one of my work benches.

Vince
 

Fisherguy

Well-known member
Joined
Oct 31, 2011
Messages
191
Location
150 Mile House BC
How wide is your mezzanine and how high is the ceiling above it?
Trying to decide how wide mine will be and how high to put it, my ceiling is 12'9". Thinking 8 feet to the bottom of the 2x6's, that would give me just over 4' up top.
Max width I can do is 5'6".
 
OP
B

BlueBomber

Well-known member
Joined
Sep 14, 2013
Messages
3,201
Location
Outside Boston, MA
How wide is your mezzanine and how high is the ceiling above it?
Trying to decide how wide mine will be and how high to put it, my ceiling is 12'9". Thinking 8 feet to the bottom of the 2x6's, that would give me just over 4' up top.
Max width I can do is 5'6".

My mezzanine sticks out from the wall 5-ft, 8-in. The central beam (a triple 2x6) supports the 2x6 floor joists of the mezzanine 2-ft out from the wall, so the beam caries the weight of the shelving and the balcony in front of the shelving cantelevers outs 3-ft, 8-in. The bottoms of 2x6 mezzanine joists are about 6-ft, 8-in above the floor, giving me just under 6-ft of head room on the mezzanine balcony. My overall garage ceiling is 13-ft, 4-in above the slab.

When I built the mezzanine, I wanted to maximize headroom on the balcony, but not at the expense of banging my head down below, where I'd spend way more time. I basically set the 2x6 beam at a height just above my noggin (6-ft, 3-in in workboots) when standing at my work bench, and started stacking from there. I have to duck my head a bit on the balcony, but its not bad.

If you just build shelving into the top four feet of your garage (no balcony) then you don't have to worry about banging your head.

Good luck!
 

Fisherguy

Well-known member
Joined
Oct 31, 2011
Messages
191
Location
150 Mile House BC
Thanks.
Mine will span 24 feet without posts, 3 - 12" LVL for the beam. Access will be by ladder only so not going to be putting engine blocks or anything super heavy up there but hopefully it will mean less clutter in the shop.
Thanks for the input.
Will
 
OP
B

BlueBomber

Well-known member
Joined
Sep 14, 2013
Messages
3,201
Location
Outside Boston, MA
One of the Life Scouts in our troop asked if he could build his Eagle Scout project in one of my garages. I said yes, in part because it forced me to clean up for company! He built a cedar composting bin for the church that sponsors our troop, and it turned out really nice. We had about 30-plus people come by over two weekends, and it was fun to share my spaces and collections with my scouting friends. cbb9408fa03a4084fbe39a82a8f2f598.jpg47c02633e0fbde9b017c6dedd33e149f.jpg

Yesterday, I worked on making a workbench next to the powder coating ovens. I added an LED shop light, insulation and drywall.

bd846f1d88b70f4ef697f52ba8c55dbe.jpgf18e8343839f0aa8976aea6d8ea82695.jpg

Next, I turned to the work surface. I've been wanting a stainless steel bench for a while, and I finally spotted an affordable utility table on Facebook market place. Here's the 6-ft table surface upside down on the saw horses. I was impressed at how substantial the structure was underneath.

e14ec944918e85d015a0df4ef40722ce.jpg

I cut the underside braces first, and then flipped it over and cut the top.

35030c2210f0b08f0ca55322433d3b12.jpg

After some trimming, here it is installed. The vises in the pics had just come out of the oven. My learning curve continues...

beca7e9c8dc739fdaffff62d6d2ab7d1.jpg

Sent from my SM-G950U using Tapatalk
 

Attachments

  • beca7e9c8dc739fdaffff62d6d2ab7d1.jpg
    beca7e9c8dc739fdaffff62d6d2ab7d1.jpg
    30.7 KB · Views: 0
  • 35030c2210f0b08f0ca55322433d3b12.jpg
    35030c2210f0b08f0ca55322433d3b12.jpg
    55.8 KB · Views: 0
  • e14ec944918e85d015a0df4ef40722ce.jpg
    e14ec944918e85d015a0df4ef40722ce.jpg
    57.5 KB · Views: 0
  • bd846f1d88b70f4ef697f52ba8c55dbe.jpg
    bd846f1d88b70f4ef697f52ba8c55dbe.jpg
    49.2 KB · Views: 0
  • 47c02633e0fbde9b017c6dedd33e149f.jpg
    47c02633e0fbde9b017c6dedd33e149f.jpg
    84.4 KB · Views: 0
  • f18e8343839f0aa8976aea6d8ea82695.jpg
    f18e8343839f0aa8976aea6d8ea82695.jpg
    34.7 KB · Views: 0
  • cbb9408fa03a4084fbe39a82a8f2f598.jpg
    cbb9408fa03a4084fbe39a82a8f2f598.jpg
    66.2 KB · Views: 0
Last edited:
OP
B

BlueBomber

Well-known member
Joined
Sep 14, 2013
Messages
3,201
Location
Outside Boston, MA
Eight inches of snow on the ground, schools and work are closed....time to start clearing the driveway!

Sent from my SM-G950U using Tapatalk
5f8a3e2e1ef4bda3ef8c4c8d07e31a49.jpg
 

Attachments

  • 5f8a3e2e1ef4bda3ef8c4c8d07e31a49.jpg
    5f8a3e2e1ef4bda3ef8c4c8d07e31a49.jpg
    46.3 KB · Views: 1
OP
B

BlueBomber

Well-known member
Joined
Sep 14, 2013
Messages
3,201
Location
Outside Boston, MA
Aaaaaaand Done! The plow makes for quick work of it.3e00bf1c1daf2c515dc273d416e1153a.jpg

Sent from my SM-G950U using Tapatalk
 

Attachments

  • 3e00bf1c1daf2c515dc273d416e1153a.jpg
    3e00bf1c1daf2c515dc273d416e1153a.jpg
    106.8 KB · Views: 2

wrenchguy

Well-known member
Joined
Sep 22, 2011
Messages
4,698
Location
NW Indiana
Ever since my daughter moved to plymouth south of u 18 years ago, u guys get the best snow storms. I visit there once/twice a year working on her colonial revival home and everytime theres some great dynamic weather going on.
 
OP
B

BlueBomber

Well-known member
Joined
Sep 14, 2013
Messages
3,201
Location
Outside Boston, MA
Ever since my daughter moved to plymouth south of u 18 years ago, u guys get the best snow storms. I visit there once/twice a year working on her colonial revival home and everytime theres some great dynamic weather going on.
I grew up in Virginia, where we rarely got snow. I love it but a lot of folks up here (those who don't make money plowing it) consider snow a 'four-letter word'. Those that get paid to plow it refer to it by another name: white gold!

Sent from my SM-G950U using Tapatalk
 
Last edited:

drivesitfar

Well-known member
Joined
Oct 23, 2013
Messages
36,014
Location
Pacific Northwest
BB: how do you like the finish of the powder coating except for the few flaws you mentioned?

i've always wanted a dedicated shop oven and I actually bought one to use as one before my landlord got a divorce and needed to sell the shop I was leasing. since we won't be moving now for maybe 10 years I sold my vintage oven to a couple that remodeled their new kitchen around it. I never thought about putting a cabinet type oven in a garage and good to see you made yours work ok.

looks like the snow hasn't slowed you down and you are keeping busy with a lot of stuff so keep up the good work.
 

Attachments

  • 00Y0Y_31xbAYPIyyF_1200x900.jpg
    00Y0Y_31xbAYPIyyF_1200x900.jpg
    60.7 KB · Views: 43
OP
B

BlueBomber

Well-known member
Joined
Sep 14, 2013
Messages
3,201
Location
Outside Boston, MA
Drives: the finish is not bad, but I've only coated cast surfaces so far. When I get some more jobs with smooth metal, I will post some close ups.

Your stove looks like it had a huge oven space, a significant limfac in my installation. I only have a roughly 18 inch cube to work with. I've seen some tricks online where you can leave the door down and fab a cover that effectively doubles the volume of the heated space. If I come up with anything that big that I want to coat, I'll give it a try.
Sent from my SM-G950U using Tapatalk
 
Last edited:
OP
B

BlueBomber

Well-known member
Joined
Sep 14, 2013
Messages
3,201
Location
Outside Boston, MA
Both kids were home this weekend, so we had a family day yesterday, hanging out and going to see the new Captain Marvel movie (a good flick).

Today, I culminated two different project, one about a year older than the other. First up was the restoration of this Wilton 9300 bullet vise.

27004f4b8b5746b99413bf76fd322419.jpg

I bought it a little over a year ago at an estate sale only a few miles from my home. It sat for a long time, as I wanted to strip it, powder coat it in an oven I had yet to set up, and bolt it to a workbench I had yet to build in the new garage. Well, now that I have powder coating oven installed and the bench done, the Wilton's time had come.

I used my homemade blasting cabinet to bead blast the Wilton and then powder coated the exterior parts, which I showed in an earlier post. I sanded out some flaws in the first coating and re-coated the vise, along with another vise I had stripped long ago and which was cluttering up a workbench. The second coating on the Wilton was not perfect, but better, and since this would be a working vise, not a show queen, I decided "good enough" had been reached. Today, I put it back together.

First, I used an orbital disc sander to smooth the shiny flat surfaces. Yes, I know the clear area on the tail piece is not meant to be used as an anvil. I left it bare for the inevitable "minor" percussive persuasion activities.

daa04eaed168c1c54e8b80cf9b57fbfa.jpg4f43acd56ef88c6a2de67b4342734ee1.jpge8d97e6c7e6a15eb4d9adbbf46e803b6.jpg

Next, I lubed and remounted the main screw and end cap, and then drove the pins back in.

c9611ff3d6bf75868edeb37a10deb52e.jpg1d8cb9ec839fc2764dda9a598c1cb932.jpg

I found this nifty can of Lubriko Grease previously at a sale and put a big plug of it in to lube the screw.

e86306f9915986ca7942129fda15f4e7.jpg

After assembling, lubing and mating the movable jaw to the base, I did the same to main screw, retaining plate and the swivel plate. The jaws of the swivel plate lock the vise positively to the base, and mine were relatively unworn.

31c0c070a8f537d73af05e37d973935a.jpgdaa8f7b080baa3d747f59ca3305431fb.jpg

Here she is, completely reassembled!

ac4249b3c545cdecb9a181c23a67de15.jpg

I dug into my stash and found exactly four fine thread 1/2-inch bolts of the right lengths, with nuts and washers. I had to run a 1/2 drill bit through the mounting ears of the swivel plate to knock out a few thousandths to make room for the bolts. Finally, I carried the vise over to the new garage, and after carefully centering the vise, I drilled the holes and mounted it.

04cd01dfc42cdd33d5f05c2c7dcc1c30.jpg

The other project I finished this weekend was the restoration of a Greene & Tweed No. 4 Defense Hammer. I picked this up late last year, rusty and missing the rawhide inserts. I recently found some replacements and they arrived last week. Here's the original hammer:

ff8f487307e6a3c38c7c916b37127949.jpg
78c47cdcdf08a6a0fb5ef7b349076814.jpg

And here it is after a bead blast treatment:

1e4d8f76958d1706e7689fd0107a0bfe.jpg276e2a5500a9521d025cef01ff04614b.jpg

I masked off the handle and the top and treated it to three coats of Rustoleum Hammered Copper. After drying for an hour or so, I smacked in the new rawhide inserts.

e7391adac6de0ab64fba537f74203459.jpg90540965edcc41bdcc72cc9b658927e0.jpge8c706baf1961d41b9897e1ebf88c84e.jpgf4ba0e3feb3fcc01fc2f8b09f1b286ff.jpg

Here are the two weekend projects together!

681749c2c32ff32620e6c9f001da1d0e.jpg3471c1f04c2907691f56dc89c8e59033.jpg
 

Attachments

  • e7391adac6de0ab64fba537f74203459.jpg
    e7391adac6de0ab64fba537f74203459.jpg
    38.5 KB · Views: 0
  • 90540965edcc41bdcc72cc9b658927e0.jpg
    90540965edcc41bdcc72cc9b658927e0.jpg
    49.8 KB · Views: 0
  • e8c706baf1961d41b9897e1ebf88c84e.jpg
    e8c706baf1961d41b9897e1ebf88c84e.jpg
    71.1 KB · Views: 0
  • f4ba0e3feb3fcc01fc2f8b09f1b286ff.jpg
    f4ba0e3feb3fcc01fc2f8b09f1b286ff.jpg
    77 KB · Views: 0
  • 681749c2c32ff32620e6c9f001da1d0e.jpg
    681749c2c32ff32620e6c9f001da1d0e.jpg
    69.1 KB · Views: 0
  • 3471c1f04c2907691f56dc89c8e59033.jpg
    3471c1f04c2907691f56dc89c8e59033.jpg
    77.3 KB · Views: 0
  • 276e2a5500a9521d025cef01ff04614b.jpg
    276e2a5500a9521d025cef01ff04614b.jpg
    44.1 KB · Views: 0
  • 1e4d8f76958d1706e7689fd0107a0bfe.jpg
    1e4d8f76958d1706e7689fd0107a0bfe.jpg
    46 KB · Views: 0
  • 27004f4b8b5746b99413bf76fd322419.jpg
    27004f4b8b5746b99413bf76fd322419.jpg
    128.9 KB · Views: 0
  • daa04eaed168c1c54e8b80cf9b57fbfa.jpg
    daa04eaed168c1c54e8b80cf9b57fbfa.jpg
    47.1 KB · Views: 0
  • 4f43acd56ef88c6a2de67b4342734ee1.jpg
    4f43acd56ef88c6a2de67b4342734ee1.jpg
    48.9 KB · Views: 0
  • e8d97e6c7e6a15eb4d9adbbf46e803b6.jpg
    e8d97e6c7e6a15eb4d9adbbf46e803b6.jpg
    68.7 KB · Views: 0
  • c9611ff3d6bf75868edeb37a10deb52e.jpg
    c9611ff3d6bf75868edeb37a10deb52e.jpg
    55.3 KB · Views: 0
  • 1d8cb9ec839fc2764dda9a598c1cb932.jpg
    1d8cb9ec839fc2764dda9a598c1cb932.jpg
    57.7 KB · Views: 0
  • e86306f9915986ca7942129fda15f4e7.jpg
    e86306f9915986ca7942129fda15f4e7.jpg
    85.4 KB · Views: 0
  • 31c0c070a8f537d73af05e37d973935a.jpg
    31c0c070a8f537d73af05e37d973935a.jpg
    70.9 KB · Views: 0
  • daa8f7b080baa3d747f59ca3305431fb.jpg
    daa8f7b080baa3d747f59ca3305431fb.jpg
    66.4 KB · Views: 0
  • ac4249b3c545cdecb9a181c23a67de15.jpg
    ac4249b3c545cdecb9a181c23a67de15.jpg
    87.5 KB · Views: 0
  • 04cd01dfc42cdd33d5f05c2c7dcc1c30.jpg
    04cd01dfc42cdd33d5f05c2c7dcc1c30.jpg
    68.8 KB · Views: 0
  • ff8f487307e6a3c38c7c916b37127949.jpg
    ff8f487307e6a3c38c7c916b37127949.jpg
    78.6 KB · Views: 0
  • 78c47cdcdf08a6a0fb5ef7b349076814.jpg
    78c47cdcdf08a6a0fb5ef7b349076814.jpg
    66.9 KB · Views: 0
Last edited:

bj383ss

Well-known member
Joined
Sep 29, 2011
Messages
3,166
Location
TX
The vise and the hammer came out a treat. I have a 9400 I need to do the same too.

Bret
 

CudaChick1968

Member Emeritus
Joined
Jul 1, 2011
Messages
1,800
Location
Northwest Tennessee (38230)
Cool Bullet! Just an observation from the cheap seats here, but I'd bet the little defects you have could have been eliminated if it had been outgassed for a few hours first before you blasted and coated it. It probably had some old grease or oil on it that soaked in over the years.


Keep up the fine work!
 
To avoid these ads, REGISTER NOW!
OP
B

BlueBomber

Well-known member
Joined
Sep 14, 2013
Messages
3,201
Location
Outside Boston, MA
So after finishing the Green & Tweed No 4 Defense Hammer a few weeks ago, I felt a compulsion to own the other two sizes, the No 1 and No 3. Ebay enabled my impulse and I soon had two rusty examples delivered to my door.38cec070c6dc003bd04b421c925307e6.jpgd6f2b629fc5c8a93a0948d4766d814b5.jpgbd0143b57c616e840bc90b66ee5c4a10.jpg

I gave them both the glass bead blast treatment to remove the crust. Here's the No 3 after exfoliation.

b5c0023befc77a0eb2e20ac84ffb8ab9.jpgb9ca13d8a7e19e0763101d4f62e025f1.jpg3af6a1647eb47417ee46045dbc2a1fd4.jpga8627ac363c7f181907468875d2a15db.jpgbe8d16ebd2364df8a07e101dee667130.jpg

Next I masked the handle on both sides...

e6b307647e932ae338e3e09d47971330.jpgf6d5d0973c81c247a61f41bba9098ed5.jpg

...and gave them the Hammered Copper treatment.

7b09fa514d6a5663d5ec8205bcfde48d.jpg

Here are all three. I have rawhide inserts from Garland on order for the two smaller hammers that should arrive in another week or so.

6e354b402f804c2717b4816a5bac6000.jpg5e7499258063d1a88a2cea2ae4346171.jpg2f1bb1cc4ae186d9c1fbb7f4f0da5101.jpg

As far as I can tell, there was no No 2 Defense Hammer by Green and Tweed. They did make a split head No 2 but that's a different hammer. So, I consider this a complete set!
 

Attachments

  • 6e354b402f804c2717b4816a5bac6000.jpg
    6e354b402f804c2717b4816a5bac6000.jpg
    98.4 KB · Views: 1
  • 2f1bb1cc4ae186d9c1fbb7f4f0da5101.jpg
    2f1bb1cc4ae186d9c1fbb7f4f0da5101.jpg
    73.7 KB · Views: 1
  • 5e7499258063d1a88a2cea2ae4346171.jpg
    5e7499258063d1a88a2cea2ae4346171.jpg
    85.1 KB · Views: 2
  • 7b09fa514d6a5663d5ec8205bcfde48d.jpg
    7b09fa514d6a5663d5ec8205bcfde48d.jpg
    86.8 KB · Views: 2
  • f6d5d0973c81c247a61f41bba9098ed5.jpg
    f6d5d0973c81c247a61f41bba9098ed5.jpg
    38.9 KB · Views: 1
  • e6b307647e932ae338e3e09d47971330.jpg
    e6b307647e932ae338e3e09d47971330.jpg
    77 KB · Views: 0
  • 38cec070c6dc003bd04b421c925307e6.jpg
    38cec070c6dc003bd04b421c925307e6.jpg
    90.2 KB · Views: 0
  • d6f2b629fc5c8a93a0948d4766d814b5.jpg
    d6f2b629fc5c8a93a0948d4766d814b5.jpg
    61.5 KB · Views: 0
  • bd0143b57c616e840bc90b66ee5c4a10.jpg
    bd0143b57c616e840bc90b66ee5c4a10.jpg
    44.4 KB · Views: 0
  • b5c0023befc77a0eb2e20ac84ffb8ab9.jpg
    b5c0023befc77a0eb2e20ac84ffb8ab9.jpg
    31.3 KB · Views: 0
  • b9ca13d8a7e19e0763101d4f62e025f1.jpg
    b9ca13d8a7e19e0763101d4f62e025f1.jpg
    78.7 KB · Views: 0
  • 3af6a1647eb47417ee46045dbc2a1fd4.jpg
    3af6a1647eb47417ee46045dbc2a1fd4.jpg
    53.8 KB · Views: 0
  • a8627ac363c7f181907468875d2a15db.jpg
    a8627ac363c7f181907468875d2a15db.jpg
    62.4 KB · Views: 0
  • be8d16ebd2364df8a07e101dee667130.jpg
    be8d16ebd2364df8a07e101dee667130.jpg
    52.9 KB · Views: 0
Last edited:
OP
B

BlueBomber

Well-known member
Joined
Sep 14, 2013
Messages
3,201
Location
Outside Boston, MA
They were made to be non-marking hammers for aircraft and body manufacturing and repair.

Sent from my SM-G950U using Tapatalk
 
Last edited:
OP
B

BlueBomber

Well-known member
Joined
Sep 14, 2013
Messages
3,201
Location
Outside Boston, MA
My latest addition to the garage was a Craftsman power hacksaw. I scored it as the diamond in a big estate sale auction lot of mostly junk.

68633f59d4a98094d2d2388fb62ac1b7.jpg
0c5e1ad3c262447605c6d12c5b2206d6.jpg
Also in the lot was the butcher block topped angle iron work bench in the above picture. Unfortunately, the bench is too big to fit in either of my garages, so I decided to make my own mobile platform from other stuff I had around the shops.

I had saved the mobile base from a scrapped Craftsman radial arm saw, but it was also a bit big, so I decided to narrow it by 3 inches.

1be6eb989f115a9c94ed62805d54aa1a.jpg

First, I unscrewed the top from the old bench. Then. I unbolted the Craftsman base on its narrowest sides and trimmed all four pieces of metal. The beauty of these universal bases is that the holes were already aligned, even after my trim.

61489bd381c2a0fda55a617b4336f7f3.jpg

Next, I cut the butcher block down so that I would have an equal 4 inch overhang on all four sides. This allows the angled legs to mostly stay under the table top.

753cfd934a84c5b359a55cc3f7bc67ff.jpg

I marked and drilled mounting holes for the hacksaw and found hardware from my stash to bolt it down. I intend to drive it with a motor under the table, so I cut a slot in to top so the belt could drop down below.


More work to follow, but that's all I had time for today!8059b5afb6f3ee0f9fe0b00756969717.jpgc433b41184723ec2c0fe6c723a501e82.jpg

Sent from my SM-G950U using Tapatalk
 

Attachments

  • c433b41184723ec2c0fe6c723a501e82.jpg
    c433b41184723ec2c0fe6c723a501e82.jpg
    83.8 KB · Views: 0
  • 8059b5afb6f3ee0f9fe0b00756969717.jpg
    8059b5afb6f3ee0f9fe0b00756969717.jpg
    52.1 KB · Views: 0
  • 753cfd934a84c5b359a55cc3f7bc67ff.jpg
    753cfd934a84c5b359a55cc3f7bc67ff.jpg
    33.8 KB · Views: 0
  • 68633f59d4a98094d2d2388fb62ac1b7.jpg
    68633f59d4a98094d2d2388fb62ac1b7.jpg
    47.7 KB · Views: 0
  • 0c5e1ad3c262447605c6d12c5b2206d6.jpg
    0c5e1ad3c262447605c6d12c5b2206d6.jpg
    55.2 KB · Views: 0
  • 1be6eb989f115a9c94ed62805d54aa1a.jpg
    1be6eb989f115a9c94ed62805d54aa1a.jpg
    65.8 KB · Views: 0
  • 61489bd381c2a0fda55a617b4336f7f3.jpg
    61489bd381c2a0fda55a617b4336f7f3.jpg
    70 KB · Views: 0
Last edited:
OP
B

BlueBomber

Well-known member
Joined
Sep 14, 2013
Messages
3,201
Location
Outside Boston, MA
Today I depart on a business trip. This one has a twist from my usual travel: I'll be driving back in a classic car!

As some of you have noticed, I have a white 1960 Impala 2-door hardtop, seen in background pics on this thread. Here it is on the day I brought it home:

a8650778a11db164a0ac3cc4f16279f3.jpg
a522c141e87737a49361c927f18c94bb.jpg9cd360a9d50d142d19435d609ce47abb.jpg

She's complete, but a total rust bucket. I've stared at her for two years, putting off starting on metal repair knowing that I'll have years of it ahead of me before I can drive it. Well, SWMBO told me a few weeks ago that she'd much rather I have a car I can drive than one I need years to finish. I think that's her way of saying she'd rather spend time with me, and not in the garage with me! So, after looking around, I found a finished car that is in my price range.

fe53367971bff2935410fee64f26ce08.jpg

The plan is to fly into Des Moine, Iowa on Friday and check her out. I had the dealership send me pictures of the undercarriage and floor boards, and they all look good. If the car is everything I think it is, I'll sign the papers and start driving her home via Dayton, Ohio (another business meeting) and Culpeper, Virginia (my parents).

Now, I realize driving a 59-year old car I've never seen 1700 miles has an element of risk. Okay, several elements. This car has been sitting a while, so there's a big risk of systems failing along the way. So, I planned my trip east to end on the first day at Thomas & Chris Payne's garage in Philo, IL. For those of you who don't know the Payne's, check out THE most popular garage on Garage Journal. I PM'd Thomas asking if I could stop in and get a brief tour of his garage, and being the friendly midwestern guy he is, he offered the USE of his garage if my jalopy needs any work!

Meanwhile, I packed a bunch of tools to hopefully help me avoid getting stuck on the side of the road somewhere. Here are the pics of the equipment I layed out for packing.

1dd59d9ac9469cf8a4fd6b525b747566.jpg6c1cb308e82fe5c82f90ca6b0cfc5c3e.jpgdc135a96a43b415df4258c4dd20a63b3.jpge239b91b823c16d8510e5923dc8bf95b.jpg

I also plan to buy a bunch of stuff in Des Moines (fluids, fire extinguisher, other supplies, etc) to help address any problems I might have.

Wish me luck, folks! I'll chronicle my purchase and journey in this thread as I go.
 

Attachments

  • dc135a96a43b415df4258c4dd20a63b3.jpg
    dc135a96a43b415df4258c4dd20a63b3.jpg
    66.3 KB · Views: 0
  • 9cd360a9d50d142d19435d609ce47abb.jpg
    9cd360a9d50d142d19435d609ce47abb.jpg
    51 KB · Views: 0
  • a8650778a11db164a0ac3cc4f16279f3.jpg
    a8650778a11db164a0ac3cc4f16279f3.jpg
    62.7 KB · Views: 0
  • a522c141e87737a49361c927f18c94bb.jpg
    a522c141e87737a49361c927f18c94bb.jpg
    62.7 KB · Views: 0
  • fe53367971bff2935410fee64f26ce08.jpg
    fe53367971bff2935410fee64f26ce08.jpg
    46.7 KB · Views: 0
  • 1dd59d9ac9469cf8a4fd6b525b747566.jpg
    1dd59d9ac9469cf8a4fd6b525b747566.jpg
    88.5 KB · Views: 0
  • 6c1cb308e82fe5c82f90ca6b0cfc5c3e.jpg
    6c1cb308e82fe5c82f90ca6b0cfc5c3e.jpg
    81.5 KB · Views: 0
  • e239b91b823c16d8510e5923dc8bf95b.jpg
    e239b91b823c16d8510e5923dc8bf95b.jpg
    58.6 KB · Views: 0
Last edited:

Arclitgold

Well-known member
Joined
Dec 20, 2017
Messages
317
Wahooo! Can’t wait to live the trip with you through pictures!


Sent from my iPhone using Tapatalk
 
OP
B

BlueBomber

Well-known member
Joined
Sep 14, 2013
Messages
3,201
Location
Outside Boston, MA
Ha !
TSA and baggage handling are real going to hate you !
Hope things go well for you. Enjoy the ride.


Sent from my iPad using The Garage Journal mobile app
Heaviest bag was 78 lbs. :)

The first test of my gear transport plan will be getting it back from the airline. I missed my connection in Dallas and had to drive to my destination. Hopefully, they'll put it on a plane tomorrow and get it here before Thursday afternoon!

Sent from my SM-G950U using Tapatalk
 
OP
B

BlueBomber

Well-known member
Joined
Sep 14, 2013
Messages
3,201
Location
Outside Boston, MA
Woot! My airline transportable tool kit made it here, along with my t-shirts and underwear! Hopefully, American has no issues with my luggage on Thursday's two-hop to Des Moines.bbac8758c547145a3df4acfe07e95ea8.jpg

Sent from my SM-G950U using Tapatalk
 

Attachments

  • bbac8758c547145a3df4acfe07e95ea8.jpg
    bbac8758c547145a3df4acfe07e95ea8.jpg
    82.5 KB · Views: 0
OP
B

BlueBomber

Well-known member
Joined
Sep 14, 2013
Messages
3,201
Location
Outside Boston, MA
My target Impala has no seat belts installed (they were optional equipment in 1960), so I found a pair on Amazon that I hope are long enough. I had them delivered to my hotel on the road, and I picked up the hardware for them tonight. The dealer in Des Moines has agreed to install them for me Friday after I sign the paperwork.
07a210c6aca110bbe5cac7788c36fe55.jpg

Sent from my SM-G950U using Tapatalk
 
Last edited:
OP
B

BlueBomber

Well-known member
Joined
Sep 14, 2013
Messages
3,201
Location
Outside Boston, MA
I am proud the report that the Impala lived up to its advertising, and we shook hands on it an hour ago. I'm now at lunch, waiting on the wire transfer to complete.

The car is far from perfect, but it's not priced like a perfect car, either. The windshield has some wiper scratches, and the rubber gaskets holding the glass in are cracked and rigid, but otherwise, it's pretty clear. The 20-yr old paint is glossy, but has some pocks, bubbles and scratches. Electrically, everything works (although the left turn signal took a while to report for duty). I could only find one small spot on the rockers under the car where some rust repair was done.

Mechanically, it starts right up and idles with 22 psi of oil pressure. It ran at 180-deg F for the drive around town and stops as well as a 59-yr old manual drum brake car can. There's a slight noise and twitch in the speedo needle, but again, not unexpected in a car this old. The front bushings are worn and the ball joint boots are shot, but they'll do to get me home.

My experience with the American Dream Machine team has been superb. They are located in an old Packard dealership in downtown Des Moines and have been here for 16 years. Owner Doug, his wife Lynn and sales manager Tom have been great to work with. They teamed me up with Matt, the mechanic who went through my Impala when it first arrived. We put it up on a lift and he and I went over everything he had done or knew about on the car. Example: the Powerglide ****** has a slight leak from both ends, but Matt said it has been doing that since the car arrived and hasn't gotten worse.

Matt also walked me around the dealership to look for the newest set of radials that fit my car. When they turned out to be on the Cragars that were on the car, Tom offered to give me a set of Rally wheels, which is the style I really wanted anyway. They also swapped out the ancient bias ply spare in the trunk for a good radial and wheel from their extras pile.

Finally, the seat belts I went through all that trouble to get turned out to be too short. No problem--Lynn said they could get a set from O'Reilly's and would just even trade them for me.

The belts should be installed by the time I get back from lunch. I'll post some more pics outside before I drive away. Meanwhile, here are some shots of the Impala and a bunch of other eye candy from around their facility.

Woot!5ccabbfe1dde56a41dba3a846ba3f23b.jpgf9c91082eb5505ac30ff4abe12b192a0.jpg4ac5fc8917495568ffe1a84addfcb5ec.jpgc998af8523e3bbe7e10e1baea1192650.jpg51411f8aa6229404944949bb5d7bcda1.jpgfb022f7f4f698f08e4bf8b17d6b1f9fd.jpgb02adf97b89bea280e0613da1356c65b.jpg20a60db680f27145c887559a21a998d4.jpg43ff8c9d046384d0067613fe58f9620e.jpgf1508e983d3ac824db659e4a6d521696.jpg

Sent from my SM-G950U using Tapatalk
 

Attachments

  • 5ccabbfe1dde56a41dba3a846ba3f23b.jpg
    5ccabbfe1dde56a41dba3a846ba3f23b.jpg
    74 KB · Views: 0
  • f9c91082eb5505ac30ff4abe12b192a0.jpg
    f9c91082eb5505ac30ff4abe12b192a0.jpg
    81.9 KB · Views: 0
  • 4ac5fc8917495568ffe1a84addfcb5ec.jpg
    4ac5fc8917495568ffe1a84addfcb5ec.jpg
    76.8 KB · Views: 0
  • c998af8523e3bbe7e10e1baea1192650.jpg
    c998af8523e3bbe7e10e1baea1192650.jpg
    66.3 KB · Views: 0
  • 51411f8aa6229404944949bb5d7bcda1.jpg
    51411f8aa6229404944949bb5d7bcda1.jpg
    88.6 KB · Views: 0
  • fb022f7f4f698f08e4bf8b17d6b1f9fd.jpg
    fb022f7f4f698f08e4bf8b17d6b1f9fd.jpg
    80.9 KB · Views: 0
  • b02adf97b89bea280e0613da1356c65b.jpg
    b02adf97b89bea280e0613da1356c65b.jpg
    77.1 KB · Views: 0
  • 20a60db680f27145c887559a21a998d4.jpg
    20a60db680f27145c887559a21a998d4.jpg
    67.6 KB · Views: 0
  • 43ff8c9d046384d0067613fe58f9620e.jpg
    43ff8c9d046384d0067613fe58f9620e.jpg
    63.6 KB · Views: 0
  • f1508e983d3ac824db659e4a6d521696.jpg
    f1508e983d3ac824db659e4a6d521696.jpg
    71.4 KB · Views: 0
OP
B

BlueBomber

Well-known member
Joined
Sep 14, 2013
Messages
3,201
Location
Outside Boston, MA
Thanks, Jake! Here's the hero shot before I left the dealer. 3ae039756ec26760f8b755e1393dce6e.jpg

Sent from my SM-G950U using Tapatalk
 

Attachments

  • 3ae039756ec26760f8b755e1393dce6e.jpg
    3ae039756ec26760f8b755e1393dce6e.jpg
    66.6 KB · Views: 0

realvc

Well-known member
Joined
Jan 7, 2011
Messages
394
Location
Lake Norrell, AR
What cool way to buy a car and drive home. Good luck on your travels with your new ride.

I'll looking forward to see how you do with rest of your adventure.

Vince
 
OP
B

BlueBomber

Well-known member
Joined
Sep 14, 2013
Messages
3,201
Location
Outside Boston, MA
First two and a half hours have rolled by without a hitch--so far, so good. Mileage is 12 mpg--I think the Holley double pumper on this 283 is a tad large, but she's happy at 70 mph.a158ef513eddc37cdfba0f552436d7eb.jpg


EDIT: Whoops, meant first 2 -1/2 HOURS, not miles. I fixed it.
Sent from my SM-G950U using Tapatalk
 

Attachments

  • a158ef513eddc37cdfba0f552436d7eb.jpg
    a158ef513eddc37cdfba0f552436d7eb.jpg
    36.9 KB · Views: 0
Last edited:
To avoid these ads, REGISTER NOW!
Top Bottom