
You are using an out of date browser. It may not display this or other websites correctly.
You should upgrade or use an alternative browser.
You should upgrade or use an alternative browser.
Christmas 2020
- Thread starter royce
- Start date


quadrcr87
Well-known member
I hope Santa’s sleigh is a forklift this year! That thing is beefy.
harley jim
Well-known member
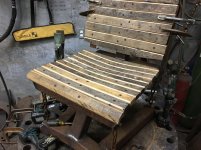
Are you pinning or biscuits or ? on the outer ends of your slats to keep them in line. I do like it.
Sent from my SM-A102U using The Garage Journal mobile app
Sent from my SM-A102U using The Garage Journal mobile app
Are you pinning or biscuits or ? on the outer ends of your slats to keep them in line. I do like it.
Sent from my SM-A102U using The Garage Journal mobile app
Harley,
I'm thinking I'll fit flat bars to the under side of the seat, on the outer edges and through bolt them, with the same screws as the center.
With the seat back having less strain on it, I'm thinking some dowel pins cut from tig wire would be a viable option.
Royce
harley jim
Well-known member
That should look good, it follows suit with the other bolts
Sent from my SM-A102U using The Garage Journal mobile app
Sent from my SM-A102U using The Garage Journal mobile app

WoodsTruck
Well-known member
- Joined
- Jan 12, 2013
- Messages
- 1,020
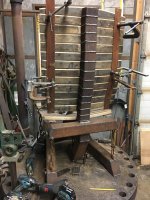
Can you cut a slit down the end of the back boards on each side and insert a metal stabilizer?
Can you cut a slit down the end of the back boards on each side and insert a metal stabilizer?
While it is certainly possible, it would be tricky fitting the metal spline, in that it would need bent 2 degrees +/- at each slat intersection.
I'm thinking that it may be easier to fit the the bar to the back side and less prone to splitting.
Royce

RoninB4
Well-known member
Really looking good Royce. I always enjoy seeing the work of others, especially when it's better than mine.


Got Santa's shop opened up, for the season.
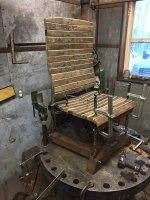
One of my daughters sent me a pic of a tensegrity table, which is a table that appears to be floating in air.
My thought is to use the same principal for a chair.
So, after some research, a foot of pencil lead and a yard of eraser, got the base cut up and welded.
Royce
So you’re one of my brothers in red? I think that chair is a good idea.

Bighead38
Well-known member
Awesome work as usual.
quadrcr87
Well-known member
A stone inlay? Now you’re just showing off! How did you cut the profile? I am thinking plasma cutter.
Sent from my iPhone using Garage Journal
Sent from my iPhone using Garage Journal

harley jim
Well-known member
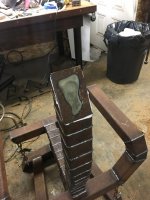
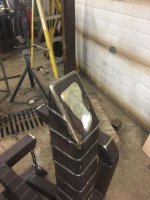
Finished up the spine cap, with the stone inlay.
Forgot to take a pic, but the stone is held in place with a couple straps tacked on the backside.
I was afraid of heat shocking the stone and busting it, so I went slow on the welding, with a bunch of stops to spray everything with water, to keep things cool.
Royce
Forgot to take a pic, but the stone is held in place with a couple straps tacked on the backside.
I was afraid of heat shocking the stone and busting it, so I went slow on the welding, with a bunch of stops to spray everything with water, to keep things cool.
Royce
Attachments
harley jim
Well-known member
I did something similar with a marble once I broke two.
Sent from my SM-A102U using The Garage Journal mobile app
Sent from my SM-A102U using The Garage Journal mobile app
manwithtools
ALLIANCE MEMBER
Beautiful work sir. You are a talented man. Great job!


quadrcr87
Well-known member
How much movement in the chains is there with it fully assembled? I picture it with some movement like a floating rocking chair.
Sent from my iPhone using Garage Journal
Sent from my iPhone using Garage Journal
How much movement in the chains is there with it fully assembled? I picture it with some movement like a floating rocking chair.
Sent from my iPhone using Garage Journal
Not as much as I would have thought and the movement is more rotational than to and fro or gee and haw
It also depends on how much preload on the center chain, I have it just snugged and get a few degrees of movement.
Royce
harley jim
Well-known member
It came out great Royce. I noticed the weld seam follow the seams in the slats. Excellent execution as usual.
Sent from my SM-A102U using The Garage Journal mobile app
Sent from my SM-A102U using The Garage Journal mobile app