To avoid these ads, REGISTER NOW!

Clausing 5400 Lathe Restoration

OP
C

Cahark

Well-known member
Joined
Sep 28, 2016
Messages
340
Location
Dayton,Oh
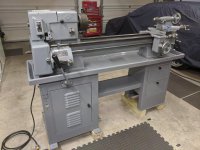
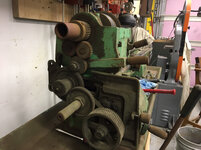
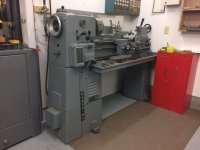
Looks like it’s back to work on the Clausing lathe. I’ve been using the machine for about a year now. It’s been more than pleasurable having a nice piece of equipment that runs pretty well, and does what I need. During my restoration process I decided to keep the bearings that were already installed in the spindle. I inspected them and gave them a good cleaning. I determined while they were not perfect, they did seem to be in relatively good condition. That was where I screwed up.

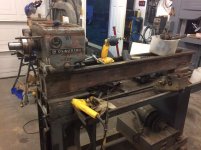
The bearings have run OK for the last year, I have been able to hold very close tolerances however, They definitely aren’t the most quiet things in the world. I’m also having problems with chatter more than I should. Seems like the only time I can get rid of chatter is to use the tailstock even on short light duty work close to the spindle. I have constantly made preload adjustments and I have finally given up on the old set of bearings.

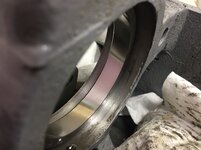
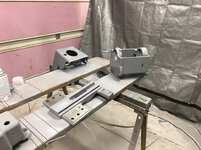
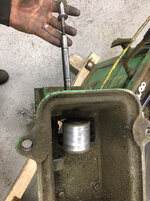
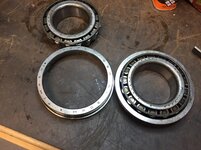
As I removed them from the spindle I decided to inspect them one more time. Seems like I have overlooked a few key details and the bearings are not in as good a shape as I remembered when they were first removed.

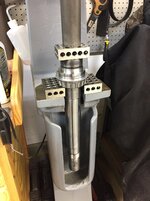
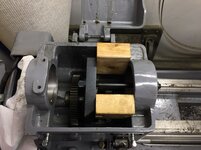
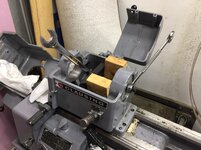
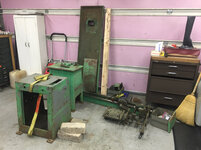
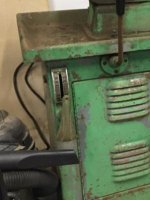
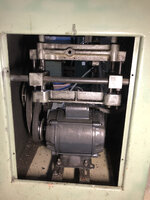
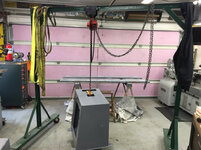
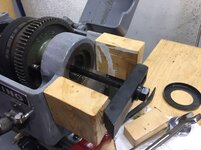
So that brings us to today. I decided to use the same technique for removing the spindle as I did when I first disassembled the machine (milling machine stud set used as a puller). The spindle came out much easier this time. When i assembled the headstock originally i made sure to stone and file off any unfortunate events or high spots of years past. This helped greatly for disassembly.

bc40bc99b9cb53ebcd1f51458cc6e0de.jpg

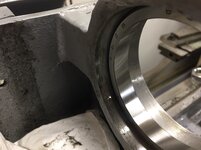
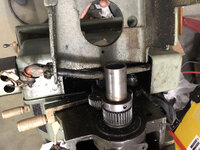
After the spindle was out I needed to remove the bearing races from the headstock. They are pressed in to the headstock casting, up against a shoulder. For this I used a slug of aluminum that was about the size of the bearing race. I then used the milling machine stud set as a puller in coordination with the slug. This pulled the race out very easily and straight.

9db1c2e1b41e8b96ee251c7137004b94.jpg
3f96740d1582acbcb574a15922f8985c.jpg
7cd6beb7d03d3ff7bc36a6f5bced7fa9.jpg

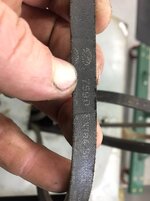
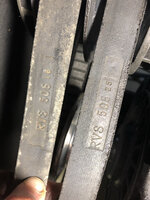
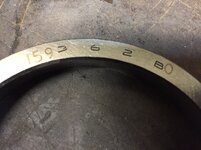
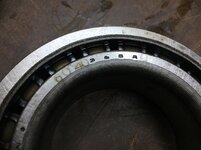
Here are all of the bearing numbers for anyone in the future. The races are the same, but there are two different bearings.

1fad37cba9fec651ea9b53e509ab8781.jpg
fb54665daa1dfe21cddf4edcb573048c.jpg
fd9d8bbd2122f82955222bec49bbdb86.jpg

I went ahead and ordered some bearings tonight. Timken replacements were $150 for everything. It looks like it will take about a week and a half for everything to get here. In the morning I’m going to call my bearing distributer to see if they have anything in stock. If they do, I will cancel the order on Amazon and pick them up in person so I can keep moving. Not the worst price in the world, but it was definitely money I didn’t want to spend. I hope this will solve my problem, Or at least quiet down the machine a little bit. I feel like that in itself would make me happy.

I’m planning on keeping you along for the rest of the ride but Moral of the story… Just replace the bearings when you have it apart. Haha. Lesson learned.


Sent from my iPhone using Tapatalk
 

Attachments

  • 1fad37cba9fec651ea9b53e509ab8781.jpg
    1fad37cba9fec651ea9b53e509ab8781.jpg
    454 KB · Views: 3
  • fb54665daa1dfe21cddf4edcb573048c.jpg
    fb54665daa1dfe21cddf4edcb573048c.jpg
    438.4 KB · Views: 3
  • fd9d8bbd2122f82955222bec49bbdb86.jpg
    fd9d8bbd2122f82955222bec49bbdb86.jpg
    514.3 KB · Views: 3
  • bc40bc99b9cb53ebcd1f51458cc6e0de.jpg
    bc40bc99b9cb53ebcd1f51458cc6e0de.jpg
    540.8 KB · Views: 3
  • 9db1c2e1b41e8b96ee251c7137004b94.jpg
    9db1c2e1b41e8b96ee251c7137004b94.jpg
    374.2 KB · Views: 5
  • 3f96740d1582acbcb574a15922f8985c.jpg
    3f96740d1582acbcb574a15922f8985c.jpg
    475.6 KB · Views: 5
  • 7cd6beb7d03d3ff7bc36a6f5bced7fa9.jpg
    7cd6beb7d03d3ff7bc36a6f5bced7fa9.jpg
    619.9 KB · Views: 5
To avoid these ads, REGISTER NOW!

matt_i

Well-known member
Joined
Mar 14, 2008
Messages
10,725
Location
SE Michigan
I just caught up to where you are :) Great job bringing this one back to great function and form! I am wondering a couple things....did you ever try to pry lightly under the chuck and use an indicator to check movement? Also I was curious if you ever checked contact between the headstock and bedway underneath. Of course its sitting on 3 points but sometimes that's not enough and it needs better contact. To fix this my suggestion would be to blue one part and set the other with a light rub and then you'd have to scrape some, which is probably a subject suitable for an entire forum. Even without the scraper tool it would only take one little soft chip that got smashed in between the headstock and bedway to push it out of alignment or be a "soft" bolted joint that could lead to chatter.

I hope the spindle bearings fix the issue for you as of course that's an easier path :)
 

bodaver32

New member
Joined
Aug 13, 2009
Messages
2
Good work on your lathe. I am currently restoring a 5914 model. As you mentioned, it is so much nicer having a lathe when restoring a lathe. I am fortunate to have a second lathe and it has been handy to build replacement shafts and bushings, etc.

When you go to the bearing house, let them know what you are going to use the bearing for. There are different classes of precision bearings. A good bearing supplier will be able to help you.
 
OP
C

Cahark

Well-known member
Joined
Sep 28, 2016
Messages
340
Location
Dayton,Oh
I just caught up to where you are :) Great job bringing this one back to great function and form! I am wondering a couple things....did you ever try to pry lightly under the chuck and use an indicator to check movement? Also I was curious if you ever checked contact between the headstock and bedway underneath. Of course its sitting on 3 points but sometimes that's not enough and it needs better contact. To fix this my suggestion would be to blue one part and set the other with a light rub and then you'd have to scrape some, which is probably a subject suitable for an entire forum. Even without the scraper tool it would only take one little soft chip that got smashed in between the headstock and bedway to push it out of alignment or be a "soft" bolted joint that could lead to chatter.

I hope the spindle bearings fix the issue for you as of course that's an easier path :)


You bring up some valid points here. As far as prying on the chuck, that probably would have been a good check. At the time, I put a bar in the chuck hanging out about 12” and gave it a good tug with an indicator in contact with the spindle. I don’t recall what the reading was at the time, however there was more movement than I expected.

In regards to checking the contact between the headstock in the bed. I made sure to lightly stone both surfaces best as I could. I did not blue-up and check the fit (that may have been worthwhile at the time) but I did put the headstock in its place without bolting it down and checked for any “rocking” with the assistance of my .0001 indicator. I also make sure to bolt and Loctite the headstock bolts once everything was cleaned and prepped. At this time I do not believe that is my problem but I have been wrong before. In the future I believe I will check the fit up with Prussian blue as you suggested.

Honestly, I believe I will be happy with the spindle bearing replacement regardless if it fixes my problem or not as long as it quiets down the headstock. I cannot explain how dissatisfied I was when I first assembled it and heard that growling noise. However, I do hope it fixed my issues.


Sent from my iPhone using Tapatalk
 
OP
C

Cahark

Well-known member
Joined
Sep 28, 2016
Messages
340
Location
Dayton,Oh
Good work on your lathe. I am currently restoring a 5914 model. As you mentioned, it is so much nicer having a lathe when restoring a lathe. I am fortunate to have a second lathe and it has been handy to build replacement shafts and bushings, etc.


When you go to the bearing house, let them know what you are going to use the bearing for. There are different classes of precision bearings. A good bearing supplier will be able to help you.


Thanks for the suggestion on looking up the bearing class. Funny you mention that. I called up Clausing The other day to inquire about the class of the bearings. The guy on the other end of the phone was very helpful but when I asked him about this he explained to me that at the point in time of manufacture and on our smaller machines, they pretty much used equal to or one step above automotive bearings ha ha. I was extremely surprised to hear this, but when I spoke to a friend of mine and fellow machinist about this we came to the conclusion that just a few years prior many lathes were still running plain bearings or Babbitt so anything were a step up! Haha.


Sent from my iPhone using Tapatalk
 

zmotorsports

ALLIANCE MEMBER
Joined
Oct 20, 2009
Messages
21,359
Location
Northern Utah
I don't know how I missed this thread last year but just read through it and got caught up.

You have done a great job bringing the old Clausing back to life and amazing restoration job.:thumbup:
 
OP
C

Cahark

Well-known member
Joined
Sep 28, 2016
Messages
340
Location
Dayton,Oh
I got out to the lathe this morning and started tinkering a while. I don’t have the bearings in yet but I figured I could prepare for their arrival. As I started looking at the area underneath where the race was and I realized that there seems to be some crud underneath where the shoulder of the bearing race would sit. I was seeing dirt and also burrs. This leads me to believe that someone replaced the bearings at one point in time and did not properly prepare the area before installation. This could be adding to my problems. The bottom of the journal looked just fine.

db604e253737eb6a5fd1f3b46ad31f6c.jpg

Unfortunately this seems to be the continuing track record for this machine


Sent from my iPhone using Tapatalk
 

Attachments

  • db604e253737eb6a5fd1f3b46ad31f6c.jpg
    db604e253737eb6a5fd1f3b46ad31f6c.jpg
    340.5 KB · Views: 2
OP
C

Cahark

Well-known member
Joined
Sep 28, 2016
Messages
340
Location
Dayton,Oh
Made some progress this afternoon. Started things off polishing up the spindle. It had some very fine scaring where the bronze bearing rides, and the take up thread needed to have a thread file ran though it. I first took my time measuring each diameter to ensure that I didn’t remove too much stock. Truly I didn’t want to remove any stock, but that’s not realistic when you are trying to clean up a buggered surface. I felt confident that as long as I kept it to a minimum (.0001”-.0002”) and stayed away from bearing surfaces, I would be just fine. I started off with a stone to knock off any high spots, then followed up with 400,600,800,1000 grit. Not everything looks beautiful, but I’m happy with how everything cleaned up and I hardly removed any material.

172226a6525b3aa865e9b883d4a28451.jpg

Next up was installing the bearing. Unfortunately I’m still waiting on the rear bearing, but I was able to get the front bearing installed.

97745f4e39b96d9fc8dcbe81549565c6.jpg

I then moved on to installing the front and rear races. Just like the removal, I installed them with a slug of aluminum and a milling machine stud set. This helped me make sure that everything stayed nice and straight, and was nicely seated against the shoulders.

9420fa8b630a50a43fba1dfa96630932.jpg
e13dab1f1ab92aaef2424236be64ee73.jpg
4bdfb20644908f327f0259cf32cd437d.jpg
f11019280275b94bf3a3d90ede4cfc11.jpg
b8b87951e2c96dc66dab0a77250d628a.jpg
b81daf0c13df857a72ffa0847c00e589.jpg

Lastly, I installed the inner protective cups. They keep chips out of the bearings, and hold the oil in for the bearings. While doing so, I placed a dab of permetex gasket sealer on the lower portion of the cup. When I first installed the cup, it liked to weep a bit of oil here and there. I did my best to fix the problem, without making the parts a bear to remove.

As the night came to an end, I wiped everything down with oil, and put some rags in the headstock to keep out as much debris as possible. I then installed the top cover since I wouldn’t be getting back to things until I receive the last bearing Wednesday or Thursday.

cbf13e9c8fafa7ee10638b112bde8cbb.jpg

Done for the night on the machine. Gotta do an oil change.


Sent from my iPhone using Tapatalk
 

Attachments

  • f11019280275b94bf3a3d90ede4cfc11.jpg
    f11019280275b94bf3a3d90ede4cfc11.jpg
    585.4 KB · Views: 2
  • b8b87951e2c96dc66dab0a77250d628a.jpg
    b8b87951e2c96dc66dab0a77250d628a.jpg
    428 KB · Views: 2
  • b81daf0c13df857a72ffa0847c00e589.jpg
    b81daf0c13df857a72ffa0847c00e589.jpg
    366.6 KB · Views: 1
  • cbf13e9c8fafa7ee10638b112bde8cbb.jpg
    cbf13e9c8fafa7ee10638b112bde8cbb.jpg
    418.3 KB · Views: 1
  • 172226a6525b3aa865e9b883d4a28451.jpg
    172226a6525b3aa865e9b883d4a28451.jpg
    516.6 KB · Views: 1
  • 97745f4e39b96d9fc8dcbe81549565c6.jpg
    97745f4e39b96d9fc8dcbe81549565c6.jpg
    478.9 KB · Views: 1
  • 9420fa8b630a50a43fba1dfa96630932.jpg
    9420fa8b630a50a43fba1dfa96630932.jpg
    478.2 KB · Views: 2
  • e13dab1f1ab92aaef2424236be64ee73.jpg
    e13dab1f1ab92aaef2424236be64ee73.jpg
    561.5 KB · Views: 3
  • 4bdfb20644908f327f0259cf32cd437d.jpg
    4bdfb20644908f327f0259cf32cd437d.jpg
    426.2 KB · Views: 3

OccupantRJ

Well-known member
Joined
May 15, 2009
Messages
11,015
Location
Eastern North Carolina
What is the latest on the lathe? I am just beginning restoration on a 5914 that I bought for $100 about 16 years ago. A couple of moves and life got in the way. Now I am retired and have more shop time available. I just finished a 20" Rockwell Delta vertical bandsaw.
 
OP
C

Cahark

Well-known member
Joined
Sep 28, 2016
Messages
340
Location
Dayton,Oh
Sorry to get back to you so late on the lathe. I got everything back together and it ran very well. I can’t say that the spindle bearings fixed everything 100%, however the spindle ran much quieter and I would say they fixed things about 95% of the way. It was great, however I’m used to running heavy duty industrial machines at work every day and as much as I was happy with Machine, I really wanted something heavier. I believe that this machine given its size was running very near its full potential with the repairs that I completed.

I had full intentions of keeping this machine and running the **** out of it for the rest my life however, By the luck of the draw I found a real gem in the basement of a house in Dayton. It was a real nightmare removing the machine from the basement but that’s another topic.

f87cbe8e0e423d158e5f3922d4ec3d98.jpg


After I purchased the new machine I decided to sell the clausing locally. It’s been gone a week now and I kind of miss it ha ha. I know it’s on to a good home and will get plenty of use.


Sent from my iPhone using Tapatalk
 

Attachments

  • f87cbe8e0e423d158e5f3922d4ec3d98.jpg
    f87cbe8e0e423d158e5f3922d4ec3d98.jpg
    746.8 KB · Views: 5
OP
C

Cahark

Well-known member
Joined
Sep 28, 2016
Messages
340
Location
Dayton,Oh
fbe47e455af5ee3d6729deb7255ccba6.jpg


Sent from my iPhone using Tapatalk
 

Attachments

  • fbe47e455af5ee3d6729deb7255ccba6.jpg
    fbe47e455af5ee3d6729deb7255ccba6.jpg
    1,017.4 KB · Views: 3

tarbellb

Well-known member
Joined
Apr 17, 2011
Messages
5,743
Location
Oregon
Congrats on the new machine!

Off topic a bit, but what was the price difference between Amazon and your local bearing supplier out of curiosity?
 
OP
C

Cahark

Well-known member
Joined
Sep 28, 2016
Messages
340
Location
Dayton,Oh
Congrats on the new machine!

Off topic a bit, but what was the price difference between Amazon and your local bearing supplier out of curiosity?


Honestly it varied wildly. If I remember correctly, amazon kicks **** on common sizes like 6203. I can usually save 20-40% on high quality Japanese bearings (amazon always wins on non name brands made in China) on the other hand, BDI usually has what I need in stock same day and Sometimes they will completely surprise me on prices and blow amazon out of the water. I’ve gotten in the habit of checking both.

When it comes to large sizes and less than common bearings I check eBay and amazon. BDI has been a bit pricy when it comes to those.


Sent from my iPhone using Tapatalk
 

vmaxma3

New member
Joined
Dec 18, 2018
Messages
1
Location
NY
Great job on the Clausing restoration. Just picked up a 5448 and came across your postings. Lots of great information.
 

AndySomogyi

Member
Joined
Sep 2, 2018
Messages
23
Location
My house
I’ve picked up one of these 5428 also. Mine’s in pretty wonky condition.

Is this right that the motor switch wiring goes under the spindle, right by the gear train? The upper wiring on mine is all dried out and rotted, need to replace it.

655827996e58e86a6b6d671387cae36a.jpg01e4abebe5b7feb3bdd7c4951be2557a.jpg


Sent from my iPhone using Tapatalk Pro
 

Attachments

  • 01e4abebe5b7feb3bdd7c4951be2557a.jpg
    01e4abebe5b7feb3bdd7c4951be2557a.jpg
    1.8 MB · Views: 3
  • 655827996e58e86a6b6d671387cae36a.jpg
    655827996e58e86a6b6d671387cae36a.jpg
    1.6 MB · Views: 2
OP
C

Cahark

Well-known member
Joined
Sep 28, 2016
Messages
340
Location
Dayton,Oh
I’ve picked up one of these 5428 also. Mine’s in pretty wonky condition.

Is this right that the motor switch wiring goes under the spindle, right by the gear train? The upper wiring on mine is all dried out and rotted, need to replace it.

655827996e58e86a6b6d671387cae36a.jpg01e4abebe5b7feb3bdd7c4951be2557a.jpg


Sent from my iPhone using Tapatalk Pro


Sorry, missed this. That switch will work just fine. It may not be original, but it has forward, reverse, and should be rated to handle your motor.


Sent from my iPhone using Tapatalk
 

Attachments

  • 655827996e58e86a6b6d671387cae36a.jpg
    655827996e58e86a6b6d671387cae36a.jpg
    301 KB · Views: 2
  • 01e4abebe5b7feb3bdd7c4951be2557a.jpg
    01e4abebe5b7feb3bdd7c4951be2557a.jpg
    414.9 KB · Views: 6

matt_i

Well-known member
Joined
Mar 14, 2008
Messages
10,725
Location
SE Michigan
Somehow I missed the appearance of the "square dial" 10EE!!!

I think its a good trade, we definitely need a separate thread on the acquisition and movement of that! :D
 

Wardmoto

Well-known member
Joined
May 20, 2016
Messages
45
Location
Carlisle PA
AndySomogyi

I just got done a refurbishing my 5400 and used this thread quite a bit. I too had to do some re-wiring and can help you with anything you might need. In your second pic of the spindle viewed from the top with the side cover folded over so you are showing us the wiring and the end of the spindle, see the large hole the spindle passes through? Directly below that is a small hole. That hole is for a bolt that passes through from the outside and locates a bracket tight up against the inside of the cover. That bracket holds the wire in question away from the meshing gear teeth inside the cover. I don't have a picture of mine, but can take one if you need it. If the picture I attach works, you can just barley see the bolt in question under the spindle...

Anything else you need, please post/ask. This thread was a huge help for me and I learned a lot; I'd love to pass on whatever I can.
 

Attachments

  • IMG_20191021_205206.jpg
    IMG_20191021_205206.jpg
    139.8 KB · Views: 58
To avoid these ads, REGISTER NOW!
OP
C

Cahark

Well-known member
Joined
Sep 28, 2016
Messages
340
Location
Dayton,Oh
That machine looks great. Glad the post was able to help others. I wound up with another 5400. I plan to go through it and sell it, or give it to my Father. I plan to post some updates as I proceed.

90a1ac3badf6c396a4449d947edf2401.jpg


Sent from my iPhone using Tapatalk
 

Attachments

  • 90a1ac3badf6c396a4449d947edf2401.jpg
    90a1ac3badf6c396a4449d947edf2401.jpg
    543.9 KB · Views: 8

Wardmoto

Well-known member
Joined
May 20, 2016
Messages
45
Location
Carlisle PA
Thanks for the compliment, it really is nice to see you back on here! I want to thank you for taking the time to post everything you did, it helped me very much and flattened my learning curve considerably. My lathe looked a bit better than the 2 you have/had but not by much. I can't understand why these things always seem to end up with terd green paint!?!
 

Attachments

  • IMG_20190605_205037.jpg
    IMG_20190605_205037.jpg
    152.9 KB · Views: 59
OP
C

Cahark

Well-known member
Joined
Sep 28, 2016
Messages
340
Location
Dayton,Oh
Thanks for the compliment, it really is nice to see you back on here! I want to thank you for taking the time to post everything you did, it helped me very much and flattened my learning curve considerably. My lathe looked a bit better than the 2 you have/had but not by much. I can't understand why these things always seem to end up with terd green paint!?!


No problem, glad I was able to help.


Sent from my iPhone using Tapatalk
 
OP
C

Cahark

Well-known member
Joined
Sep 28, 2016
Messages
340
Location
Dayton,Oh
As some of you may have read in the past few comments, I somehow wound up with another one of these Clausing 5400 lathes. This machine spent its last 30 years or so in the home shop of a man who made and re-built pedal tractors. It’s in pretty rough condition but I believe that it should clean up well. I intend to sell the machine after completion as I already have another machine. I just really enjoy this as a hobby.

I started to take the top half of the lathe apart over the past two weeks. As I proceeded I wire wheeled every single fastener and part where applicable. After the bulk of the grime was removed I used my parts washer or my ultrasonic to finish the cleaning process. I like to use the simple green precision cleaner in my ultrasonic as hot as I can get it. I then followed up with a light coat of oil where necessary.

This year I have the help of a sandblaster at home. Last time I just used a needle scaler, wire wheel, and a scrub brush. This worked fine but it made it much larger mess and took a lot longer. You have to be careful that you don’t get into any precision surfaces with the bead blaster, but it makes very quick work of removing many years of paint, dirt, and grime. On areas like hand wheels, I polished The non-painted surfaces after blast with a wire wheel. I plan to paint the inside with color, and clearcoat the unpainted outside to prevent rust. I’ve done this a couple times on other machines and it seems to of worked out well.

Another change for this year is the setting up of a temporary paint booth. I decided to put some hooks into my ceiling and purchase some tarps and a grommet kit to make a paint booth that I could throw up quickly and easily. I tried it out for the first time today and it worked out very well. I used to cover up everything in my shop and paint out in the open, but this addition helped to keep my mess to one consolidated area.

I’m just going to dump a bunch of pictures to show progress. Feel free to ask questions and I will try to help as best as I can.

12137a5011355d614d22736084dad6f6.jpg
d4ecf2066137f9eb52153af6058b89d4.jpg
9ebeacc54c40a59fabe677e3b386137e.jpg
8a2acbcdb560f6ba0f0c5b20ed59038a.jpg
251207d0472fc604cf643618ee7237d0.jpg
51c62395de2183a8260e2403ef2876eb.jpg
df29e57f919eaa4a886ee51ec3b0fc87.jpg
95b50f97c28390b68ab9fc9b90029e85.jpg
d46089d6e72ab15c4dd25f457de6c202.jpg
aadc21023e4d2e3fc7e631b384ed2eb9.jpg
2f4b3cc3d38c29e25a668350d1aee890.jpg
10b5cc064245f525604902dee7b49366.jpg
d175e659fc56a6768f6f081f1e777324.jpg


Sent from my iPhone using Tapatalk
 

Attachments

  • 2f4b3cc3d38c29e25a668350d1aee890.jpg
    2f4b3cc3d38c29e25a668350d1aee890.jpg
    735.4 KB · Views: 8
  • 10b5cc064245f525604902dee7b49366.jpg
    10b5cc064245f525604902dee7b49366.jpg
    748 KB · Views: 6
  • d175e659fc56a6768f6f081f1e777324.jpg
    d175e659fc56a6768f6f081f1e777324.jpg
    726.2 KB · Views: 4
  • aadc21023e4d2e3fc7e631b384ed2eb9.jpg
    aadc21023e4d2e3fc7e631b384ed2eb9.jpg
    776.9 KB · Views: 3
  • d46089d6e72ab15c4dd25f457de6c202.jpg
    d46089d6e72ab15c4dd25f457de6c202.jpg
    858.8 KB · Views: 2
  • 12137a5011355d614d22736084dad6f6.jpg
    12137a5011355d614d22736084dad6f6.jpg
    563.7 KB · Views: 2
  • d4ecf2066137f9eb52153af6058b89d4.jpg
    d4ecf2066137f9eb52153af6058b89d4.jpg
    882.7 KB · Views: 3
  • 9ebeacc54c40a59fabe677e3b386137e.jpg
    9ebeacc54c40a59fabe677e3b386137e.jpg
    731.4 KB · Views: 1
  • 8a2acbcdb560f6ba0f0c5b20ed59038a.jpg
    8a2acbcdb560f6ba0f0c5b20ed59038a.jpg
    678 KB · Views: 1
  • 251207d0472fc604cf643618ee7237d0.jpg
    251207d0472fc604cf643618ee7237d0.jpg
    689.1 KB · Views: 1
  • 51c62395de2183a8260e2403ef2876eb.jpg
    51c62395de2183a8260e2403ef2876eb.jpg
    835.5 KB · Views: 2
  • df29e57f919eaa4a886ee51ec3b0fc87.jpg
    df29e57f919eaa4a886ee51ec3b0fc87.jpg
    757.1 KB · Views: 2
  • 95b50f97c28390b68ab9fc9b90029e85.jpg
    95b50f97c28390b68ab9fc9b90029e85.jpg
    725.5 KB · Views: 2
Last edited:
OP
C

Cahark

Well-known member
Joined
Sep 28, 2016
Messages
340
Location
Dayton,Oh
This evening turned out to be more productive than I had originally expected. I started things out cleaning up the painted parts and the makeshift paint booth. Everything turned out very well and the gloss looks great.

Next I moved on to removing the bed from the base. This year I have the help of a small shop crane, so the job was very simple and easy on my back. The crane isn’t the most heavy duty, but for small items less than 500 pounds it works great. I then flipped the bed over and started to remove the idler pulley. Unfortunately it was more stuck than the last machine that I worked on. On that machine I was able to use a slide hammer, but I didn’t have any luck with that this time. I took a tip from Andy and made a Small puller out of some threaded rod and tubing. That allowed me to slowly walk out the shaft with a nut and some washers. Worked great.

I hope to have everything stripped by the weekend and get to painting the base and bed this week.

6a3532bb119c301a9fe0e60c4ab18440.jpg
79110a876f1a5a64461a8837b2db5dc2.jpg
04ec003629ef6424880ae477a02f32da.jpg


Sent from my iPhone using Tapatalk
 

Attachments

  • 6a3532bb119c301a9fe0e60c4ab18440.jpg
    6a3532bb119c301a9fe0e60c4ab18440.jpg
    845.1 KB · Views: 1
  • 79110a876f1a5a64461a8837b2db5dc2.jpg
    79110a876f1a5a64461a8837b2db5dc2.jpg
    846 KB · Views: 1
  • 04ec003629ef6424880ae477a02f32da.jpg
    04ec003629ef6424880ae477a02f32da.jpg
    786.3 KB · Views: 1
OP
C

Cahark

Well-known member
Joined
Sep 28, 2016
Messages
340
Location
Dayton,Oh
This evening I had a few hours to continue disassembly. I focused on the Base and the under Drive unit.

This allowed me to verify some bearing numbers and belt sizes so I can go ahead and get them on order. I figured it would be the same as the last machine but you never know for sure until you start getting into it.

206b1df4cb335baf26ecaba68bdc257c.jpg
2263487f51764a9aaf1cf2b4bdacbbfd.jpg
de975f9667decd1965466d3bee997848.jpg
34022fb5275d03294a87ae548ac0c3ed.jpg
3d04a3ab3f9fe09222d4b562000325e8.jpg


Sent from my iPhone using Tapatalk
 

Attachments

  • 3d04a3ab3f9fe09222d4b562000325e8.jpg
    3d04a3ab3f9fe09222d4b562000325e8.jpg
    754.6 KB · Views: 1
  • 34022fb5275d03294a87ae548ac0c3ed.jpg
    34022fb5275d03294a87ae548ac0c3ed.jpg
    804.6 KB · Views: 2
  • de975f9667decd1965466d3bee997848.jpg
    de975f9667decd1965466d3bee997848.jpg
    662 KB · Views: 2
  • 2263487f51764a9aaf1cf2b4bdacbbfd.jpg
    2263487f51764a9aaf1cf2b4bdacbbfd.jpg
    595.3 KB · Views: 2
  • 206b1df4cb335baf26ecaba68bdc257c.jpg
    206b1df4cb335baf26ecaba68bdc257c.jpg
    764.3 KB · Views: 1

AndySomogyi

Member
Joined
Sep 2, 2018
Messages
23
Location
My house
This evening I had a few hours to continue disassembly. I focused on the Base and the under Drive unit.

This allowed me to verify some bearing numbers and belt sizes so I can go ahead and get them on order. I figured it would be the same as the last machine but you never know for sure until you start getting into it.

206b1df4cb335baf26ecaba68bdc257c.jpg
2263487f51764a9aaf1cf2b4bdacbbfd.jpg
de975f9667decd1965466d3bee997848.jpg
34022fb5275d03294a87ae548ac0c3ed.jpg
3d04a3ab3f9fe09222d4b562000325e8.jpg


Sent from my iPhone using Tapatalk


The under drive on this one is the same as mine. This is the squirreliest belt drive I’ve ever seen. b0e155c92dcd894b42d6cdd72627edab.jpg


Sent from my iPhone using Tapatalk Pro
 

Attachments

  • b0e155c92dcd894b42d6cdd72627edab.jpg
    b0e155c92dcd894b42d6cdd72627edab.jpg
    79.3 KB · Views: 3
  • 3d04a3ab3f9fe09222d4b562000325e8.jpg
    3d04a3ab3f9fe09222d4b562000325e8.jpg
    124.5 KB · Views: 2
  • 34022fb5275d03294a87ae548ac0c3ed.jpg
    34022fb5275d03294a87ae548ac0c3ed.jpg
    140.2 KB · Views: 1
  • de975f9667decd1965466d3bee997848.jpg
    de975f9667decd1965466d3bee997848.jpg
    90 KB · Views: 1
  • 2263487f51764a9aaf1cf2b4bdacbbfd.jpg
    2263487f51764a9aaf1cf2b4bdacbbfd.jpg
    89.6 KB · Views: 1
  • 206b1df4cb335baf26ecaba68bdc257c.jpg
    206b1df4cb335baf26ecaba68bdc257c.jpg
    113.7 KB · Views: 3

Wardmoto

Well-known member
Joined
May 20, 2016
Messages
45
Location
Carlisle PA
Hey guys,

My lathe was reworked a bit prior to my ownership. It has a stepped under drive with a 5 position drive pulley belted to a 5 position driven pulley that sits on the same shaft that contains the clutch pack,brake shoe arraignment. I know they made a few of different under drive configurations but despite ours being different, to the left of the clutch/brake lever of both of your machines you have something where I just have blanked over holes. You can see mine in this pic, my holes were covered with a round and rectangle plate...what goes in those holes on your machines and what does it do??
 

Attachments

  • 5400.jpg
    5400.jpg
    156.7 KB · Views: 35

AndySomogyi

Member
Joined
Sep 2, 2018
Messages
23
Location
My house
here is what I am referencing on your machines...


That’s the variable speed control, and speed read out. Some of these came with step pulleys and others with variable speed belt drive. The hand screw controls a lever that moves the variable speed pulleys in and out


Sent from my iPhone using Tapatalk Pro
 
OP
C

Cahark

Well-known member
Joined
Sep 28, 2016
Messages
340
Location
Dayton,Oh
The under drive on this one is the same as mine. This is the squirreliest belt drive I’ve ever seen. b0e155c92dcd894b42d6cdd72627edab.jpg


Sent from my iPhone using Tapatalk Pro


That’s odd, my motor is mounted on the back side. However, I do know that there are multiple mounting configurations for the drive system.


Sent from my iPhone using Tapatalk
 

Attachments

  • b0e155c92dcd894b42d6cdd72627edab.jpg
    b0e155c92dcd894b42d6cdd72627edab.jpg
    40.8 KB · Views: 5

AndySomogyi

Member
Joined
Sep 2, 2018
Messages
23
Location
My house
That’s odd, my motor is mounted on the back side. However, I do know that there are multiple mounting configurations for the drive system.


Sent from my iPhone using Tapatalk


Here’s mine from the back, and here’s the two drive belts. Don’t know who the manufacturer is, but the outer one says ‘RVS 506 16’ and the inner one says ‘RVS 505 25’d9af1e5c808066889b0c10b0e8414b9a.jpgc5eebef1f41ddb20aa3b78a0398ee5a9.jpg


Sent from my iPhone using Tapatalk Pro
 

Attachments

  • c5eebef1f41ddb20aa3b78a0398ee5a9.jpg
    c5eebef1f41ddb20aa3b78a0398ee5a9.jpg
    1.7 MB · Views: 3
  • d9af1e5c808066889b0c10b0e8414b9a.jpg
    d9af1e5c808066889b0c10b0e8414b9a.jpg
    1.4 MB · Views: 3
OP
C

Cahark

Well-known member
Joined
Sep 28, 2016
Messages
340
Location
Dayton,Oh
The last few days allowed for a lot of progress. I was able to strip down the rest of the machine with angle grinders and the media blaster. It came off pretty well using a 60grit flap wheel being careful to only remove the paint. I also used a needle scaler to get into the corners.

I was able to get the frozen clutch assembly apart. There I found why it would not engage or disengage due to a broken key keeping everything from moving. Thanks to the extra clutch assembly found with the machine I believe this to have been replaced recently. The extra parts all look to be serviceable, so I may have some parts for sale in the near future if anyone needs them. Let me know.

Today I painted half of the stripped parts, and Friday I will finish the other half. If all goes as planned I should be able to start assembly this weekend or next.

c228bc5c6b79de4e6433f9a29de04d4c.jpg
575c3340c3c69c1f5cea990a328e6d3c.jpg
4fdb5427a0b837c5d14ace010458c731.jpg
9358466081ec582fbf143939c7173826.jpg


Sent from my iPhone using Tapatalk
 

Attachments

  • 575c3340c3c69c1f5cea990a328e6d3c.jpg
    575c3340c3c69c1f5cea990a328e6d3c.jpg
    779.8 KB · Views: 2
  • 4fdb5427a0b837c5d14ace010458c731.jpg
    4fdb5427a0b837c5d14ace010458c731.jpg
    783.2 KB · Views: 1
  • 9358466081ec582fbf143939c7173826.jpg
    9358466081ec582fbf143939c7173826.jpg
    752.5 KB · Views: 2
  • c228bc5c6b79de4e6433f9a29de04d4c.jpg
    c228bc5c6b79de4e6433f9a29de04d4c.jpg
    743.5 KB · Views: 2
OP
C

Cahark

Well-known member
Joined
Sep 28, 2016
Messages
340
Location
Dayton,Oh
Today I was able to finish the rest of the paint. Assembly should start towards the end of the weekend or next week.

2aa34af32b704e5a70919aaac1ef2415.jpg
bfc26ede950b40f385dcad9fb8a7ae5a.jpg


Sent from my iPhone using Tapatalk
 

Attachments

  • 2aa34af32b704e5a70919aaac1ef2415.jpg
    2aa34af32b704e5a70919aaac1ef2415.jpg
    697.4 KB · Views: 2
  • bfc26ede950b40f385dcad9fb8a7ae5a.jpg
    bfc26ede950b40f385dcad9fb8a7ae5a.jpg
    716.5 KB · Views: 2
OP
C

Cahark

Well-known member
Joined
Sep 28, 2016
Messages
340
Location
Dayton,Oh
After working on a few other projects today that took full advantage of our 55° weather, I turned my attention to assembly. The machine takes up quite a bit of space when it is disassembled, Plus I would like to have the lathe operational as soon as possible.

I decided to install everything on The 2 x 4 runners that we used to move the machine. This makes it simple for me to move around the shop with a pallet jack and very easy for someone to load onto their trailer. The wood runners had stains and dirt coated all over them. It would be a shame to put together a fresh machine like this with those ugly things, so I decided to quickly spray them with some black paint just to dress them up a little bit. I plan to inform whoever decides to purchase this machine to remove them and anchor the machine to the ground during final installation.

Just wanted to remind everyone that this machine will be for sale upon completion in the Dayton Ohio area.


3d99c78ccae7ad2794760aeece7606d8.jpg
908937ffcd43774c7021abc86afdb6da.jpg
 

Attachments

  • 908937ffcd43774c7021abc86afdb6da.jpg
    908937ffcd43774c7021abc86afdb6da.jpg
    781.2 KB · Views: 2
  • 3d99c78ccae7ad2794760aeece7606d8.jpg
    3d99c78ccae7ad2794760aeece7606d8.jpg
    772 KB · Views: 7

OccupantRJ

Well-known member
Joined
May 15, 2009
Messages
11,015
Location
Eastern North Carolina
Cahark, seems you are a refurb junkie like myself. As I mentioned in post #129, here is a before and after on the Clausing 5914 lathe that I was starting at the time. It has been a sweet running machine.
 

Attachments

  • 85A3B00C-0C31-4E94-9EE6-6F5945557382.jpg
    85A3B00C-0C31-4E94-9EE6-6F5945557382.jpg
    103.8 KB · Views: 39
  • ECB78E75-5225-4B7E-83CD-249D64CA0F5D.jpg
    ECB78E75-5225-4B7E-83CD-249D64CA0F5D.jpg
    148.4 KB · Views: 37
OP
C

Cahark

Well-known member
Joined
Sep 28, 2016
Messages
340
Location
Dayton,Oh
Cahark, seems you are a refurb junkie like myself. As I mentioned in post #129, here is a before and after on the Clausing 5914 lathe that I was starting at the time. It has been a sweet running machine.


Wow, that’s a nice machine. Yep, my hobby is working on machines whenever I come across them cheap enough. I just finished up a Logan 8” shaper

5bcb0de9d57cfe32be9374c3e350e4cc.jpg

8fe8d802c21b6a2b5774c9af1580d3b1.jpg


Sent from my iPhone using Tapatalk
 

Attachments

  • 5bcb0de9d57cfe32be9374c3e350e4cc.jpg
    5bcb0de9d57cfe32be9374c3e350e4cc.jpg
    746.8 KB · Views: 7
  • 8fe8d802c21b6a2b5774c9af1580d3b1.jpg
    8fe8d802c21b6a2b5774c9af1580d3b1.jpg
    506.3 KB · Views: 4

AndySomogyi

Member
Joined
Sep 2, 2018
Messages
23
Location
My house
Wow, that’s a nice machine. Yep, my hobby is working on machines whenever I come across them cheap enough. I just finished up a Logan 8” shaper


Wow, that’s a great shaper. I’ve never used one, and I really wish I had more time and money, would love to play around with one, see what kinds of possibilities it had, ha ha, maybe even do a CNC shaper build :)


Sent from my iPhone using Tapatalk Pro
 
To avoid these ads, REGISTER NOW!
Top Bottom