To avoid these ads, REGISTER NOW!

Craftsman Drill Press

OP
F

FrankLee

Well-known member
Joined
Sep 13, 2010
Messages
3,542
Location
seMI, 48317
My motor definitely needs a new cord. The whole thing is just cracked to pieces. And there's a broken wire inside. Can I add a ground where the bottom cover plate screw goes.

Also. My motor really needs rebuilt. But I'm not up for that right now. I need to get this thing running.

Yes, that motor definitely needs attention. I used that plate cover screw for ground on one of my refurbs. See the link in my signature. It may not be "code", but I figured that that motor was not originally equipped with a ground wire. So it's better than nothing.

I found a motor that the guy says he don't think it's ever been used. It was his dads. He thinks his dad sent in a bad motor and got this one as a replacement but never used it. There's no cord or switch. He says it looks like it's never had one.

Or it could be a junk motor that his dad robbed the cord off of,,,,lol.

Anyway. Would this little Craftsman work on my model 100 drill press. Is it the right style. I don't know if it will bolt up. Or I might try to use it on my Delta, God forbid having a Craftsman motor on my Delta,,,lol.

Hard to make out the model number. But I think it is 113.18351. I can't find anything on it.

You guys got any ideas. Thanks.

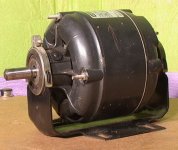
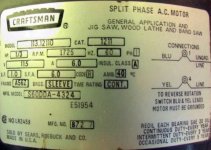
The brown/gold motor has sleeve-bearings and should work well on your DP. I can't read the label from your picture, but there should be a catalog number listed. You may need to investigate whether this sleeve-bearing motor can be mounted vertically. Some sleeve-bearing motors are specified for horizontal mounting only. Craftsman catalogs can be found online. Mounting options are usually specified in the general description of each motor type.

Like outlaw said above, the motor shaft needs to match the bore of your pulley. It's possible you may need a sleeve adapter if the motor shaft is 1/2" and the pulley bore is 5/8". Not a problem. I believe some 1/2" shaft motors came with an adapter when new.

In addition, the motor rotation need to be correct. Many Craftsman motors are reversible. There should be a label attached to the inside of the terminal cover with instructions on which wires to switch to change rotation.

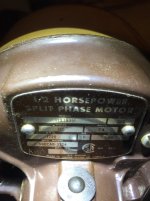
Below are a few pictures of one of my motors very similar to that one.

 
Last edited:
To avoid these ads, REGISTER NOW!

CalsXS2

Well-known member
Joined
Jun 2, 2013
Messages
507
If it is sleeve bearing, and it does not specify use, does that necessarily mean it's ok to use on a drill press. If it does not say "ball bearings" does that mean it's sleeved.

Do you know for a fact that is a sleeved motor with out more info. But I do think you are correct.

I found just a general statement from a sears catalog said sleeved bearing motors should not be used in a vertical application.

I found a very similar motor on ebay describing it's use. I think it's from the same era because of the crown top logo. Pics below.

IDK. I might be wasting $25 on a motor that I will trash in short order. Or do you guys think I can oil it frequently and just use it to make my dp go. Then get something else when I can.

The first 2 pics are of the one on ebay. Not the one I might buy. The last pic is the one I might get. Can this type of mount be swaped with my original. Or will it bolt up as is.
 

Attachments

  • 3875_02.jpg
    3875_02.jpg
    137.4 KB · Views: 40
  • 3875_05.jpg
    3875_05.jpg
    30.4 KB · Views: 48
  • 00101_d69ZBvAHCYb_600x450.jpg
    00101_d69ZBvAHCYb_600x450.jpg
    33.8 KB · Views: 45
Last edited:
OP
F

FrankLee

Well-known member
Joined
Sep 13, 2010
Messages
3,542
Location
seMI, 48317
If it is sleeve bearing, and it does not specify use, does that necessarily mean it's ok to use on a drill press. If it does not say "ball bearings" does that mean it's sleeved.

Do you know for a fact that is a sleeved motor with out more info. But I do think you are correct.

I found just a general statement from a sears catalog said sleeved bearing motors should not be used in a vertical application.

I found a very similar motor on ebay describing it's use. I think it's from the same era because of the crown top logo. Pics below.

IDK. I might be wasting $25 on a motor that I will trash in short order. Or do you guys think I can oil it frequently and just use it to make my dp go. Then get something else when I can.

The first 2 pics are of the one on ebay. Not the one I might buy. The last pic is the one I might get. Can this type of mount be swaped with my original. Or will it bolt up as is.

You can usually identify a sleeve bearing motor if there are plugs or oil ports for lubricating the sleeve bearings. The rubber plugs on those two you pictured tell me that they are sleeve bearings. AFIK, ball bearing motors have no external means to lubricate the bearings.

I would not hesitate to use a sleeve bearing motor on a drill press. Do not go overboard on oiling sleeve bearings. A few drops every several years is probably plenty.

The black motor is catalog number 1211. I found it on page 36 in the 1966 Craftsman catalog. The description states that it can mount in any position.

You said above that the model number of the brown/gold motor is 113.18351 (I think it may actually be 113.19351, but I'm not positive). That should translate to catalog number 1935. The 1963 Craftsman catalog has a #1935 motor on page 19. It does not specify orientation, but I would use it on a drill press.

I did not check all catalogs for #1835.
 
Last edited:

CalsXS2

Well-known member
Joined
Jun 2, 2013
Messages
507
You can usually identify a sleeve bearing motor if there are plugs or oil ports for lubricating the sleeve bearings. The rubber plugs on those two you pictured tell me that they are sleeve bearings. AFIK, ball bearing motors have no external means to lubricate the bearings.

I would not hesitate to use a sleeve bearing motor on a drill press. Do not go overboard on oiling sleeve bearings. A few drops every several years is probably plenty.

The black motor is catalog number 1211. I found it on page 36 in the 1966 Craftsman catalog. The description states that it can mount in any position.
http://www.vintagemachinery.org/pubs/222/4428.pdf#page=36

You said above that the model number of the brown/gold motor is 113.18351 (I think it may actually be 113.19351, but I'm not positive). That should translate to catalog number 1935. The 1963 Craftsman catalog has a #1935 motor on page 19. It does not specify orientation, but I would use it on a drill press.
http://www.vintagemachinery.org/pubs/222/4409.pdf#page=19

I did not check all catalogs for #1835.

Thanks for all your work Frank.


In both catalog it does say "small drill presses".

That's assuming it is 1935 and not 1835. But I think you might be right again.

He is supposed to send me better pics tonight and measure the shaft. I need 1/2''. Which that's what the catalog says it is.

So I'm going for it,,,lol.
 
OP
F

FrankLee

Well-known member
Joined
Sep 13, 2010
Messages
3,542
Location
seMI, 48317
Thanks for all your work Frank.


In both catalog it does say "small drill presses".

That's assuming it is 1935 and not 1835. But I think you might be right again.

He is supposed to send me better pics tonight and measure the shaft. I need 1/2''. Which that's what the catalog says it is.

So I'm going for it,,,lol.

Looking closer at the picture of the brown/gold motor, it looks like there is a keyway on the shaft. That tells me it's 5/8"
 

CalsXS2

Well-known member
Joined
Jun 2, 2013
Messages
507
Looking closer at the picture of the brown/gold motor, it looks like there is a keyway on the shaft. That tells me it's 5/8"

Well that would be a deal breaker. I'll know tonight.

I'm headed out for the day so I won't be replying for awhile.
 

CalsXS2

Well-known member
Joined
Jun 2, 2013
Messages
507
I clean up my motor a little and put a new cord on it. But it's kinda noisy. I don't know if I got a bearing issue or what.

Tell me what you guys think of this. Is it normal.

My plan right now is to just turn it on and let it run to see if it quietens down,,,lol.

 
Last edited:
OP
F

FrankLee

Well-known member
Joined
Sep 13, 2010
Messages
3,542
Location
seMI, 48317
I clean up my motor a little and put a new cord on it. But it's kinda noisy. I don't know if I got a bearing issue or what.

Tell me what you guys think of this. Is it normal.

My plan right now is to just turn it on and let it run to see if it quietens down,,,lol.


Yeah, the bearings sound very dry to me. Remove the bearing covers. The bearings are open on the outboard sides. Add a few drops of oil to each bearing and run it again. You'll be surprised how it will quiet down. Reinstall the covers.
Also verify that the pulley is not contacting the end cap.
 

CalsXS2

Well-known member
Joined
Jun 2, 2013
Messages
507
How can I remove the pulley with out destroying it. It looks like someone all ready did a number on it.

Should I just be able to remove the set screw and tap it off. Or is it going to require a puller.
 

CalsXS2

Well-known member
Joined
Jun 2, 2013
Messages
507
I'm not sure if I should still get this other motor. I think my original is usable. It did quieten down. But I still hear something.

I guess for $25 it would be a good back up motor, or I can use it on my Delta just to make it go.

Is it worth the effort. It would cost me $25 and a 2 hour round trip.

My original motor after oiling the bearings. They had grease. Should I be using grease instead of oil.


This is the other optional motor for $25. Should I get it.
 

Attachments

  • 00101_d69ZBvAHCYb_600x450.jpg
    00101_d69ZBvAHCYb_600x450.jpg
    33.8 KB · Views: 41
  • IMG_4199.jpg
    IMG_4199.jpg
    119.7 KB · Views: 42
  • IMG_8860.jpg
    IMG_8860.jpg
    115.3 KB · Views: 39

CapnKay

Member
Joined
Feb 9, 2016
Messages
6
Location
California
Hey I'm new to the community and found this great thread from a previous search in tearing down my 150 I got free from a barn. I figure this is a question for you, what is your painting process besides regular cleaning, sanding and priming? Do you use an enamel and then a clear coat on your restores or do you have a better process? Just wondering because I plan to use my 150 for years to come and would like to have the paint last. Any tips would be helpful and sorry if I didn't see it in the above.
 
OP
F

FrankLee

Well-known member
Joined
Sep 13, 2010
Messages
3,542
Location
seMI, 48317
Repainting... prep, paint options and colors

Hey I'm new to the community and found this great thread from a previous search in tearing down my 150 I got free from a barn. I figure this is a question for you, what is your painting process besides regular cleaning, sanding and priming? Do you use an enamel and then a clear coat on your restores or do you have a better process? Just wondering because I plan to use my 150 for years to come and would like to have the paint last. Any tips would be helpful and sorry if I didn't see it in the above.

Welcome and thanks! I'm glad the information here is helpful.

I have no room in my small two-car garage and do not clean the large pieces in my basement, so I wait for warmer weather and clean pieces in my driveway.

I start by wiping off as much dirt and crud as I can with dry rags. Then I use a green scotchbrite pad with mineral spirits and scrub off the rest. If really crusty rusty, I'll use a wire wheel on a drill. Prior to priming, I'll spray down each piece with a liberal dose of brake cleaner.

There are many other techniques used from paint stripper to media blasting to electrolysis. It just depends on your preference and resources available to you.

I normally use Rustoleum or Duplicolor automotive paints with no clear top coat. There are a variety of other options... epoxy paint, powder-coating, etc.

Good luck. I hope to see a refurb thread with your machine.
 
Last edited:

CapnKay

Member
Joined
Feb 9, 2016
Messages
6
Location
California
Thank you FrankLee, I'll be sure to start one with the restore. Thanks for the info! Also, what are you doing to protect the bare metal on the posts once cleaned up? I was thinking of using floor wax as I had read that in another post.
 
Last edited:
OP
F

FrankLee

Well-known member
Joined
Sep 13, 2010
Messages
3,542
Location
seMI, 48317
Thank you FrankLee, I'll be sure to start one with the restore. Thanks for the info! Also, what are you doing to protect the bare metal on the posts once cleaned up? I was thinking of using floor wax as I had read that in another post.

Yes, I use Johnson's paste wax in the yellow can on the column and table.
 
Last edited:
To avoid these ads, REGISTER NOW!

JZiggy

Well-known member
Joined
Dec 1, 2014
Messages
990
Location
Atlanta
I'm not sure if I should still get this other motor. I think my original is usable. It did quieten down. But I still hear something.

I guess for $25 it would be a good back up motor, or I can use it on my Delta just to make it go.

Is it worth the effort. It would cost me $25 and a 2 hour round trip.

My original motor after oiling the bearings. They had grease. Should I be using grease instead of oil.


This is the other optional motor for $25. Should I get it.

I bought a Craftsman 150 drill press that had that exact style of motor on it, same colors too, except it was a 3/4hp. I did not use it for a long time but it seemed to work well and had apparently been operating with that motor for quite a while. For what it's worth!!
 

CalsXS2

Well-known member
Joined
Jun 2, 2013
Messages
507
So I got the extra motor. How do I hook it up. Which one is hot.

Am I missing some wires.

And does it have to be grounded just to make it work.
 

Attachments

  • 20160211_210553[1].jpg
    20160211_210553[1].jpg
    144.7 KB · Views: 78
  • 20160211_215532[1].jpg
    20160211_215532[1].jpg
    149.3 KB · Views: 64
Last edited:
OP
F

FrankLee

Well-known member
Joined
Sep 13, 2010
Messages
3,542
Location
seMI, 48317
So I got the extra motor. How do I hook it up. Which one is hot.

Am I missing some wires.

And does it have to be grounded just to make it work.

Here's a video.


You've got the wiring figured out.

My motors spark some too. You may want to clean the contacts on the internal starting switch. Use caution when handling the internal wires. The insulation may be very fragile and can crack or break.

The catalog states that the motor is reversible. Did you find an instruction label inside the terminal cover?
 
Last edited:

CalsXS2

Well-known member
Joined
Jun 2, 2013
Messages
507
You've got the wiring figured out.

My motors spark some too. You may want to clean the contacts on the internal starting switch. Use caution when handling the internal wires. The insulation may be very fragile and can crack or break.

The catalog states that the motor is reversible. Did you find an instruction label inside the terminal cover?

No instruction for anything. Do I have to have a puller to get that end cover off.

It's turning clockwise. Is that correct for a drill press.
 
OP
F

FrankLee

Well-known member
Joined
Sep 13, 2010
Messages
3,542
Location
seMI, 48317

CalsXS2

Well-known member
Joined
Jun 2, 2013
Messages
507
OK. I cracked it's skull open.

Are these burnt windings??
 

Attachments

  • 20160212_110533[1].jpg
    20160212_110533[1].jpg
    152.8 KB · Views: 96
  • 20160212_110542[1].jpg
    20160212_110542[1].jpg
    153.4 KB · Views: 100
  • 20160212_110558[1].jpg
    20160212_110558[1].jpg
    155.3 KB · Views: 90
OP
F

FrankLee

Well-known member
Joined
Sep 13, 2010
Messages
3,542
Location
seMI, 48317
I'd bet those are the start winding's,

I thought the start windings are the heavier gauge loops on the outside. I'm not sure, but I wish I could find those split phase motor pictures I saw online recently.

Is it possible that the burnt areas are likely from the large sparking at start-up? Try cleaning the switch contacts with emery board or similar and see if sparking is reduced or eliminated.
 
Last edited:

bubinga

Well-known member
Joined
Jul 26, 2014
Messages
12,744
Location
Bridgeport Ohio. (Across River From Wheeling WV)
I thought the start windings are the heavier gauge loops on the outside. I'm not sure, but I wish I could find those split phase motor pictures I saw online recently.

Is it possible that the burnt areas are likely from the large sparking at start-up? Try cleaning the switch contacts with emery board or similar and see if sparking is reduced or eliminated.
Yeah Frank, and didn't it look like the start contacts are burned too?
 

CalsXS2

Well-known member
Joined
Jun 2, 2013
Messages
507
There doesn't appear to be any coatings on the windings. But they don't smell burnt either.

The contact button has a bad burn across it. And the flat copper piece is burnt almost in two. See it at the end of the red straw.
 

Attachments

  • 20160212_120931[1].jpg
    20160212_120931[1].jpg
    159 KB · Views: 101
OP
F

FrankLee

Well-known member
Joined
Sep 13, 2010
Messages
3,542
Location
seMI, 48317
There doesn't appear to be any coatings on the windings. But they don't smell burnt either.

The contact button has a bad burn across it. And the flat copper piece is burnt almost in two. See it at the end of the red straw.

Can that contact board be acquired??

I think you'll either need a donor piece or you could possibly repair that with a patch soldered across the gap.
 

Outlawmws

Well-known member
Joined
Aug 9, 2011
Messages
39,081
Location
The Badlands
For the switch I'd patch/repair like frank suggested.

Tho windings.. Hard to tell a lot in the pics, but doesn't look good/right...


I'd disconnect all the power cord connections and do a continuity/resistance test from the main frame to each live wire connection you can access. If any show continuity, the motor is an accident waiting to happen. Then try just resistance testing across every winding termination point you can. list the results and look for anomalies.
 
Last edited:

ShadowRuleZ

Well-known member
Joined
Feb 27, 2011
Messages
1,916
Location
Detroit

I've been going through this thread top to bottom to see if I can figure this out. I just picked up my first drill press and it sounds fine. I'm not sure if it's supposed to or not, but when you lower the chuck (sorry if I'm using the wrong terms), the pulley also goes down and bottoms out about an inch down. Is that how these are supposed to work?

In the exploded diagram Fig 2, I believe that the pulley attaches to 9. Are 9 and 5 rigidly fixed or are they supposed to slide?
 
To avoid these ads, REGISTER NOW!
Top Bottom