To avoid these ads, REGISTER NOW!

Craftsman Drill Press

Craptain

Well-known member
Joined
Apr 18, 2013
Messages
4,027
Location
Tampa Bay FL
Well fabrication of a replica cover has begun. Mock up complete. This is all been done off just pictures I found on the inter-web. I didn't have measurements to work off so it's a best guess.
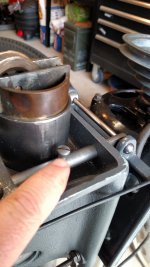
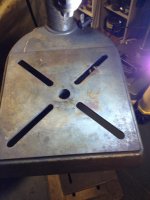
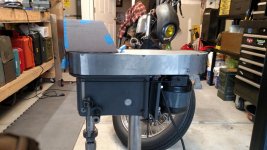
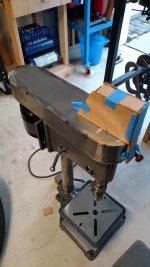
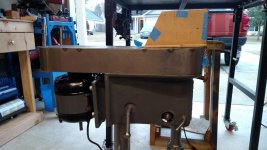
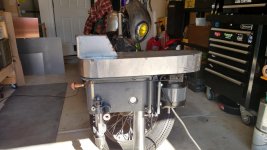
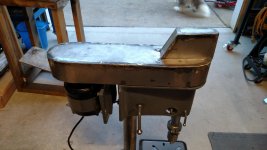
Oh sh*# I had forgotten to get you some info. Luckily I was just leaving my shop and popped back in. Hope this helps. b838fd446ab156d688d3ec0d43833185.jpge5cec69d1f9705c93ab38631a62e5ec4.jpge29bc46961e5ccc1c26b90236aae6c91.jpg7d0f94783955c9ebcf9b19e1ed1bd202.jpg2d0bb142e7e391ee396757d82afc8793.jpg86f03a499b0017d00f5d7e226aad14fe.jpg974c0cbe1a57db98c284babb422aca59.jpg

Note that with this cover it is necessary to lower the quill to allow it to open.
Sent from my SM-G900T using Tapatalk
 

Attachments

  • 86f03a499b0017d00f5d7e226aad14fe.jpg
    86f03a499b0017d00f5d7e226aad14fe.jpg
    72.7 KB · Views: 1
  • b838fd446ab156d688d3ec0d43833185.jpg
    b838fd446ab156d688d3ec0d43833185.jpg
    98.7 KB · Views: 1
  • e5cec69d1f9705c93ab38631a62e5ec4.jpg
    e5cec69d1f9705c93ab38631a62e5ec4.jpg
    68 KB · Views: 1
  • e29bc46961e5ccc1c26b90236aae6c91.jpg
    e29bc46961e5ccc1c26b90236aae6c91.jpg
    56.6 KB · Views: 1
  • 7d0f94783955c9ebcf9b19e1ed1bd202.jpg
    7d0f94783955c9ebcf9b19e1ed1bd202.jpg
    61.2 KB · Views: 1
  • 2d0bb142e7e391ee396757d82afc8793.jpg
    2d0bb142e7e391ee396757d82afc8793.jpg
    80.5 KB · Views: 1
  • 974c0cbe1a57db98c284babb422aca59.jpg
    974c0cbe1a57db98c284babb422aca59.jpg
    69.9 KB · Views: 4
To avoid these ads, REGISTER NOW!

ndfan6464

Well-known member
Joined
Jan 17, 2017
Messages
593
Location
All over
@Craptain. Man thanks buddy. These will definitely help. I actually wasn't to far off on the mohawk measurements. But looks like I was about a half inch off on the height of the lid base.. Thanks again buddy
 

ndfan6464

Well-known member
Joined
Jan 17, 2017
Messages
593
Location
All over
Well this is as far as I got today. After many of interruptions and some trial and errors this is were it stands. After seeing Craptain pictures I am about 1/2" short on the base. With out a my sandbags or English wheels to get the curve in the lid I'll have to figure something out to achieve the look or just settle for the edge.
 

Attachments

  • IMG_20170218_175654999.jpg
    IMG_20170218_175654999.jpg
    150.2 KB · Views: 63
  • IMG_20170218_175636984.jpg
    IMG_20170218_175636984.jpg
    147 KB · Views: 60
  • IMG_20170218_175628174.jpg
    IMG_20170218_175628174.jpg
    146.2 KB · Views: 60

rrich1

Well-known member
Joined
Oct 7, 2015
Messages
793
Well this is as far as I got today. After many of interruptions and some trial and errors this is were it stands. After seeing Craptain pictures I am about 1/2" short on the base. With out a my sandbags or English wheels to get the curve in the lid I'll have to figure something out to achieve the look or just settle for the edge.
Looks awesome! Good job so far.

Sent from my Pixel XL using Tapatalk
 

Craptain

Well-known member
Joined
Apr 18, 2013
Messages
4,027
Location
Tampa Bay FL
Re: The Classic Craftsman 100/150 Drill Press

nd. Your cover includes the motor which the original did not. I think yours is an improvement.

Sent from my SM-G900T using Tapatalk
 

Cruzan80

Well-known member
Joined
Jul 22, 2015
Messages
4,176
Location
Denver, CO
Actually, the original did include the motor (as mine does). Yours had been hacked off at some point, unfortunately.
 

Craptain

Well-known member
Joined
Apr 18, 2013
Messages
4,027
Location
Tampa Bay FL
Actually, the original did include the motor (as mine does). Yours had been hacked off at some point, unfortunately.
Good to know. In that case it was "hacked" off very well as it doesn't show.
Now I have to find an un-hacked one.

Sent from my SM-G900T using Tapatalk
 

ndfan6464

Well-known member
Joined
Jan 17, 2017
Messages
593
Location
All over
Good to know. In that case it was "hacked" off very well as it doesn't show.
Now I have to find an un-hacked one.

Sent from my SM-G900T using Tapatalk

Good luck finding one. Hard to find just like a spring.. Reason I am trying to recreate one along with a spring.
 

Cruzan80

Well-known member
Joined
Jul 22, 2015
Messages
4,176
Location
Denver, CO
The horizontal band that is screwed in on mine measures 3/4". The overall face is between 7/8 and 15/16". I knew there was a measurement I didn't send you. :)
 

ndfan6464

Well-known member
Joined
Jan 17, 2017
Messages
593
Location
All over
Well here is the lid. I had to submit to defeat when it came to the rounded edges. Without the proper anvils I couldn't get a roll that I was happy with. So I'll have to settle for edges, for now. All that's left is finish up the welds, primer then paint.
 

Attachments

  • IMG_20170220_102518308_HDR.jpg
    IMG_20170220_102518308_HDR.jpg
    147.4 KB · Views: 60
  • IMG_20170220_102526286_HDR.jpg
    IMG_20170220_102526286_HDR.jpg
    145.1 KB · Views: 57

bubinga

Well-known member
Joined
Jul 26, 2014
Messages
12,744
Location
Bridgeport Ohio. (Across River From Wheeling WV)
Well here is the lid. I had to submit to defeat when it came to the rounded edges. Without the proper anvils I couldn't get a roll that I was happy with. So I'll have to settle for edges, for now. All that's left is finish up the welds, primer then paint.
man, you are a heck of a good fabricator!!
I would have never attempted that.
You're going to have to come by, and help me make some dog-leg patches for the old 2002 Alero.........................LOL
Now, something like that, (I am not much of a welder) Do you just tack it, and fill and prime and paint, or will you weld the seams up solid.
You said the metal is 22 gauge, IIRC?
How thick is that in thousands roughly?
 

ndfan6464

Well-known member
Joined
Jan 17, 2017
Messages
593
Location
All over
man, you are a heck of a good fabricator!!
I would have never attempted that.
You're going to have to come by, and help me make some dog-leg patches for the old 2002 Alero.........................LOL
Now, something like that, (I am not much of a welder) Do you just tack it, and fill and prime and paint, or will you weld the seams up solid.
You said the metal is 22 gauge, IIRC?
How thick is that in thousands roughly?

If you live near me, SC, I could swing by. Lol. I welded it up solid after tacking it up. 22 gauge is 1/32 in inches 0.03125 in decimal format. It little harder to weld up when all I had to use was my MIG. Was really missing my TIG welder but got her done. I'll have it primed and painted tomorrow. I'll add the front strip tomorrow also. Just have to make 22 of the rectangle squares first..
 

Attachments

  • IMG_20170220_180100347.jpg
    IMG_20170220_180100347.jpg
    147.6 KB · Views: 47
  • IMG_20170220_180119367.jpg
    IMG_20170220_180119367.jpg
    141.1 KB · Views: 40
  • IMG_20170220_180104385.jpg
    IMG_20170220_180104385.jpg
    141.8 KB · Views: 47
Last edited:

ndfan6464

Well-known member
Joined
Jan 17, 2017
Messages
593
Location
All over
Beautiful!!
Maybe I'll drive to SC.................LOL
Looking Great.
LOL.............................Funny, I was googling 22 gauge, and I saw your answer in this post.
Thank You.
That is going to look great!

HAHAH I'll be here lol!! Thanks for complement. Couldn't have done it without Everyone helping me with tons of pictures and measurements.
 

rrich1

Well-known member
Joined
Oct 7, 2015
Messages
793
Re: The Classic Craftsman 100/150 Drill Press

That looks great. Good job. It is really coming together for you.

Sent from my Pixel XL using Tapatalk
 
To avoid these ads, REGISTER NOW!

rrich1

Well-known member
Joined
Oct 7, 2015
Messages
793
Re: The Classic Craftsman 100/150 Drill Press

So did it get up and running?
No. The switch I bought is too deep and I need to find a shorter one so that it does the touch the cardboard and metal shield. [emoji17]
Other than that the actual motor is back together and metal shield is on.
Sent from my Pixel XL using Tapatalk
 

RHJO51

Well-known member
Joined
Feb 27, 2015
Messages
242
Location
Red Hook, NY 12571
Hello All, I've been looking for craftsman floor model drill press for my basement workshop and I just acquired this one for a reasonable price. These are hard to come by in the Hudson Valley. Unfortunately the ID tag from the base is gone and I'd like to get an idea of the year, and the model. King Seely, gold/bronze color, I'm guessing mid-late 50's, model 100? Aside from the vari-slow, it also had this extra, smaller table, Anyone have any info on that?
 

Attachments

  • 013.jpg
    013.jpg
    143.2 KB · Views: 89
  • 014.jpg
    014.jpg
    144.4 KB · Views: 96
  • 012.jpg
    012.jpg
    137.8 KB · Views: 95
  • 016.jpg
    016.jpg
    143 KB · Views: 89
  • 017.jpg
    017.jpg
    140.1 KB · Views: 94
  • 020.jpg
    020.jpg
    148.1 KB · Views: 92
  • 021.jpg
    021.jpg
    143.4 KB · Views: 88
OP
F

FrankLee

Well-known member
Joined
Sep 13, 2010
Messages
3,554
Location
seMI, 48317
Hello All, I've been looking for craftsman floor model drill press for my basement workshop and I just acquired this one for a reasonable price. These are hard to come by in the Hudson Valley. Unfortunately the ID tag from the base is gone and I'd like to get an idea of the year, and the model. King Seely, gold/bronze color, I'm guessing mid-late 50's, model 100? Aside from the vari-slow, it also had this extra, smaller table, Anyone have any info on that?

Very nice!

The head frame lock and feed stop bracket are painted, and the paint on the head frame appears to be flaking off. It was repainted, so it's earlier than 1956. Because it has the safety collar on the chuck, it's later than 1952.

There may be a date code on the motor that may help, but I suspect that the motor is newer than the press.

The table may not be Craftsman, but is a nice add-on.
 
Last edited:

bubinga

Well-known member
Joined
Jul 26, 2014
Messages
12,744
Location
Bridgeport Ohio. (Across River From Wheeling WV)
Hello All, I've been looking for craftsman floor model drill press for my basement workshop and I just acquired this one for a reasonable price. These are hard to come by in the Hudson Valley. Unfortunately the ID tag from the base is gone and I'd like to get an idea of the year, and the model. King Seely, gold/bronze color, I'm guessing mid-late 50's, model 100? Aside from the vari-slow, it also had this extra, smaller table, Anyone have any info on that?

Very nice!

The head frame lock and feed stop bracket are painted, and the paint on the head frame appears to be flaking off. It was repainted, so it's earlier than 1956. Because it has the safety collar on the chuck, it's later than 1952.

There may be a date code on the motor that may help, but I suspect that the motor is newer than the press.

The table may not be Craftsman, but is a nice add-on.
Nice, especially with the "vari-slow".
Cool looking old switch on the side too.:pimpflash I've something like that on my band-saw.
 
OP
F

FrankLee

Well-known member
Joined
Sep 13, 2010
Messages
3,554
Location
seMI, 48317
Hello All, I've been looking for craftsman floor model drill press for my basement workshop and I just acquired this one for a reasonable price. These are hard to come by in the Hudson Valley. Unfortunately the ID tag from the base is gone and I'd like to get an idea of the year, and the model. King Seely, gold/bronze color, I'm guessing mid-late 50's, model 100? Aside from the vari-slow, it also had this extra, smaller table, Anyone have any info on that?

Very nice!

The head frame lock and feed stop bracket are painted, and the paint on the head frame appears to be flaking off. It was repainted, so it's earlier than 1956. Because it has the safety collar on the chuck, it's later than 1952.

There may be a date code on the motor that may help, but I suspect that the motor is newer than the press.

The table may not be Craftsman, but is a nice add-on.

I just noticed the non-tilting table. On a 100, that suggests 1956 to '58.


The smaller table looks like a Delta.

16755-B.jpg
 
Last edited:

ndfan6464

Well-known member
Joined
Jan 17, 2017
Messages
593
Location
All over
OK super stupid question and I am sure I am going to kick myself for asking but in the picture, the screw my finger is pointing at, is that a tension screw to keep the motor in place once set? So set the right height and tension of the belt and motor then screw the screw in till it touches bottom? I'd rather ask them assume.
 

Attachments

  • IMG_20170221_133111584.jpg
    IMG_20170221_133111584.jpg
    144.5 KB · Views: 58

rrich1

Well-known member
Joined
Oct 7, 2015
Messages
793
Re: The Classic Craftsman 100/150 Drill Press

Here is my motor after we finished last night. Need to get a different switch and wire it up. Apparently I was only ocd enough to align my bolts on one side and not the other. Lol f5d633f299d126309495bba04948dd99.jpg96ee034acabfc916073e48404dad6764.jpgcb4161cd8c7c83ce889982215aa5a3f1.jpg

Sent from my Pixel XL using Tapatalk
 

Attachments

  • f5d633f299d126309495bba04948dd99.jpg
    f5d633f299d126309495bba04948dd99.jpg
    109.9 KB · Views: 6
  • 96ee034acabfc916073e48404dad6764.jpg
    96ee034acabfc916073e48404dad6764.jpg
    102.2 KB · Views: 4
  • cb4161cd8c7c83ce889982215aa5a3f1.jpg
    cb4161cd8c7c83ce889982215aa5a3f1.jpg
    89.8 KB · Views: 6

RHJO51

Well-known member
Joined
Feb 27, 2015
Messages
242
Location
Red Hook, NY 12571
I just noticed the non-tilting table. On a 100, that suggests 1956 to '58.

The smaller table looks like a Delta.

16755-B.jpg

Well I'll be - Frank was right again. Looks like the DP was painted the gold color and nice job they did. But it is grey underneath. Now if I could just get the gold off and leave the original grey...

This is a nice DP and in really good shape. Quiet and smooth. The vari-slow works great too but needs better alignment. I redid the vari-slow on my 150 DP and I really like them. The table on this doesn't have a mark on it other than dirt and grime. They took the step pulley off the motor but I guess that's OK with the vari-slow although I'll either find a pulley, or put a single on there that's the correct dimension. I think Frank is also correct that the extra table is a Delta - it has the DP number on it like Delta parts do. Might be a good table to hang a vintage craftsman grinder on.

I was looking for a 150 bench top DP awhile ago and I found one, but it was shot and not worth restoring. However I have the base and column from it so I might use this head, table, vari-slow, etc and put it on the bench top base and column. We'll see. Thanks for the help as always - Jim
 

Attachments

  • 025.jpg
    025.jpg
    141.8 KB · Views: 33
  • 024.jpg
    024.jpg
    145.9 KB · Views: 41
  • 023.jpg
    023.jpg
    145.5 KB · Views: 36
  • 026.jpg
    026.jpg
    145.7 KB · Views: 30
OP
F

FrankLee

Well-known member
Joined
Sep 13, 2010
Messages
3,554
Location
seMI, 48317
Well I'll be - Frank was right again. Looks like the DP was painted the gold color and nice job they did. But it is grey underneath. Now if I could just get the gold off and leave the original grey...

This is a nice DP and in really good shape. Quiet and smooth. The vari-slow works great too but needs better alignment. I redid the vari-slow on my 150 DP and I really like them. The table on this doesn't have a mark on it other than dirt and grime. They took the step pulley off the motor but I guess that's OK with the vari-slow although I'll either find a pulley, or put a single on there that's the correct dimension. I think Frank is also correct that the extra table is a Delta - it has the DP number on it like Delta parts do. Might be a good table to hang a vintage craftsman grinder on.

I was looking for a 150 bench top DP awhile ago and I found one, but it was shot and not worth restoring. However I have the base and column from it so I might use this head, table, vari-slow, etc and put it on the bench top base and column. We'll see. Thanks for the help as always - Jim

Did you find a date on the motor information plate?
 

ckadams00

Well-known member
Joined
Sep 12, 2011
Messages
1,273
Location
Seattle, WA

ndfan6464

Well-known member
Joined
Jan 17, 2017
Messages
593
Location
All over
I have 6 of these decals left. Free of charge and free shipping. If anyone still needs one PM with a subject line: Craftsman Decal and leave your mailing address.

For the members who reserved ones already, they are shipped. I sent you a PM letting you know.
 

Attachments

  • andrew-standiford_sheet01_proof.jpg
    andrew-standiford_sheet01_proof.jpg
    152.5 KB · Views: 49
OP
F

FrankLee

Well-known member
Joined
Sep 13, 2010
Messages
3,554
Location
seMI, 48317
Very nice!

The head frame lock and feed stop bracket are painted, and the paint on the head frame appears to be flaking off. It was repainted, so it's earlier than 1956. Because it has the safety collar on the chuck, it's later than 1952.

There may be a date code on the motor that may help, but I suspect that the motor is newer than the press.

The table may not be Craftsman, but is a nice add-on.

I just noticed the non-tilting table. On a 100, that suggests 1956 to '58.

The smaller table looks like a Delta.

I checked the motor plate and it said model 115.19780 and it was stamped 5 58 . so I'm guessing the motor is from 1958. Could that be the original motor for this DP? Thank you.

Based on the original gray color and the non-tilt table, I'm going to stay with my second guess of 1956. So no, I don't think that's the original motor.

I believe 1957 was Craftsman's anniversary year when they started using the power bronze color.
 

Trey T

Well-known member
Joined
Aug 3, 2011
Messages
3,749
Location
Houston, TX
Hello All, I've been looking for craftsman floor model drill press for my basement workshop and I just acquired this one for a reasonable price. These are hard to come by in the Hudson Valley. Unfortunately the ID tag from the base is gone and I'd like to get an idea of the year, and the model. King Seely, gold/bronze color, I'm guessing mid-late 50's, model 100? Aside from the vari-slow, it also had this extra, smaller table, Anyone have any info on that?
not one DP w/ varislow but TWO!!!!! That is easy to come by in Hudson Valley, my friend .... I lurk on CL at least twice a week for those DP for the last several yrs but it's so dry here Houston
 

Cruzan80

Well-known member
Joined
Jul 22, 2015
Messages
4,176
Location
Denver, CO
Hey, I think I have a lathe column laying around here somewhere. May have to steal this idea to give my 103.0303 a little more height. Then I can really justify letting the floor DP220 go.
 

bubinga

Well-known member
Joined
Jul 26, 2014
Messages
12,744
Location
Bridgeport Ohio. (Across River From Wheeling WV)
I finally made some progress on #27. This is the smaller 13-1/2" ball bearing Craftsman 80 drill press I picked up a couple weeks ago. Most parts are cleaned, new quill bearings are installed, and it's going back together.


Over the past few years, I've picked up parts from various older Craftsman machines. One of the parts is the tubular bed from a Craftsman wood lathe. The OD of the lathe tube is 2-1/4"; the same diameter as the 2-1/4" column from the Craftsman 80 drill press.

I drilled out the rivets from the spline attached to the tubular lathe bed and cleaned the tube. It works perfectly for the column on the drill press! The original dp column height is 28-1/2". The lathe tube height is 48-1/4". It's not quite tall enough as a floor standing drill press, but who can't use a few more inches?

The photo on the left shows the head frame at 28-1/2" high. The photo on the right shows the head frame at 48-1/4" high with the original column to the right.


Hey, I think I have a lathe column laying around here somewhere. May have to steal this idea to give my 103.0303 a little more height. Then I can really justify letting the floor DP220 go.
Good Idea.
My HF bench is a tall bench top, something like that.
 
To avoid these ads, REGISTER NOW!
Top Bottom