To avoid these ads, REGISTER NOW!

Craftsman Drill Press

OP
F

FrankLee

Well-known member
Joined
Sep 13, 2010
Messages
3,547
Location
seMI, 48317
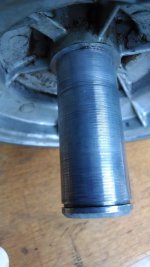
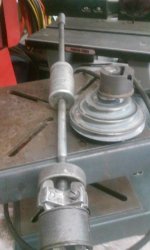
So here's an observation - compared with picture #10 from your link, looks like someone changed the bearing (?) and put two spacers to keep the pulley up, however the spacers are not keeping the pulley high enough. I assume now I need to figure out where to get more spacers.

I agree. Here are my observations.

Your sleeve bearing is either worn down, pressed down too far, a previous owner replaced it with a shorter version, and/or the splined sleeve was not pressed up enough to be fully seated into the pulley. That's why there's vertical play when you lift the pulley. The sleeve bearing should stick up from the head frame casting. The inside ring surface in the pulley should ride on the end surface of the sleeve bearing. Is that a steel washer pressed into the pulley?

Maybe the previous owner pressed the sleeve bearing too far into the head frame casting. Check from inside.

http://vintagemachinery.org/pubs/222/4727.pdf

You may want to verify whether the steel washer (26714) and snap ring ((26811)are present at the bottom of the splined sleeve (26617).
 
To avoid these ads, REGISTER NOW!

RHJO51

Well-known member
Joined
Feb 27, 2015
Messages
242
Location
Red Hook, NY 12571
Thanks guys! This one doesn't pivot front to back, but up and down on an angle very easily. JB Weld and drill it is! Plus new belts, which thanks for the part numbers too!

I did that JB Weld and drill/ream on two of these Vari-slow rigs and it worked great. I've had no issues with the JB Weld. Good luck!
 

Plombob

Well-known member
Joined
Oct 19, 2008
Messages
4,116
Location
Tennessee
I thought you guys would be interested in the restoration of a DP I bought a couple of years ago. Our member Zeet did the work and it came out great. I posted a review in the Vendor section because Zeet does machinery restorations for a living. Here's the link and a tease.

https://www.garagejournal.com/forum/showthread.php?t=391200

View media item 83137
It's so purty I might not be able to use it! :(
 

paulm12

Well-known member
Joined
Apr 29, 2015
Messages
584
Location
NW Chicago 'burbs
I am ordering the spindle bearings today for my recent 103.23640. I have it apart down to sub-assemblies so far. I forgot to take a picture of the inner bearing. I assume is the same as the outer bearing? And any ideas why the original schematic shows the inner bearing as part of the spindle assembly? and it doesn't therefore list a part number for that bearing? Just wondering.

Thanks all, and thanks a bunch Frank for this thread. Disassembly was easy following the steps and comments. Especially that hidden screw on the spindle pulley.
 
OP
F

FrankLee

Well-known member
Joined
Sep 13, 2010
Messages
3,547
Location
seMI, 48317
I am ordering the spindle bearings today for my recent 103.23640. I have it apart down to sub-assemblies so far. I forgot to take a picture of the inner bearing. I assume is the same as the outer bearing? And any ideas why the original schematic shows the inner bearing as part of the spindle assembly? and it doesn't therefore list a part number for that bearing? Just wondering.

Thanks all, and thanks a bunch Frank for this thread. Disassembly was easy following the steps and comments. Especially that hidden screw on the spindle pulley.

You're very welcome!

Yes, both the upper and lower spindle pulley bearings are the same part number.

I would verify that the old bearing inner race did not spin and damage the spindle pulley shaft. If it did, you may consider an extended inner race bearing.
Check this post by Cjmac and several posts following:
https://www.garagejournal.com/forum/showthread.php?p=7096809#post7096809
 
Last edited:
OP
F

FrankLee

Well-known member
Joined
Sep 13, 2010
Messages
3,547
Location
seMI, 48317
I thought you guys would be interested in the restoration of a DP I bought a couple of years ago. Our member Zeet did the work and it came out great. I posted a review in the Vendor section because Zeet does machinery restorations for a living. Here's the link and a tease.

https://www.garagejournal.com/forum/showthread.php?t=391200

It's so purty I might not be able to use it! :(

That is beautiful work!


Many times original paint cannot be saved, but I like original paint so much that I'm kinda going somewhat in the opposite direction. I believe I'm going to be swapping the base, column, and table from dp#41, rust, paint drips and all, into the head frame, etc., from my dp#15 (background).

 
Last edited:

paulm12

Well-known member
Joined
Apr 29, 2015
Messages
584
Location
NW Chicago 'burbs
You're very welcome!

Yes, both the upper and lower spindle pulley bearings are the same part number.

I would verify that the old bearing inner race did not spin and damage the spindle pulley shaft. If it did, you may consider an extended inner race bearing.
Check this post by Cjmac and several posts following:
https://www.garagejournal.com/forum/showthread.php?p=7096809#post7096809

Frank: yep. read through that thread too. So much useful info here. Thanks again.
.
 

lafester

Well-known member
Joined
Mar 1, 2017
Messages
2,191
Location
Northern CO
That is beautiful work!


Many times original paint cannot be saved, but I like original paint so much that I'm kinda going somewhat in the opposite direction. I believe I'm going to be swapping the base, column, and table from dp#42, rust, paint drips and all, into the head frame, etc., from my dp#15 (background).

Original is the way to go unless it's bronze.
Currently stripping my bronze/gold pedestal and I'm really liking the naked look as well.

Only way I would keep bronze is if it was in very good condition.

Sent from my moto x4 using Tapatalk
 

lafester

Well-known member
Joined
Mar 1, 2017
Messages
2,191
Location
Northern CO
Original is the way to go unless it's bronze.
Currently stripping my bronze/gold pedestal and I'm really liking the naked look as well.

Only way I would keep bronze is if it was in very good condition.

Sent from my moto x4 using Tapatalk

Wouldn't let me add a pic.

IMG_20180521_134811658.jpeg

These picture issues are driving me nuts.
 
Last edited:

Rushton

Well-known member
Joined
Dec 27, 2016
Messages
55
Location
Richmond, VA
FrankLee, what are the dimensions of the rectangular plywood base you have under the Model 100 Drill Press in your picture below? It looks to be just about right for the base I should build under my Model 150 to deal with a non-level floor and give the DP a more stable platform.

 
OP
F

FrankLee

Well-known member
Joined
Sep 13, 2010
Messages
3,547
Location
seMI, 48317
FrankLee, what are the dimensions of the rectangular plywood base you have under the Model 100 Drill Press in your picture below? It looks to be just about right for the base I should build under my Model 150 to deal with a non-level floor and give the DP a more stable platform.

Those are 22" x 29.75". More info on those here.
 

paulm12

Well-known member
Joined
Apr 29, 2015
Messages
584
Location
NW Chicago 'burbs
Frank: here is the spindle shaft. Seems ok, picture looks worse than it feels. The first bearing I used a puller with a nut over the end of the shaft, it didn't take much force at all to slide it. Then I was able to pull off the bottom bearing by hand, not real easy, but it came off. I will clean up the shaft with some steel wool or very fine paper, just enough to slide on the new bearings easily.

New bearings are on order from Accurate Bearings.

Thanks
.
 

Attachments

  • IMG_20180521_153434519.jpg
    IMG_20180521_153434519.jpg
    67.6 KB · Views: 19
  • IMG_20180521_153441913.jpg
    IMG_20180521_153441913.jpg
    58.5 KB · Views: 20
OP
F

FrankLee

Well-known member
Joined
Sep 13, 2010
Messages
3,547
Location
seMI, 48317
Frank: here is the spindle shaft. Seems ok, picture looks worse than it feels. The first bearing I used a puller with a nut over the end of the shaft, it didn't take much force at all to slide it. Then I was able to pull off the bottom bearing by hand, not real easy, but it came off. I will clean up the shaft with some steel wool or very fine paper, just enough to slide on the new bearings easily.

New bearings are on order from Accurate Bearings.

Thanks
.

Yep, that looks pretty good.
 

Smokeshow69

Well-known member
Joined
Dec 7, 2012
Messages
8,366
Location
Pacific Northwest
Started working on a bench top model I got from Oregonrockcrusher! It was pretty ratty looking but so far is cleaning up well! It was pretty rusty and had not received any love for years but only because all the machines he has are of the highest caliber and all are fully restored vintage examples! He graciously let me get my paws on this one[emoji5] I already have a nice original crowntop 150 model so I am giving this one to my brother. So far, all the rust has been removed to reveal nice parts that just needed some elbow grease. I am not repainting it as I don’t have the time right now and since all the other chrome and metal is not perfect, if I painted it, they would look even worse. I removed the light and switch and degreaser it! The original paint actually came out very presentable given what it did look like.
IMG_0036.jpg
IMG_0037.jpg
IMG_0038.jpg
IMG_0039.jpg
IMG_0042.jpg

After degreaser and hot water with dish soap
IMG_0045.jpg
IMG_0046.jpg


Sent from my iPhone using The Garage Journal mobile app
 
Last edited:

Smokeshow69

Well-known member
Joined
Dec 7, 2012
Messages
8,366
Location
Pacific Northwest
Re: The Classic Craftsman 100/150 Drill Press

Picture of the column before the craftsman block grinder
IMG_0025.jpg
IMG_0026.jpg

Clamped in the smooth jaw vice for work
IMG_0029.jpg

After
IMG_0031.jpg

What do you use to remove the column foot plug bolt ? Why a rhft craftsman ratchet and a craftsman long c 8 point socket!
IMG_0030.jpg
Feed stop is clean but the nut was not cleaned yet. You can see how much surface rust was on this thing
IMG_0032.jpg


Sent from my iPhone using The Garage Journal mobile app
 

lafester

Well-known member
Joined
Mar 1, 2017
Messages
2,191
Location
Northern CO
Re: The Classic Craftsman 100/150 Drill Press

Picture of the column before the craftsman block grinder
IMG_0025.jpg
IMG_0026.jpg

Clamped in the smooth jaw vice for work
IMG_0029.jpg

After
IMG_0031.jpg

What do you use to remove the column foot plug bolt ? Why a rhft craftsman ratchet and a craftsman long c 8 point socket!
IMG_0030.jpg
Feed stop is clean but the nut was not cleaned yet. You can see how much surface rust was on this thing
IMG_0032.jpg


Sent from my iPhone using The Garage Journal mobile app
Looking better already! I thought it was bronze at first lol.

If you feel like selling that collar I've been looking for one. Couldn't tell if you have both lock nuts but I have a spare that needs a home.

Sent from my moto x4 using Tapatalk
 

Smokeshow69

Well-known member
Joined
Dec 7, 2012
Messages
8,366
Location
Pacific Northwest
Re: The Classic Craftsman 100/150 Drill Press

Looking better already! I thought it was bronze at first lol.

If you feel like selling that collar I've been looking for one. Couldn't tell if you have both lock nuts but I have a spare that needs a home.

Sent from my moto x4 using Tapatalk


Thanks but I want to keep the collar with the machine [emoji51]


Sent from my iPhone using The Garage Journal mobile app
 
To avoid these ads, REGISTER NOW!

Smokeshow69

Well-known member
Joined
Dec 7, 2012
Messages
8,366
Location
Pacific Northwest
Re: The Classic Craftsman 100/150 Drill Press

I was able to get both table tops and the column waxed and set into place tonight. Hard to believe it is the same machine!
IMG_0052.jpg

Picture of the wax I used and the lube I am using on all the nut inserts on this machine
IMG_0053.jpg
Also pictured is my drill with a wire wheel chucked up in it. That thing has been a lifesaver especially with the small places a larger wheel can’t get to


Sent from my iPhone using The Garage Journal mobile app
 

Rileysan

Well-known member
Joined
Sep 11, 2015
Messages
4,298
Location
Milwaukie, Oregon
I'd like to thank Smokeshow for pointing me in the direction of this Craftsman model 103.23130 bench top drill press. I happily gave the man $100 for it. It has been very well cared for and so far the only thing wrong I have found is a worn bushing on the middle pulley. It has been really well cared for!

Are the stamped numbers on the date of manufacture? It says "J3 48".

My Craftsman X-Y vise looks really good on it. I got that as a resuof Smokeshow playing a prank on me a few months ago 😀
Brian
 

Attachments

  • 0522180942.jpg
    0522180942.jpg
    59.2 KB · Views: 60
  • 0522180949.jpg
    0522180949.jpg
    67.3 KB · Views: 56
  • 0522180946.jpg
    0522180946.jpg
    62.3 KB · Views: 59
  • 0522180958.jpg
    0522180958.jpg
    58.3 KB · Views: 54
  • 0522181027.jpg
    0522181027.jpg
    65.3 KB · Views: 51
  • IMG950033.jpg
    IMG950033.jpg
    68.3 KB · Views: 51

sheltonfilms

Well-known member
Joined
May 28, 2014
Messages
157
I'd like to thank Smokeshow for pointing me in the direction of this Craftsman model 103.23130 bench top drill press. I happily gave the man $100 for it. It has been very well cared for and so far the only thing wrong I have found is a worn bushing on the middle pulley. It has been really well cared for!


Are the stamped numbers on the date of manufacture? It says "J3 48".


My Craftsman X-Y vise looks really good on it. I got that as a resuof Smokeshow playing a prank on me a few months ago [emoji3]

Brian


Are you talking about the sleeve that you pulled out with the bearing puller/slide hammer? That shouldn’t be worn at all. Slack is taken up by the set screw that comes out at an angle from the main plug of the pulley assembly. If the main plug is spinning in the sleeve, then it isn’t tightened down enough.


Sent from my iPhone using Tapatalk
 
OP
F

FrankLee

Well-known member
Joined
Sep 13, 2010
Messages
3,547
Location
seMI, 48317
I'd like to thank Smokeshow for pointing me in the direction of this Craftsman model 103.23130 bench top drill press. I happily gave the man $100 for it. It has been very well cared for and so far the only thing wrong I have found is a worn bushing on the middle pulley. It has been really well cared for!

Are the stamped numbers on the date of manufacture? It says "J3 48".

My Craftsman X-Y vise looks really good on it. I got that as a resuof Smokeshow playing a prank on me a few months ago ��
Brian

Are you talking about the sleeve that you pulled out with the bearing puller/slide hammer? That shouldn’t be worn at all. Slack is taken up by the set screw that comes out at an angle from the main plug of the pulley assembly. If the main plug is spinning in the sleeve, then it isn’t tightened down enough.

That is a beauty!

Yes, that is a date code. I'm not sure how to decipher the first two digits, but the second group is the year. Perhaps "J" is the month (October), and 3 is the week of the month. I dunno.

I'm very curious about the bushing wear also. Please elaborate. You shouldn't really need a puller on that sleeve unless the column is upside-down and the sleeve was jammed into the too-small end. That was the case on my dp#1.
 

Smokeshow69

Well-known member
Joined
Dec 7, 2012
Messages
8,366
Location
Pacific Northwest
I'd like to thank Smokeshow for pointing me in the direction of this Craftsman model 103.23130 bench top drill press. I happily gave the man $100 for it. It has been very well cared for and so far the only thing wrong I have found is a worn bushing on the middle pulley. It has been really well cared for!


Are the stamped numbers on the date of manufacture? It says "J3 48".


My Craftsman X-Y vise looks really good on it. I got that as a resuof Smokeshow playing a prank on me a few months ago [emoji3]

Brian


When I pointed this out to you I had no clue it had the 3rd pulley. You ****! I can’t think of a better home for it to go to!


Sent from my iPhone using The Garage Journal mobile app
 

Rileysan

Well-known member
Joined
Sep 11, 2015
Messages
4,298
Location
Milwaukie, Oregon
That is a beauty!

Yes, that is a date code. I'm not sure how to decipher the first two digits, but the second group is the year. Perhaps "J" is the month (October), and 3 is the week of the month. I dunno.

I'm very curious about the bushing wear also. Please elaborate. You shouldn't really need a puller on that sleeve unless the column is upside-down and the sleeve was jammed into the too-small end. That was the case on my dp#1.

I wasn't sure how tightly that bushing was in place, so a little gentle persuasion with a Plomb slide hammer made short work of it.

When I first started the dp, I heard dry bearings. When I looked towards the center pully, it was rocking back and forth. After pulling the assembly, I could clearly see wear on both the bushing and the shaft. There's easily.030" play in the assembly. However, you gave me an idea. The bushing can be turned over by removing the snap ring and placing it on the other side.

Brian
 

Attachments

  • 0522181250.jpg
    0522181250.jpg
    45.3 KB · Views: 30
  • 0522181253.jpg
    0522181253.jpg
    42.1 KB · Views: 28

sheltonfilms

Well-known member
Joined
May 28, 2014
Messages
157
I wasn't sure how tightly that bushing was in place, so a little gentle persuasion with a Plomb slide hammer made short work of it.


When I first started the dp, I heard dry bearings. When I looked towards the center pully, it was rocking back and forth. After pulling the assembly, I could clearly see wear on both the bushing and the shaft. There's easily.030" play in the assembly. However, you gave me an idea. The bushing can be turned over by removing the snap ring and placing it on the other side.


Brian


If you only have one snap ring then that is your problem. Should be one on both ends. Frank was able to recreate them using 14 gauge bike spokes.

https://www.garagejournal.com/forum/showthread.php?p=4870269&post4870269


Sent from my iPhone using Tapatalk
 

Rileysan

Well-known member
Joined
Sep 11, 2015
Messages
4,298
Location
Milwaukie, Oregon
If you only have one snap ring then that is your problem. Should be one on both ends. Frank was able to recreate them using 14 gauge bike spokes.

https://www.garagejournal.com/forum/showthread.php?p=4870269&post4870269


Sent from my iPhone using Tapatalk

I worked on it this morning and honestly can't see how two snap rings would work. The housing is too narrow to allow the bushing to slip into the housing with one on the bottom and top. In fact, the one snap ring at the top acts as a stop to keep it in place.

To each his own, they say. I flipped over the bushing and moved the snap ring to the opposite end then added shims to the outside of the bushing as I slid it into place. I also replaced the bearings and reassembled it. The wobble is gone and it runs smoothly.

Brian
 

Attachments

  • 0524181214.jpg
    0524181214.jpg
    61.7 KB · Views: 30
Last edited:

sheltonfilms

Well-known member
Joined
May 28, 2014
Messages
157
I worked on it this morning and honestly can't see how two snap rings would work. The housing is too narrow to allow the bushing to slip into the housing with one on the bottom and top. In fact, the one snap ring at the top acts as a stop to keep it in place.

To each his own, they say. I flipped over the bushing and moved the snap ring to the opposite end then added shims to the outside of the bushing as I slid it into place. I also replaced the bearings and reassembled it. The wobble is gone and it runs smoothly.

Brian


Measure the ID of the column. If you have a 2 3/8” ID then get rid of the snap ring altogether. The snap rings are there for 2 1/2” ID columns on later models.

Again make sure you are using the right end of the column. The right side will have a machined inner bore and will have almost a shelf so the plug won’t fall in.


Sent from my iPhone using Tapatalk
 

Rileysan

Well-known member
Joined
Sep 11, 2015
Messages
4,298
Location
Milwaukie, Oregon
Measure the ID of the column. If you have a 2 3/8” ID then get rid of the snap ring altogether. The snap rings are there for 2 1/2” ID columns on later models.

Again make sure you are using the right end of the column. The right side will have a machined inner bore and will have almost a shelf so the plug won’t fall in.


Sent from my iPhone using Tapatalk

Thanks for the new information! The thread is too big for me to have gleaned all that .

The tube is in the correct orientation and it's the smaller diameter tube. I'll remove the snap ring.

Brian
 

Smokeshow69

Well-known member
Joined
Dec 7, 2012
Messages
8,366
Location
Pacific Northwest
Thanks for the new information! The thread is too big for me to have gleaned all that .


The tube is in the correct orientation and it's the smaller diameter tube. I'll remove the snap ring.


Brian


You just need to spend time to read the thread [emoji16] franklee has done a fantastic job with it. If you go to the first page he has posted links in an index fashion which are a great for quick reference!


Sent from my iPhone using The Garage Journal mobile app
 

Rileysan

Well-known member
Joined
Sep 11, 2015
Messages
4,298
Location
Milwaukie, Oregon
You just need to spend time to read the thread [emoji16] franklee has done a fantastic job with it. If you go to the first page he has posted links in an index fashion which are a great for quick reference!


Sent from my iPhone using The Garage Journal mobile app

One of these days I'll fix my PC and get back into GJ full force. Until that time, I'm stuck with my phone's browser
 

rshub

Member
Joined
May 23, 2018
Messages
8
Location
T.O.
Hey guys - thrilled I found this thread. Got this Craftsman 150 with the Vari Slo attachment from my grandfather who passed away several years ago. He kept it in great shape and it still works really well. Going to clean it up and check all moving parts and all your past advice is extremely helpful! Funny thing - I always thought the Vari Slo was seized because I could never get it to move until I read your posts and discovered the DP needs to be running to adjust it. Tried it last night and it works perfectly!
 

Attachments

  • IMG_3445.jpg
    IMG_3445.jpg
    104 KB · Views: 56
  • IMG_3444.jpg
    IMG_3444.jpg
    103.4 KB · Views: 55
OP
F

FrankLee

Well-known member
Joined
Sep 13, 2010
Messages
3,547
Location
seMI, 48317
Hey guys - thrilled I found this thread. Got this Craftsman 150 with the Vari Slo attachment from my grandfather who passed away several years ago. He kept it in great shape and it still works really well. Going to clean it up and check all moving parts and all your past advice is extremely helpful! Funny thing - I always thought the Vari Slo was seized because I could never get it to move until I read your posts and discovered the DP needs to be running to adjust it. Tried it last night and it works perfectly!

Welcome to The Garage Journal and welcome to the Craftsman Drill Press thread! I'm always pleased to see new members' first posts here.

That is a very nice looking machine and I always like the family history.

I hope you stick around here and elsewhere on the forum. I'm looking forward to your updates and progress on the drill press.
 

Smokeshow69

Well-known member
Joined
Dec 7, 2012
Messages
8,366
Location
Pacific Northwest
Hey guys - thrilled I found this thread. Got this Craftsman 150 with the Vari Slo attachment from my grandfather who passed away several years ago. He kept it in great shape and it still works really well. Going to clean it up and check all moving parts and all your past advice is extremely helpful! Funny thing - I always thought the Vari Slo was seized because I could never get it to move until I read your posts and discovered the DP needs to be running to adjust it. Tried it last night and it works perfectly!


Congrats on the family heirloom! Thank goodness you did not break the varislow assembly by trying to move it while it was not running. They are too easy to break that way. Keep us posted with pictures[emoji16]


Sent from my iPhone using The Garage Journal mobile app
 
To avoid these ads, REGISTER NOW!
Top Bottom