MSC has all kinds and sizes of knobs in its catalog.
Thanks for that heads up. They definitely have some interesting knobs I am going to consider.
I haven't been able to update for a few days as real world work has interfered. Nonetheless, I have managed to work a bit of time into my schedule for my drill press. I also made time to read through every page and post of this thread which was a herculean task unto itself!
First of all, I want to thank Frank for starting this thread. The data he and other contributors have shared and made available is invaluable. I also want to thank him for helping me get my chuck issues resolved as well. I received a new thrust collar and had it fitted within five minutes. Works like a charm now.
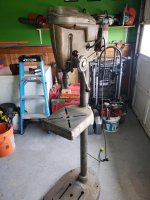
Sadly, I have encountered other issues with my press. This is my first major tool restoration so please excuse any missteps I may make or any heresy's I may commit along the way. Upon first getting this drill press, my hope had been to make it look and function as good as brand new. Well, things go along and reality sets in. Under ideal circumstances, I should of passed on buying this one, but they are a rare bird in this area so ya take what ya can get. Maybe somewhere down the road something else will come on the market and I can trade up. Ultimately though, as I saw Fred comment in here somewhere, I'm not making a museum piece, this will be a working press and I bought it to use, not to flip or look pretty in the corner of the garage.
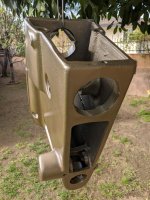
Along with my chuck being messed up (now fixed), and my feed handles being broken (easily replaced), I am sad to report that my column and base are pretty much jacked. The base clearly had been sitting in some water for a long time as the cast iron is VERY pitted in many places. I have been unsuccessful in separating the column from the base using any means I have access to. I've soaked it for days (inside and out) with penetrating oil, used a BFH, used a 2 x 4, used heat, tried twisting it. All to no avail. On top of that, at some point prior to my owning it, the base somehow got cracked about 4-5” near the bolster that supports the column. It even extends to the casting fins on the underside. The base has also been monkeyed with at some point as about half of the raised edges where the mounting bolts go through have been ground off. Likely to level it on an uneven floor. If this all weren't bad enough, the bottom of the column had been mushroomed a bit keeping the column wedged on as well. Now honestly, I can deal with all this...I've been able to clean the rust on the base up for the most part, I can have the crack brazed at some point if I feel it is causing a problem, and I can live with not being able to get the column out even though it's a pain, and I can figure out a way to shim it if need be. I think that I will probably be keeping an eye out for a new base or donor machine if I can find one in my area at a reasonable price.
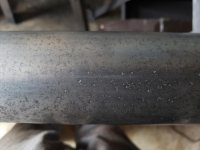
Which brings me to another point. The column had rusted so much that a goodly chunk of it is deeply pitted. I've gotten the worst of it off, but no matter what I do, it's not going to be all nice and sparkly like some I see. It's going to look like a gray and silver leopard. I've been working it over with 220 grit, and am going to hit it some more with 500 grit to see where I'm at. What grit does everyone else go down to when polishing these things? Since I can't get it off the base, obviously I've been doing most of it by hand which is a long and arduous procedure. There again, this is something I can live with, and I don't think it's functionally problematic, it's just disappointing. As with the base, maybe I can find another donor drill press locally and I can just swap them out.
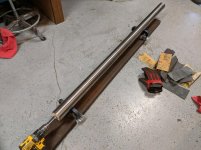
I also discovered that at some point, someone tried to take the quill out by hitting the top of it with a punch or something. This would explain why I had a hell of a time trying to get it out of the head. The punch marks can be seen along the rim, and there was an ever so slight bit of mushrooming to the quill which made it quite difficult to get out, and impossible to put back in. So I popped it in the vice and with a fine file carefully smoothed out the mushrooming, followed with some intensive buffing to eliminate the file marks. It slides back in the head nicely now.
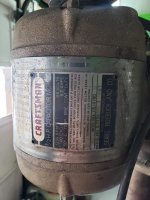
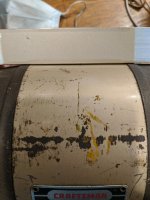
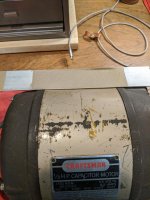
I have also started dismantling the motor. While it runs fine, the cord really needed to be replaced and as I suspected, mud daubers have been inside. The pulley came off just as slick as you please. The case needs painting and the cover band is severely rusted. I'm just going to clean that up and paint it with some of the “chrome” type paint and see how it turns out. I'll also go ahead and touch up the wiring with shrink wrap.
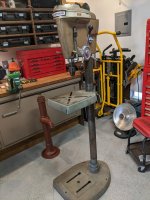
As for the rest of the cast iron, I've now got everything cleaned, and taped up, ready to paint. Weather should cooperate tomorrow, but It's really going to hinge on whether my paint arrives or not. I decided to go with the Rustoleum “Deep Slate” paint. I was unhappy with anything I could find locally, so I had to order this specially. It really *****, because the paint itself was only like $5, but Menards (the cheapest place I could find it) hit me for $15 in shipping and taxes. For that kind of money I might as well have gone to my local paint house and had a color custom made which matches the original.
With any luck, my new quill bearings should be arriving soon, and hopefully I can start reassembly within the week.


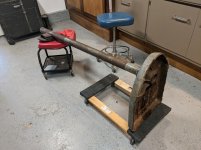
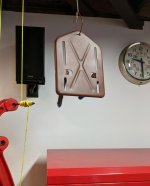
 here's a shot at the handles I got. They come in several different dimensions.