To avoid these ads, REGISTER NOW!

Craftsman Drill Press

lafester

Well-known member
Joined
Mar 1, 2017
Messages
2,191
Location
Northern CO
Re: Craftsman #6604 Grinder

I just picked up its big brother, and little brother.
The label on the little brother looks very fragile...


This afternoon, I picked up this 103.6604 belt-drive grinder. It needs refurbing, but everything is there, and then some. The left guard was in a drawer in the stand. It came with a Craftsman drill bit sharpening jig, a Dunlap wheel dresser and many related and unrelated bits and pieces.

The grinder is complete. Waiting on motor bearings.


Attachments

  • IMG_20210131_153917.jpg
    IMG_20210131_153917.jpg
    150 KB · Views: 53
  • IMG_20210131_171637.jpg
    IMG_20210131_171637.jpg
    148.2 KB · Views: 36
To avoid these ads, REGISTER NOW!
OP
F

FrankLee

Well-known member
Joined
Sep 13, 2010
Messages
3,554
Location
seMI, 48317
I just picked up its big brother, and little brother.
The label on the little brother looks very fragile...

Sounds like what I just brought home yesterday.
The 8 incher is pretty substantial for a belt driven grinder.
Who needs side guards with 8x1 inch wheels?

At least the tool rests are more then just decorations...

Very nice!

The Craftsman 6677 Drill Bit Grinding Attachment and Craftsman 2504 Tubular Workbench Lamp too! Anything else?

When you get to it, what are the bearings in your 8" 6611? The original Nice 6971-3 bearings in the 6604 were a very uncommon size with all SAE dimensions; 9/16" bore, 1-3/8" OD, 7/16" W. Replacements are #1622, if you can find them.
 
Last edited:

lafester

Well-known member
Joined
Mar 1, 2017
Messages
2,191
Location
Northern CO
I posted some pics in the crown top thread...

https://www.garagejournal.com/forum/showpost.php?p=8919864&postcount=810
https://www.garagejournal.com/forum/showpost.php?p=8919952&postcount=811

There was a 18 inch jig saw, the power switch and of course the large tool bench which had an extra set of quick release brackets installed. I did not know these existed but I will see what I can find in the catalogs.

Hmmm. The 61 catalog shows the proper lamp and power switch, but only the 26x26 bench and does not list extra brackets. The 57 catalog has the 44x26 bench and extra brackets but does not show a quick release option. Being bought in 60, it must have been one of the last years the large bench was available, and the first year for the crown top lamp and metal power switch. I'll get a couple pics of them soon.

I'm trying to come up with a reason to keep the bench but my space is very limited. I might take it apart to store until I get more room.


I just took the grinder apart to check it out and everything looks pretty nice.
The fine grit wheel does seem to be crumbling a bit in the center rim.
I do not see any markings on the bearings unfortunately.


Very nice!

The Craftsman 6677 Drill Bit Grinding Attachment and Craftsman 2504 Tubular Workbench Lamp too! Anything else?

When you get to it, what are the bearings in your 8" 6611? The original Nice 6971-3 bearings in the 6604 were a very uncommon size with all SAE dimensions; 9/16" bore, 1-3/8" OD, 7/16" W. Replacements are #1622, if you can find them.
 

Attachments

  • IMG_20210201_144918.jpg
    IMG_20210201_144918.jpg
    158.2 KB · Views: 24
  • IMG_20210201_144909.jpg
    IMG_20210201_144909.jpg
    156.4 KB · Views: 26
  • IMG_20210201_144847.jpg
    IMG_20210201_144847.jpg
    158.2 KB · Views: 22
  • IMG_20210201_142842.jpg
    IMG_20210201_142842.jpg
    147.7 KB · Views: 21
  • IMG_20210201_142034.jpg
    IMG_20210201_142034.jpg
    136.4 KB · Views: 21
  • IMG_20210201_141614.jpg
    IMG_20210201_141614.jpg
    148.2 KB · Views: 28
Last edited:

lafester

Well-known member
Joined
Mar 1, 2017
Messages
2,191
Location
Northern CO
Here are a couple pics of the brackets. Having the long piece hang down seems kind of excessive but I like the idea. I'm going to throw them on the bottom of my 26x26 bench to brace a plywood shelf.
 

Attachments

  • IMG_20210201_155316.jpg
    IMG_20210201_155316.jpg
    139.8 KB · Views: 31
  • IMG_20210201_155322.jpg
    IMG_20210201_155322.jpg
    124.4 KB · Views: 37
OP
F

FrankLee

Well-known member
Joined
Sep 13, 2010
Messages
3,554
Location
seMI, 48317
Here are a couple pics of the brackets. Having the long piece hang down seems kind of excessive but I like the idea. I'm going to throw them on the bottom of my 26x26 bench to brace a plywood shelf.

I had a couple Combo Kits, one large bench and one larger bench, with those brackets on the larger. I've never seen just the large bench sold by itself. The motor rail is somewhat different than on the larger combo kit. Those benches are very nice and very heavy duty.

Very cool. Thanks for posting!
 
Last edited:

lafester

Well-known member
Joined
Mar 1, 2017
Messages
2,191
Location
Northern CO
Re: The Classic Craftsman 100/150 Drill Press

Yeah I had one of the extra big ones as well. I think those only came with the combo kits. This size is a little more manageable.

Sent from my SM-G970U1 using Tapatalk
 

joe schmo

New member
Joined
Jan 31, 2021
Messages
4
Location
NC
Howdy, I've been lurking around this page and wanted to say thanks to Franklee for all the great info. I have bought a few Craftsman drill presses this year and it was super helpful. I made the tool stands out of a couple donors..The press is a mashup..
 

Attachments

  • image0.jpeg
    image0.jpeg
    126.9 KB · Views: 81
  • image1.jpeg
    image1.jpeg
    131.7 KB · Views: 80
  • image2.jpeg
    image2.jpeg
    139.6 KB · Views: 84
OP
F

FrankLee

Well-known member
Joined
Sep 13, 2010
Messages
3,554
Location
seMI, 48317
Howdy, I've been lurking around this page and wanted to say thanks to Franklee for all the great info. I have bought a few Craftsman drill presses this year and it was super helpful. I made the tool stands out of a couple donors..The press is a mashup..
Welcome joe!

Thanks for your comments. That is a very nice mashup! Is the paint original? If so, it looks fantastic! If that's not original paint, it looks fantastic!

The table lift appears to have a custom crank knob and the thrust bearing is outside the gear housing.

The lamp looks interesting... very compact and adjustable/removeable. Nice!

Very nice job on the grinder stands. I love mine.

Tell us more about the journey.
 
Last edited:

joe schmo

New member
Joined
Jan 31, 2021
Messages
4
Location
NC
Ahh...The table lift..That and the motor is why I bought the last machine. (nd to make another two tool ,tool stand. The handle was missing so its just a crank handle knob and I put the bearing on the outside to support the table weight. The zinc gears were toast but I was able to find some off the shelf that needed a bit of modification to work. The market place add said "works perfect"..The one pic is the jenky gear spinning jig to cut the gear relatively straight..The paint on the press is original the lift is not..
 

Attachments

  • image4.jpeg
    image4.jpeg
    126.4 KB · Views: 63
  • image3.jpeg
    image3.jpeg
    105.2 KB · Views: 59
  • image5.jpeg
    image5.jpeg
    107.8 KB · Views: 53
  • image6.jpeg
    image6.jpeg
    118.8 KB · Views: 57

joe schmo

New member
Joined
Jan 31, 2021
Messages
4
Location
NC
The bevel gears came from amazon. they are Boston gear L102Y steel miter gears.. the one for the crank can be ordered in the proper bore size and then the height just needs to be cut down to match. the lead screw gear needs to be bored out to 3/4 " , cut to height and then a key way filed in. I cut the old lead screw gear off and reused the bushing end. a set screw will be need in the bottom of the bushing where the lock collar was so it won't walk out..
 
Last edited:
OP
F

FrankLee

Well-known member
Joined
Sep 13, 2010
Messages
3,554
Location
seMI, 48317
The bevel gears came from amazon. they are Boston gear L102Y steel miter gears.. the one for the crank can be ordered in the proper bore size and then the height just needs to be cut down to match. the lead screw gear needs to be bored out to 3/4 " , cut to height and then a key way filed in. I cut the old lead screw gear off and reused the bushing end. a set screw will be need in the bottom of the bushing where the lock collar was so it won't walk out..
Thanks for that info!
 

joe schmo

New member
Joined
Jan 31, 2021
Messages
4
Location
NC
Oh yea..The light is a Harbor Fraught mag base led.. I'm waiting to find a period correct machine light and then converting it to led..1 million candle power so I can see again..Ha..
 

Hoorn

Well-known member
Joined
May 19, 2020
Messages
1,140
Location
Glendora, CA
Finished my 150. Thanks to Frank and 11b30b4 for great advise.
 

Attachments

  • IMG_20210203_185455.jpg
    IMG_20210203_185455.jpg
    74 KB · Views: 71
  • IMG_20210203_185324.jpg
    IMG_20210203_185324.jpg
    99.7 KB · Views: 73
  • IMG_20210203_185311.jpg
    IMG_20210203_185311.jpg
    95.3 KB · Views: 74
  • IMG_20210203_185257.jpg
    IMG_20210203_185257.jpg
    128.9 KB · Views: 72
  • IMG_20210203_185211.jpg
    IMG_20210203_185211.jpg
    102.7 KB · Views: 71
  • IMG_20210203_185142.jpg
    IMG_20210203_185142.jpg
    105.8 KB · Views: 80
  • IMG_20210203_185129.jpg
    IMG_20210203_185129.jpg
    100.4 KB · Views: 83
OP
F

FrankLee

Well-known member
Joined
Sep 13, 2010
Messages
3,554
Location
seMI, 48317
Frank, how far are you willing to drive for a "new unused" 150? I guess you could call it a barn find? This one just popped up on Craigslist south of Boston. Its out of my price range at $400
https://boston.craigslist.org/sob/tls/d/norwell-craftsman-150-drill-press/7272016197.html
I've had to cast my net much wider to find machines, but Boston is a little outside of my 2 hour radius.

That is way outside my price range. I never got that much for my nicest refurb. That would likely need a complete teardown and refurb. The motor is not period correct, but it is a nice looking drill press though. Thanks for posting.

Photo saved for posterity.

 
To avoid these ads, REGISTER NOW!

subroc

Well-known member
Joined
Apr 22, 2017
Messages
781
Location
Dover, NH
I've had to cast my net much wider to find machines, but Boston is a little outside of my 2 hour radius.

That is way outside my price range. I never got that much for my nicest refurb. That would likely need a complete teardown and refurb. The motor is not period correct, but it is a nice looking drill press though. Thanks for posting.

Photo saved for posterity.


Boston/New England asking prices have reached the point of absurdity. I don't believe any are actually selling at the silly prices but without actual sold listings to view I could be wrong about that. I expect it is the self perpetuating problem. A seller has no idea what his tool is worth. He looks for what others are asking, finds the highest price for a similar machine and offers his at a bit more. Then the next seller does the same. And the the next seller. And on and on and on. Maybe in the next year or so reality will strike but for the foreseeable future it is the silly season up here.

That said, it is pretty nice with an unmolested table.
 

11b30b4

Well-known member
Joined
Jul 16, 2020
Messages
1,029
Location
GA
Subroc, Frank is correct, there are slim pickings everywhere. Down here in Atlanta, I search in a 250 mile radius and only a few possibilities show up. Seems the average asking price is around $250.00’; although we have our fair share of loonies as well. Perfect Example, this 100 series had an asking price of $500.00 when it first listed two months ago on CL. I eventually messaged them and explained that that machine at best should sell for around 200 but I would not buy it for more than 100. Since then they reduced it to 400 and have listed on other sites like ebay and FB.

https://macon.craigslist.org/tls/d/perry-craftsman-king-seeley-15-drill/7240196690.html

I believe the seller is an estate sale person and not the owner. In their description they say this “the machine is substantially unrestored original, and has apparently seen moderate use as evidenced by it's overall good condition. Other than normal age related patina, there are no deficiencies in the fit or finish to report.” Thank the maker it has the “age related patina”, I was worried that was rust showing.

I have even seen a floor model 150 in Tennessee selling for $600.00. Good luck with that.
 
OP
F

FrankLee

Well-known member
Joined
Sep 13, 2010
Messages
3,554
Location
seMI, 48317
It's not just drill presses. I went to see this 1/4 hp Dunlap grinder the other day. Asking price is $100 and probably worth $30. There are a few extras, but also some junk.

I offered $40 only because I believe the original paint is very nice. The actual owner was not present, so I left waiting for a response and have heard nothing after two update messages. I think they were offended and I got blocked on their fb.

https://www.facebook.com/marketplace/item/1115858148884706/


subroc

Well-known member
Joined
Apr 22, 2017
Messages
781
Location
Dover, NH
Subroc, Frank is correct, there are slim pickings everywhere. Down here in Atlanta, I search in a 250 mile radius and only a few possibilities show up. Seems the average asking price is around $250.00’; although we have our fair share of loonies as well. Perfect Example, this 100 series had an asking price of $500.00 when it first listed two months ago on CL. I eventually messaged them and explained that that machine at best should sell for around 200 but I would not buy it for more than 100. Since then they reduced it to 400 and have listed on other sites like ebay and FB.

https://macon.craigslist.org/tls/d/perry-craftsman-king-seeley-15-drill/7240196690.html

I believe the seller is an estate sale person and not the owner. In their description they say this “the machine is substantially unrestored original, and has apparently seen moderate use as evidenced by it's overall good condition. Other than normal age related patina, there are no deficiencies in the fit or finish to report.” Thank the maker it has the “age related patina”, I was worried that was rust showing.

I have even seen a floor model 150 in Tennessee selling for $600.00. Good luck with that.
We have one up here with an asking price of $550. Here is the link. Nice enough to be sure but there is a drilled head and an arc of shame on that press? $550?

He can ask what he wants. It is his. But I reserve the right to be incredulous over such prices.

Buyers are constantly labeled lowballers among other not so flattering names by sellers. I label those with ridiculous prices internet bandits especially on eBay.

It's not just drill presses. I went to see this 1/4 hp Dunlap grinder the other day. Asking price is $100 and probably worth $30. There are a few extras, but also some junk.

I offered $40 only because I believe the original paint is very nice. The actual owner was not present, so I left waiting for a response and have heard nothing after two update messages. I think they were offended and I got blocked on their fb.

https://www.facebook.com/marketplace/item/1115858148884706/


Part of pricing old tools is a fair and honest comparison with a new current tool that will do a similar/same job. Add or subtract for condition. Add or subtract if there is some vintage or other value. Clearly the reality of just what they actually have hasn't struck them. It is just an old ratty grinder.

A fair offer to be sure.

You will get some solace in 6 or 8 months when you still see it for sale. Maybe then they will take $30 instead of the fair $40.
 

Hoorn

Well-known member
Joined
May 19, 2020
Messages
1,140
Location
Glendora, CA
Wow! That is stunning!

I really like the satin finish and the quill lock handle.

Beautiful results in only two weeks! You set the bar high.


Frank, I ran into an issue. I ran the 150 at the P/Os home without issue. While cleaning everything, the motor ran very quiet and without issue on the workbench, and ran smooth and quiet when I mounted it back to the DP. But once I hooked up a belt, it will come on but simply struggle and rock the motor mounted pulley back and forth half an inch or so and then eventually trip the overload. I took the belt off and with my gloved hand can hold the pulley, turn it on and it will not turn. In fact it offers almost no resistance to my hand and I did not have a death grip on it as I expected it to start turning.
Can I assume the capacitor does not have the mojo to get it up to speed any longer? Although I tore the entire DP apart I was not about to take apart the motor which was still aesthetically in good shape, and was running seemingly without issue. I'm pretty handy but I know that things can go south pretty fast with small motors. Both pulleys turn as smooth as possible and there is no interference.
 

Hoorn

Well-known member
Joined
May 19, 2020
Messages
1,140
Location
Glendora, CA
Before I go any further, from previous posts, I've seen a thin rectangular capacitor in a cardboard box mounted in this area. I don't see one here. The model of this motor is 115. 19780 dated 1958. Unless the capacitor is somewhere else inside this motor which I doubt, I assume that's my issue..
 

Attachments

  • IMG_20210204_094444.jpg
    IMG_20210204_094444.jpg
    137.7 KB · Views: 58

Hoorn

Well-known member
Joined
May 19, 2020
Messages
1,140
Location
Glendora, CA
Under the electrical tape. Well that was easy to figure out.
 

Attachments

  • IMG_20210204_095308.jpg
    IMG_20210204_095308.jpg
    90.9 KB · Views: 59
OP
F

FrankLee

Well-known member
Joined
Sep 13, 2010
Messages
3,554
Location
seMI, 48317
Frank, I ran into an issue. I ran the 150 at the P/Os home without issue. While cleaning everything, the motor ran very quiet and without issue on the workbench, and ran smooth and quiet when I mounted it back to the DP. But once I hooked up a belt, it will come on but simply struggle and rock the motor mounted pulley back and forth half an inch or so and then eventually trip the overload. I took the belt off and with my gloved hand can hold the pulley, turn it on and it will not turn. In fact it offers almost no resistance to my hand and I did not have a death grip on it as I expected it to start turning.
Can I assume the capacitor does not have the mojo to get it up to speed any longer? Although I tore the entire DP apart I was not about to take apart the motor which was still aesthetically in good shape, and was running seemingly without issue. I'm pretty handy but I know that things can go south pretty fast with small motors. Both pulleys turn as smooth as possible and there is no interference.

Before I go any further, from previous posts, I've seen a thin rectangular capacitor in a cardboard box mounted in this area. I don't see one here. The model of this motor is 115.19780 dated 1958. Unless the capacitor is somewhere else inside this motor which I doubt, I assume that's my issue..
Yeah, the capacitor was removed and the wires taped. There should be a bottom cover also, but maybe you removed it?

Here's the manual for your motor: http://vintagemachinery.org/pubs/222/5577.pdf

I'll check a few things and be back.


Oh, did you feel the motor heat up or smell burning?
 
Last edited:

Hoorn

Well-known member
Joined
May 19, 2020
Messages
1,140
Location
Glendora, CA
There was no cover plate, and I did not smell anything burning. When I put my hand on the motor after the overload had shut it off it did not feel warm either.
 
OP
F

FrankLee

Well-known member
Joined
Sep 13, 2010
Messages
3,554
Location
seMI, 48317
OK, here are the capacitor specs from a 1950-ish 115.6962 motor.


A few years ago, I bought [URL="[url]hNTE Electronics MSC125V124 Series MSC Motor Start AC Electrolytic Capacitor, Two 0.250" Quick Connect Terminals, 124-149 µF Capacitance, 110/125V[/url]"]this capacitor[/URL] for a non-Craftsman motor. I think this would work on yours, but you may have to mount it remotely or make a spacer for your motor base.
https://www.amazon.com/gp/product/B007Z7MKVI/?tag=atomicindus08-20


I have three spare(?) Craftsman sardine can capacitors, but do not know if they work and don't know how to test without installing them. You'd probably be better off with a new one from Amazon or ?
 
Last edited:

Hoorn

Well-known member
Joined
May 19, 2020
Messages
1,140
Location
Glendora, CA
I'll cover both bases. Original and stock looking is important to me, I'll order the Amazon capacitor "in case", but DM you regarding your spares. Thank you for all your effort regarding this.
 

39 LaSalle

Well-known member
Joined
Aug 11, 2020
Messages
102
Location
TN
Speaking of motors...

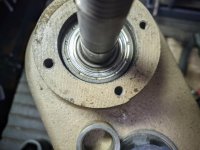
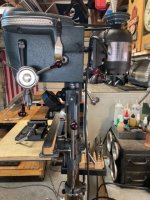
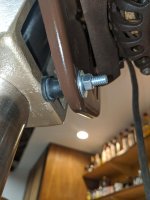
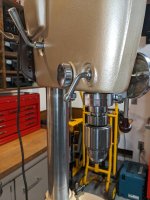
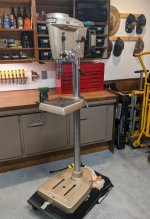
My current update is one of both good and bad news. The good news I got my DP all put back together, motor mounted, and running. Everything looks and sounds like it's running as smooth as glass. I don't have a dial indicator, but to the naked eye, runout doesn't look bad. As a side note, a little trick I picked up either here on GJ or somewhere was to use an Irwin Quick Clamp with the jaws reversed to adjust belt tension. Put one end on the motor housing and the other behind the head frame behind the badge and gradually tighten belt. Worked great.

Anyway, now for the bad...after running about two minutes I started smelling a burning smell. Shut it down and a small stream of smoke comes out of the pulley end of the motor. It's not what I would declare a typical burning wire smell, so I'm thinking maybe some paint is burning off from my repaint job, or possibly the belt is too tight and the bearings (which I didn't replace) are doing something funny. I loosened the belt a bit, turn it back on, and sure enough about a minute or two later it starts doing the same thing. Great... :mad: At least at this point, the motor is still running for all that's worth.

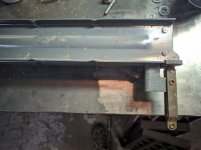
So I take the motor back off, and decide I'm going to have to crack it open again. I don't see any evidence of burning or scorching anywhere on the housings, on the condenser, stator, centrifugal switch, or anywhere else. As I roll the motor around I finally see some of the windings are now black, whereas they hadn't been before (see attached photo).

Even though I tried to be super careful when I revamped the motor I'm suspecting some of the varnish insulation fell off the windings and this is causing my issue.

Does anyone have any thoughts about what's going on here and what the solution might be? I'm not an electrical guy by any remote stretch of the imagination. I did find a product someone somewhere recommended called Sprayon Insulating Varnish which appears to me "may" or was designed to recoat the wiring in cases such as this, but I don't know enough about it.

I'd just as soon not have to take it to a motor repair shop because I suspect they're just going to tell me it needs to be rewired, and quite frankly, I further suspect that will cost far more than what a new or used motor would cost me.
 

Attachments

  • Burnt windings.jpg
    Burnt windings.jpg
    149.6 KB · Views: 46

sheltonfilms

Well-known member
Joined
May 28, 2014
Messages
157
Re: The Classic Craftsman 100/150 Drill Press

That the start windings maybe? Centrifugal switch get stuck?


Sent from my iPhone using Tapatalk
 
OP
F

FrankLee

Well-known member
Joined
Sep 13, 2010
Messages
3,554
Location
seMI, 48317
Yeah. That is a classic symptom of the capacitor switch not opening when the motor gets up to speed. Do you recall hearing the click when you shut it off? There is a link in post #1 to a post about centrifugal switches.
 

39 LaSalle

Well-known member
Joined
Aug 11, 2020
Messages
102
Location
TN
Yeah. That is a classic symptom of the capacitor switch not opening when the motor gets up to speed. Do you recall hearing the click when you shut it off? There is a link in post #1 to a post about centrifugal switches.

I read that link, and it certainly describes how the whole rig supposed to work, but none of the issues seem to match what I have going on (at least that I can tell). Nothing broken or missing on the finger weights, no broken wires, no debris, burnt contacts or any noticeably worn/broken spots. Motor re-assembly? Possible. But would it have run at all had I put it back together wrong?

Definitely hear a solid click or clack when the motor is winding down. Admittedly, I didn't take apart either the switch or governor assemblies when I cleaned up the motor last week. I did spray everything down with contact cleaner though.

So far as I can tell the governor assembly is functioning fine. No parts are broken or missing. One side is perhaps ever so slightly harder to press down than the other. Perhaps I should take a few minutes to disassemble it and clean it a bit further before reassembling?

I did lightly polish up the nubs on the switch assembly, but don't really see any evidence of arcing or anything like that there. Is there something else I should be looking for in there?

I did a little more digging into the Sprayon Insulating Varnish. Apparently, it is just an aerosol version of red insulating varnish. So I went ahead and ordered a bottle of brush on insulating varnish which should be more easily controlled. I've got to imagine that wires where the varnish has crumbled off touching one another is not a good thing. Does anyone have a good testing procedure for those windings to tell if perhaps they are shorting out against one another, causing heat buildup and thus the smoke? I do have a ohmmeter.

If bare winding wires is my issue, am I just wasting my time and the motor needs to be trashed? So far as I can tell there are no broken wires, and the motor still runs, so I figure that must account for something.
 

11b30b4

Well-known member
Joined
Jul 16, 2020
Messages
1,029
Location
GA
39 LaSalle, I am a bit late to respond but since I do have some experience with this issue. It indeed does sound like the start windings. The smell is not the wires burning but the varnish insulation on them buring. Even if the Centrifugal switch is moving on the shaft it may not be moving enough to trigger the disconnect. This difference can be very small but enough to cause the symptoms you are having now. What motor model do you have again?
 

39 LaSalle

Well-known member
Joined
Aug 11, 2020
Messages
102
Location
TN
39 LaSalle, I am a bit late to respond but since I do have some experience with this issue. It indeed does sound like the start windings. The smell is not the wires burning but the varnish insulation on them buring. Even if the Centrifugal switch is moving on the shaft it may not be moving enough to trigger the disconnect. This difference can be very small but enough to cause the symptoms you are having now. What motor model do you have again?

It is a 6962. I figured it was the insulation varnish once I saw what was going on in there. It still begs the question, if I recoat the wiring (that I can see) with new varnish, will that potentially save them enough that the motor doesn't have to be scrapped? Windings appear to be intact, just charred.

Now, as to what caused the insulation to start burning off...should I attempt to disassemble and clean the governor (centrifugal switch)? What remedy can I pursue if that is indeed the problem. I'm attaching photos of the governor and the switch mechanism, though I'm not sure that will show much.
 

Attachments

  • Governor.jpg
    Governor.jpg
    149.5 KB · Views: 32
  • Switch.jpg
    Switch.jpg
    99.8 KB · Views: 44
OP
F

FrankLee

Well-known member
Joined
Sep 13, 2010
Messages
3,554
Location
seMI, 48317
Sorry I'm late... busy morning.

I've never found it necessary to dismantle the governor assembly.

The picture of your cent switch shows a black wire from the thermal switch crossing over the hinge portion of the switch. That may be some interference with switch operation.

Below is a before photo of a 6962...


and a 6963.

 
Last edited:

11b30b4

Well-known member
Joined
Jul 16, 2020
Messages
1,029
Location
GA
39 LaSalle, Frank is on it. There is possible some interference with the switch operation.

I am not an electrician. If I understand you correctly, the motor ran before and now it is giving you the issues you stated?

If you have not disassembled the Centrifugal switch, then do not take it apart. This would only complicate the issue most likely. Re-coating the exposed windings can be done and is fine to do if you make sure all the windings are touching before you coat. They all need to be in contact then insulated. However, I would not re-coat them unless you determine this to be an issue.

All things considered, I would recommend you first determine if there is a wire or something preventing the switch from operating. Next make sure the contact have not been bent to prevent operation.

An issue I found on one of my motors was that is operated just fine when it was horizontal but when mounted on the press vertically, it would not disengage the start windings. That motor was a split phase motor and a more complicated Centrifugal switch. I suspect your Centrifugal switch is operating correctly so the most likely issue is the end cap switch, the one that the Centrifugal switch disengages when iiit opens fully.

One last thought, are you sure you assembled all the wires correctly when you put the motor back together? one wrong wire connected improperly will certainly cause the same issues.
 
To avoid these ads, REGISTER NOW!
Top Bottom