To avoid these ads, REGISTER NOW!

Craftsman Drill Press

39 LaSalle

Well-known member
Joined
Aug 11, 2020
Messages
102
Location
TN
39 LaSalle, Frank is on it. There is possible some interference with the switch operation.

I am not an electrician. If I understand you correctly, the motor ran before and now it is giving you the issues you stated?

If you have not disassembled the Centrifugal switch, then do not take it apart. This would only complicate the issue most likely. Re-coating the exposed windings can be done and is fine to do if you make sure all the windings are touching before you coat. They all need to be in contact then insulated. However, I would not re-coat them unless you determine this to be an issue.

All things considered, I would recommend you first determine if there is a wire or something preventing the switch from operating. Next make sure the contact have not been bent to prevent operation.

An issue I found on one of my motors was that is operated just fine when it was horizontal but when mounted on the press vertically, it would not disengage the start windings. That motor was a split phase motor and a more complicated Centrifugal switch. I suspect your Centrifugal switch is operating correctly so the most likely issue is the end cap switch, the one that the Centrifugal switch disengages when iiit opens fully.

One last thought, are you sure you assembled all the wires correctly when you put the motor back together? one wrong wire connected improperly will certainly cause the same issues.

Frank and yourself may well be right. It certainly makes sense.

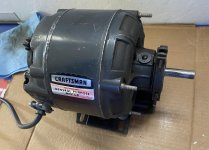
I didn't really disassemble any wires other than those in the base to attach a new cord, so I don't see that being a problem. The order in which this all went was when I got the DP, I had the motor off and the cord was VERY sketchy looking. So I plugged it into a power strip with the switch off, and the motor switch on so that I could effectively turn the motor on from the power strip. I figured I didn't want any part of me touching any part of that motor just in case. Motor ran great, of course I didn't leave it on for more than say 30 seconds at a time.

I then disassembled the motor to clean and repack the bearings, get the mud dauber nests out of it, inspect the wiring, replace the cord, and to repaint the end frames, air cone, and stator band cover. Photo from this point shows that the windings in question still had the reddish copper color to them. Got that all done and put it all back together, which granted, putting that switch assembly back in the frame was a nightmare.

Got it all back together and bench tested it, and it ran great. But again, I didn't run it for more than say 30 seconds. I didn't really see a need to at the time. It ran great from what I could tell and that was that. After I got it on the press and actually ran it for up to 2-3 minutes at a time is when the burning issues became apparent. So I decided to pull it back off and bench test it again to see if friction of some sort was the problem. Nope. Still burning. That meant I had to take apart again, but I've left the switch assembly in place so I don't have to fight that again unless I have to. This is where I discovered the windings in question were now charred.

I think what I'm going to try next is leave the governor and switch alone for now. Tomorrow my insulation varnish "should" arrive and I can apply that over the windings. Then I'll reassemble the motor and make extra damn sure that none of the cutout switch wires or anything else is interfering with the governor and see if that fixes the problem. I'll report back what my findings are as the information becomes available.
 
To avoid these ads, REGISTER NOW!

VerkWerx

New member
Joined
Feb 9, 2021
Messages
2
Location
Las Vegas
Re: The Classic Craftsman 100/150 Drill Press

Hi all, so I got my hands on a bench top dp early model it seems like motor has a 49 date on it. I've started to investigate what it needs. The return feed spring is a goner. It is single loop kind I saw the link for the newer style has anyone been able to find a company or page where I could score a custom made spring by any chance? This Machine was passed onto me by an old friend that has passed I think his dad bought it new back in the day. It is in great condition. Thinking about doing a full resto and leave the paint as is. I know it wasn't used by my friend. What I'm thinking is that he played with it a little and over turned the spring or turned it clockwise as franklee mentioned.
 
OP
F

FrankLee

Well-known member
Joined
Sep 13, 2010
Messages
3,552
Location
seMI, 48317
.......


Got it all back together and bench tested it, and it ran great. But again, I didn't run it for more than say 30 seconds. I didn't really see a need to at the time. It ran great from what I could tell and that was that.

......
Been there done that. Only I didn't find out until I delivered a machine an hour away from home. Arg.
 
OP
F

FrankLee

Well-known member
Joined
Sep 13, 2010
Messages
3,552
Location
seMI, 48317
Re: The Classic Craftsman 100/150 Drill Press

Hi all, so I got my hands on a bench top dp early model it seems like motor has a 49 date on it. I've started to investigate what it needs. The return feed spring is a goner. It is single loop kind I saw the link for the newer style has anyone been able to find a company or page where I could score a custom made spring by any chance? This Machine was passed onto me by an old friend that has passed I think his dad bought it new back in the day. It is in great condition. Thinking about doing a full resto and leave the paint as is. I know it wasn't used by my friend. What I'm thinking is that he played with it a little and over turned the spring or turned it clockwise as franklee mentioned.
Welcome to GJ and the Craftsman Drill Press Club!

I looked for new replacement springs, but no luck. There is a spring manufacturer nearby that I never got around to stopping in.

When you're able, please post some pictures of your machine and that spring. On more than one occasion, I've been able to reform a wonky spring and make it useable again. Otherwise, ebay or a donor machine are your likely options.
 

Bro-Dozer

Well-known member
Joined
Aug 27, 2016
Messages
50
Good morning.

Could someone be so kind as to point me to a thread or section where someone cleans their DP's paint, but does not actually re-paint it? Just looking for a technique.

Mucho appreciado from Phoenix, Arizona!!
 

Smokeshow69

Well-known member
Joined
Dec 7, 2012
Messages
8,366
Location
Pacific Northwest
Good morning.

Could someone be so kind as to point me to a thread or section where someone cleans their DP's paint, but does not actually re-paint it? Just looking for a technique.

Mucho appreciado from Phoenix, Arizona!!

Hello, and welcome!
There is alot of folks on here who clean and wax their machines with no repainting... I believe the first page has a link to cleaning....but basically what I did was break the machine down completely, cover the emblems with tape because most degreasers will remove the color. Then I soaked them in degreaser for 15 minutes, came back with hot water and soap and brush and then rinsed. You may need to do this process a few times. once cleaned and reassembled, I waxed all painted surfaces.:beer:
 

39 LaSalle

Well-known member
Joined
Aug 11, 2020
Messages
102
Location
TN
Been there done that. Only I didn't find out until I delivered a machine an hour away from home. Arg.

That had to be painfully embarrassing. :yikes:

Well, as my minor tale continues to unfold, I got the new insulation varnish. I liberally applied it to all of the exposed windings, allowing it to seep down into the wires. It actually flows pretty good in that regard. Will it do any good? I don't know, but I had to try something. Then I allowed it to dry overnight, and semi reassembled the motor leaving the base and stator band off so I could more easily see what was going on. I made absolutely, positively sure that no wires or anything else could interfere with the operation of the governor.

Powered it up, and everything runs as great as I would hope. Turn it off, governor spins down and clicks as expected. I was also watching it operate through the air vents. Everything works perfect...until I turn it back on and decide to run it for an extended period. At two minutes and fifteen seconds into the run I begin to smell and see smoke again. Not a lot, but it's there. So I decide to hell with it, I'm going to run it for five minutes or until it dies in flames...whichever comes first. After a couple of more minutes, the smoking action seems to stop. At five minutes I shut it back down and shoot a temperature reading on the windings which comes in at around 180 degrees. That seems pretty hot to me, but I have no point of reference.

I decide to let it cool back off and then try it all again. Twice more to be exact. Basically I get the same results, except with successive tests, there seems to be less smell and visual evidence of smoking going on.

This pretty much leaves me in a weird place. Maybe the smoke and burning smell I'm picking up on now is the new varnish baking itself onto the wire. I really don't know. Overall, it "seems" to be better, but I'm still left with great uncertainty of what went wrong, or if I've fixed anything. Short of taking it to a shop (which I don't think is really worth dropping the money into) I'm pretty much at a dead end.

At this point, unless somebody has any better ideas, I've pretty much decided the best thing to do is to button it all back up and remount it on my press. I might as well run it until it burns out completely. Leave it unplugged until I need it, and see what happens. In all likelihood I don't imagine most jobs I would have would require it to be in operation for more than 2-5 minutes at a stretch anyway, so it's possible I could go the rest of my life without it burning out on me. Meantime, I can keep my eyes out for a reasonably priced replacement and snag one at my leisure.
 

y'sguy

Well-known member
Joined
May 1, 2010
Messages
1,308
Location
Tulsa, Oklahoma
As Outlaw suggests, new varnish. Also fresh or old lube can do that till it clears out. Mine did it some but quickly subsided. Good luck. I'd let it run and keep an eye on it.
 

Bro-Dozer

Well-known member
Joined
Aug 27, 2016
Messages
50
Thank you.

Hello, and welcome!
There is alot of folks on here who clean and wax their machines with no repainting... I believe the first page has a link to cleaning....but basically what I did was break the machine down completely, cover the emblems with tape because most degreasers will remove the color. Then I soaked them in degreaser for 15 minutes, came back with hot water and soap and brush and then rinsed. You may need to do this process a few times. once cleaned and reassembled, I waxed all painted surfaces.:beer:
 

39 LaSalle

Well-known member
Joined
Aug 11, 2020
Messages
102
Location
TN
Sounds like a plan

I bet the recent smell was the new varnish burning in...

As Outlaw suggests, new varnish. Also fresh or old lube can do that till it clears out. Mine did it some but quickly subsided. Good luck. I'd let it run and keep an eye on it.

And that's what I've done. Guess I'll see what happens. Here are a couple of before and after pics of my more or less completed drill press. Pardon the messy background, but I have very limited space in my garage so it becomes something like a Chinese puzzle shifting things around to make things fit. :eyecrazy:

I'm fairly pleased with how it all turned out considering with what I started with. Learned a lot along the way, and got to meet some great folks here who tutored me through the process. I still wish I could have gotten the column off the base, but maybe I'll revisit that again later in the year. I also installed a removable pull chain switch lamp fixture up inside the head with a cheap "U" bracket. That should be quite beneficial.

Now I can give those Vari-slo parts a quick rinse off and list those up for sale to see if anyone is interested.
 

Attachments

  • 20210212_121458.jpg
    20210212_121458.jpg
    92.5 KB · Views: 67
  • 20210212_121514.jpg
    20210212_121514.jpg
    109.8 KB · Views: 69
  • 1.jpg
    1.jpg
    71.9 KB · Views: 68
  • 2.jpg
    2.jpg
    68.1 KB · Views: 63

Bro-Dozer

Well-known member
Joined
Aug 27, 2016
Messages
50
Things get weird sometimes. I justed picked up...finally...a little 80. At least I think it is. 103.23590 is on the band.

Looking forward to restoration....someone painted it black! NO!!!
 

Attachments

  • Derpie.jpg
    Derpie.jpg
    78.4 KB · Views: 38

Bro-Dozer

Well-known member
Joined
Aug 27, 2016
Messages
50
I'm not a fan of the black color on this.
 

Attachments

  • IMG-0056.jpg
    IMG-0056.jpg
    82.6 KB · Views: 59
  • IMG-0057.jpg
    IMG-0057.jpg
    79.2 KB · Views: 59
OP
F

FrankLee

Well-known member
Joined
Sep 13, 2010
Messages
3,552
Location
seMI, 48317
Dp#97

I'm way behind on posting.

Last week, I picked up DP#97, a 15" Atlas bench model #63, and a 24" Delta Jig saw in a bundle deal. The drill press came with a rather nice Palmgren No. 000 vise.


Everything was neglected and the machines were poorly repainted.

Both machines came with Dunlap 115.5454 motors. They did "run" when I tested, but I could barely turn the rotors by hand. I refurbished both motors this week and both now run beautifully.

I was going to replace the oe ND 8013 bearings, but even the cheapest 87013 replacements I found were $15 each, so I cleaned and repacked them. I'm glad I did because they cleaned-up like new.


The saw and its motor had been repainted, but it seemed like a latex wall paint was used. Luckily that old painted came off the motor during a Simple Green soaking. I used the cleaned rusty dp motor band on the saw motor and added the vinyl. The painted center band cleaned acceptably well and will not need any further finishing.


The vise cleaned up nicely in citric acid and I'll likely repaint when the weather improves.


2/13/2021

The jigsaw is complete.

 
Last edited:
OP
F

FrankLee

Well-known member
Joined
Sep 13, 2010
Messages
3,552
Location
seMI, 48317
And that's what I've done. Guess I'll see what happens. Here are a couple of before and after pics of my more or less completed drill press. Pardon the messy background, but I have very limited space in my garage so it becomes something like a Chinese puzzle shifting things around to make things fit. :eyecrazy:

I'm fairly pleased with how it all turned out considering with what I started with. Learned a lot along the way, and got to meet some great folks here who tutored me through the process. I still wish I could have gotten the column off the base, but maybe I'll revisit that again later in the year. I also installed a removable pull chain switch lamp fixture up inside the head with a cheap "U" bracket. That should be quite beneficial.

Now I can give those Vari-slo parts a quick rinse off and list those up for sale to see if anyone is interested.

Nice work! The motor issue is a bummer, but a replacement will pop up.
 
OP
F

FrankLee

Well-known member
Joined
Sep 13, 2010
Messages
3,552
Location
seMI, 48317
I'm not a fan of the black color on this.
Your lengthy search finally paid off! Congrats!

That is a 12-1/4" drill press. Because of the crown logo, it is a '64 model, and perhaps a '65 (no catalog in '65 to verify). It was not shown in the '66 catalog, so that is an uncommon model. It looks like the motor mount was redesigned to pivot. I've had that model on my radar, for a while. Earlier 12-1/4" models were badged as Dunlap.

The 13-1/2" Craftsman 80 drill press was discontinued in '58(?).
 

Bro-Dozer

Well-known member
Joined
Aug 27, 2016
Messages
50
Thank you. Should be a good project. Tear down looks straight forward.

And now, it's time to strip some paint.

Your lengthy search finally paid off! Congrats!

That is a 12-1/4" drill press. Because of the crown logo, it is a '64 model, and perhaps a '65 (no catalog in '65 to verify). It was not shown in the '66 catalog, so that is an uncommon model. It looks like the motor mount was redesigned to pivot. I've had that model on my radar, for a while. Earlier 12-1/4" models were badged as Dunlap.

The 13-1/2" Craftsman 80 drill press was discontinued in '58(?).
 

jg4660

Well-known member
Joined
Jul 30, 2019
Messages
130
Location
Western NY
I finally got my 103.23641 drill press torn down for cleanup. Went pretty well. The spindle bearings seem okay but may change them while its apart. The quill bearings feel a little gritty but no noticeable play. I haven't tried taking the quill apart yet but seems like i'd need to make a press to do it. I don't see too many posts of people changing them..too difficult? Is there a common supplier and part# that is good for the bearings?

Thanks
JG
 
To avoid these ads, REGISTER NOW!
OP
F

FrankLee

Well-known member
Joined
Sep 13, 2010
Messages
3,552
Location
seMI, 48317
I finally got my 103.23641 drill press torn down for cleanup. Went pretty well. The spindle bearings seem okay but may change them while its apart. The quill bearings feel a little gritty but no noticeable play. I haven't tried taking the quill apart yet but seems like i'd need to make a press to do it. I don't see too many posts of people changing them..too difficult? Is there a common supplier and part# that is good for the bearings?

Thanks
JG
It's not a given that you need a press to dismantle the quill/spindle assembly. Clean the spindle and splines above the quill with steel wool. About half the time, the spindle will simply slide out of the quill after removing the spindle collar. Sometimes because of dirt and grime, a rubber mallet works too. You'll need to verify that a previous owner did not remove and reinstall the spindle collar incorrectly and tighten the set screw on the spindle surface instead of the divot. If so, you may need to first knock down a burr on the spindle with a file.

For installing the quill bearings, search GJ for the freeze/heat technique. It usually works quite well.

Accurate Bearing is a common source for quality bearings. I've used JSB Great Bearings recently, but you need to watch for COO, if that is a concern.

The important thing about ordering quill bearings is that the bore must be 5/8". There is a link to bearing info in the first post of this thread.


Did you get your motor issue resolved?
 

jg4660

Well-known member
Joined
Jul 30, 2019
Messages
130
Location
Western NY
I suspect somebody was into this one at some point as the quill bumper is missingm maybe it just disintegrated. If it comes apart easily i may go ahead and give replacing them a try. Still looking for a Craftsman motor, not many come up around here at least for the drill press's, a few for table saws.Thanks again for all the great info in this thread Frank, its helped me a lot recently.


Did you think Evaporust would damage the bearings in the quill? i'd like to drop that in tub too.

JG
 
OP
F

FrankLee

Well-known member
Joined
Sep 13, 2010
Messages
3,552
Location
seMI, 48317
I suspect somebody was into this one at some point as the quill bumper is missingm maybe it just disintegrated. If it comes apart easily i may go ahead and give replacing them a try. Still looking for a Craftsman motor, not many come up around here at least for the drill press's, a few for table saws.Thanks again for all the great info in this thread Frank, its helped me a lot recently.


Did you think Evaporust would damage the bearings in the quill? i'd like to drop that in tub too.

JG
Yes, I do. I would not do that.

The quill bumpers often break and are missing.
 

Htscheg

Well-known member
Joined
Nov 2, 2016
Messages
362
Location
Buffalo, NY
If I remember correctly there was a gentleman making a speed pulley set up for these drill presses does anyone have a name and/or link aling with any experience using it? Thanks in advance

HT
 

Bro-Dozer

Well-known member
Joined
Aug 27, 2016
Messages
50
Agreed...it's seems a tad bit harder to find on-line resources with this model.

Going to paint it 'Golden Bronze' with the oft referenced Rustoleum paint, Champagne Mist.

I'm a novice with these machines, but should be no harder than working on my '65 mustang.

Your lengthy search finally paid off! Congrats!

That is a 12-1/4" drill press. Because of the crown logo, it is a '64 model, and perhaps a '65 (no catalog in '65 to verify). It was not shown in the '66 catalog, so that is an uncommon model. It looks like the motor mount was redesigned to pivot. I've had that model on my radar, for a while. Earlier 12-1/4" models were badged as Dunlap.

The 13-1/2" Craftsman 80 drill press was discontinued in '58(?).
 

Hoorn

Well-known member
Joined
May 19, 2020
Messages
1,140
Location
Glendora, CA
Agreed...it's seems a tad bit harder to find on-line resources with this model.

Going to paint it 'Golden Bronze' with the oft referenced Rustoleum paint, Champagne Mist.

I'm a novice with these machines, but should be no harder than working on my '65 mustang.


Dozer, if I could make a recommendation. I just finished my 150 and went with the champagne mist. I really enjoyed how the color came out, however, it is very glossy. If your goal is to closely represent power bronze, what I did was give it two coats of satin clear coat enamel (after letting that Rust-Oleum dry for at least 4 days) and that gave it a much softer sheen. Much closer to the original. Good luck.
 

Hoorn

Well-known member
Joined
May 19, 2020
Messages
1,140
Location
Glendora, CA
Frank, I was determined to make a new cylindrical capacitor work on my 150 with a spacer. I cut a piece of hardwood to the same footprint as the base and made it 1/2" wide.

I coated it multiple times with hammered spray to give it a "cast iron look". Of course then I needed everything to match so I took the entire motor completely apart and painted the end caps and base with "Montana Gold Shock Brown Dark" which was far and away the closest to the deep brown that Craftsman used to accompany the power bronze. Another benefit was that the paint came in a matte finish.
I crimped all the appropriate wires together and then used electrical tape to secure.

Runs very strong, very quiet, just went through several test stacks of wood effortlessly.
 

Attachments

  • IMG_20210214_132111.jpg
    IMG_20210214_132111.jpg
    101.2 KB · Views: 67
  • IMG_20210214_134003.jpg
    IMG_20210214_134003.jpg
    94.3 KB · Views: 65
  • IMG_20210214_134020.jpg
    IMG_20210214_134020.jpg
    100.5 KB · Views: 71
  • IMG_20210214_113039.jpg
    IMG_20210214_113039.jpg
    132.5 KB · Views: 66
OP
F

FrankLee

Well-known member
Joined
Sep 13, 2010
Messages
3,552
Location
seMI, 48317
Frank, I was determined to make a new cylindrical capacitor work on my 150 with a spacer. I cut a piece of hardwood to the same footprint as the base and made it 1/2" wide.

I coated it multiple times with hammered spray to give it a "cast iron look". Of course then I needed everything to match so I took the entire motor completely apart and painted the end caps and base with "Montana Gold Shock Brown Dark" which was far and away the closest to the deep brown that Craftsman used to accompany the power bronze. Another benefit was that the paint came in a matte finish.
I crimped all the appropriate wires together and then used electrical tape to secure.

Runs very strong, very quiet, just went through several test stacks of wood effortlessly.
Very nice solution! Glad that new capacitor worked and saved that motor.
 

Bro-Dozer

Well-known member
Joined
Aug 27, 2016
Messages
50
Thank you for the tip! What brand of satin did you spray? Rustoleum?

Dozer, if I could make a recommendation. I just finished my 150 and went with the champagne mist. I really enjoyed how the color came out, however, it is very glossy. If your goal is to closely represent power bronze, what I did was give it two coats of satin clear coat enamel (after letting that Rust-Oleum dry for at least 4 days) and that gave it a much softer sheen. Much closer to the original. Good luck.
 

Hoorn

Well-known member
Joined
May 19, 2020
Messages
1,140
Location
Glendora, CA
Thank you for the tip! What brand of satin did you spray? Rustoleum?


Yes, since the champagne mist is Rust-Oleum I just stuck with the same brand.

Not sure how much spray painting you've done with rattle cans but specifically with Rust-Oleum you absolutely have to wait at least 3 days before you recoat or topcoat otherwise you will get wrinkles in your top coat. It's a very slow drying paint and needs time to gas out. If you live somewhere cold or humid I would wait even longer.

I've had to re-sand and prime a few projects because I didn't wait long enough.
 

Bro-Dozer

Well-known member
Joined
Aug 27, 2016
Messages
50
Right on! I will take your advice and pick up a can. Thank you.

Yes, since the champagne mist is Rust-Oleum I just stuck with the same brand.

Not sure how much spray painting you've done with rattle cans but specifically with Rust-Oleum you absolutely have to wait at least 3 days before you recoat or topcoat otherwise you will get wrinkles in your top coat. It's a very slow drying paint and needs time to gas out. If you live somewhere cold or humid I would wait even longer.

I've had to re-sand and prime a few projects because I didn't wait long enough.
 

Indexmill

Well-known member
Joined
Apr 12, 2013
Messages
1,413
Location
Central NC
Yes, since the champagne mist is Rust-Oleum I just stuck with the same brand.

Not sure how much spray painting you've done with rattle cans but specifically with Rust-Oleum you absolutely have to wait at least 3 days before you recoat or topcoat otherwise you will get wrinkles in your top coat. It's a very slow drying paint and needs time to gas out. If you live somewhere cold or humid I would wait even longer.

I've had to re-sand and prime a few projects because I didn't wait long enough.

Or, do the second and third coats as soon as the prior coat is tacky; usually 30-60 minutes.
 

LRV_Guy

Member
Joined
Aug 7, 2020
Messages
6
Location
Massachusetts
I purchased one of these and did a restoration that included new spindle bearings from Freemont Industrial Supply. (this is my first post- so I can't post a picture or a link- I will soon)


Sears Craftsman 18211 103.23141 Quill Bearing Replaces XF121PP (these are actually the same bearings used on the 6/18" jointer I restored as well) I paid $5.00 each for the bearings- delivery was free.

I also added a safety switch. I was not happy with the location of the traditional power switch.
 
OP
F

FrankLee

Well-known member
Joined
Sep 13, 2010
Messages
3,552
Location
seMI, 48317
I purchased one of these and did a restoration that included new spindle bearings from Freemont Industrial Supply. (this is my first post- so I can't post a picture or a link- I will soon)

Sears Craftsman 18211 103.23141 Quill Bearing Replaces XF121PP (these are actually the same bearings used on the 6/18" jointer I restored as well) I paid $5.00 each for the bearings- delivery was free.

I also added a safety switch. I was not happy with the location of the traditional power switch.
I also used the Rustoleum Champagne Bronze- found it to be a great match. Once my "post count" gets over 5- I will post a photo.
:)
Welcome!
 

11b30b4

Well-known member
Joined
Jul 16, 2020
Messages
1,029
Location
GA
Hoorn, that spacer for the motor capacitor came out nice. I had considered doing a spacer if I ended up with a bad capacitor but luckily my capacitor works. Great job and the paint looks great as well.

LRV_GUY, I have used Freemont in the past for the bearings on my Emerson machines. I like that you can search their site based on the craftsman part number and they provide the correct sized bearing. The odd thing about their site is that they do not provide any listed specifications for the bearings and if you search my drill press model number and then by part number you often get different results with different prices for the same bearings. They also sometimes offer a two bearing deal for same sized bearings. Anyway, I have been pleased with the bearings I have ordered from them.
 

Bro-Dozer

Well-known member
Joined
Aug 27, 2016
Messages
50
Here is the motor that came with my new-old ~1965 DP.
The decal has the same crown as the DP.
I have no idea how to date code it.
 

Attachments

  • motor on bench 2.jpg
    motor on bench 2.jpg
    145.5 KB · Views: 38
  • motor on bench.jpg
    motor on bench.jpg
    112.9 KB · Views: 30
To avoid these ads, REGISTER NOW!
Top Bottom