To avoid these ads, REGISTER NOW!

Above 1200 Sq/FT DFB's Garage

Wokspaces above 1200 squarefeet.

jon72vega

Well-known member
Joined
Apr 17, 2013
Messages
3,442
Location
Niles Michigan
The last drive of 2024................................

IMG-3595f.jpg

IMG-E3604ff.jpg

I can't say I'll be sad to see 2024 end. Even though it brought joy a few months ago, there was too much trauma that went on before and after the Mustang arrived. I guess you can't have pleasure without some pain along the way.

Two weeks prior to going on leave, I was subjected to some pretty rough treatment at work, and not for the first time. I nearly then and there threw in the towel, but all I wanted to do was get through those remaining weeks, pick up my new car and forget about the world for a while. Leading up to my last day, I was crippled with neck and back pain. It took two visits to the chiropractor and nearly two weeks for it to settle, just in time for the car to arrive.

I've spent the last couple of months fretting, especially the last week. I came to the conclusion that there were far more reasons why I didn't want to go back then there was to stay. Something needed to change. After more than 20 years working for the same company, on Friday last week, I handed in my notice.

I'm not going to detail the specifics as to where it all went wrong, it was a death of 1000 cuts spread over far too many years. I want to say that both parties are to blame, I know my idiosyncrasies and how that is projected. But I also know that I am reactive to what happens around me.

I put my heart and soul into that business, my signatures still present all over the place. I had no financial stake in the business, but I treated it like my own. I also leave behind some great customers and couple of co-workers, so even though this was the right decision, I still fell apart once I got back into my car and had been shaking in terror the whole time I was there.

Going forward, I'd like to rebuild some of my gardening work, explore more detailing, and ideally continue writing for Detailing Shed in some form. Apart from that, I'm not rushing into anything other than thinking about my next move(s). I haven't been to the chiropractor in months, where previously I needed an adjustment every 6-weeks. I'm also sleeping better since Friday's bombshell. That has to be a positive.

So, I finally did it. Eyes forward. New beginnings. New opportunities.
Good luck for the future.
 
To avoid these ads, REGISTER NOW!
OP
D

D.F.B

Well-known member
Joined
Aug 2, 2023
Messages
1,555
Location
Australia
It sounds like you've made the right decision. Life is too short to put up with a work environment that seems to have been affecting your health.

Stay strong and grab the future with both hands.
It took me far too long to make the decision, it had been bubbling for many years, pre-Covid in fact. Seems like there was always a convenient excuse to get out of having to stand up like a man and make the move.

Actually, the Covid lockdowns were a savior, the complete opposite for most, it gave me a breather from the dynamic I was battling. Being a diabetic and working in retail, I was terrified about getting Covid at work. For the first and longest lockdown, all non-family staff were sent off on paid leave. At that stage, it was looking pretty bleak I'd wondered if I would have a job to go back to, somehow that sentiment got back to boss via one of my neighbors.

When the government started to subsidize businesses in a bid to keep people employed, as in FREE LABOUR, I was called and asked if I would like to return to work, like they were doing ME a favor. My first day back, I was then roasted in the office for apparently getting the wrong idea why we were sent on leave, apparently it was to "protect" everyone's health. Funny how "protecting" the workforce went out the window the moment the government was paying their wage bill.................despite Covid still circulating, way more than when we were sent on leave.

I have a very low tolerance to bullsh.t and hypocrisy, especially being lied to in a bid to make someone look better than they really are. This also displays why gossip is so dangerous, mainly because information gets skewed and taken out of context. Nine times out of ten, the issues I had in the workplace were caused by contextual misunderstandings or hypocrisy. And because the boss is the alpha male, he is very dismissive, there is NO explaining your side of the story. This then leads to being so anxious about screwing up or saying the wrong thing, to the point where you are preempting your every move or word to avoid confrontation. That wears you down.

I'm also very literal, if you ask me to do or don't do something, I will follow through because I know how important it is to the person asking. But it has to be the same for everyone! So, when a non-family member does the complete opposite, then it's up to me to fix, that gets makes me very angry. There is never any recourse for laziness or poor work ethic when it comes to the family, nothing ever got said to keep the family dynamic happy, which means the frustration gets projected onto the non-family employee...................me. But then guess who ends up with the reputation for being ****?

I was also sent this text message in error back in 2018 after advising the boss on what car his sister should buy (afterhours too) -

textmess.png

I was never apologized to for that, or even had it acknowledged.
 

dtaylo2

New member
Joined
Dec 22, 2019
Messages
2
Location
UK
I don’t reply much, but read all your posts and they inspire me to crack on with my own projects. Have a great 2025 and keep posting!
 
OP
D

D.F.B

Well-known member
Joined
Aug 2, 2023
Messages
1,555
Location
Australia
Got an email today welcoming me to the Ford Performance Club. I'm not sure if this played out the same for others, but I actually had to chase this up with the dealer just before Christmas as I hadn't been contacted by Ford or offered the welcome pack.

Screenshot-290.png

I'm not sure who is responsible for this stuff, dealership of head office, but it seems to be very sporadic in its approach. If Ford are going to offer this to customers, it kinda needs to be consistent in its roll out.
 
OP
D

D.F.B

Well-known member
Joined
Aug 2, 2023
Messages
1,555
Location
Australia
The Wildtrak's turn today. I've previously noted that I'm in between coatings with this car. I had intended to detail the car in October or November, but I was out of action for the better part of a month due to illness, then I was busy with other things. It was then smashed into by a senile driver, which then involved a second insurance claim, further delaying things. It's now due to be fixed early February. I didn't want to waste time and product on something that would be removed at the shop, and I'm then going to have to contend with the paint curing before polishing and laying down a coating. As such, I'm trying to limp it through until the timing stars align.

Every January, Dad heads off to the Tour Down Under in and around Adelaide, which is a 1460 km (907 miles) round trip, not including the travel to and from each stage. With the above in mind, I really wanted to get something on the paint to hopefully make the post road-trip cleaning easier.

So, first step was a wash using NV Snow, which is slightly more aggressive than other soaps but won't totally strip whatever is left on the paint. After blow drying, I decided to use ADS Ceramic Spray Sealant.

ARMOUR Detail Supply Ceramic Spray Sealant 6 months Durability - Detailing Shed
Armour Detail - Ceramic Spray Sealant | The Rag Company

IMG-3615.jpg

This product couldn't be easier to use, just prime your towel, then apply a couple of sprays per panel and work in with the towel, followed by a dry towel to level any potential streaks. For the most part, you almost don't need the second towel, it flashes away so well. To get the most out of the claimed 6-month longevity, make sure to keep the car dry for at least 8 hours after application, and avoid cleaning products for at least 24 hours.

Here's hoping it will do what I need.
 
OP
D

D.F.B

Well-known member
Joined
Aug 2, 2023
Messages
1,555
Location
Australia
My mother used to buy me a Ford/FPV calendar for Christmas every year. This was before online shopping existed, and even if it did, Mum wouldn't know how to do so. As such, she always bought one at a news agent. After FPV stopped doing them, I would get a Ford themed calendar with a variety of old Ford's that didn't really interest me other than them being Ford's. Something like this -

2025 Official Calendar Classic Ford Cars | Supercheap Auto

Nothing against those cars, but as I said, they just don't speak to me like the 90's and 2000's stuff does.

So eventually, I decided instead of looking at other people's cars all year, why not make my own. I know, what a self-absorbed thing to do, but I don't care, at least the images mean something to me rather someone else pride and joy. I make one for myself, then a few to give as Christmas gifts.

IMG-3616.jpg

IMG-3617.jpg

IMG-3618.jpg

IMG-3619.jpg

IMG-3620.jpg

IMG-3621.jpg

IMG-3623.jpg

IMG-3624.jpg

I also have one made featuring my best friend........................

IMG-3625.jpg

IMG-3626.jpg

IMG-3627.jpg

IMG-3628.jpg

IMG-3629.jpg

IMG-3630.jpg
 
OP
D

D.F.B

Well-known member
Joined
Aug 2, 2023
Messages
1,555
Location
Australia
This image represents where I wanted to be 3 months ago, at ease without a certain something hanging over my head. I still have some hurdles to clear, but they seem so insignificant compared to where I was back then.............or even a week ago.

IMG-3637.jpg

I've been driving the XR8 a bit lately too, and I have to say, its nice to walk out into the garage and see the car in all its glory rather than hidden under a cover. The suspension though is what my uncle would call "rough as guts", its easily the hardest ride of all my cars, even my workhorse 1-tonne Ranger rides softer.

It also takes quite a bit to reacclimatize to the urgent throttle response and healthy low-end torque. I kinda get why some complain about a lack of torque with the naturally aspirated version of this engine. With my previous Mustang, I think the short gearing and manual transmission masked some of that low rev torque deficit. And...............we were spoiled for choice with engines like the 4.0T Barra and supercharged Miami.

5.0 Coyote V8 (S650 Gen 4) -

345 kW @ 7,250rpm
550 Nm @ 4,850rpm
Curb Weight - 1841 kg

5.0 Miami V8 (Gen 1 Coyote) -

335 kW @ 5750-6000 rpm
570 Nm @ 2200-5500 rpm
Curb Weight - 1815kg

So, a 10-year-old XR8 produces more torque at lower revs and spread over a wider rpm band. In the right conditions, it will also produce more power on over-boost, an official over-boost figure is a little vague, but engineers hinted at about 375 kW/500 hp. The XR8 is also 26 kg lighter, both have 275 rear tyres. So, you would expect the XR8 to be quicker in standing start acceleration times? Actually, very unlikely.

The Mustang has 10 gears instead of 6, which helps the Pony car get off the line with less resistance, even if it does need an extra gear change before hitting 100. The Mustang also has wider rear wheels, so 19x10 with the HP wheels on my car, the Falcon has 19x9. Then consider the Falcon's suspension geometry at the rear, which lacks sufficient travel to squat down and help with traction. On any given day, the 0-100 kph (0-62) times between the two would favor the Mustang, getting the perfect launch from those Falcon's was always a challenge. However, on the right road, right conditions and the perfect launch, both would be doing 4.6 - 4.9 sec 0-100 kph times. But where the Falcon shines is at rolling acceleration, doesn't matter which gear you are in either.

It's not lost on me how lucky I am to have both of these cars to bounce between, comparing two completely different vehicles other than sharing the same basic engine architecture.
 
OP
D

D.F.B

Well-known member
Joined
Aug 2, 2023
Messages
1,555
Location
Australia
I also replaced a couple of parts on the Ranger today.

The first was the driver's side scuff panel, which for some reason had popped out of place. I removed and attempted to re-seat it, only to discover the two outboard clips had broken. More great Ford quality.......................

IMG-3636.jpg

After putting it back in place, I went and ordered a replacement from Jefferson Ford. The new one clicked into place and now is now properly seated.

Ford Front Door Scuff Plate Right Side Everest Ranger: EB3Z2113208AF

Genuine Ford Front Door Scuff Plate Right Side Everest Ranger

At this point I want to say, why didn't I buy one of these sooner................

Kincrome TorqueMaster Trim Clip & Panel Remover Set K8691 - Bunnings Australia

IMG-3631.jpg

The second item I replaced was the lower fan shroud in the engine bay. Again, for some reason the holding tabs had lost their tension and caused intermittent contact with the fan on startup. The new one clipped in and seated as it should. Again, great quality Ford.

Genuine Ford Lower Fan Shroud For Everest Ranger PX

I have to say, it's pretty average to be replacing parts on a vehicle with so little usage on the clock, and it's not like I'm hard on the car or don't take care of it. Throw in the headlight oxidization and paint wearing off the OE-fit steel wheels, it's annoying for a car with only 43,000 km on the clock.

Same with my father's two PX-series Ranger's, far too much premature wear and major failures. His original 3.2 PX did the auto gearbox at 60,000 km, two rear main seals (one at 20,000 km and again at 100,000km), and the A/C packed it in at 30,000km. On his latest PX III, its had an engine replaced under warranty at 40,000 km because they found metal in the oil from a batch of bad oil pumps, the door exterior lower window trims have all turned white, the headlights oxidized very early on, a broken driver's side lower seat trim, the lettering is coming off the passenger side aluminum door sill plate, the fabric section of the driver's seat is nearly thread bare, the manual mode rocker switch on the gear lever is loose.

These aren't cheap vehicles either. I can't help noticing that my Mazda built 2010 PK Ranger was streets ahead on quality and reliability, impressive considering how cheap it was back then.
 

manwithtools

ALLIANCE MEMBER
Joined
Aug 24, 2015
Messages
13,642
Location
Lebanon, TN
Happy New Year DFB! Glad you got the gusto to get up and out of a toxic work situation. Take some time to clear your head, I'm sure things will turn in the right direction for you.
 
OP
D

D.F.B

Well-known member
Joined
Aug 2, 2023
Messages
1,555
Location
Australia
Twenty-five years ago, I was enjoying the freedom that came from a driver's license and my first car.

AU-43.jpg

My parents helped me with my first car. After searching far and wide looking at various Falcon's, eventually this 2001 AU III Fairmont sedan popped up at the local Ford dealer. After a test drive, along the same roads I shot the videos of my Mustang and XR6, it all went quiet. A few days later, I noticed the car had disappeared from the lot, which was kinda the clue. On my birthday, the 28th of December, this 3-year-old Fairmont was sitting in the driveway. A few days later, I passed my driving test in the same vehicle. Funnily, one of my friends got to drive my first car before I did, he worked at the Ford dealer as an apprentice mechanic, where he did the pre-sale inspection.

AU-30.jpg

The car was made on the 11th of November 2001, making it one of the first AU III's off the line. So early that this example actually had the AU II's diamond pattern seat and door trim material. This didn't bother me, actually I only discovered it a few years later, at least it had the Warm Charcoal instead of the cheap looking Dark Graphite grey colour tone.

With only 54,000 km on the clock and painted in the majestic Barossa Red, it had the standard 157 kW 4.0 SOHC engine and 4-speed auto. Apart from the massive tow bar, which was clearly used going by the scraped up rear mud flaps, the car was standard. Although that would change, my uncle was the spare parts manager at the same Ford dealer, so I had access to various genuine Ford parts.

Screenshot-291.png

The first thing I did was to fit a rear spoiler. With various spoilers offered on the AU, I wanted it to look like it was originally ordered with it, so I went with the curvier item with the triangular central brake light. That spoiler was originally used on the series one XR's, but for AU II and AU III, it then became the factory option spoiler and was standard on the SR SVP. I had it painted and fitted at a local panel shop......................who lost my keys and ended up having to replace the whole ignition system with two brand new keys/fobs installed at their cost. Thinking back, this was when my phobia of leaving my cars in the "care" of someone else began.

AU-10.jpg

Next, I replaced the ugly 16-inch wheels that were fitted with horrible no-name tyres fitted. Actually, I nearly wrote the car off due to those tyres, the rear snapping into full opposite lock oversteers on a cold, wet morning WITHOUT provocation. The AU III Fairmont used the previous AU II Fairmont Ghia wheels, they were a nightmare to clean and really made the car look like the grandpa's express it was originally meant to be.

Again, I wanted OEM, which back then was relatively simple. They don't exist anymore, but Wheel King used to buy up OE wheels from Holden and Ford and offered them at a good price, with or without tyres. I decided I wanted the 17-inch wheels offered as an option on AU series one XR's, but was also the optional Tickford wheels on all other models. They had a machined face, which made them shimmer on the move. I also liked how easy they were to clean and the beautiful set of Tickford wings on the center caps.

AU-19.jpg

On the inside, I fitted a Momo leather shifter. I also fitted the Fairmont Ghia woodgrain surround, which involved removal of the 1-piece center console. I remember it being mid-summer, so I was working inside the car with the fan running....................then flattened the battery. You live, you learn. :unsure: At some point, I also had a Metallic Blue Momo steering wheel fitted, the best steering wheel I have ever used. This wheel was optional across the range and was a different to the Wild Blue used on the T-Series.

AU-60.jpg

I also got my uncle to order a Fairlane exhaust tip. I remember paying $120 trade for it. I could have bought something generic from Repco or Supercheap, but no, I wanted the Ford part, I just loved the size and angle of it. It didn't change the sound, which was fine by me. They also used this tip on XR6 VCT.

AU-11.jpg

Mechanically, the car served me well. I put 30,000 km on the car over the 3.5 years I owned it, I even loaded my mower in the back to go do lawns. At one point, it needed the front ball joints addressed as it had a weird clunk in the front end when letting off the brakes from rest. I also had to replace the rear muffler as it was rotted out towards the end of my ownership. And the 6-stack CD head unit needed to be repaired, as did the climate control display.

AU-37.jpg

Driving wise, it was a superb long-distance cruiser with stunning highway fuel economy. The brakes were weak though, and I suspect it had done a LOT of towing, the transmission was occasionally thump back to second. Ride comfort was as expected for a car heavily skewed to an older driver, but she did like to roll around a bit. The engine was super smooth up to about 3000 rpm, at which point the intake manifold would switch to the short runners for the final 2750 rpm. Those engines really didn't like to spend much time over 3000 rpm, they were noisy and rough as guts up top. The noise was pretty nasty as well, too much wheezing and whining. But.................she would pull a mean single ped burnout pulling out of rural TAFE campus at 3.30pm home time. (Hey, we all did it) :ROFLMAO:

AU-49.jpg

In the end, I sold the car to a family friend in June 2008, but haven't seen it since. It's hard to know if I miss the car itself, or the time in my life when things weren't so complicated. Probably both.

Most of the images above were taken in the same locations as the below images, 20 years later......................

IMG-3366.jpg

dec134f.jpg
 

Geoff289

Well-known member
Joined
Nov 10, 2013
Messages
1,209
Location
Melbourne, Australia
I never understood why the AU body shape was so generally unloved. Unless it was the base model with the egg crate grille I thought they looked fine.

My promotion to the level where a car was part of the salary package occurred in early 2000 and I ordered an AU I Futura with a couple of options. Without boring everyone, there were rules about what we could get and the leasing price which prevented a Fairmont or XR. My AU was the same colour as yours. I can't remember what the wheels were.

We only leased them for two years so in 2002 I got another AU Futura, a III I guess. One of the options i got was a wood grain Momo wheel. That one was kind of a gun metal grey. Come 2004 and the time for the next car I'd had another promotion and could up the ante and got the BA V8 Ghia in Ice Mint Silver I've mentioned before on your thread.
 
OP
D

D.F.B

Well-known member
Joined
Aug 2, 2023
Messages
1,555
Location
Australia
I never understood why the AU body shape was so generally unloved. Unless it was the base model with the egg crate grille I thought they looked fine.
Oh no, you've opened the can of worms..................................

When the AU Falcon was released in 1998, I was only 12-years old and not really into cars. A few years later, I became interested in cars, and for some reason I gravitated towards Ford. Perhaps it was because at the time Ford were the underdog, and I felt like I was also the underdog myself. Like you, I never understood the problem with the AU Falcon design, I just liked Ford's, so I liked the Falcon. All I knew was that Ford were struggling with the Falcon, that Holden were smashing it in the showroom and racetrack. The tables turned with the BA and suddenly the balance between the two brands leveled, Holden sold more, but Ford weren't as far behind as they were and the vehicle itself was far more sophisticated than the archaic Holden platform.

The thing is, the AU Falcon had a lot of good points, often over and above the VT-VX Holden's. Holden used steering, front and rear suspension that debuted in 1978. So even though they had IRS across the range, it didn't really benefit the car like Holden proclaimed. Ford only offered IRS on the top spec models, it was vastly superior to the Holden's semi-trailing arm design. The Falcon used double wishbones front and rear, offering superior ride on the luxury models, and superior steering and body control on the performance versions. It's steering was sublime too, and not just next to the horribly gluggy, heavy feel of the Holden. However, while the Ford inline 6 was better than that Buick V6, Ford got smashed on the V8 front after Holden introduced the LS1. At least the Windsor V8 Ford's sounded amazing. I also felt the Ford's had superior build quality, probably because the factory was running slow because of reduced demand.

But...............we all know why the AU failed. It wasn't from the way it drove, the specification, the lower service costs...................it was purely a stylistic problem. I personally like it, but I certainly know WHY people found issue with it. Those goofy headlights, the "droopy" rear end, the domed roof and oval shaped windscreens, the way the doors curved down and under the vehicle. The interior also had too many round design elements. Overall, it was a very confused design. The head and taillights had a modern sharpness to them, as did that lovely crisp belt line that ran the entire length of the vehicle. But then they combined it with an egg-like profile...............it just didn't work. They did try to disguise the curvature with the Series II update, using squared off spoilers, horizontal grill designs, deeper/squarer bumpers. But for most, it looked even more confused.

Screenshot-37.png

Screenshot-39.png

Screenshot-50.png

Screenshot-49.png

The other problem Ford had was they implemented too much change, too soon. It just didn't look like a Falcon and alienated their traditional customer base who preferred a more rugged look. With AU, Ford were trying to reduce visual bulk and appeal to more women. Without being sexist, back then males were still the primary car buyer within families or fleet managers. The AU design completely missed their target customer.

Screenshot-38.png

The funny thing is, a few simple alterations to the design prior to the car going into production would have transformed the AU design. The first would be the roof, flattening it both length and cross ways. Then instead of the ovoid front and rear glass, I'd have squared that off. In fact, Ford did just that for the AU-based BA Falcon in 2002, an expensive change that normally wouldn't happen on a mid cycle redesign. The final change would have been to reduce the curvature of the rear boot lid, but keeping the triangular lights. While I actually love the AU's rear, most hated it.

Many say the AU was ahead of its time. And in many ways, that is a spot on assessment. The equivalent VT-VX Holden's have not aged well, although the same could be said about most "jelly-bean" looking cars produced during that era. As the years went on, many other car companies started to implement that tapered front and rear design profile on their sedans, most evident by the 2005 Mercedes Benz CLS. Actually, you will notice they implemented the flatter/squarer roof and glass profile. The designer of the first generation CLS was an Aussie, although Mercedes would never admit getting inspiration from an obscure Ford made in Australia, from memory they said they used old Jaguar's as reference.

2005_MercedesBenz_CLS55AMG3.jpg

The only upside to the AU for Ford was the Ute, it comfortably outsold the Holden, most likely by offering a cab-chassis variant.

AU-III-FALCON-XL-IN-LIQUID-SILVER.jpg

AU-III-FALCON-XR8-WITH-OPTIONAL-SPORTBAR-2.jpg

My promotion to the level where a car was part of the salary package occurred in early 2000 and I ordered an AU I Futura with a couple of options. Without boring everyone, there were rules about what we could get and the leasing price which prevented a Fairmont or XR. My AU was the same colour as yours. I can't remember what the wheels were.

We only leased them for two years so in 2002 I got another AU Futura, a III I guess. One of the options i got was a wood grain Momo wheel. That one was kind of a gun metal grey. Come 2004 and the time for the next car I'd had another promotion and could up the ante and got the BA V8 Ghia in Ice Mint Silver I've mentioned before on your thread.

That AU Futura would have been Sparkling Burgundy as Barossa was introduced in late 2001 to replace it. Sparkling Burgundy was similar to Barossa Red, but SB was darker, while Barossa was brighter and had more metallic. The Futura below is Regency Red, but you should have had those 15-inch wheels.

AU-FUTURA-SEDAN-SHOWN-IN-REGENCY.jpg

The AU III Futura would have been Meteorite, which was a lovely color. AU III Futura used the previous AU II Fairmont Ghia wheels.

AU-III-FUTURA-IN-CONGO-GREEN.jpg

Meteorite........................

T3_TE50_IN_METEORITE_WITH_BREMBO_BRAKES.jpg

I can't say I was a fan of Ice-Mint Silver, just lacked depth and luster. Those 3V 5.4 engines were torque monsters, a bet it was great on the hwy.

BA-FALCON-XT-SEDAN-IN-ICEMINT-SILVER.jpg

BA-FAIRMONT-GHIA.jpg

These were the wheels that came on my AU III Fairmont, this example painted Congo Green.................................

AU-III-FAIRMONT-SEDAN-IN-CONGO-GREEN.jpg

I eventually bought my teenage poster car back in 2012, the top of the range TS50 in the signature Blueprint paint. Mine was built on the 20th of August 2002, so one of the last. It was build number 154 and was optioned with the $5000 Brembo brakes, Premium Sound, Wild Blue Interior, ESS Automatic transmission. Phil Geroulis was the engine builder, proudly displayed on the rocker cover. Despite being very different to my entry level Fairmont, it still felt like "home", AU's have such an airy feel to the driving position and the steering is just so nice. The TS50 also had Koni dampers, so they rode quite well despite the firmer settings. And that V8 was a torque monster.................that also had a monster thirst for fuel, but when it sounded that good, who would care. I can safely say, that TS50 is the best driving Falcon I have ever experienced. The later Control-Blade IRS cars just didn't have the same competence offered by the long travel double wishbones used on the AU cars. BA and FG don't steer as well either.


JAN_2012_2.33jpg.jpg

JAN_2012_22.jpg

JAN_2012_DELIVERY.jpg

JAN_2012_533.jpg

So yeah, I'm one of those sicko's who loved the AU Falcon, then and now. They controversial styling hides the brilliance hidden beneath. History has also shown that the AU is probably the most reliable and durable of any Falcon before or after.
 
OP
D

D.F.B

Well-known member
Joined
Aug 2, 2023
Messages
1,555
Location
Australia
Featuring one of the best sport sedans ever made, the E39 M5, this is an excellent video on engine bay cleaning.


I've said this before, but his content is so well done. I just wish he hadn't fallen for the Giraffe pressure washer thing, I'm pretty sure they sent it to him. For someone so professional, it's a little jarring to see him lumbering around with that goofy gun setup.

Completely unrelated, his shoes get my approval.
 

Geoff289

Well-known member
Joined
Nov 10, 2013
Messages
1,209
Location
Melbourne, Australia
Oh no, you've opened the can of worms..................................

You're all over it as usual. Like you, I think i was born a Ford guy.

That AU Futura would have been Sparkling Burgundy as Barossa was introduced in late 2001 to replace it. Sparkling Burgundy was similar to Barossa Red, but SB was darker, while Barossa was brighter and had more metallic. The Futura below is Regency Red, but you should have had those 15-inch wheels.

AU-FUTURA-SEDAN-SHOWN-IN-REGENCY.jpg
Yep, that's exactly what mine looked like.
The AU III Futura would have been Meteorite, which was a lovely color. AU III Futura used the previous AU II Fairmont Ghia wheels.

AU-III-FUTURA-IN-CONGO-GREEN.jpg

Meteorite........................

T3_TE50_IN_METEORITE_WITH_BREMBO_BRAKES.jpg
Yep, that's it, Meteorite. I don't think mine had those wheels, though. Maybe there were some other, larger diameter options?
I can't say I was a fan of Ice-Mint Silver, just lacked depth and luster. Those 3V 5.4 engines were torque monsters, a bet it was great on the hwy.

BA-FALCON-XT-SEDAN-IN-ICEMINT-SILVER.jpg
I wasn't really happy with the Ice Mint Silver either. Choosing the colour every couple of years was the hardest decision, frankly. Again, I don't think I had those wheels. Mine also had an XR type spoiler. It was a great car but very thirsty but as I wasn't paying for the fuel that was fine. The powers that be actually changed the rules after I got that to prevent us getting 8 cylinder and forced induction engines. My next three were a BA XR6 manual, BF XR6 manual and an FG G6E I bought that last one from the leasing company when I retired.

I've driven a T550, as you say, a great car. Hard to go past a Windsor and I have a pretty healthy one in my Mustang, of course. The lazy torque of the Ford in line sixes also makes them a much nicer drive than the busy thrashing machines the GM V6's were.
 
OP
D

D.F.B

Well-known member
Joined
Aug 2, 2023
Messages
1,555
Location
Australia
Yep, that's exactly what mine looked like.

Yep, that's it, Meteorite. I don't think mine had those wheels, though. Maybe there were some other, larger diameter options?

I wasn't really happy with the Ice Mint Silver either. Choosing the colour every couple of years was the hardest decision, frankly. Again, I don't think I had those wheels. Mine also had an XR type spoiler. It was a great car but very thirsty but as I wasn't paying for the fuel that was fine. The powers that be actually changed the rules after I got that to prevent us getting 8 cylinder and forced induction engines. My next three were a BA XR6 manual, BF XR6 manual and an FG G6E I bought that last one from the leasing company when I retired.

I've driven a T550, as you say, a great car. Hard to go past a Windsor and I have a pretty healthy one in my Mustang, of course. The lazy torque of the Ford in line sixes also makes them a much nicer drive than the busy thrashing machines the GM V6's were.
My biggest car regrets was not ordering the Turbo when I bought my FG way back in 2008. I have otherwise owned or driven every modern era Falcon engine, the Turbo though is the missing link. That includes the 5.0 and 5.6 Windsor V8, the Boss 5.4 V8 (never experienced the 3V), the mighty 5.0 Miami V8, the original SOHC 4.0 inline 6 in an EB II (the very first car I ever drove), the SOHC AU-spec 4.0 in standard and VCT guise, the BA and BF spec DOHC 4.0, and the FG spec DOHC 4.0. I've also driven the 3.3 and 4.1 OHV cross-flow's 6's, those things were not very nice at all.

Those Tickford spec AU Windsor's sounded amazing, somewhat making up for their power deficit compared to the Gen-III Chev. I remember someone describing the sound as blood and guts raw. The big 5.6 was a beast, thumping hard from low down and had decent top end with that huge intake plenum sitting up above the engine. She wasn't a sweet revving engine though, I guess the old cast iron design had its limitations. Not sure if you have seen this video, but it shows how those engines were stripped from a crate engine and rebuilt using various Tickford designed parts. They were a very special engine.


T3_WINDSOR_V8.jpg

This was the poster I mentioned in the previous post.............................

t3poster.jpg

The 5.4 DOHC Boss V8 that came the following year certainly had the numbers on paper, but somehow they just didn't deliver. I don't totally hate this engine like some of the Ford guys do, they sounded amazing with insane induction note and a creamy exhaust warble. They were also butter smooth from idle to red line. I've been in and driven Boss 260 and 290 versions of this engine, they have nothing until 4500 rpm then take off and slam into the limiter at 6000 rpm, so a 1500 rpm power and torque band. The lack of VCT on those 4V heads really showed and would have transformed the low rev torque and made the engine feel more usable across the rev range.

Obviously the 5.0 Coyote based supercharged Miami V8 that arrived in 2010 fixed those issues. For my favorite cousins wedding in 2011, my XR6 was used as one of the bridal cars, and my Ford parts manager uncle snagged a Vixen Red FPV GT from the dealership, and some junk Holden made up the trio. :ROFLMAO: The next day, it was tee'd that my uncle, his son and I would take the GT out for a drive. Three guys and a supercharged Falcon GT, no prizes for guessing that poor car copped a flogging. Easily the most powerful car I had driven to that point, the noises that came out of that engine was unlike any I had experienced, the subtle supercharger whine at low speed transforming into a howling wail as it wound out to the 6250rpm up shift, accompanied by a rasping exhaust note and that lovely whipcrack sound as the ZF gearbox upshifted. So addictive!!

APR-2011-10.jpg


Those engines were so special, hand built with a variety of local parts, totally unique within the Ford world. They also had so much untapped potential. The story is, both early versions of the engine, the Boss 315 and Boss 335, the throttle only opened something like 50 to 70 percent to hold them back. The lack of an intercooler also limited them, mainly from a heat soak point of view, so the PCM will pull power to protect the engine when ambient and engine bay temps reach a threshold. For the GT's Boss 335, FPV quoted 335 kW and 570 Nm figures, but they later admitted those numbers were the minimum the engine would make. On a hot day, my XR8 with the Boss 335 certainly feels somewhat flat, clearly its only making those minimum numbers. But on a nice crisp morning, they are an animal, feeling way more lively and shoving you back into the seat with considerable force. Again, FPV later admitted the Boss 335 was capable of 375 kW (500+ hp) on over-boost.

The later Boss 345 and Boss 351 engines were more refined in their torque limiting strategies, the Boss 351 in particular was known to make something like 410 kW. I know this all sounds like bull-**** folklore, but by law, Ford/FPV were required to quote the minimum numbers the engine would produce in any condition, they would have copped a wrap over the knuckles for quoting inflated figures that were not achieved in certain conditions.

So why did they do this? Why does Ford do anything....................cost. While the plenum was designed for an intercooler, doing so and unleashing the full potential of the engine required extensive engineering of the firewall. This was due deemed necessary to handle the power and torque of that engine and therefore make it a warrantable proposition. To do so also required another set of crash tests...................all for a couple of thousand sales per year. FPV couldn't afford it, Ford wouldn't justify it. So, FPV calibrated the engine to account for the lack of the intercooler, which meant the situations outlined above.

Still, its an amazing engine and one that I'm proud to own.


My engine was made by Mr. Stevie Voice, I actually had the chance to thank him for his work.

IMG_E1520.jpg

IMG_2890.jpg

As for the 6's, I always thought it silly how Holden and its owners thought they had something special when they started using the cast-iron 3.8 OHV V6, like, somehow a V6 was exotic. And yet somehow the Ford inline 6 with its OHC layout and alloy head was seen as outdated. To be fair to Holden, those SOHC 4.0-litre engines were hardly the last word in refinement, so they were no better or worse than those 3.8 V6's. I always hated the wheezy sound the AU SOHC engines sounded, they also turned rough above 3500 rpm.

The DOHC Barra though was a different story. Those engines made the 3.8 V6 Holden look, sound and feel ancient. When Holden introduced the 3.6 Alloytec V6 (GM HFV6), there was an expectation it would hold a significant advantage over the Ford. I remember reading many reviews noting how unrefined that engine was, which puzzled many considering the HFV6 was a truly all-new engine. And yet, the Ford 4.0 inline 6 with its cast iron block and new 24-valve DOHC cylinder head was designed on a shoestring budget out classed the HFV6 across the board, especially low rev torque and overall refinement.

fgo103.jpg

I hated how those GM V6's sounded. Sure, they revved harder than the long stroke Ford, but they sounded so wheezy and asthmatic. At the time, GM boasted how they benchmarked V6's Toyota, Nissan and Honda when designing the HFV6 engine. The on-paper specs looked fantastic, DOHC 24v heads, dual length intake, VVT, all-alloy construction, provision for future updates such as direct injection and turbocharging. So, what went wrong? How did they benchmark and deliver an engine that ended up being a non-event? Most likely the finance department. And history has shown that these engines were/are unreliable.

While the DOHC Barra was smooth and refined, she was pretty strained up top. However, it was significantly sweeter sounding and feeling in almost all normal driving conditions, not something the GM V6 could achieve. The turbo version was more refined again, somehow the turbo soothed high rpm sound, as well as making for a deeper note. Having said that, I actually love the rasp of the naturally aspirated version. Compared to the BA-BF NA engine, for FG they actually put some effort into tuning the intake sound.


I always thought it amazing how the Barra was the result of four decades of evolution. Apparently, the bore centers of the 4.0 block could trace roots back to the 1960 log-head OHV inline 6. To deliver a superior engine from such a small budget compared to what GM spent on the HFV6 is quite amazing to me. Apparently, the changes needed to meet emission standards beyond the 2016 closure were a mere stroke of a pen, so while many wrote it off as an outdated engine, there was more potential for it. Direct injection was on the table, at one point they were messing about with a diesel version too.

If you hadn't noticed, I'm quite interested in engines........................:ROFLMAO:
 
To avoid these ads, REGISTER NOW!
OP
D

D.F.B

Well-known member
Joined
Aug 2, 2023
Messages
1,555
Location
Australia
Kranzle KHD10/122 Oil Change

I’ve previously documented the oil change process on the mobile K1152 (K1122), but in this instance, I’m featuring the KHD10 that I wall mounted back in June 2023. After 18-months of solid use, this will be its first oil change.

The owner’s manual instructs to change the oil at 50 hours, then at 250 hours or yearly from there on. The oil change is also a general guide to the health of the machine. If oil coming out of the machine is grey or white, that indicates water is getting past the seals and into the oil chamber, meaning more extensive work will be needed in the future.

Screenshot-292.png

It’s not recommended turn these machines upside down, so the oil should be drained from the bottom drain plug rather than out of the dipstick. To gain access to the drain plug, the machine needs to be taken off the shelf. That means removal of the rubber saddle clamps that secure the unit to the shelf, then the inlet water hose, followed by disconnecting the jumper hose which transfers pressurized water to the hose reel. Finally, unplug the power and lift the machine off the shelf.

wm20.jpg

wm14.jpg

IMG-3646.jpg

IMG-3649.jpg

With the machine on the bench and before going further, I took the time to go over it with Bilt Hamber Trace-less. Not that it was especially dirty, but I like to work on clean machines.

IMG-3653.jpg

It can be tricky to drain the oil due to where the drain plug is located and the lack of clearance under it. As such you need to rig up something to hold the unit above the oil drain pan, although this is much easier on the KHD series rather than the bulkier cart models like the 1122/1152. In this case, I used two small buckets.

IMG-3656.jpg

Once suspended, you can then loosen the drain plug with a 13mm socket or wrench, then backing it out by hand. The oil used in these machines is thick, so remove the dip stick to speed up the process. I also recommend gloves, this stuff is basically diff oil, which means the corresponding acrid stench.

IMG-3659.jpg

IMG-3662.jpg

IMG-3664.jpg

The oil that came out of the machine was darker than I was expecting, so I probably should have changed it sooner. Because of that, I decided to flush
the case with some 15W-40 motor oil I had on hand. Once fully drained, the plug was cleaned and reinstalled, ready for the fresh oil.

IMG-3668.jpg

Consulting the owner's manual, it asks for 0.25L of the OE-spec Kranzle Gear Oil, which seems to be a bit thin on the ground at the moment. The manual also suggests the use of 15W-40 motor oil as a substitute. Measure out and then add the oil, reinstall the dipstick and check the level, adding more if needed.

Kranzle Pressure Washer Pump Oil 1L - High-Quality Lubricant - Detailing Shed
Kranzle Pressure Washer High Performance Pump Gear Oil

Kranzle Pressure Washer Gear Oil Change Guide and Maintenance Tips – Obsessed Garage

At this point I'll point out that these Kranzle pumps always take more than 0.25L of oil. Each and every time I have changed oil on these, I've always had to add at least another 50ml of oil to even register on the dipstick. For a German company, I find this puzzling.

IMG-3667.jpg

It's then time to re-install the machine on the wall. I connected the inlet and jumper hoses first, then shuffled the machine to line up the saddle clamps with the holes in the shelf. Everything tight, I fired it up for a test run.

IMG-3675.jpg

Serviced and ready for another year of washing.
 
OP
D

D.F.B

Well-known member
Joined
Aug 2, 2023
Messages
1,555
Location
Australia
Yes, a direct line from the 1960 170 cube in line six with the head and inlet manifold all one piece ........

to this


I've come across those a few times, but for some reason, they don't light my fire. Super cool though.

To me, there is a charm to the big iron block on Barra, makes them look unbreakable. I note that the billet aluminum block only saves 17 kg over the factory cast iron Ford block, I guess they have beefed it up to account for the 3000+ HP potential.


BA-BARRA-182-GRAPHIC.jpg

BARRA-182.jpg

1960 to 2010..............................

XK-FALCON-FG-FALCON.jpg

XK-FALCON-DELUX-FG-FALCON-XR6.jpg

XK-FALCON-144ci-INLINE-6.jpg

FG-FALCON-4-0-INLINE-6.jpg

And the last iteration. Notice the special carbon fiber snorkel and how they even changed the casting of the rocker cover to recess the build plaque.

FG-X-XR6-SPRINT-ENGINE-SHOWN.jpg

FG-X-FALCON-XR6-SPRINT-ENGINE.jpg

ford-falcon-xr6-sprint-2016-1.jpg

And the last engine built...........................

57-B-940-B-4532-84-A8-5-C40-B6-B1-FA49-zpstvfi7rnq.jpg
 
OP
D

D.F.B

Well-known member
Joined
Aug 2, 2023
Messages
1,555
Location
Australia
My Ford Performance welcome pack arrived today........................

IMG-3682.jpg

Also arriving, a fluid extractor. This particular one has a 9.5-litre capacity to account for the both the Ranger and XR8, which hold 8.6 and 8.5 respectively. This one also features both pump action and a compressed air connection.

IMG-3686.jpg

No excuses now.
 
OP
D

D.F.B

Well-known member
Joined
Aug 2, 2023
Messages
1,555
Location
Australia
Got rained out yesterday, so it was back on the tools today. Despite it being warm over the last two weeks, the lawns I cut today were relatively tame. With the long soaking rain yesterday, I doubt that will be the case at the next visit in two weeks.

On the last lawn of the day, instead of the usual 3 - 4-inch-high Kikuyu, I was dealing with a metric sh.t tonne of leaves shed from two dirty gum trees on the nature strip. Once blown onto the grass, which is difficult because the flatness of these leaves makes them resistant to blower, in some places all you could see was leaves and not grass. I filled a 240-litre green waste bin 3/4 full with leaves.

IMG-3688.jpg

I'm not great at identifying gums, probably because I have little to no interest in them, but I think these two offenders are Eucalyptus leucoxylon. Not only do they constantly shed foliage, but they shed bark as well. I have always hated just about all Corymbia/Eucalyptus trees. The are a select few that I actually like, including eucalyptus caesia Silver Princess for its draping white stems and red flowers caps, Eucalyptus scoparia Willow Gum for its white trunk and dappled canopy, and Corymbia citriodora Lemon Scent Gum for that delightful aroma, especially after rain. The rest do nothing for me, they are ultra messy and prevent other plants from growing underneath.

In the nursery, when asked if a customer wanted an evergreen or deciduous tree, 9 times out of 10 they would say evergreen, and almost always it that response came from males. My response was always along the lines of a deciduous tree sheds only once a year, an evergreen tree will shed all-year-round. Anyone with a Magnolia grandiflora relative (Little Gem, Kay Parris ect) will know what I mean.
 
OP
D

D.F.B

Well-known member
Joined
Aug 2, 2023
Messages
1,555
Location
Australia
Rover Combat Service -

Readers will remember that one of my garden clients gave me this 18-inch alloy chassis Rover Combat. I was actually the last person to use it, I would use his mower to save unloading my own, but a leaking fuel tank and a running issue meant it sat unused in his garden shed for more than a decade. When cleaning out their shed, they had no use for it and asked if I wanted it..................is the Pope catholic?

IMG_7670.jpg

IMG_7672.jpg

IMG_7676.jpg

The Model-Type-Code numbers on the engine paint a picture of its age and helps with future parts ordering -

https://www.briggsandstratton.com/c.../en_us/Files/Numerical_Designation_System.pdf

Model -
121702

12 = Cubic inch displacement, 190cc
1 = Design series
7 = Vertical shaft
0 = Bearing type, plain
2 = Starter type, rewind

Type -
185-01

These numbers are used represent paint colour, decals, top engine speed and the customer/brand using the engine.

Code -
92121658

92 = Year
12 = Month
16 = Day
5 = Plant/Factory number
8 = Assembly line number

So, this engine was made in December 1992, so the mower itself would likely have been made in early 1993.

Because it was so dirty and had clearly been used as Fluffy's toilet, it needed a thorough clean to make it safe to work on.

IMG_7724.jpg

IMG_7728.jpg

IMG_7734.jpg

While this mower is somewhat weathered, because it sat for so long, it's mostly cosmetic and I believe it hasn't done as much work as you would expect for the age of the machine.

The running issues I diagnosed as being caused by the leaking fuel tank, it just wasn't getting enough fuel unless ran on choke. Because this is mid-series Quantum, it has a different fuel tank to the later engines, which meant having to wait a few months to get the correct part.

IMG_7678.jpg

IMG_8708.jpg

IMG_8718.jpg

In addition to the tank and a new fuel line, I had also ordered a carb kit, fully expecting I'd have to clean and rebuild it. But after dropping the bowl, its cleanliness was remarkable, so I replaced the bowl gasket and left it at that. With fresh oil, new filters and a new spark plug, it was then time to fire it up, fire it up, fire it up..........................


These engines still had low and high-speed carb adjustments, which meant I could dial it in to have a nice stable tick-over and a strong top end.

IMG_8765.jpg

IMG-8778.jpg

With the engine running properly again, I also replaced the cracked handlebar knobs, which I had to have sent from the UK as no one here bothers with them.

IMG_7794.jpg

I even polished the muffler.......................

IMG_9034.jpg

IMG_9040.jpg

So that's the recap, so what was today about? Mainly because of storage issues, I loaned out this mower to the nursery to maintain a specific lawn that we wanted cut ultra short, something the Aussie-designed Rover could do very easily. For obvious reasons, I contemplated leaving the machine there on my departure, but I sunk a fair bit of money into this mower and it's such a sweet runner that I wanted it back. No doubt that will be looked down upon.

Most likely unnecessary, but out of curiosity I wanted to de-coke the cylinder head. So, I ordered a new cylinder head gasket and got to it.

IMG-3691.jpg

After removing the eight remarkably clean head bolts and the two smaller bolts holding recoil, I gently lifted the head away from the block. The piston was also remarkably clean, and while it looks bad in the photo's, the head wasn't too bad either. Compared to the oil-burning Sprint from a couple of months ago, this one looks quite reasonable. The intake valve was pretty crusty though.

IMG-3693.jpg

IMG-3694.jpg

I then went about cleaning up the head, block and piston, removing any remaining gasket material in the process. I also sanded the head on the bench to level down any warping and create a level gasket surface. You would probably do that with the block as well, but I wasn't removing the engine or all the surrounding parts to make that possible. The valve faces were cleaned, and I did my best with the valve seats.

IMG-3696.jpg

IMG-3699.jpg

After cleaning the block and head with carb spray, it was then time for reassembly. For the head gasket, you need to be careful when ordering these. Despite these flat-head engines being largely unchanged over many decades, Briggs did change a lot of parts over the years, head gasket included. This is where your model-type-code number comes into the equation, which helps narrow down what parts your engine needs. For this vintage Quantum, I needed the 272200 or 272200S head gasket.

Head Gasket for 4.5HP Briggs & Stratton Quantum Motors 272200 272200S

IMG-3701.jpg

With the recoil cover still on the machine, it can be tricky getting the head levered up under the cover plate, then aligning the gasket and at least two head bolts with the block. Once located properly, I then fed in the rest of the bolts, getting them started by hand then seating them with the impact driver. Important to note that I didn't torque them down with the impact, I just ran them down till the first click and then followed with a torque wrench. I know there is probably an official torque sequence, but I just follow a cross pattern, the first round to 10 Nm, then followed by the suggested 16 Nm..............actually, I did them at 17 Nm.

IMG-3705.jpg

With that done, I turned to some more basic service items, starting with the spark plug. These engines originally came with Champion CJ8 plugs, but a J19LM that was used on the later flat-heads will also work. I had both in stock but went with the J19LM.

Champion J19LM

IMG-3709.jpg

Next, the filters. Both the paper panel filter and foam pre-filter were dirtier than expected. I could have blown out and/or washed them, but I don't have the patience for that, so I just replaced them. The items that came out of the machine were aftermarket parts, the ones that went in are genuine Briggs.

Briggs & Stratton Genuine Filter-A/C Foam 493537S
Briggs & Stratton Genuine 3-6.5hp Quantum Filter-A/C Cartridge 491588S

IMG-3711.jpg

IMG-3713.jpg

It was then time to fire it up, fire it up, fire it up for a test run, which started on the first pull and settled into that sweet idle.

IMG-3715.jpg

I love these engines, they are so simple to work on and seem to run much nicer than the later versions with their fixed speed carburetors. That means they can actually idle and then have enough fuel for high rpm running. What I did today wasn't really needed, but after seeing the condition of the piston and those head bolts, it sort of confirmed my suspicion that this engine hasn't done much work.

Next? I need to figure out why that Victa Commando keeps over-revving.
 
OP
D

D.F.B

Well-known member
Joined
Aug 2, 2023
Messages
1,555
Location
Australia
The following small project took more than 4-months to complete!

Back in early September last year, the mulching plug retainer on the Mulchmaster wouldn't stay in place. These mowers can be run in mulch mode with the plug in places, or side throw with it removed. On inspection, the through-bolt that locates and holds the plug in place had rusted to the point where it no longer had threads. This meant the top knob wouldn't hold and caused the plug to fall out.

IMG-3728.jpg

So, I went and looked up the parts manual for this machine and went from there. I've been storing links to various parts and owner's manuals to help with parts lookup. For common parts, I then copy and paste the part number and store it in the appropriate tab, blades, plugs, filters, oil quantities ect.

Screenshot-294.png

Of course, Victa don't bother selling the bolt separately, and I didn't want or need the full mulch plug assembly. So, I took the bolt to a specialty bolt supplier and was given the appropriate substitute for free (don't stress, I've bought countless other items from them in the past, and my father's business one of their biggest customers). The replacement bolt got the machine patched up, but the threads of the knob were a bit suss too.

I then went online looking for a replacement knob. No one but Outdoor King offered it, and even though it wasn't in stock, the "leaves our warehouse within 7-12 business days" gave me the confidence to place the order.

https://www.outdoorking.com.au/lawn...parts/victa-genuine-mulch-plug-knob-ch86885aw

Screenshot-295.png

A month later and I was emailing wondering where the order was, only to be told that they were still waiting for the part. Ahhh, so it's going to be one of those situations where you take my money and sit on for a few months because your website doesn't update product listings or inventory.......................:unsure:

So, fast forward to last week and 4 months down the track, I again (politely) emailed wondering where the hell my order was. Amazing how it was suddenly ready dispatch the next day. Better late than never, the parts arrived today. Included in the order was an updated deflector design for when using the side throw function.

These early Mulchmaster's came with a completely ridiculous plastic deflector skirt............................


vmm101.jpg

That deflector lasted all but 10-minutes on my machine! I can see why they went with this design, and in certain situations, it poses no issues. But the stupid thing would hang op on the edge of paths or garden edges, it even made turning around at the end of a row difficult. So, I removed it and threw it in the back of the garden shed.

IMG-0513.jpg

In mulch mode with the plug installed, running without the deflector was completely fine. However, for thick growth that warranted side discharge, the lack of deflector was quite dangerous. Re-fitting the plastic skirt would mean remembering to take it with you on the job, then have a socket set on hand and burn time on the job fitting it. Clearly Victa put some further thought into this and redesigned the deflector, reverting back to what earlier Mulchmaster 550's used.

mm550102.png

Current model Mulchmaster 560.....................

-560-VICTA-22-INCH-MULCHMASTER-SELF-PROPELLED-L1-1.jpg

Typical Victa, they didn't bother updating their product images to represent the newer 850-series fuel tank and cowling design. The crappy V200 engine is fully representative though. Considering Briggs and Stratton own Victa, you would expect them to want their products accurately depicted. Or maybe it's just me who notices these things? :unsure:

mmv200.jpg

Anyway, consulting the parts manual, the newer steel discharge flap is a direct fitment on older machines and not outrageously expensive, so I ordered it too.

https://www.outdoorking.com.au/bran...ts/victa-genuine-discharge-flap-assy-ch87226a

Before getting started, I decided to give the unit a superficial clean, applying Shine Supply Wise Guy to the whole machine, left it to dwell then rinsed with the pressure washer. When I had power and water routed to the pressure washer, I had them bill it out as "workshop maintenance washer"...............so I guess that was somewhat accurate. ;)

IMG-3724.jpg

I had kept the plastic deflector mounting bolts and washers installed on the machine, which made installing the new steel item easy. You need to fit this first before installing the mulch plug and knob, you can't do it the other way.

IMG-3733.jpg

IMG-3736.jpg

IMG-3745.jpg

IMG-3743.jpg

The functionality of swapping between side discharge and mulching is the same procedure, just unscrew the knob and drop the plug out. However, with the flap in place, it makes side throwing much safer but without being an obstruction.

A four month wait for two parts installed in less the 5-minutes.
 

Attachments

  • IMG-3733.jpg
    IMG-3733.jpg
    222.2 KB · Views: 4
Last edited:
OP
D

D.F.B

Well-known member
Joined
Aug 2, 2023
Messages
1,555
Location
Australia
A few years ago, I bought a small selection of AMMO NYC products to try, this being before AMMO Australia was set up. With Hydrate being one of his signature products, I ordered two bottles of it to try.

IMG-0949.jpg

Hydrate is very different to all other drying aids on the market, Larry terming it as a "paint moisturizer". It's considerably thicker in consistency, much like moisturizing lotion, as such it doesn't atomize. My bottles are the earlier v1 formula, the latest PRO version is even thicker again. You also don't spray it directly onto the paint, rather one or two sprays onto a damp towel, spread it over a section, then wipe with a second dry towel.

IMG-1661.jpg

IMG-1664.jpg

IMG-0960.jpg

I wanted to love this product but found the unconventional application a challenge. After being reminded of this product recently, I decided to give Hydrate another try on the XR8 today.

IMG-3723.jpg

I haven't used Hydrate on a ceramic coated surface, but on the XR8 with Wolfgang DGPS, it worked very well. In this case, I used a damp TRC Platinum Pluffle for the initial wipe, followed by another for the final buff. For each section, I found a single spray into the damp towel was sufficient, less is more.

Hydrate certainly has a very lubricated feel to it, although it doesn't quite leave the surface as slick as ADS Amplify, Bead Maker or Meg's HCD. Where Amplify and HCD can be used with a single towel, you really need that extra towel for Hydrate. In some ways, it's like a spray wax in that it needs a slight flash period before leveling any high spots with the second towel. I think that's where I struggle with Hydrate, those initial wipes produce a smeary finish that looks like it will be a nightmare to deal with but then transforms with the second wipe...................you just need to keep the faith and be patient with it. And lastly, I've always thought that this product smells a little odd, very distinctive though.

I'm going to try and keep using it on this car and see if I acclimatize to it because I really like the concept of this product. I like how Larry thinks out of the box with his products rather than just being another Youtuber with a bunch of white-labeled generic products with a premium price tag.

One last note, considering Hydrate pre-dated Larry's foray into ceramic coatings, I suspect the latest PRO version was designed to work better with coatings. The price is up there, however, considering how little you use per vehicle, that bottle will last you a VERY long time.

For those who want to give the AMMO range a try, the products are now available in Australia via the STASH group -

AMMONYC AU
AMMO Hydrate Paint Moisturizer – AMMONYC AU

US Link -
AMMO Hydrate Paint Moisturizer – AMMONYC
AMMO NYC – AMMONYC
 
OP
D

D.F.B

Well-known member
Joined
Aug 2, 2023
Messages
1,555
Location
Australia
Mustang is now out from under its cover, trading places with the XR8.

IMG-3749f.jpg

IMG-3752f.jpg

After working just about every weekend for more than 10-years, I'd come home so tired that I'd just crash with no desire to go anywhere. I'm told that's not healthy, but you have to do what you have to do. So, it's nice to jump in the car on a Saturday evening and just go for a cruise.
 
OP
D

D.F.B

Well-known member
Joined
Aug 2, 2023
Messages
1,555
Location
Australia
A little re-stock and something new............................................... ......

IMG-3765.jpg

IMG-3768.jpg

After being available in the US for some time now, Ghost Tire Sealant is finally available in Australia. This is supposed to last longer than Tire+ and on first acquaintance, it's runnier than I was expecting compared to Carpro Darkside and Gyeon Q2 Tire, both also tire sealants. Can't wait to try it out.

AU Links -
https://detailingshed.com.au/product...f5cede05&_ss=r
https://autobuff.com.au/products/arm...t-tyre-sealant

US Links -
 
OP
D

D.F.B

Well-known member
Joined
Aug 2, 2023
Messages
1,555
Location
Australia
Just came across this virtually brand new 2015 FG-X XR8 for sale, same Emperor Red as mine. It has all of the production line build sheets, even the plastic is still on the seats and touchscreen. Having never been registered, if/when it's sold, it will actually count on the official Vfact's monthly sales tally......................................... 9-years after they stopped making Falcon's!


85xr8.jpg

This example has only 85 km (53 miles) on the clock and looks to be owned by a Ford dealer. A lot of Ford dealers held onto some of the last Falcon XR6's and XR8's to sit in the showroom indefinitely. My local dealer had a Winter White XR8 on the showroom floor for many years, not sure what happened to it though.
 
OP
D

D.F.B

Well-known member
Joined
Aug 2, 2023
Messages
1,555
Location
Australia
I've been a bit quiet in this thread over the last week. In addition to catching up on a few garden jobs, I've been fighting off a summer cold, not helped by humidity that also drains my energy. Losing a close friend and colleague to cancer, and one last step in terminating my employment has also drained my motivation. But, as of 3pm today, I'm a free man.

I had planned to wash the Ranger today, but it was pointless to do so due to the rolling showers and the need to go out this afternoon.................I'll do it tomorrow. 😁

Instead, I made the 52nd attempt at getting this cranky b.tch running properly again.................

IMG_1039.jpg

I've been trying to get this thing sorted for far too long. Every few months, I'd pull it out of the shed, make an attempt to fix it, fail, then crack the sh.ts and put it back in the shed. Rinse and repeat.

First, it was revving its guts out, which sounded amazing, but it would have eventually thrown rod doing that for too long. I traced that to a cracked intake tube and replaced it with a secondhand unit. That tube also came with a carburetor that I want to rebuild at some point, mainly to have a spare unit on hand but to also get experience with the inner workings, although after today I'm more confident about that now.

That fixed it briefly, and was running fine until it started to die on full throttle, like it was starving for fuel. I replaced the fuel tap as it seemed to be flowing very weak from the gravity fed fuel tank.

IMG-1415.jpg

Success! Until the engine warmed up and it started to do the same dam thing. Cue another trip back to the shed.


I recently ordered a bunch of Victa G4 carburetor parts, mainly to have in stock but to also hopefully cure this thing. I'm sort of using this machine as my learning subject for when, not if, my other Victa 2-strokes start to give trouble.

The first thing I did on this attempt was to replace the pumping diaphragm (figure 12 below). This would be the deepest I've dug into one of these carbs, replacement of the diaphragm requires removal of the outer cap (15), diaphragm spring (14), diaphragm washer (13), the lifter spring (11) and lifter (10), the poppet valve (2) falls out by design. While I had the carb off the manifold, which is a simple bayonet fitting, I also replaced the o-ring on the manifold as a precaution, which did have some minor age marks on it.

Screenshot-299.png

I fired it up and let it reach operating temp, I was then thinking I had it fixed only for it to die out again a few seconds later. :cautious: Again, like it was starving for fuel.

So, off with the cowling/fuel tank again. At this point, I decided to pull off the primer cap, which also houses the main jet, needle, seat and float. These caps are notorious for causing leaks and flooding as they age. With the cap removed, I noted how there was no fuel in the chamber.

IMG-9263.jpg

Inspecting these parts, to me it appeared as if the needle was not moving freely, in effect causing the float to remain in the closed position, or sporadically closed. The needle also looked to be worn. So, into the parts department for a replacement cap and needle. Installed back on the carb, it promptly began to leak out the primer button. Off it came. :cautious:

This is something I have noticed a lot with aftermarket parts like this, there is quite a lot of variability in the quality, meaning this brand-new part was leaking right out of the box. These particular caps looked suss to me when they were delivered, the plastic surrounding the actual primer button looking very poorly made. I don't recommend buying from Varietech for this and other reasons.

I then tried another primer cap, which was from Push Mower Repair, which looks like a much higher quality part. The new cap was installed with a new yellow needle and new o-ring. (You can buy these parts in kit form, but you then end up with a bunch of parts you don't use, and with so many machines to maintain, I find its just easier to buy each part separately)

Old parts.....................

IMG-3806.jpg

With the new needle and cap and installed with no leaks, I was fairly confident that this would solve the issue. However, I really didn't want to remove the cowel/tank again, so I just bit the bullet and decided to replace the starter o-ring while it was there. Again, this is the deepest I've been in one of these engines before. The o-ring is accessed by removing the three bolts holding the starter assembly to the crankcase.

This o-ring is imperative as, like all 2-stokes, it ensures the engine is sealed from ingesting dust and provides sufficient vacuum/pressure to the carburetor. One simple leak in any one component will cause poor running and internal damage over time.

Considering how firm the seal was on this unit, I determined that this wasn't the cause of the running issue, the old o-ring looked completely fine with no visible damage. Still, I replaced it with a new one.

IMG-3796.jpg

The Victa PowerTorque is what's called a half-crank engine, which is normally something you would find on really cheap line trimmers as its cheaper to make. On the big Victa, it's actually a very clever way of creating a single piece crankcase and cylinder block. On the previous full-crank engine, it had a separate cylinder, separate cylinder head and a two-piece crankcase, which would naturally take longer to assemble on the line. The power torque has a cast iron block and cylinder with an alloy head. To replace a piston or rod on this engine, you only need to remove two parts, the starter and cylinder head. It's also refreshing to see a giant lump of cast iron and, if fueled correctly, these things will go for ever. The only main drawback to this design is how the flywheel and ignition coil are located under the engine, which would require removal of the blade disk and removal of the engine from the mower to gain access should it lose spark.

vpt105.jpg

vpt104.jpg

I think when you look at this engine, you can see how Aussie ingenuity created a durable and long-lasting engine while keeping it at an affordable price point. Looking at modern Chinese and American made engines, to hit their price points they are pulling quality out of the unit via cheaper/thinner castings, plastic parts. Cheaper doesn't always have to mean poor quality if there was some thought put into the manufacturing process from the very beginning. Ford, General Motors and Chrysler/Dodge/Ram/FAC/Stellantis/Purple People Eater car company could all learn from this.

With it all back together, and some fresh fuel in the tank, I started it up and left it running for quite a while. As it stands, it would seem like I have fixed this machine. Full throttle revs sitting at the magical 3600 rpm, racing up beyond 4000 rpm and settling back down again when under load, which is what they were designed to do rather than running wild for no reason.

IMG-3789.jpg

Returned to the shed, this time without frustration, this cranky b.tch is a little less cranky.
 
Last edited:
OP
D

D.F.B

Well-known member
Joined
Aug 2, 2023
Messages
1,555
Location
Australia
The battery in the Ranger has been on its last legs for quite a while. I limped it through winter, but it's been struggling more than usual over the last month. On the load test, it only showed 300 cca, about half its capacity. Considering its the original from early 2016, I've had a decent run out of it.

IMG-3799f.jpg

IMG-3797.jpg

IMG-3803.jpg

This will be the third AC Delco battery for me now.
 
OP
D

D.F.B

Well-known member
Joined
Aug 2, 2023
Messages
1,555
Location
Australia
Yeah, I needed another lawn mower like a hole in the head....................

IMG-3810.jpg

I needed another project, thinking it would be something like a 90's Rover or Victa, but then I spotted a local listing for an OG Victa 18 on marketplace and well, things got out of hand. That led me to looking at restored examples and it was like, NO, stop!

victaspecialresto2.jpg

If I had bought a beautifully restored example, I would be frightened to undo all that hard work, which is not the point of a lawn mower, I want to hear that engine and smell the 2-stroke smoke mixing with the aroma of freshly cut grass. Besides, I already have enough garage ornaments that don't get used enough. So, I regrouped and decided to reach out to the owner of the unrestored locally listed example, then drove the 20-minutes to the neighboring town to look at it.

v18special.jpg

v18special2.jpg

v18special3.jpg

v18special4.jpg

As always with stuff like this, there is a story behind it. The seller is a retired vehicle and small engine mechanic, he bought it off an old customer to display in his showroom and was never ran afterwards. The old guy only sold it to him because then he knew where it would be, with instructions to never sell it. I'm told the original owner had special stainless-steel blades made for it so that it would extend past the deck so that he didn't have to use a trimmer to cut up against the fence....................suuuuuper dangerous and something I WON'T be replicating. They called these the Toe Cutter for a reason!

After closing his shop, the seller wanted to restore the mower to a showpiece but decided he already had enough showpieces..............a fully restored burgundy Model A Ford and a Model T in restoration...............I should have snapped photos! With no intention to restore it, and the old gentleman now passed, he felt now was the time to send it on its way.

I will admit, on first inspection I was quite disappointed that the throttle was jammed, the choke flap on the air cleaner housing was missing, the recoil was very stiff..................and it hadn't ran in decades. But.................I was there, the thing was mostly original and clean (the byproduct of being stored indoors for the past 30 years) and, well, I fell in love with the back story. It also had the original owner's booklet. For some reason it wasn't obvious, but at this point the seller asked if I was interested and I was like, here's the money! I'm not a haggler, I just pay the asking price like a gentleman and figure it out later. Yes, it was a bummer that it wasn't a running machine, but then it wasn't covered in grass, rat droppings and grease. So, the seller carried it out in his arms like a baby, loaded it up and even attempted to teach me how to tie a knot properly...............yeah, some things are virtually impossible, but that's ok, we can't be good at everything. :ROFLMAO:

Doing some research, I'm pretty sure this example is a 1st gen Model 5 that were produced between 1957 and 1960. This one has the optional rewind starter compared to the pully which you would hand wind a rope around. Bizarrely, the rewind starter uses wire cable instead of rope.

https://www.vintagemowers.net/Victa_Specials.php

IMG-3807.jpg

These plastic "Special" badges are hard to find in this condition. "Special" denotes the adjustable deck height function and mounting clips on the handlebar for the supplied spanner, which were over and above the "Standard". You could also option a "clip on safety rim" and an edger attachment that would gear off the engine and would reside in a recess on the deck.

IMG-3812.jpg

As mentioned, this machine came with the original "Instructions Booklet". Having a read over coffee, it's amazing how differently things were worded back then, such as the directions for starting...........

"........place left hand on top of the starter and pull handle smartly to you.......".......yeah, you wouldn't want to pull the handle dumbly. :ROFLMAO:

Or instructions for cleaning the air filter.................

"........tap the sides of the housing sharply......to remove dust......".

The booklet also suggests how an owner can remedy common running issues, which these days would end in a lawsuit, it's just easier to say "contact your closest dealer".


Also supplied was a supplement for the later low-mounted air filter/choke arrangement. There is also a paper slip which carried the "complimentary" medium duty blades............ "you may find greater satisfaction and obtain longer blade life by using the Victa medium blades as enclosed and which we ask you to accept with our compliments". Again, today it would be like "you will get what we give you, take it or leave it".

The Villers leaflet is a mystery, its clearly a Victa engine but not related to this mower as it's for a 140cc engine not the 125cc. Oh, and a Lifetime Guarantee card, I wonder if I can claim a warranty on a 70-year-old mower?

IMG-3816.jpg

Once home, the first thing to sort was the plastic fuel cap, which was welded to the metal tank. A little penetrating fluid and a set of multigrips, I very carefully cracked it free without damaging a near 70-year-old part. The tank was dry but had a lot of rust residue in it. So, I threw some mineral spirits in it, swirled it around and then dumped it out. I then put a small amount of 25:1 fuel into it, opened the brass fuel tap and watched fuel flow down the rock-hard fuel line. The fuel tap was leaking when open, then leaking fuel through the line once closed. I then noticed fuel leaking out of the carb bowl from a perished o-ring.

None of this surprised me, so I made the snap decision to just remove the carb so that I could at least clean it up and then figure out what I needed to rebuild it. I first removed the perished intake tube, which will need replacement, then undid the clamp holding the carb onto the intake manifold. I then couldn't get the throttle cable free, which having never seen one of these carbs before, I didn't realise that the throttle slider had frozen in place, which was also preventing the throttle lever from working. So, I decided I would leave the cable attached until I had done some research.

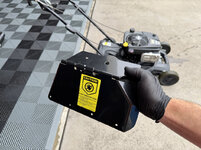
Also of concern was the starter and its wire "rope" feeling very stiff and reluctant to recoil. Two things were happening here. First, the engine hadn't turned over in decades, so she was a little stiff. Secondly, these things didn't have a compression release like later Victa's, so I was also fighting some pretty decent compression. After a few pulls, it started to free up, although still needed some muscle to spin properly.

At this point, I decided to see if I could get the engine to lick off on starting fluid. This was mainly to determine if it had spark, but to at least satisfy my curiosity as to if the thing could run. After two "smart" pulls, I detected the brief hint of a cough. One more pull and bingo, she briefly roared to life. 😁 So, I decided to set the camera up and repeat the trick..................


This brief burst of life basically changed my attitude from "what have I done" to "yep, I've got this!".

After attending to other things, I returned to the little Victa and made another attempt at removing the throttle cable. By using a small flat screwdriver, I levered up on the throttle slide and pop, out it came. I've now disassembled the carb and have it soaking in kerosene. Reading the instructions booklet, they suggest rubbing the brass throttle slide with fine emery paper to allow free movement in the carb barrel. As you can see, it was pretty crusty in there.

IMG-3844.jpg

I'm trying to resist the urge to complete strip this thing down and restore that classic green and red colour scheme. However, I may decide to clean it down and lock in the patina with clearcoat. In any case, I just want to get it running so that I can occasionally run over my own lawns with it as a novelty. To do so, I need to order a few parts, which to my surprise, you can still get rebuild kits for the carb. I need to find a replacement intake snorkel and air filter/choke housing, and it needs blades to operate safely as the ones on it a wafer thin. Also, I need to find a replacement fuel tap, and figure out how to clean out that fuel tank.

So, I'm equal parts excited and daunted by this little project.

For US readers - These Victa's were invested by Mervyn Victor Richardson, hence the abbreviated VICTA name. The Victa 18 was like the VW Beetle or Ford Model T of the mower world, the people's mower if you will. They were extremely affordable, making them attainable for just about every homeowner. They used a 125cc 2-stroke engine, a cast aluminum disk for the chassis, and two small flail blades on a round disk. They became known as the "toe-cutter" due the complete lack of safety or containment of the blades. It's been said that on a Saturday morning during this era, the air would be filled with plumes of blue smoke as everyone went out and cut their grass. These mowers evolved over the years, becoming more safe and more versatile as they evolved into what most people would associate with a lawn mower today. Victa was bought out by Briggs and Stratton in the mid 2000's and continued to make their 2-stroke engines until the mid 2010's. In my opinion, they are still THE best mowers on the market for cut quality, catching ability and overall durability.
 
OP
D

D.F.B

Well-known member
Joined
Aug 2, 2023
Messages
1,555
Location
Australia
Ok, back to some detailing content!

In line for treatment today was the Ranger after it trip to pick up the Victa 18. With my latest Detailing Shed order, I decided to try ADS Shampoo+ again. And what a nice soap it is; easy to pour, nicely slick, great foaming ability, a pleasant scent and cleaning ability that easily removed a layer of light road film from yesterday's rain. I used this to clean the wheels and body.

Also included in my order, two additional Pressol bottles. You can tell a good product when I transition it from the manufacturers bottle and sprayer to one these Pressol or Kwazar's. On this occasion, ADS Pilot and Amplify, teamed with the appropriate label.

IMG-3819.jpg

The main reason for this order was to finally sample Armour Detail Supply Ghost, which has been on sale in the US since last year. Ghost moves beyond a typical water-based tyre dressing, being classified as a tyre "sealant" instead. That means longer durability, which is not the reason why I was interested in it, rather the lovely finish I was seeing from US reviewers.

Prior to application, I made sure to clean the tyres as best I could. Starting by scrubbing with Wise Guy, then followed by Stoner Tarminator after the wash to strip and reset the sidewalls.

IMG-3822.jpg

Ghost is surprisingly sprayable compared to the gel-like tyre sealants I have used in the past. It also has a blue tracer in it to show where you have applied, something I have never experienced with a tyre dressing before.

IMG-3825.jpg

IMG-3828.jpg

IMG-3830.jpg

IMG-3833.jpg

IMG-3837.jpg

IMG-3835.jpg

WOW, what a product!!!! I like most of the tyre dressing products I try, but this stuff has leap frogged above almost all of them. It works in easily, the tracer a handy feature. But it's the completely dry/residue free finish with just the right amount of enhancement that gets me excited! I can see why this is getting so much attention.

A more detailed review will follow.
 

Dixie_Flatline

Well-known member
Joined
Oct 30, 2024
Messages
387
Location
Tennessee
Was that a single application? I like the results you achieved. I was just reading you can apply more within a ten-minute window. Not sure what that would look like though. Soaking wet tires?
 
OP
D

D.F.B

Well-known member
Joined
Aug 2, 2023
Messages
1,555
Location
Australia
What a blissful few hours in the garage, music on and completely lost in my own little world. Thankfully, a cool change that blew through on Wednesday evening and a cool breeze makes outdoor activity a very enjoyable.

After messing about with the Victa Combat on Wednesday morning, I placed an order with Push Mower Repair later that afternoon for a stock of G4 carburetor parts. A less than two day turnaround is impressive!

Victa Parts | Push Mower Repair
Push Mower Repair | eBay Stores
(14) PushMowerRepair.com - YouTube

IMG-3850.jpg

It's all very well having parts on hand, but they are completely useless if you don't know what they are. So, a little bit of sorting and labeling for organizational bliss!

IMG-3852.jpg

Stored in the Milwaukee Parts Department, or the MPD..................

IMG-3854.jpg

Those parts got put to use straight away, my MasterCut had been flooding out and leaking from the primer bulk if the fuel tap was left on between lawns. See, I told you they are high maintenance these things. So, I replaced the primer cap and o-ring, re-using the OE needle. Fuel tap on, and no flooding out. I then nipped up the cylinder head bolts and cleaned the OE-fit NGK BM6A spark plug.

IMG-9839.jpg
 
OP
D

D.F.B

Well-known member
Joined
Aug 2, 2023
Messages
1,555
Location
Australia
Work continued on the Victa 18 today.

Last night I spent hours trawling for parts, I'm like a dog with a bone with this sort of thing. I also spent time watching how to rebuild these Victa 3F carburetors. Some may know him for his Ford content, but Peter Anderson also has plenty of Victa content on his channel, this one in particular is the clearest video I could find on this topic.


My carburetor was in much worse condition than his. I had partially dissembled it yesterday and submerged everything in kerosene overnight. This morning, I went about cleaning it up piece by piece. The brass components cleaned up fine, finished off with a light scrub with a scotch pad, then rinsed with carb spray. I needed to use a wire brush to remove the aluminum corrosion present on the carb body and bowl. That corrosion had also set up around the float needle and the classic "tickler" (primer), both frozen in place. A blast of carb spray and some light pick work got both free. I then used a torch tip wire to unplug the emulsion tube orifice, then gave the body a good flush with carb spray.

IMG-3858.jpg

The throttle slide tube that was frozen in place is now moving freely in the barrel, some light scuffing with a scotch pad sorted it easily. All clean and ready for full assembly once the gasket set arrives.

https://www.ebay.com.au/itm/3527548...SfUJV2EvnJyWwEEkFSaeQ2qjkr3Na7V8aAhCSEALw_wcB

From here, I decided to remove the blade carrier. A little penetrant and a few zips with the rattle gun had it off hassle free. This gave me access to scrape away the dirt and grass cocktail that had been there for 30-years, then a quick blast with the pressure washer. The blades on it are as thin as a piece of paper and in no way safe. So, I have ordered a replacement disk, NOS blades and a new disk nut. Which disk I use will depend on what I find on closer inspection of the original.

IMG-3855.jpg

Behind the blade disk is the muffler outlet, just above the lower right engine nut. The gorgeously designed spiral muffler takes exhaust gas from the engine and directs it down through the deck and into the lower muffler plate. This type of arrangement was used on those 2-stroke Lawn Boy's in the USA.

IMG-3877.jpg

Not all of them had that muffler arrangement, I think it was specific to the Special, others had a basic round muffler pot.

v18roundmuf.jpg

I then decided to do some "detailing". I didn't want to be blasting this with a pressure washer, or use aggressive alkaline chemicals. So, I mixed up some DIY Detail Rinse-less wash at the 128:1 water-less ratio. Why this product? Because it would offer a gentle but effective clean, reducing the risk of damaging the 70-year-old paint. Being surfactant based, this particular rinse-less also lathers up under agitation.

IMG-3863.jpg

Next, I decided to tackle the fuel tank and fuel tap. To start, I disconnected the spark plug and removed the three bolts holding the cowl/blower shroud to the engine. The shroud is then lifted off the engine and a small nut loosened to release the metal tank strap. The tank can then slide off the shroud. I then loosely re-installed the shroud to keep the parts in tact.

The brass fuel tap was the removed from the tank, disassembled and placed in the kerosene bath. The two o-rings are replaceable and included in the carb kit above. I then installed a plastic fuel tap to facilitate the next step.

IMG-3866.jpg

To clean, I added a handful of stones and some white vinegar into the tank. The stones help agitate loose rust flakes and the vinegar is supposed to help neutralize the rust. I'll let it soak and see what I get.

IMG-3867.jpg

How she is sitting at the moment after a light clean and a little hyper dressing.

IMG-3872.jpg

At this point, I'm now waiting for parts to reassemble the carb and fuel tank, then fit new blades. I have also ordered some vintage cable clips to remove the electrical tape holding the throttle cable in place. At the moment, I can't find a replacement dome air filter/choke assembly. It seems Victa reverted to a tube style intake and filter, so I've ordered one of those until the correct item pops up. Hopefully, it will then be time to fire it up, fire it up, fire it up.
 
To avoid these ads, REGISTER NOW!
Top Bottom