To avoid these ads, REGISTER NOW!

E-tek Restorations: PROJECT THREAD

machine_punk

Well-known member
Joined
May 14, 2011
Messages
2,540
Location
Napa Valley, California
Howdy, E-tek.

It somehow never occurred to me that you had a web page or blog site...so I finally went and looked at those today. I have a web page reserved, but there is not much there yet...just mainly a quick blurb about the studio and directions to Garage Journal to see the rest.

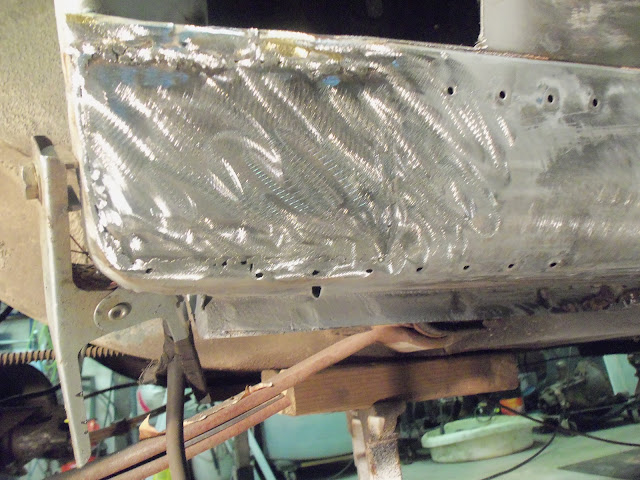
YIKES! That car isn't giving you any sort of break, is it? How do you deal with that on a customer's car (just generally...is there a budget discussed at the front of the project, with conversations when it is clear that budget isn't going to be met?) I assume this is your 'day job,' so it would actually be best to take the longest time on the car (assuming 'time and materials,') but I suspect your are limited by the customer's budget in how long you can take.

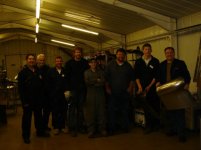
Also, I thought I'd attach a couple of pics of me, doing a little 'panel beating.' These were several years ago, when I was stationed in England. I went to a 5-day course on building patch panels and bodies from scratch, for vintage Jaguar XK's. These guys at Contour Autocraft are amazing. Give them three months, and they can reproduce a Jaguar XK new, from scratch. Here, you see me shaping a fender patch panel on their modern version of a stump. Then, a picture of me, holding my biggest project of the week, along with the other guys who took the course too (That's me, on the right, holding the Jaguar fender).

M_P
 

Attachments

  • 2007 12 3-7 Contour Autocraft Course 039 (800x600).jpg
    2007 12 3-7 Contour Autocraft Course 039 (800x600).jpg
    43.4 KB · Views: 139
  • 2007 12 3-7 Contour Autocraft Course 093 (800x600).jpg
    2007 12 3-7 Contour Autocraft Course 093 (800x600).jpg
    45.2 KB · Views: 123
To avoid these ads, REGISTER NOW!
OP
E

e-tek

Well-known member
Joined
Dec 19, 2007
Messages
10,690
Location
Saskatoon, SK
Well geeze M_P, with all those courses under your belt, I'd bet you could do what I'm doing - and do it much better to boot!

As far as my day job, most here know that my 'real' day job is selling drugs ;). I'm a pharma rep for a major drug company, which gives me the freedom to enjoy my hobby, which is working on cars. As far as charging goes, I only charge for the time I am actually working and don't even charge for general materials. I generally average one job every year or two (yes, two) and I bill $50/hr, which is about half to one-third a shops rate.
I only work on jobs I can "get in to" and where the owner is into it even more. I don't really solicit work, it's generally word of mouth and if I get a break between working on others' rides (which isn't often lately), I work on my own projects.
Next up is a 40 Ford Sedan Rod with an LS1 already in it. It needs finishing, including panel fitment, electrical, a custom console and interior work. No rust work!
 
Last edited:
OP
E

e-tek

Well-known member
Joined
Dec 19, 2007
Messages
10,690
Location
Saskatoon, SK
Continuing on, I made these pieces and applied Zinc.

106_1911.JPG


As well as the edges to be welded to:

106_1910.JPG


106_1909.JPG


This is the inside of the above area:

106_1908.JPG


Which needed cleaning and undercoat removed. Best tool I've found yet to remove undercoating is this oscillating multi-tool. Works like a charm!

106_1906.JPG


106_1907.JPG


106_1908.JPG


Welding in the pieces:

106_1913.JPG


This is one of those hidden pieces. It's the end cap on the rocker....

106_1915.JPG


Then this piece is from the inner half of the wheel well, which goes over top:

106_1917.JPG


This is how picky I try to be: I could see by looking at the left side that the next piece should look like it's overlapping the inner piece with no weld at the edge. It was was spot welded at the factory, so I'll do the same:

106_1918.JPG


106_1919.JPG


Outer rocker patch welded and dressed:

106_1920.JPG


Now the more difficult part - the wheel arch and quarter patch I cut out:

106_1922.JPG


Trim and shape...

106_1923.JPG


I decided to make the lip separately, then weld them together, so that I wouldn't need to pie-cut it to form the arch:

106_1924.JPG


106_1927.JPG


106_1929.JPG


Looks like it might work - with a lot of work!

106_1931.JPG


Lastly for today, I welded up all the old slide-hammer holes.

106_1932.JPG


Tomorrow I'll begin planishing them, as well as the quarter, with the air hammer and this bit that I made. I want to smooth it all out so as not to require as much filler as was there previously.
 
Last edited:
OP
E

e-tek

Well-known member
Joined
Dec 19, 2007
Messages
10,690
Location
Saskatoon, SK
Ed, not sure if you are aware but your photos are slow to load making your topic hard to follow. I wonder what / who / where you are using as a photo host.

First I've heard of that. I use Picasa. Anyone else notice same?
 

Omphaloskeptic

Well-known member
Joined
Oct 11, 2008
Messages
2,346
Location
Ultima Ratio, Wa.
Nasty surprises waiting for you to 'discover' them.

A quick question for the 'Magician of Metals' -
When you are getting a patch ready for tacking in place, how do you decide when you have the correct curve/contour/bend/crease/detail? Do you judge 'by eye', 'by palm feel', 'contour gauge', 'opposite side panel comparison', or what? It just seems to me that there is much more 'art' than 'skill' in trimming and forming these panel patches.
 
OP
E

e-tek

Well-known member
Joined
Dec 19, 2007
Messages
10,690
Location
Saskatoon, SK
Nasty surprises waiting for you to 'discover' them.

A quick question for the 'Magician of Metals' -
When you are getting a patch ready for tacking in place, how do you decide when you have the correct curve/contour/bend/crease/detail? Do you judge 'by eye', 'by palm feel', 'contour gauge', 'opposite side panel comparison', or what? It just seems to me that there is much more 'art' than 'skill' in trimming and forming these panel patches.

First off thank you, - but without trying to be overly humble - the real 'magicians' are guys like Ron Covell and Robert (MP&C). Have you see his work? I do OK and am learning all the time, but I only aspire to "magician" status!

Anyways, I do agree with your assessment above - it's more about feel and look (for me) than anything. I do use a contour gauge and ruler when needed, but a lot of times I find that if I get it close and tack it in, I can then work it to a more exact shape as I go. Of course, sometimes I have to cut it out and start from scratch (of which there are several examples of that in this thread!)

Cheers!
 
Last edited:

machine_punk

Well-known member
Joined
May 14, 2011
Messages
2,540
Location
Napa Valley, California
As a side comment here...it is much more common for a new metalshaper to put too much shape into a panel, rather than too little (I.E. the patch panel will bulge out, instead of being a little too flat. It is always best to sneak up on the shape you need, and keep adding a little more shape.

Great job, e-tek! I am always amazed at how patiently you keep plugging away at the seemingly-endless repair patches in this project.

M_P
 

Omphaloskeptic

Well-known member
Joined
Oct 11, 2008
Messages
2,346
Location
Ultima Ratio, Wa.
E-tek, thanks for your reply, and I will check out the work of the gentlemen you mentioned.

You may not consider yourself a 'Magician of Metals', but you certainly have your GJ audience convinced! Your skill may be just an illusion, but we're truly 'mesmerized'! lol :eyecrazy:
Please keep up the great work in documenting your 'magic act'.:thumbup:

P.S. - I'm also looking forward to seeing your son's first production video here or on your website.
 
OP
E

e-tek

Well-known member
Joined
Dec 19, 2007
Messages
10,690
Location
Saskatoon, SK
Thanks "O" - I appreciate the sentiment.

Today I got the largest piece of this sides puzzle installed. Now I need to clean up the inside, work out all the bump and humps, align everything and then apply a skiff of All-Metal filler.

IMG-20120803-00081.jpg


IMG-20120803-00077.jpg
 
OP
E

e-tek

Well-known member
Joined
Dec 19, 2007
Messages
10,690
Location
Saskatoon, SK
A Princess Auto X-mas in August!!!

106_1939.JPG


Why take the truck? "OUR GAL" just eats stuff up.

106_1938.JPG


106_1940.JPG


106_1941.JPG


106_1942.JPG


This Impact Wrench is a work of art. I wanted one with more than 240 ft lbs (which is where a lot of them stop, but this one has 482 ft-lbs!!! That's enough to twist the ******* off Rosie O'Donnell.

106_1947.JPG


106_1948.JPG


106_1953.JPG


Finally - a PLANISHING HAMMER baby!!! I was going to make one, but at $179 frikken bucks - WHY??

106_1945.JPG
 
Last edited:

HOTFR8

Banned
Joined
Mar 2, 2007
Messages
24,498
Location
Castlemaine, Victoria. The Hot Rod Centre of Austr
OK, I am no officially jealous you even have a hoist with your own name on it. :lol:
My guess is Bendpak did that for you knowing full well you will be giving them free publicity. Now the dilema is should your posts be reported as SPAM :lol:

All jokes aside I wish I was there with you opening all those presents. Would have been alot of fun.
 

Kevin54

MEMBER EMERITUS
Joined
Jan 12, 2005
Messages
29,341
Location
Urbana, Ohio
This Impact Wrench is a work of art. I wanted one with more than 240 ft lbs (which is where a lot of them stop, but this one has 482 ft-lbs!!! That's enough to twist the ******* off Rosie O'Donnell.

That left an ugly impression in my mind:eek::puke:
 
To avoid these ads, REGISTER NOW!
OP
E

e-tek

Well-known member
Joined
Dec 19, 2007
Messages
10,690
Location
Saskatoon, SK
Lots done today....some of it made easier with the new tools just purchased!

This is the patch on the inside of the R quarter. Normally this would be left fairly raw, maybe hit with some heavy undercoating, but then this ain't amateur hour. I cleaned it all up with several different dies, rocks and grinding wheels, then put a skiff of kitty hair on it. I'll sand that out and finish it so it's completely hidden - but more importantly - well sealed.

106_1958.JPG


106_1959.JPG


I treated the seams inside the quarter the same way. I did this on my Challenger and it looked like there had never been a repair there.

106_1963.JPG


So......on to the last trouble spot (yay, but boo...). The previously damaged Left quarter was pulled with a frame puller with tabs welded to the quarters. These tabs rip as it's being pulled, tearing holes in the metal, which then need to be welded up. It's not the worst repair ever - especially since it was a collision repair (not a resto), done a long time ago (brass) and there were (and are still!) no new parts available for these cars.

However, there was a lot of filler in here, so by cutting out this section and working the metal we can get it closer to original (less filler), replace the weakened edges and come away with a better overall repair:

106_1964.JPG


106_1965.JPG


106_1966.JPG


Here's the worst part of the repaired area:

106_1967.JPG


I needed to put some contour into the new piece, so I got to use the new planishing hammer! First I grabbed some scrap to adjust and get used to the new machine:

106_1972.JPG


106_1974.JPG


Then I cut out the measured pieces:

106_1975.JPG


106_1976.JPG


This:

106_1973.JPG


Helps make this:

IMG-20120808-00087.jpg


The replacement will consist of 4 pieces, these 3, plus one to replace all the brass at the top (which will be behind the quarter extension piece).

Lotsa welding and grinding to come!
 

Omphaloskeptic

Well-known member
Joined
Oct 11, 2008
Messages
2,346
Location
Ultima Ratio, Wa.
I'm guessing that new toy/tool of yours is like a (Metal) Magician getting to use a brand new 'Magic Wand'. lol

Hey Rocky, watch me pull a Cougar out of my hat.....
 

Attachments

  • bullwinkle_magic-hat.jpg
    bullwinkle_magic-hat.jpg
    37.4 KB · Views: 22
OP
E

e-tek

Well-known member
Joined
Dec 19, 2007
Messages
10,690
Location
Saskatoon, SK
I'm guessing that new toy/tool of yours is like a (Metal) Magician getting to use a brand new 'Magic Wand'. lol

Hey Rocky, watch me pull a Cougar out of my hat.....

HaHa - well, maybe, kinda.... ;)

I am finding - like anyone I guess - the older I get, the smarter I get :thumbup:
....and how good tools can produce better results, easier.
 

Kevin54

MEMBER EMERITUS
Joined
Jan 12, 2005
Messages
29,341
Location
Urbana, Ohio
E-Tek.....don't you have a shrinker and stretcher? If not, you ought to look into one. It would save you a lot of pounding for the tricky places.

8036-55_L.jpg


I imagine the new planishing hammer will get a good workout with the cars you do. :thumbup:
 
OP
E

e-tek

Well-known member
Joined
Dec 19, 2007
Messages
10,690
Location
Saskatoon, SK
Ya - I' ve thought of getting a S/S many times. Not sure why I still form parts "old school"!??! Guess I was taught that way, enjoy it and don't really see the need to change it. The thing about the planishing hammer is that it can save me some time and give a smoother result than doing the same thing with my hammer on the anvil.

Speaking of which:

IMG-20120808-00089.jpg


IMG-20120808-00088.jpg


Also did a bunch of 'housekeeping' stuff today too, including helping the neighbor with her shower (drain!), cut the grass and killed weeds at 3 of our houses, hooked up a 5 speaker system in the Galaxie, laced up the FE Engine and painted a couple last bits, picked apples and repaired some stuff around the house.....

106_1980.JPG


106_1984.JPG


106_1986.JPG


Mrs E-tek's MINI is going to get even faster. It's VERY quick already, but a new pulley will over-drive the Supercharger another 15%. She'll LOVE it.

106_1992.JPG


I really have too much stuff now....

106_1998.JPG


Yes - She got it "For Good Behavior!!

106_1997.JPG


All while watching the Olympics from 3 TV's!! Usian Boooooolllttttt!!! Canada Womens Soccer, great wrestling, diving and Heptathalon too!

106_2000.JPG
 
Last edited:

Kevin54

MEMBER EMERITUS
Joined
Jan 12, 2005
Messages
29,341
Location
Urbana, Ohio
106_2000.JPG


All while watching the Olympics from 3 TV's!! Usian Boooooolllttttt!!! Canada Womens Soccer, great wrestling, diving and Heptathalon too!

And some of my buddies thinks it odd that I have 2 TV's in my garage. :beer:
 

wnstwolf

Well-known member
Joined
Nov 7, 2007
Messages
837
Location
New York and PA
Mr.s E-teck will love the added power you just gave the Mini. Prior to moving to the north country (well north here in NY) I had a 2008 Mini s and did the same hop up. I lived close to Helix Motors in Philly. The place is a Mini Hot rod shop that a lot like this forum once your in you can't get out. Amazing how fast you can make those tiny cars scoot!
Your a busy Guy E....
 

MP&C

Well-known member
Joined
Oct 21, 2009
Messages
4,396
Location
Leonardtown, MD
Ed, I'll have to agree with Kevin, the s/s would be a good addition to your shop. Bending a 90 degree flange and setting the profile with the s/s IMO puts you ahead of the game over having to weld on a flange. If you can make your repair patches in one piece with no welds (or as few as possible), the better off you'll be. Even without a Lancaster style shrinker, one can perform tuck shrinking inexpensively and effectively. :beer:
 
OP
E

e-tek

Well-known member
Joined
Dec 19, 2007
Messages
10,690
Location
Saskatoon, SK
Hum, pickled apples. Might you post up the recipie? I've got about 12 trees busting with apples and need ideas and I don't think I've ever had pickled apples.

Pickled apples??? I said: PICKING apples!! :bounce:

Not sure I'd want them pickled!

Mr.s E-teck will love the added power you just gave the Mini. Prior to moving to the north country (well north here in NY) I had a 2008 Mini s and did the same hop up. I lived close to Helix Motors in Philly. The place is a Mini Hot rod shop that a lot like this forum once your in you can't get out. Amazing how fast you can make those tiny cars scoot!
Your a busy Guy E....

Yer lucky you had it done at a shop - the mini-est thing about the MINI is the engine bay - Arrgghh!

The pulley I need to change is down there....

106_2033.JPG


Even the tool I made from flat bar stock barely fit!

106_2035.JPG


Anyways, back to the Cougar...this is (hopefully) the LAST piece of metal I need to replace!

106_2010.JPG


106_2011.JPG


106_2016.JPG


106_2017.JPG


106_2019.JPG


Just have to planish the weld area and bump it out a touch

106_2025.JPG
 

Omphaloskeptic

Well-known member
Joined
Oct 11, 2008
Messages
2,346
Location
Ultima Ratio, Wa.
Isn't it just great to find the component (supercharger pulley in this case) that was obviously the first piece to hit the assembly line and the rest of the car was built around it! lol
 
OP
E

e-tek

Well-known member
Joined
Dec 19, 2007
Messages
10,690
Location
Saskatoon, SK
I'm so proud of my little apple tree. I planted it when my boys were born and finally this year I got it just right (pruning, Calcium, watering schedule) and got great apples - and tons of them!! I can taste the apple pies, apple crisps, apple dumplings, apple soup and especially....the apple pickes.....yum!

106_2029.JPG


106_2030.JPG


....and of course I can watch the Olympics while picking apples!

106_2038.JPG


Then lay in the hammock on the last 2 days of my 1-month holiday. :( **** that went by fast....

106_2037.JPG
 

machine_punk

Well-known member
Joined
May 14, 2011
Messages
2,540
Location
Napa Valley, California
Good job on getting all those little jobs done, sounds like you had a productive day!

I thought it was bad just taking everything off the front of the van's engine to get to the water pump...that engine compartment is TIGHT.

I am pleased to see you are nearing the end of the metal replacement on that car. I'm not sure I would have had the patience to work through all those problems.

YAY! New tools. I remember, not too long ago, when I was cutting 1/4" aluminum plate into parabolas with a 4-1/2" grinder and and a disc sander. I quickly got the tools to 'make it faster and easier,' and I cannot imagine doing it the 'old' way anymore.

Looks like things are going well!

M_P
 

wnstwolf

Well-known member
Joined
Nov 7, 2007
Messages
837
Location
New York and PA
Sorry E I bought the toy's at the shop but installed myself. Gotta love step 5 of the install process, remove engine mounts. I did have the special belt adjuster tool and pulley removers though. Amazing how little rom are designed into things. Then again my 68 CJ Stang has you removing valve covers to get to the plugs.. I am sure you know that one too!
Jarhead I thought it was just me. Mrs. E sure takes a nice Picture.. Must be all those Apples!
 
OP
E

e-tek

Well-known member
Joined
Dec 19, 2007
Messages
10,690
Location
Saskatoon, SK
Sorry E I bought the toy's at the shop but installed myself. Gotta love step 5 of the install process, remove engine mounts. I did have the special belt adjuster tool and pulley removers though. Amazing how little rom are designed into things. Then again my 68 CJ Stang has you removing valve covers to get to the plugs.. I am sure you know that one too!
Jarhead I thought it was just me. Mrs. E sure takes a nice Picture.. Must be all those Apples!

I ended up putting it back together and ordering the special pulley puller. I also learned how to remove the ECU from inside the airbox...Should go much easier next time!
 

IGO2XS

Well-known member
Joined
Apr 24, 2012
Messages
1,415
Location
Sarasota, FL
I ended up putting it back together and ordering the special pulley puller. I also learned how to remove the ECU from inside the airbox...Should go much easier next time!

I bet you cant say "pulley puller" 5 times real fast.........:lol:
 
OP
E

e-tek

Well-known member
Joined
Dec 19, 2007
Messages
10,690
Location
Saskatoon, SK
But I bet I can "Pull my Puller" 500 x fast!!

We where talking about welding wires in another thread. Here's the wire I've been using of late: ESAB's MIG-6. Although ALL the classification numbers are the same as wires you can get cheaper (Princess Auto) it sure feels like it welds with less power and lays down much cleaner and more smoothly - especially over a tiny bit of rust/filler/paint.

106_2039.JPG


Anyways, I did some final welding and metalwork on the Left quarter today, getting it ready for a skiff of kitty hair. That's all it'll need - which is MUCH less than the 1/4"+ that was on there previously.

A couple guys mentioned the use of a shrinker stretcher - for which I'm sure there are many uses - but after 30 years of doing this, I've come up with some decent methods of making parts, even if they are deemed "rudimentary" by others! For example, I find cutting out flanges and welding them to a main piece, thereby making sections from multiple peices of metal and welding them together, I can make some very exacting, compound shapes. Case in paint was this quarter panel section - check the fit I was able to get with the quarter extension piece. And this was before any tweaking or grinding (meaning some weld was holding the piece a way from the quarter making it look less perfect than it really is):

106_2042.JPG


106_2040.JPG


When this side was hit way back when, then mangled together, the panel flanges where lost, along with about 1/8" of quarter panel length, which was then made up with brass and filler. The piece I made has these flanges attached which added the requisite amount to the overall shape and brought the extension out to the original dimension.

Right side - that flange was missing from left side, necessitating brass and filler to build it out instead

106_2045.JPG


Old Left side - tons of brass, no flanges folded over from quarter panel, lots of damage that was filled up to 1/2" thick in some spots

106_1799.JPG


New Left side - new flanges take up space that was previously missing/filled, removes major damage that was filled, strengthens corner that was still broken, cracked and brazed

106_2046.JPG


And here's how it looks after some initial metalwork. I'll continue to work it until it needs very little filler (just enough to block it out)

106_2071.JPG


106_2080.JPG


I would have been able to finish off these pieces tomorrow, but duty calls and I'll be on the links most of the day! :p Hopefully I get a few hours over the weekend on it.
 
Last edited:
To avoid these ads, REGISTER NOW!
Top Bottom