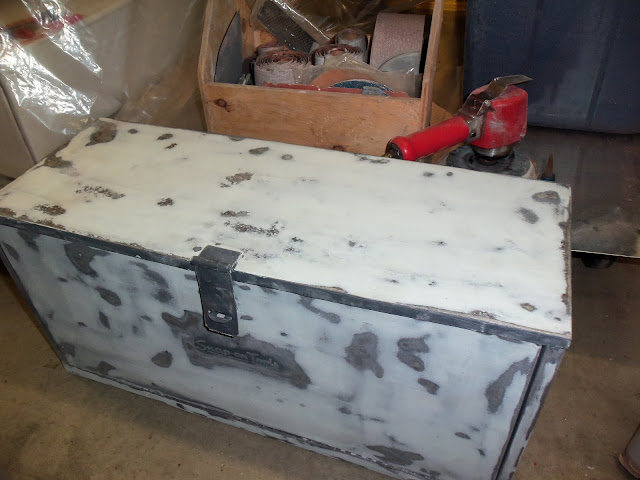
To avoid these ads, REGISTER NOW!

E-tek Restorations: PROJECT THREAD

To avoid these ads, REGISTER NOW!

winnipegtibook

Well-known member
Joined
Jun 3, 2010
Messages
300
Location
100 miles from Tolstoi
Speechless as the little toolbox that could comes back to life! The misses is actually starting to "get" my evening visit to the GJournal, and the various posts of garage "life." Rob, thanks as well for the advice. I can't say enough about the transformation of this rusty, broken-down lil' toolbox!

E-tek, so, when can I sign up for apprenticeship classes with you?
 

MP&C

Well-known member
Joined
Oct 21, 2009
Messages
4,396
Location
Leonardtown, MD
Glad to help out. Next year those shrinker/stretcher sets will be sold with an optional "lift" accessory. And you saw it here first........... :lol_hitti
 
OP
E

e-tek

Well-known member
Joined
Dec 19, 2007
Messages
10,690
Location
Saskatoon, SK
The misses is actually starting to "get" my evening visit to the GJournal, and the various posts of garage "life."

Little by little they realize we're spending time on one of the most "positive" sites the net!:bounce: Certainly helps when there's something personal to show her too...

E-tek, so, when can I sign up for apprenticeship classes with you?

The apprenticeship program has started - and we're all in it together!

What your choice for regular and high build primer ?

Bit of a convoluted answer, but here goes: On small jobs, I often use an Etch Primer on the bare metal and then Pro-Form's High Build ( http://www.proformproducts.com/en/products/listing/?category=8), which are both available in spray-can form, but on large jobs (more than a fender), or if some is bare metal and some still has old paint, etc, I'll use an all-in-one Urethane/Epoxy 2K Primer surfacer like "Slicksand" or Proform.

Last year, Clausen's sent me a sample of their "All-U-Need" 2K primer filler - it's really an awesome product. Goes on over anything, fills like crazy with no shrinkage and sands so easily it silly.
 
Last edited:

theoldwizard1

Well-known member
Joined
Feb 22, 2011
Messages
43,076
Location
SE MI
Last year, Clausen's sent me a sample of their "All-U-Need" 2K primer filler - it's really an awesome product. Goes on over anything, fills like crazy with no shrinkage and sands so easily it silly.

Between what you said and their claims, why would you use any things else, except for small jobs where a rattle can is more appropriate ?
 

theoldwizard1

Well-known member
Joined
Feb 22, 2011
Messages
43,076
Location
SE MI
Different question.

From a practical stand point, what is the difference between a lacquer and an enamel in a typical automotive application ?
 
OP
E

e-tek

Well-known member
Joined
Dec 19, 2007
Messages
10,690
Location
Saskatoon, SK
Between what you said and their claims, why would you use any things else, except for small jobs where a rattle can is more appropriate ?

It's a good question.....but loyalty, preference, availability and price has a lot to do with decisions.....

Different question.

From a practical stand point, what is the difference between a lacquer and an enamel in a typical automotive application ?

Lacquer "was" very forgiving - easy to paint, wide temperature range, easy to cut and buff - but it wasn't very durable - it would check (crack) and haze. Enamel is much thicker and harder and you could still polish out solid colors.

Base/Clear has the advantage of a clear that is durable and can be repaired, buffed and re-painted. Duplicolor is now selling a LACQUER-based "Base/Clear" system with the advantages of both.

That help?
 
OP
E

e-tek

Well-known member
Joined
Dec 19, 2007
Messages
10,690
Location
Saskatoon, SK
Finally (;)) back from Xmas at the in-laws and into a 10-day run in the shop!

Started the rebuilding of the Holley94 Carbs for the new Edelbrock Slingshot that will adorn my flathead-powered rod:

117_3361.JPG


117_3365.JPG


Then I took a good look at Winnipegitbook's SnapOn box restoration and decided I couldn't paint it without at least smoothing it a bit. It's rough enough that a skim coat of filler is just what the restoration-doctor ordered - ya, sometimes it's hard being me.

117_3370.JPG


Then I got back to the main project du jur - the 40 Ford Rod.

Installed Rear Bumper brackets:

117_3372.JPG


117_3385.JPG


Then the front. Reason to get these installed now was to check the cut-out and fender heights. If all is correct, these brackets should sit in the center of the bracket cutouts.

117_3383.JPG


I then made some adjustments and once everything was sitting where it should be , I could secure the front fenders to the new Mustang II frame with some new brackets.

I had a few things in the old Metal Fab tickle-trunk that could have worked...

117_3374.JPG


But none of those looked very classy, so I pulled out some 1" aluminum stripping and made them out of that:

117_3396.JPG


117_3397.JPG


In the above photo you can see also see a rubber edging I installed to make sure the positive battery cable wouldn't rub on the sharp inner fender edge....

117_3398.JPG


I can't believe it's getting close to the end of the mock-up stage already. A couple more days of wiring, interior work and fitting the hood and I'll be ready to reverse much of the process by pulling the engine and other parts and send it off for final bodywork and paint.This ones gonna be a beauty when going back together!
 
Last edited:
OP
E

e-tek

Well-known member
Joined
Dec 19, 2007
Messages
10,690
Location
Saskatoon, SK
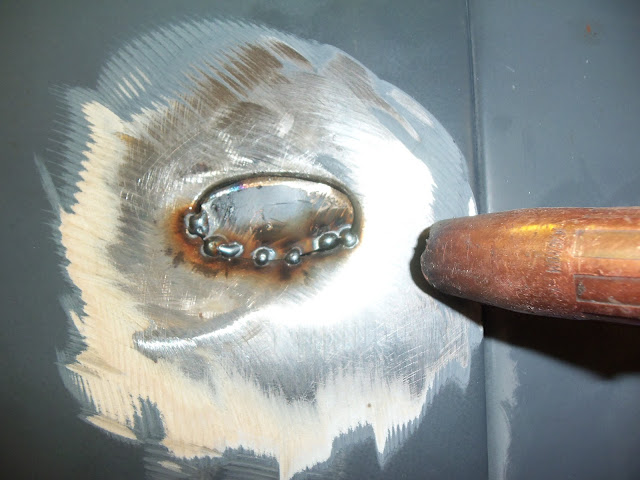
Soda blasting will clean up that carb, but how do you restore its original patina ?

I've done a fair amount of research on this and found that a lot of carbs can be polished to look very good. I'm doing that with these Holley94's (pics later).

Duplicolor Wheel Paint works well and is durable - was also mentioned on Gears. The heat of the engine helps cure it. Here's some parts I did with it -

IMG00787-20120112-1251-742913.jpg


Eastwood also has some specific paints for carbs that resist gas and oil. I've used them and they looked good for quite a while. Here a 2 bbl I did with it -

IMG00763-20120106-1117-762300.jpg


IMG00789-20120112-1510-722569.jpg


IMG00791-20120112-1511-754247.jpg


Of course you can also have carbs and linkages powder coated or replated - but I've never gone to that extent.

** I would caution anyone painting/powdering a carb to carefully mask off the inners so as to avoid anything that could come loose and gum up the passages!
 
Last edited:

Kevin54

MEMBER EMERITUS
Joined
Jan 12, 2005
Messages
29,341
Location
Urbana, Ohio
It's a good question.....but loyalty, preference, availability and price has a lot to do with decisions.....


Lacquer "was" very forgiving - easy to paint, wide temperature range, easy to cut and buff - but it wasn't very durable - it would check (crack) and haze. Enamel is much thicker and harder and you could still polish out solid colors.

Base/Clear has the advantage of a clear that is durable and can be repaired, buffed and re-painted. Duplicolor is now selling a LACQUER-based "Base/Clear" system with the advantages of both.

That help?

Sometimes lacquer it wasn't so forgiving. I remember a few cars that we painted in the heat of summer with what seemed like 100% humidity. The worst one was a '55 Chevy. All black lacquer. The humidity was high that day. We got the car shot and instantly is fogged. We had put a retarder in the paint to slow it down but it didn't help. Nothing worse than black turning almost white.

I got into a duscussion with an individual some while back about lacquer vs. BC/CC. He was telling me that the gloss of a BC/CC paint was way better than any lacquer paint job out there. I had to disagree. If painted correctly, and rubbed out correctly, a lacquer paint job will stand out in a crowd of BC/CC. My dads Caddy was lacquer. It was very well taken care of, always garaged, and always held a deep gloss that was like no other. EPA killed off the lacquer paints though because of the VOC's. It was also one of the easiest paints to learn technique of using a spray gun because it was forgiving. It was always a great feeling to shoot the car, buff it out, clean it up and pull it out into the sun. Lacquer really could stand out. :beer:
 
OP
E

e-tek

Well-known member
Joined
Dec 19, 2007
Messages
10,690
Location
Saskatoon, SK
Someone asked what I used to buff out the TransAm out with. My Dad purchased the can on the right when I was a kid! The tag on the front is from a Canadian Tire in Richmond, BC, where I grew up - it must be nearly 40 frikken years old!!!
Turtle Wax still makes it, as I bought the can on the left about 2 years ago. Still works just as well - maybe I should try it on the old can and see if it looks new again!

117_3424.JPG


I was also asked about restoring the finish on carbs - here's the one I was working on after starting to polish it out. I put about 10 minutes into it on the wheel and by hand. Imagine what it could look like with some real work!

117_3418.JPG


117_3416.JPG


Couple more fender braces done today. Had to weld a tab on the Left fender to get it all connected -

117_3399.JPG


117_3404.JPG


117_3426.JPG


117_3425.JPG


Made a couple shorter ones to tie down the front end as well -

117_3407.JPG


117_3410.JPG


117_3411.JPG


117_3412.JPG


After that I went back to the wiring and got far enough so that could run a Self Diagnostic test. Not having a CEL (Check Engine Light), I used an Analog Multimeter and counted the sweeps to decipher the codes. It came up with several, some I knew about (need a MAP sensor) and some that I was able to clean up and clear before turning the engine over. I'm not keen on running it for more than a couple seconds right now as it has no exhaust and I don't really want to have to exhaust the shop - because it's like 25 below zero here! :willy_nil
 
Last edited:

Omphaloskeptic

Well-known member
Joined
Oct 11, 2008
Messages
2,346
Location
Ultima Ratio, Wa.
25 below?! Man, that's COLD! E-Tek, I'm surprised that you don't have a shop hose to pump that CO right outside and use the 'engine-in-test' as an auxiliary shop heater. lol

If you could detail the rebuild of the Holley94 Carbs with words and pics, it would be much appreciated. Are you going to dissect them to the point of opening/reaming the internal factory passages? Maybe it's my 'monkeyahnic' limited knowledge, but I've always thought that carbs are one component that need to be thoroughly rebuilt by carb specialists in order to be trouble-free when installed; I dunno?
 

Omphaloskeptic

Well-known member
Joined
Oct 11, 2008
Messages
2,346
Location
Ultima Ratio, Wa.
25 below?! Man, that's COLD! :eek2:

E-Tek, I'm surprised that you don't have a shop hose to pump that CO right outside and use the 'engine-in-test' as an auxiliary shop heater. lol

If you could detail the rebuild of the Holley94 Carbs with words and pics, it would be much appreciated. Are you going to dissect them to the point of opening/reaming the internal factory passages? Maybe it's my 'monkeyahnic' limited knowledge, but I've always thought that carbs are one component that need to be thoroughly rebuilt by carb specialists in order to be trouble-free when installed; I dunno?:dunno:
 
OP
E

e-tek

Well-known member
Joined
Dec 19, 2007
Messages
10,690
Location
Saskatoon, SK
25 below?! Man, that's COLD! :eek2:

E-Tek, I'm surprised that you don't have a shop hose to pump that CO right outside and use the 'engine-in-test' as an auxiliary shop heater. lol

If you could detail the rebuild of the Holley94 Carbs with words and pics, it would be much appreciated. Are you going to dissect them to the point of opening/reaming the internal factory passages? Maybe it's my 'monkeyahnic' limited knowledge, but I've always thought that carbs are one component that need to be thoroughly rebuilt by carb specialists in order to be trouble-free when installed; I dunno?:dunno:

Hey O - looks like you were up LATE last night!!

I do have exhaust tubes to run cars in the shop, but they are about 6 feet long and as I mentioned, the 40 Ford has it's exhaust cut right behind the O2 sensors. This means I'd need about 10-12 feet of tubing to run it for a long period - and we don't really need to at this point because it's all coming out for paint!! The final run up and tune can be done when it goes back together - or even when I have it out. Right now I really just needed to make sure all the wiring was correct to be able to start it, so that when the engine is out, I can clean/hide/route it all and just have the connectors I need sticking out for a clean re-connection.

As for the carb rebuild....sometimes I think I post TOO MANY pics here and don't want to bore people or take up too much space! Carbs definitely need an exhaustive cleaning and meticulous re-assembly, but with a few home-made tools, carb cleaner and compressed air, I think anyone can do a "professional" rebuild.

On the Holley 94 above, I've already reamed the throttle plate shaft opening for a new one and opened all the idle and throttle-body passages in advance of re-assembly. But since you asked - and I learned a lot from my neighbor - I have a second carb to do so I'll do a detailed photo write-up on it explaining what I think I know about the process on my blog - stay tuned!:rocker:
 

machine_punk

Well-known member
Joined
May 14, 2011
Messages
2,540
Location
Napa Valley, California
Whew...that is cold...and one of the reasons I moved away from the midwest (Nebraska), where it go down to -30 F (-34 C) about every third winter, with a -60 F (-50 C) wind chill factor. Of course, I have lived in 130 F (55 C) weather too...in Iraq. Which I why I moved to this area...Napa Valley, California is one of the five Mediterranean climates in the world. Almost never over 100F (38 C) and rarely below freezing. The average day is 70 F (21 C) and sunny.

I'll keep checking back frequently, since you are in a 10-day stretch of shop time. Our boys are with family over the next week, so I may get some more shop time myself this week.

Kev
 
OP
E

e-tek

Well-known member
Joined
Dec 19, 2007
Messages
10,690
Location
Saskatoon, SK
Just came in from a 10 hour stint in the shop! This is day 3 of my 10-day stint and I got so much done today I'll just give ou some highlights here, but if you're interested in the details, check out the blog....

After cleaning up the wiring a bit more, I put the hood on the 40 Ford in order to check the front end fit, the latch system and measure for gas struts -

117_3431.JPG


Going to need a tiny trim here to clear the radiator -

117_3433.JPG


Gas shocks will open the hood nicely -

117_3450.JPG


Also cut and did an initial fit on a lower panel to extend the dash -

117_3436.JPG


117_3441.JPG


There are still two somewhat major issues to attend to before tear down, including repairing this rear fender and re-trimming the rear trunk pan. This fender was repaired off the car and it ended up way short of the running board. From the under side you can see a fair amount of repair, which somehow shortened the wheel opening, causing this gap to open up.

117_3454.JPG


In order to repair it, I'm going to slice it at the marks shown, because on the other side, the vertical line is much more perpendicular than is this side. Once I close the gap, I'll then either add some metal and work it to smooth it all out -

117_3461.JPG


The rear pan needs to be moved out about 1/2" to better line up with the trunk lid -

117_3462.JPG


Oh ya - here's that specialized tool for carb rebuilds I mentioned earlier ;) -

117_3470.JPG


Before I came in, I knocked the filler off Brian's Snap On box. Another coat of primer and it'll be paint ready.

117_3438.JPG
 
To avoid these ads, REGISTER NOW!
OP
E

e-tek

Well-known member
Joined
Dec 19, 2007
Messages
10,690
Location
Saskatoon, SK
Just came in from a 10 hour stint in the shop! This is day 3 of my 10-day stint and I got so much done today I'll just give ou some highlights here, but if you're interested in the details, check out the blog....

After cleaning up the wiring a bit more, I put the hood on the 40 Ford in order to check the front end fit, the latch system and measure for gas struts -

117_3431.JPG


Going to need a tiny trim here to clear the radiator -

117_3433.JPG


Gas shocks will open the hood nicely -

117_3450.JPG


Also cut and did an initial fit on a lower panel to extend the dash -

117_3436.JPG


117_3441.JPG


There are still two somewhat major issues to attend to before tear down, including repairing this rear fender and re-trimming the rear trunk pan. This fender was repaired off the car and it ended up way short of the running board. From the under side you can see a fair amount of repair, which somehow shortened the wheel opening, causing this gap to open up.

117_3454.JPG


In order to repair it, I'm going to slice it at the marks shown, because on the other side, the vertical line is much more perpendicular than is this side. Once I close the gap, I'll then either add some metal and work it to smooth it all out -

117_3461.JPG


The rear pan needs to be moved out about 1/2" to better line up with the trunk lid -

117_3462.JPG


Oh ya - here's that specialized tool for carb rebuilds I mentioned earlier ;) -

117_3470.JPG


Before I came in, I knocked the filler off Brian's Snap On box. Another coat of primer and it'll be paint ready.

117_3438.JPG
 

Kevin54

MEMBER EMERITUS
Joined
Jan 12, 2005
Messages
29,341
Location
Urbana, Ohio
E-Tek.........In case I forget to tell you, thanks for all of the postings throughout the year that I know have taught many, so much. Not in only entertainment but also in education.

You, Mrs. E, and the kids, all have a Safe and Happy New Years. :beer:
 

Omphaloskeptic

Well-known member
Joined
Oct 11, 2008
Messages
2,346
Location
Ultima Ratio, Wa.
E-Tek,

I don't know if I'm a 'regular' type of guy, but I do enjoy all your postings; thanks for sharing your knowledge, skill, and time.

Hey, is that high-tech carb tool SO? lol

Quick question about the gas struts. Are they engineered to function properly after repeated 'cycles' of exposure to engine compartment heat? The struts that I have on my truck cap rear window have gotten 'tired' over the years and don't hold the weight in cold weather. I'm wondering if high temps will cause yours to leak out and fail prematurely.:dunno:

Is the toolbox going to get the plaid paint treatment ala 'The Dupli-Dozen's' 'Cloud of Color'? :evil:


Have fun in the shop during your 'Work Holiday' and may you and yours have a very Happy New Year!
 

HOTFR8

Banned
Joined
Mar 2, 2007
Messages
24,498
Location
Castlemaine, Victoria. The Hot Rod Centre of Austr
Ed many of us watch, read and not comment on every post. Keep up the good work. :thumbup:

Also looking at the running boards and the fit. A workshop here got some reproduction running boards recently from a well known US firm only to find they did not match and had major work on a well built original bodied car to make them fit. Changes in inches to the fenders to make them fit.
 

tcianci

Well-known member
Joined
Feb 7, 2009
Messages
4,242
Location
Walpole, Ma
Hey E,

Please let us know on how you make out with the gas springs on the hood of that 40. My bet is that you will be pulling your hair out trying to get the hood to land in the same place twice. I had them on my 40 for a while but got tired of the alignment issues. I saw one guy at a show who had pulled it off but he said he nearly gave up on it too but the customer wanted it. May be I'm missing something. I hope it works for you!
 
OP
E

e-tek

Well-known member
Joined
Dec 19, 2007
Messages
10,690
Location
Saskatoon, SK
"O" - I'd definitely consider you a 'regular' as far as commenting on the thread - but not so sure about in 'real life'....would love to find out!! ;)

As for the struts - it's probably just an age effect, or a cold effect .. the ones on our Cooper are like the ones on your truck, but only in winter.

Thanks to you all as well - and HAPPY NEW YEAR!!!!!
 
OP
E

e-tek

Well-known member
Joined
Dec 19, 2007
Messages
10,690
Location
Saskatoon, SK
Got started on the last couple repairs needed before teardown for paint. To recap, this fender underwent a bunch of rust repair off the car and when it was re-attached, was found to be pretty wonky. You can see the gap along the quarter panel is uneven and it's a couple inches short at the running board...

117_3489.JPG


Here's the fix -

117_3490.JPG


First thing was to guesstimate where the fender could best be cut so that the front portion could be twisted forward without disturbing the rest -

117_3491.JPG


117_3492.JPG


With the fender split and able to be manipulated, I brought the lower portion forward to meet the running board -

117_3493.JPG


117_3494.JPG


117_3495.JPG


To ensure the fender edge lined up, I clamped a piece of tubing inside the lip -

117_3497.JPG


Because there was some lead in the hood, I thought I might be able to metal finish the fender with lead as well....

117_3511.JPG


But as soon as I started grinding the primer off to start the repair, I found plastic filler....

117_3500.JPG


After a lot of hammer and dolly work, I began a series of tack welds to weld in the filler piece -

117_3502.JPG


Then I dressed the welds and did some more H&D work to make for a gradual transition -

117_3504.JPG


With the gaps looking good and the transition fairly smooth, I whipped up some RAGE. Once nearly dry I took the top off with the old cheese grater, then shaped it with some 80 grit -

117_3514.JPG


A few coats of primer....and I called it a day!

117_3520.JPG


Fender was easy to bolt to running board now -

117_3496.JPG
 
Last edited:
OP
E

e-tek

Well-known member
Joined
Dec 19, 2007
Messages
10,690
Location
Saskatoon, SK
Thanks guys - I'll keep posting! ;)

Finished up the last couple of metal-work processes on the 40 Ford today, including 'shaving' the door handles and repairing the trunk "overbite"....

117_3534.JPG


117_3535.JPG


Using a magnet to hold the plug -

117_3536.JPG


117_3539.JPG


117_3541.JPG


117_3549.JPG


117_3555.JPG


Repairing the trunk pan could have gone a couple different ways. The gap was only about 3/8 of an inch - almost small enough to just build up some filler to match the panels - although doing that you risk the filler cracking due to vibration or it getting bumped hard.

Another method I was contemplating invloved cutting the pan at it's top edge, then pushing it out and welding in a strip to fill it out. The problem with that idea was how to handle the side and lower transition sections. This would have been more reasonable if the gap was 1/2 an inch or more.

I finally settled on welding in a section of metal brake line - which was the exact thickness I needed. This way the edge would be all metal with all the strength required. It also allowed me a straight line to get the gap worked just right.

117_3538.JPG


117_3545.JPG


117_3552.JPG


With the rod welded top and bottom, I was able to grind it all down to be almost a solid metal transition, needing only a skiff of filler to smooth it out.

117_3557.JPG


Finally got some paint on the SnapOn box too. Just did the inners so I can then put it together and then shoot the outsides.

117_3530.JPG


117_3531.JPG


Lastly, I finished up the Holley94 rebuid - which is fully detailed on my blog -

117_3566.JPG
 

winnipegtibook

Well-known member
Joined
Jun 3, 2010
Messages
300
Location
100 miles from Tolstoi
Fantastic work! The misses said, "uhhh, that's amazing" (when seeing the latest resto pics).

And I was so inspired that I went looking at supplies at Princess Auto this eve (60 gallon Sanborn compressor and air stuff). Despite looking everywhere, they didn't seem to have the "E-Tek" how to guide. Perhaps they were all sold out on Boxing Day.:thumbup:
 
Last edited:
To avoid these ads, REGISTER NOW!
Top Bottom