To avoid these ads, REGISTER NOW!

E-tek Restorations: PROJECT THREAD

MP&C

Well-known member
Joined
Oct 21, 2009
Messages
4,398
Location
Leonardtown, MD
Ed, just to clarify a couple of your points for those who may be interested in the process using the DA......


As for what you need to use these 1500/3000 discs they are mostly hook-and-loop (Velcro) based, so you'll need to buy a new pad ($15) for your DA.


True, you'll need a Velcro pad for your DA, but that pad is only good for absolute flat panels. Try using it on rounded panels and you'll be leaving flat tracks in the clear. So in addition to that pad, you'll need a foam interface pad, which allows the abrasive disc to follow the contour of the panel, especially helpful on a vehicle like that 40...

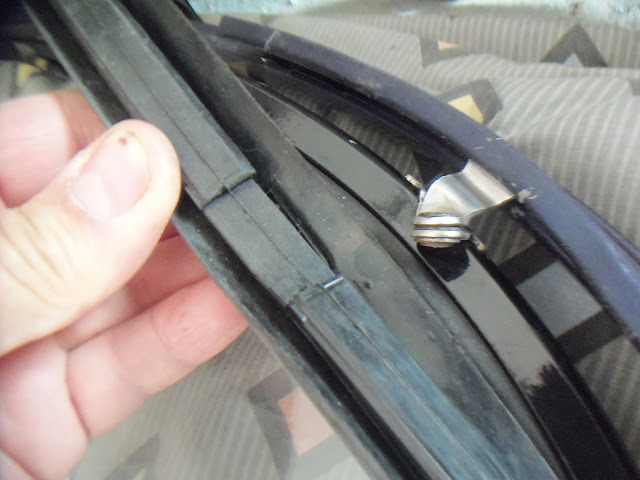
These are used on a DA using hook and loop pad, and a 1/2" thick interface pad. This pad helps the abrasive sheet to follow the contour of the panel. A perfectly flat pad would have a tendancy to leave flat spots in a crowned panel, where the picture below shows how the interface pad helps the abrasive follow the contour of what you're finishing.


Picture080.jpg


Good discussion gents! I thought he was using a block, but may have used his hand on some of those areas. None-the-less he only used 1500 then 3000 so it buffed out fairly easily. The 40 Ford was painted with production-quality paint and clear (Proform) .........

As for what you need to use these 1500/3000 discs they are mostly hook-and-loop (Velcro) based, so you'll need to buy a new pad ($15) for your DA. I found that the paint on the 40 was still soft enough that - although I had purchased a new Palm-DA for it - I decided it could be done by hand just as quickly. Perhaps next spring, when the clear has fully hardened, I may need the DA to knock the clear down at a reasonable rate!

Cheers!


The biggest difference between the DA method and the manual version by hand (no pad or block) is that fingers add pressure points through the paper that can leave "finger tracks" in the finish, which if deep enough could show up even after buffing. The DA, using a foam interface pad, would leave that front fender as smooth as a baby's ***, which will save even more time in buffing. I think I had some pretty bad paint defects to remove when I used this process, and had some pretty good results. You may want to show this to the owner, I think he'd opt for using the interface pad on the DA......

Here's your typical defects, dust nibs, slightly orange peely/grainy appearance..


Picture041-1.jpg


A quick once over with the 1500 grit Trizact on the DA highlights the areas needing attention quite well.


Picture043.jpg


Monitoring various defects through the process....


Picture046-1.jpg


After the 1500. Notice all the sanding scratches alongside the tape. It's all in the (lack of proper) prep....that was sprayed right over top of. And now I get to fix his work.


Picture047.jpg


After the 3000 grit Trizact. As nice as this is coming out, it shouldn't take too much effort in buffing (fingers crossed)


Picture050.jpg


Smooth as a baby's behind...


Picture049.jpg


All done with the 3000 here, time for the next fender...


Picture058-1.jpg


Comparison, before and after.....


Picture041-1.jpg


Picture094.jpg


I'd say this process saved about 1/3 to 1/2 the time over wet sanding by hand (given the same end result) and with such a uniform finish at this point, saves time in the buffing process as well... As nice as that pearl on the 40 pops in the sun, this process and a good buffing would really do it justice.. 3M (and possibly Norton) has some good instructional videos on using this process, for anyone interested.. My local salesman for my autobody supplier actually came to my shop and showed me the process, so something else you could check on...
 
Last edited:
To avoid these ads, REGISTER NOW!

Kevin54

MEMBER EMERITUS
Joined
Jan 12, 2005
Messages
29,341
Location
Urbana, Ohio
Robert.....I know I got to get me some a dat!!!! I need to pick up some paint for the Olds, so I'm going to look into some supplies and that's going to be one thing for sure. I can only sand with one arm so anything that would help.

Just out of curiosity, on the pic of the sanded fender, could a person rub that out by hand also? The reason I ask is that back in the lacquer days, it was the wool pad and compound after soap sanding. But the shine on that before buffing looks like if someone had to put some elbow grease into it they could.

One thing with the wool pads, back in the day, we had some of the shiniest screwdrivers around. We always used them to knock the compound out of the pads while running :lol:

E-Tek...do you use a comb to clean compound out of yours or the screwdriver trick? I never used a comb, I don't even know if they had combs for pads back then :dunno: I remember tossing them into the old wringer washer and run them through a few times then wring them out and let them dry.

And when we had to clean out my parents house, I bet I throwed away two dozen wool pads. If I had known, I could of shipped them your way as some were still new.
 
OP
E

e-tek

Well-known member
Joined
Dec 19, 2007
Messages
10,690
Location
Saskatoon, SK
I generally use a "dull" driver just like most people but I took a job as a paint rep when we moved to Saskatoon and I recall them talking about polishing and they adamantly spoke about how BAD a screwdriver is for the wool pad. The combs' wheels move and hence don't pull the fibers of the pad apart, as does a screwdriver.

Perhaps I'll buy one when I get the foam interface pad for my DA! ;)

Here's a Challenger I painted and buffed out to show-car standards. Too bad I sold it to a kid who was going to drive it hard :(

img_1025.jpg
 
Last edited:
OP
E

e-tek

Well-known member
Joined
Dec 19, 2007
Messages
10,690
Location
Saskatoon, SK
Time for a topic change!

After our first @*$&^%(@#! snowfall of the year I got side-tracked with shovelling, putting out the heated mats around my hot tub and giving the 'new' snowblower a tune-up before using it. I changed the oil, removed the old gas from the carb, cleaned and gapped the plug and then gave 'er hell. After 12 years in Saskatoon without a blower, it was a DAMN nice change from shovelling! :)

7540578.jpg


Anyways....after all that action I was totally wasted :p so I decided I'd better just do something easy in the shop: replacing the felt vent glass runners on the door glass channels.

First up was to remove the original oiled felts that held the chrome strips onto the door glass:

106_5668.JPG


106_5669.JPG


Interestingly, one side was totally deteriorated and the other side was still complete and pliable...

106_5670.JPG


With the original rivets exposed, they were easily drilled out -

106_5671.JPG


106_5672.JPG


New rivets came with the new felts. Here I'm using a pick to line them up to get them through the holes -

106_5673.JPG


With the felt on and the rivet inserted from the underside, I lined up the channel on the vice so I could peen the rivet -

106_5678.JPG


Viola!


106_5683.JPG


With the glass installed -

106_5685.JPG


Baring another snowfall, I hope to have more time and energy tomorrow to get to some of the larger items on the restoration check-list....
 
Last edited:

Kevin54

MEMBER EMERITUS
Joined
Jan 12, 2005
Messages
29,341
Location
Urbana, Ohio
106_5678.JPG


The rivets you are using are called tubular rivets, or drilled rivets. By all rights they should have a proper seat to set them in to prevent any deforming, and a proper punch that will roll the rivets over without cracking. I have made thousands of rivet punches over the years. If you can give me the body diameter of the rivet, the hole diameter, the head diameter and head height, I'll make you up a proper sized punch and pocket to set the head in for riveting, on my dime,
 
OP
E

e-tek

Well-known member
Joined
Dec 19, 2007
Messages
10,690
Location
Saskatoon, SK
The rivets you are using are called tubular rivets, or drilled rivets. By all rights they should have a proper seat to set them in to prevent any deforming, and a proper punch that will roll the rivets over without cracking. I have made thousands of rivet punches over the years. If you can give me the body diameter of the rivet, the hole diameter, the head diameter and head height, I'll make you up a proper sized punch and pocket to set the head in for riveting, on my dime,

Thank you for the info and that generous offer Kevin! If one is doing this often I can see how you'd want a specific tool for the process. However, since this is like the fourth time over 3 years I've had to do it, I think my center punch then alignment punch method will suffice. I'll take a photo of the end result today - I managed to get them all peened without cracking them...
Do you have a thread with some of the tools you've made? I'd love to see your work.
 

MoonRise

Well-known member
Joined
Nov 5, 2010
Messages
4,028
Location
NJ
OR use a roll pin punch or a modified roll pin punch to get the end of the rivet to start to roll/flare over. The rounded 'nib' on the end is usually a bit more gentle/graceful on getting the rivet end to roll over than the straight taper on a center punch, which tends to just rapidly flare the tubular end.

Similar to a grommet tool (grommet as in the things on tarps or fabric, not a rubber grommet to prevent chafing through a hole).

But the 'best' way is the dedicated tool.

Just some more FYI.

Carry on. :beer:

(re: snow First time in the last three years that we haven't had a Halloween snow storm. I'll take it. :D And a decent snowblower beats the heck out of shoveling. 12 years in Canada without a snowblower and just using a shovel? Are you nuts?!!?! :) )
 
OP
E

e-tek

Well-known member
Joined
Dec 19, 2007
Messages
10,690
Location
Saskatoon, SK
(re: snow First time in the last three years that we haven't had a Halloween snow storm. I'll take it. :D And a decent snowblower beats the heck out of shoveling. 12 years in Canada without a snowblower and just using a shovel? Are you nuts?!!?! :) )

Apparently!! I never minded shovelling...but now that I'm 50, my back seems to be making more of the decisions....:(

:bounce:
 

Kevin54

MEMBER EMERITUS
Joined
Jan 12, 2005
Messages
29,341
Location
Urbana, Ohio
Thank you for the info and that generous offer Kevin! If one is doing this often I can see how you'd want a specific tool for the process. However, since this is like the fourth time over 3 years I've had to do it, I think my center punch then alignment punch method will suffice. I'll take a photo of the end result today - I managed to get them all peened without cracking them...
Do you have a thread with some of the tools you've made? I'd love to see your work.

OR use a roll pin punch or a modified roll pin punch to get the end of the rivet to start to roll/flare over. The rounded 'nib' on the end is usually a bit more gentle/graceful on getting the rivet end to roll over than the straight taper on a center punch, which tends to just rapidly flare the tubular end.

Similar to a grommet tool (grommet as in the things on tarps or fabric, not a rubber grommet to prevent chafing through a hole).

But the 'best' way is the dedicated tool.

Just some more FYI.

Carry on. :beer:

(re: snow First time in the last three years that we haven't had a Halloween snow storm. I'll take it. :D And a decent snowblower beats the heck out of shoveling. 12 years in Canada without a snowblower and just using a shovel? Are you nuts?!!?! :) )

Ed.....I don't have any pics of the tools I made, only pics of personal tools I made. I'll check with momma though to see what she has in her toolbox as she was an electronics and prototype assembler for 40 years. I think she may have a drawer full of the particular punches for various rivets. Most of what I made for her. Our shop was major hardasses when it came to snapping a pic in the shop of anything. But even for simple things like a rivet, there is actual Government inspection documents about what is allowable and not allowable when bucking rivets / setting rivets / peening rivets / or whatever other terminology there is.

Here is a semi-tubular rivet.

Strivet333.JPG


Since we built our products for aircraft, then we were tied down to very strict government "standards" as far as inspections go. Just as in what you showed when rolling a tubular rivet, in the critical world of aircraft specs, there is to be no crack into the barrel of the rivet, which means down to where the crack goes from the roll into the straight portion, you are allowed no more than three cracks total, then the roll has to seat all of the way around with something like .002 max as a gap. So it goes from just flaring a rivet as you and many others call it, to becoming a science to making the tool to roll the rivet over. I can take an eyelet, make a punch for it, and roll an eyelet to where it will roll right over itself and just looks like a tiny ring. The specs even get into rivet height, height above whatever you are riveting ties down to just a couple thousandths.

I find some pics of some various rivet tooling that we have made. One of the big things that we made a lot of were "hand squeezers". We would take a set of parallel pliers, dismantle them, then make a "C" shaped piece and a few other components where you could do everything with one hand.

So if you ever do need a specialty tool for doing something like that, be sure to let me know :beer:
 
OP
E

e-tek

Well-known member
Joined
Dec 19, 2007
Messages
10,690
Location
Saskatoon, SK
I was looking at the Camaro and thought I'd get the speakers out of it before they got too dirty - and here's what I found when I removed the grilles:

106_5686.JPG


Someone either had a serious lack of skill, tools or conscience!! :eyecrazy: Wonder if there was any off-key resonant effects! ?! :bounce:

After bolting up the the grille on the 40, I found it considerably mis-aligned to the hood - which was not the case before it was tight - and definitely not the case during mock up...

106_5688.JPG


106_5689.JPG


In cases like this, out comes the tape measure (as Robert also mentioned earlier) to check for square and then to measure everything side to side...

106_5690.JPG


106_5691.JPG


These first checks showed a minor variance of 1/4" in the front section - which would easily be taken up by shifting things around in their bolt holes - but this was more than that, so I continued checking to see if there was a problem somewhere else.

From the same bolt hole on either side, I measured back to the rubber grommet that protects the cowl, as well as the door edge, which showed a difference of nearly 3/4" side to side -

106_5693.JPG


Then, looking down, I found an obvious sign of the problem:

106_5692.JPG


The fenders were not even side-to-side. Of course everything was still loosely bolted up, so one or both fenders must have shifted as I tightened up the grille section. By pulling one side forward and pushing the other side back, I was able to even up the fenders and bring the grille back in line. As I mentioned earlier, these 40 Fords, especially when the front frame section has been swapped out for an IFS system, are prone to getting out of square.

After moving everything I could see how the inner fenders had moved just enough on the frame ends to allow me to align the grille to the hood again:

106_5699.JPG


106_5701.JPG


106_5651.JPG


After all that fun, I turned my attention back to the engine wiring. First up was checking all the sensor connections, as well as their vacuum line connections -

106_5704.JPG


Once everything is hooked up and ******* out of the way, I'll power the system up and (hopefully!) be able to read codes with the reader the owner bought.

106_5702.JPG


With the fenders evened out I'll soon be able to mount the running boards - but not before glueing the rubber mats down -

106_5706.JPG


Unfortunately, that'll have to wait until Saturday - as tomorrow I put on my other hat, that of the professional drug dealer....

oliver_platt_and_jake_gyllenhaal_as_pharmaceutical_reps_in_love_and_other_drugs-460x307.jpg
 
Last edited:
OP
E

e-tek

Well-known member
Joined
Dec 19, 2007
Messages
10,690
Location
Saskatoon, SK
One of the big things that we made a lot of were "hand squeezers". We would take a set of parallel pliers, dismantle them, then make a "C" shaped piece and a few other components where you could do everything with one hand.

So if you ever do need a specialty tool for doing something like that, be sure to let me know :beer:

How often do we find ourselves in a spot where we could use tools like that - I know I wish for a "third hand" tool almost daily! :bowdown:
 
OP
E

e-tek

Well-known member
Joined
Dec 19, 2007
Messages
10,690
Location
Saskatoon, SK
A few people have PM'd me about my lack of activity (slave drivers!! ;)), so I'm just popping in to say it's because I've been SICK :( One of those really bad colds, but not quite the flu things. I did give it a go yesterday as the cars owner was in town, but it just beat me up even worse.

So, while I ride the couch for a few more days, I'll endeavor to post what did get done over the past week!
 
Last edited:
OP
E

e-tek

Well-known member
Joined
Dec 19, 2007
Messages
10,690
Location
Saskatoon, SK
Next up was to get the running boards cleaned up and the matting glued on. I had stretched and laid the rubber out on the boards quite a while back, so I knew they fit well and it was just a matter of having enough clamps, prep and glue!

So I began by roughing (roughening?) up both surfaces (the rubber back and the POR15-coated running boards themselves) with a Scotch Brite pad:

106_5715.JPG


Then, a good cleaning of all surfaces with Wax and Grease Remover:

106_5714.JPG


Then I went to look for the Rubber Cement that came with the Covers....which I was pretty sure I put with all the other 40 parts....hmm, not there now. Maybe in the paint cupboard.....nope. ****.

So I spent half-an-hour looking high and low and I coudn't find the GD stuff! I found all kinds of other glues, but have heard this is the only stuff that lasts, so I wasn't about to substitute...

Anyways, I just had to move on to other stuff, like the new hood lock system and some support bars. This was all MUCH easier said than done, as there were 5 bars, clips, springs and cotter pins to go in...

106_5718.JPG


Next, I was looking at this upper fan shield. It will definitely help force air through the rad and is polished stainless for some serious bling factor -

106_5719.JPG


Oddly though, there's a tab on the rad support that looks as though it aids in centering the hood once closed - and the instructions make no mention of it:

106_5721.JPG


106_5722.JPG


So, after some consultation with the cars owner, it's decided it will not be required....and off it came.

106_5738.JPG


With it gone, the plate now sat flush and the screw holes could be drilled and tapped. The protective white film won't be removed until final delivery.

The vent glass installation had given us some trouble a while back - as the glass would not seat all the way into the metal frame - at least not as far as we thought it should. After some rather indelicate persuasion, the glass still stuck out past the metal frame. Turns out, the rubber seal supplied was just something a glass shop gave the owner, not a specific part for this application. So, that being the case. it was decided the rubber was the culprit, so we shaved them for a better fit.

As for re-installation, the owner came up with a great little press to push the glass in without having to use the hammer again:

106_5730.JPG


106_5731.JPG


It worked exactly as advertised and, along with a liberal application of soapy water, the glass and newly-sized rubbers slid right in:

106_5733.JPG


In this shot you can see the glass is flush with the frame - perfect!

106_5748.JPG


Now to get it all together and in here:

106_5745.JPG


The rubber seal that goes on the inner door garnish was next to give us some trouble. after much back and forth, it appears that the vent glass hinge has to go THROUGH the seal, but there's no hole or slot for it, so I wanted to confirm that with someone before doing any cutting...

106_5744.JPG


Thus far I've haven't found anything online that shows how to install this seal. With no supplied instructions I can see a LOT of people riveting the seals on only to find they could't get the vent glass in....

Anyone have any experience with these? :dunno:

So with that on an information-hold, we removed the park-lenses from the original HL rings:

106_5750.JPG


....and began wiring the HL's up. I FINALLY found these bare wire crimps that allow you to use properly-sized shrink tubing, instead of the crappy heavy plastic covers that usually come on connectors, which look like **** when crimped, ending up too big to allow shrink wrap to be slid over them and still shrink to the size of the wire:

106_5742.JPG


Right side bucket installed:

106_5740.JPG


That'll be it for this week! I'm sure I'll be back to it next weekend when the 40 Ford will continue heading towards it inevitable completion!
 
Last edited:

DynoDave

Well-known member
Joined
Mar 25, 2005
Messages
1,685
Location
Michigan
No complaints here, E. You get more done most days than I do in a month. Example above...I don't think I'd have the patience for working with glass.
 
To avoid these ads, REGISTER NOW!
OP
E

e-tek

Well-known member
Joined
Dec 19, 2007
Messages
10,690
Location
Saskatoon, SK
E-tec, where did you get those bare wire crimps? I have not seen them at the places I shop.

Warren...........

They were at my Autobody Supply Store - of all places. Likely not something they sell too often either, so we were BOTH happy.

I would think Electrical Supply houses would be also a good bet.
 
Last edited:

NASTYZEN

Well-known member
Joined
Jun 11, 2010
Messages
2,823
Location
St-Colomban,Que. Canada
I tip my hat to your patience and dedication in doing the long hours on these restores.:bowdown:
I leave most other things other than fabricating to other more patient people like your self.
 
OP
E

e-tek

Well-known member
Joined
Dec 19, 2007
Messages
10,690
Location
Saskatoon, SK
I tip my hat to your patience and dedication in doing the long hours on these restores.:bowdown:
I leave most other things other than fabricating to other more patient people like your self.

Thanks Zen! Sometimes I wish I could just do the same thing over and over - and get REAL good at it, like you have. But my OCD keeps me moving, whether it's doing 10 different chores on a Sunday, or doing everything from teardown to welding panels to engine work, wiring and polishing out the chrome!

Finally getting over this cold. Still pissed that I didn't get 4 full days last weekend on it. Should have been on the last few items by now!
 
Last edited:
OP
E

e-tek

Well-known member
Joined
Dec 19, 2007
Messages
10,690
Location
Saskatoon, SK
Finally feeling normal again (yay)....Did a bunch today on the '40: installed rad/fan combo (holy PIA!!), chrome repair, buffing, and a bunch of wiring....but the SD card I was using crapped out (2nd time in a couple weeks)...I'll re-take the pics tomorrow.
 

MP&C

Well-known member
Joined
Oct 21, 2009
Messages
4,398
Location
Leonardtown, MD
Ed, don't you have any free samples to use when you get under the weather like that? :lol_hitti


Looking forward to seeing this all together. Just in time for snow, right? He should have it all polished up ready for spring.
 
OP
E

e-tek

Well-known member
Joined
Dec 19, 2007
Messages
10,690
Location
Saskatoon, SK
Ed, don't you have any free samples to use when you get under the weather like that? :lol_hitti

Got lots of everything - but "time" is still the only thing that truly "cures" a cold or flu...

Looking forward to seeing this all together. Just in time for snow, right? He should have it all polished up ready for spring.

It's coming together fast now - see below. But it still has to go for full upholstery and a custom exhaust. Then it'll likely be back to me for some final items and fine tuning - and the final polish, which - as you eluded to above - is best done in the new sunlight of spring! :rocker:
 
OP
E

e-tek

Well-known member
Joined
Dec 19, 2007
Messages
10,690
Location
Saskatoon, SK
After installing a bunch of the final chrome I took a few photo's and was amazed by how much different the paint looks in each photo. The tri-pearl color is really going to pop in the sunlight. :pimpflash

photo%25202.JPG


photo%25204.JPG


The back-end awaits nice chrome pieces (including an original emblem and a new chrome plate holder and light). Owner scored "40 Ford" SK plates....I can't believe they hadn't been taken yet - lucky!

photo%25205.JPG
 
OP
E

e-tek

Well-known member
Joined
Dec 19, 2007
Messages
10,690
Location
Saskatoon, SK
Yesterday I found that halogen lights have their alignment tabs in different places than do conventional sealed beams - which I'm guessing is so you don't put halogens in without updated relays....

photo%25201.JPG


Notice where the daytime light ends up:

photo%25202.JPG


So today I sorted that issue out, plusI mounted the front and rear bumpers, secured the bottom of the rad (still need to make brackets for the top), fitted the rad hoses and adjusted the fenders and brackets again....to get the gaps closer....it's a work in progress.

photo%25201.JPG


I then spent a bunch of time on the underside: re-fitting the trans lines, sorting trans wiring, fuel pump relay wiring, brake wiring...

photo%25204.JPG


^^ I can see here that the rad bottom needs a new coat of black. Better get on that! ;)

LAstly today I began cutting an access plate in the drivers floor to maintain the brake fluid reservoir, which I'll finish up tomorrow. As well, I'll remove the DS again, which needs another inch cut out...
 
Last edited:
OP
E

e-tek

Well-known member
Joined
Dec 19, 2007
Messages
10,690
Location
Saskatoon, SK
Nicely done Ed. You must be happy with the finish.

Thanks Simon. I am actually - the color choice is awesome and the paint work is pretty good overall, but there's still quite a few areas that will need attention - fit and finish as they say.
 

akdiesel

Well-known member
Joined
Aug 8, 2008
Messages
2,617
Location
Wasilla, AK
Ed

Beautiful work. That is a very nice color choice.
I imagine you have snow now so will you have to wait till summer to take it out?
 

tdkkart

Well-known member
Joined
Jun 17, 2006
Messages
6,887
Location
Eastern Iowa
Now why the hell did this thread get moved to the fab and techniques section?? I for one will never see it here..........I agree FP may not be the best place for it, but neither is this.
 

Kevin54

MEMBER EMERITUS
Joined
Jan 12, 2005
Messages
29,341
Location
Urbana, Ohio
106_5719.JPG


photo%25204.JPG


E-Tek....Roll that car out in the sun and get a pic before the snow flies. The blue with the chrome grille looks great. :thumbup:

Question.....On the stainless shroud, shouldn't that tab have come up through the hole that is showing in the shroud? They look to be in the same location except the tab just look like it was bent down some :dunno:

The blue on the '40 reminds me of the blue I had on my '89 Silverado. Black looking at night but really popped in the daytime. IIRC, I think my color was called Black Sapphire. I like it!!.
 

MP&C

Well-known member
Joined
Oct 21, 2009
Messages
4,398
Location
Leonardtown, MD
+1

need.......sunlight........pictures.......... :thumbup:


On those light reflectors, IIRC the daytime light should be keyed toward the bottom.
 
OP
E

e-tek

Well-known member
Joined
Dec 19, 2007
Messages
10,690
Location
Saskatoon, SK
Ed
Beautiful work. That is a very nice color choice.
I imagine you have snow now so will you have to wait till summer to take it out?

Yes sir - it's minus 20 with half a foot o' the white **** outside...tho maybe on the next sunny day....:dunno:

Now why the hell did this thread get moved to the fab and techniques section?? I for one will never see it here..........I agree FP may not be the best place for it, but neither is this.

Kinda what I think too, but now they're all over there....so whatever...

Subscribe to it then and you will never miss it. :thumbup:

There's one answer...but I wonder how many people (especially newer members) will find these threads 'by accident' in Fabrication....not too many I suspect...

I'd get a pic before the snow flies. The blue with the chrome grille looks great. :thumbup:

Too late....:sad:

Question.....On the stainless shroud, shouldn't that tab have come up through the hole that is showing in the shroud? They look to be in the same location except the tab just look like it was bent down some :dunno:

Nah they didn't match up. Owner was also sure the tab was useless - so off it came!

The blue on the '40 reminds me of the blue I had on my '89 Silverado. Black looking at night but really popped in the daytime. IIRC, I think my color was called Black Sapphire. I like it!!.

I'll have to look that color up Kevin - sounds awesome! Thanks for the comments!
+1

need.......sunlight........pictures.......... :thumbup:

Soon, soon...!

On those light reflectors, IIRC the daytime light should be keyed toward the bottom.

Right you are! I was just showing where they landed when clocked into the stock tabs in the HL buckets. I clocked them 'straight-on' for these photo's and will modify the buckets to match. I have to open them up again to complete the install of park/signal retro-fit sockets that go in there.
 
To avoid these ads, REGISTER NOW!
Top Bottom