
You are using an out of date browser. It may not display this or other websites correctly.
You should upgrade or use an alternative browser.
You should upgrade or use an alternative browser.
Above 1200 Sq/FT Eastern Washington Workshop
- Thread starter slodat
- Start date
Wokspaces above 1200 squarefeet.

Finallygotit
ALLIANCE MEMBER
Ah! Got it!
Toolfool
Well-known member


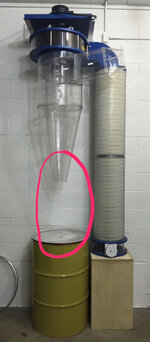
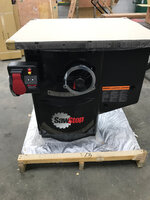
Finished the chip bin inlet. I sealed all of the edges of the foamed PVC flanges with silicone. It seems to have turned out well.

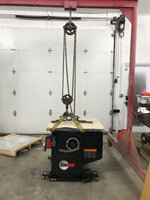
Fired it up for the first time. It is a lot louder than I had expected. This is a serious dust collector. I think I will have to build a small room enclosing it.
Fired it up for the first time. It is a lot louder than I had expected. This is a serious dust collector. I think I will have to build a small room enclosing it.
Attachments

Duker
Well-known member
Slodat, saw the D.C. and your dust gates on the other thread and I had to read through the entire shop build. Incredible build and totally envious of the equipment! Looking forward to see what other projects come out of the shop!
Sent from my iPad using Tapatalk Pro
Sent from my iPad using Tapatalk Pro
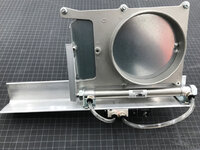
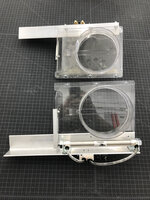
Starting to put the ducting together and needed another 6" gate. There are two main branches in the system and these two 6" gates isolate the respective main branches. The way it works out one branch is Bay 2 where the CNC router, planet and jointer live. The other is Bay 3, the woodshop, with the table saw, bandsaws and all of the router tables. For now I want to get these two 6" gates installed in the ducting so I can continue with the ducting. I'm happy with the way the gates are going together. The 4" gates will be made the same way.


These cast aluminum dust gates don't fit the 6" S&D very well. I came up with a way to make it work. I slide the 6" pipe onto the gate and then use a sectioned piece of pipe as a key to wedge into the gap. Two flange head screws hold it all together. Looks like it will do the trick. I have some of Clearvue's 6" gates for non-automated use.

These cast aluminum dust gates don't fit the 6" S&D very well. I came up with a way to make it work. I slide the 6" pipe onto the gate and then use a sectioned piece of pipe as a key to wedge into the gap. Two flange head screws hold it all together. Looks like it will do the trick. I have some of Clearvue's 6" gates for non-automated use.
Attachments


Duker
Well-known member
Those look great. It may be more work to post then you care to do but I and perhaps others would love to see how you tie this into the air system and the PLC. I was leaning toward an iVac system but you have peaked my interest to perhaps build my own.
Sent from my iPad using Tapatalk Pro
Sent from my iPad using Tapatalk Pro
drivesitfar
Well-known member
SD: lots of great stuff going on at your shop. keep up the great work.
just curious do you have plans yet for the extra lot or just cleaning it up for now?
just curious do you have plans yet for the extra lot or just cleaning it up for now?
Thanks guys!
Duker - I will document the dust collection controls on here. Happy to share what I'm learning and sorting out.
Drives- I'd like to get the lot cleaned up, graded, covered in gravel with a cyclone fence with a large gate. I'm going to try to replicate the privacy the old single wide has afforded me on that side of my shop driveway.
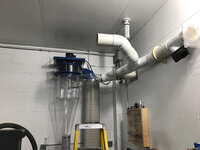
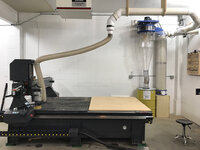
Starting to get a plan together on how to run the ducting. I'm hoping to balance not adding excessive restrictions in the systems with something that is at least a little aesthetically pleasing..
First machine to get connected will be the router. Feeling good about the way this is coming together..

This is the ceiling mounted pipe support I came up with.


First machine to get connected will be the router. Feeling good about the way this is coming together..
This is the ceiling mounted pipe support I came up with.
Attachments


Last edited:


250
Well-known member
Is that a powermatiac 141 and delta 20 inch I see there?
drivesitfar
Well-known member
SD: your shop is really shaping up nicely and i love the dust collection system you are setting up. WHAT MESS??
if i owned your space and didn't need the lot next door for my own use i might clear it and asphalt it and pay for that with a few boats and RV owners. not even sure what to charge, but i think my storage unit charges $90 per month to park a car inside it's gate and we are 20 minutes south of downtown Seattle.
if you can afford to just fence it and let it sit or maybe park a few of your projects and supplies you don't have room for in the shop it works for me.
have a great weekend.
250
Well-known member
SD: pay for that with a few boats and RV owners.
This is an interesting idea, probably could just have gravel even. My... worry... would be how does it not turn into a yard where things go to die the slow death of dry rot?
drivesitfar
Well-known member
250: with SD's talent to fix almost anything i bet that wouldn't be an issue especially if the owners are paying their bills. if they are not paying then some wording in the contract so SD gets title sort of like a towing yard would do and he's got a new project. and it would be a good place to put some of SD's finds and projects he picks up that doesn't have time to work on or want to park inside his shop right away.
of course it's like being a landlord and you do get to pick and choose the people and the items you'd let them store there.
another idea is to build a little storage facility and have units to rent cause guessing with the business next door that the property is zoned for something other than just a manufactured home, but not certain about that.
in any case he's got a few options now that he owns it. also his side of the state of WASHINGTON doesn't get nearly the rain that my side does so while rust can and will happen it will be a slower process over in his area.
The lot is a huge project because of the basement next to the trailer that will have to be dealt with. I tried my hand as a landlord a couple years ago. Got burned bad by tenants and worse when I sold it.
I bought the lot to clean it up. My plan, once it's level and clear is to put in a nice cyclone fence, cover with gravel and use for my own storage. At this time the only thing I have to put on it is my utility trailer.
Building on the lot is not in the plans at this time.
I bought the lot to clean it up. My plan, once it's level and clear is to put in a nice cyclone fence, cover with gravel and use for my own storage. At this time the only thing I have to put on it is my utility trailer.
Building on the lot is not in the plans at this time.
drivesitfar
Well-known member
SD: i hear you about tenants, but house rentals are a bit different than commercial type ones so keep an open mind. also you learned from a bad experience and know what not to do next time. of course being a landlord isn't for everybody so i fully understand your feelings.
just an FYI if you hire a guy that demos homes your foundation would be gone in an afternoon. we just had a little house (livable) across the street from us bulldozed and thrown in 2 dumpster loads and completely gone in 2 days.
in your part of the state where you don't need as many permits and there are more handy guys with track hoes or bulldozers i bet if you find a good guy it might not cost you much or maybe even a trade involved since many guys in that business need their equipment or trucks spiffed up.
good luck and i'm not trying to tell you what to do and just throwing out some ideas cause you are doing great on your own so far.
Attachments
![WP_20170321_020[26472].jpg](/forum/data/attachments/513/513851-caf566b10a8403f71dc2403213a2e58a.jpg)
![WP_20170321_001[25364].jpg](/forum/data/attachments/513/513750-d832d70c6180420389591d852525fd38.jpg)
![WP_20170321_011[25362].jpg](/forum/data/attachments/513/513797-97c892ff82565d37728176002e6083c9.jpg)
![WP_20170321_017[26469].jpg](/forum/data/attachments/513/513824-7a6ace6f220ad1b621853b1c56e37c09.jpg)
My concern is the amount of fill dirt I will need to fill the huge hole that is currently a basement, and all that. The quotes I'm getting are high.
I want a clean lot next to the shop. Trying to clean up a neglected, run down area.
I like the ideas you guys are throwing out! It probably doesn't look like much of a project from the photos. Given my day job schedule, getting the shop dialed in and ready for a customer project coming in, etc and that lot looks like a lot of work")
As always, I enjoy the comments. Thanks guys!
I want a clean lot next to the shop. Trying to clean up a neglected, run down area.
I like the ideas you guys are throwing out! It probably doesn't look like much of a project from the photos. Given my day job schedule, getting the shop dialed in and ready for a customer project coming in, etc and that lot looks like a lot of work
As always, I enjoy the comments. Thanks guys!
Last edited:
drivesitfar
Well-known member
SD: do you know anybody with a dump truck? is there a quarry close by? a few years ago i had a guy deliver two trucks of 5/8 minus gravel in my parking area (about 15 yards cause trucks were full) and he drove 40 miles from the quarry near his house and my bill was $250. sure it was a deal, but you have a lot more gravel and rock in your area and you might know a few guys that own a dump truck.
or maybe a dump truck purchase is in your future as a project to use until you spiff up and sell?
anyway if I recall correctly the quarry charged the guy that delivered my gravel maybe $8 per yard, but that was 5 years ago.
also a big dozer could probably crush up the cement foundation so you don't have to dump it and use it as some of the fill.
good luck finding a good honest guy with a truck and or a dozer and have fun (or progress with a lot of hard work) in your shop in the meantime.
The router's control cabinet upper door came with a cheesy window and the hinge was on the right. This put the open door in the walkway between it and the router. I've wanted to flip it over and make a better window since it arrived.
These type of projects are the way I'm learning how to use the CNC equipment. It took some tinkering to sort out drawing it up. The holes aren't in any exact layout. All a little goofy. I'm the end I got it! Turned the latch upside down and it works a treat!
Window that came with it.
All done:

My helper is coming over to work on the lot cleanup today. I'll be working on.. one of the hundred things I have to get done in the next month!
These type of projects are the way I'm learning how to use the CNC equipment. It took some tinkering to sort out drawing it up. The holes aren't in any exact layout. All a little goofy. I'm the end I got it! Turned the latch upside down and it works a treat!
Window that came with it.
All done:
My helper is coming over to work on the lot cleanup today. I'll be working on.. one of the hundred things I have to get done in the next month!
Attachments


ODIS
Well-known member
Of the thousands of things you have completed so far, guessing that the next few hundreds of steps will be easily completed.
Great thread and has been fun to follow. Well done!
Great thread and has been fun to follow. Well done!
Thank you for following along and commenting!
The helper is getting a lot done on the lot. Today's progress:

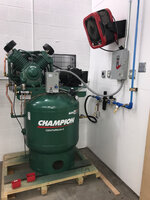
I started the air plumbing today. The Fastpipe is really nice to work with! Out of the compressor there's a full pressure tap, main regulator, soft start valve and lower pressure tap. Then it heads out to the shop.


The helper is getting a lot done on the lot. Today's progress:
I started the air plumbing today. The Fastpipe is really nice to work with! Out of the compressor there's a full pressure tap, main regulator, soft start valve and lower pressure tap. Then it heads out to the shop.
Attachments


drivesitfar
Well-known member
SD: just giving your thread a bump cause it needs to get more member's eyes with all the cool stuff you've been doing.
also was going to mention your garage door rain fix to another member that's having issues. is yours still keeping the rain out?
hopefully the bad weather is behind us and we'll have a few more sunny days in our future for a while now.
cheers
also was going to mention your garage door rain fix to another member that's having issues. is yours still keeping the rain out?
hopefully the bad weather is behind us and we'll have a few more sunny days in our future for a while now.
cheers
SD: just giving your thread a bump cause it needs to get more member's eyes with all the cool stuff you've been doing.
also was going to mention your garage door rain fix to another member that's having issues. is yours still keeping the rain out?
hopefully the bad weather is behind us and we'll have a few more sunny days in our future for a while now.
cheers
Thank you!
The door seals are working well. I have had some water a couple times when the wind was blowing the rain really hard. It looks like that is at the ends. I think it's something I can take care of with some silicone. We have crazy wind and rain today. I'm sure I'm getting a little bit inside today.. MUCH less than before I installed the seals.
I just pressurized the air system as shown in the photos below. The soft start valve is so nice! I have a smaller one in my dust collection automation system.
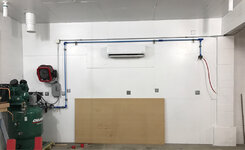
I got the Reel Craft hose reel up. Nice unit! So much more to do. The Fastpipe -> MaxLine -> FastPipe transition worked well for navigating the pipe under the beam.
I saw on RapidAir's website they now offer a straightener for the MaxLine.. Thinking about ordering it to speed up the install of that stuff.
Current:
Attachments


Got through Bay 2!! Running behind the beam was a bit of a trick. The FastPipe doesn't like being bent with a conduit bender. It worked, but I don't love it.

There are two 1/2 NPT tees with plugs in them for any future needs in Bay 2. You never know when the CNC router might get an ATC spindle friend.. and a CNC milling machine
Next up is Bay 3 - the woodshop..
There are two 1/2 NPT tees with plugs in them for any future needs in Bay 2. You never know when the CNC router might get an ATC spindle friend.. and a CNC milling machine
Next up is Bay 3 - the woodshop..
Attachments

RivennHewn
Well-known member
Cool stuff going on here!
Maybe I should drop off the seat to my '77 ford F350 and see what comes of it.
Maybe I should drop off the seat to my '77 ford F350 and see what comes of it.
Cool stuff going on here!
Maybe I should drop off the seat to my '77 ford F350 and see what comes of it.
Don't threaten me with a fun project!! I've seen so many interesting materials in the last week. I can not wait to get to some upholstery work.
In other news... a local guy stopped in today.. he's interested in trading upholstery work for completely taking care of the cleanup and dirt work next door.. might be booked into 2018!
Woodshop hose reel is up as well as an outlet drop below it on the wall. This is my assembly area in the woodshop. Having the hose reel and a drop lets me keep two (or three if I remove the plug) tolls plugged in should I need it.

The run down the wall is level. I used my laser to locate the mounting clips. The beam is on an angle. The FastPipe bends like total **** with a conduit bender. Good thing it's behind dust collection ducting so I don't have to stare at it.

I need a FastPipe tee for the drop on the back wall. Not much FastPipe left to install. Then I transition to MaxLine and head into the finish room and out into the upholstery bay. Rapid Air offers a MaxLine straighter now. I'm going to get it ordered. It will look so much better..
The run down the wall is level. I used my laser to locate the mounting clips. The beam is on an angle. The FastPipe bends like total **** with a conduit bender. Good thing it's behind dust collection ducting so I don't have to stare at it.
I need a FastPipe tee for the drop on the back wall. Not much FastPipe left to install. Then I transition to MaxLine and head into the finish room and out into the upholstery bay. Rapid Air offers a MaxLine straighter now. I'm going to get it ordered. It will look so much better..
Attachments

Duker
Well-known member
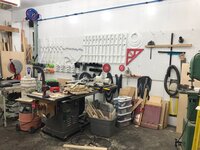
The air install is coming along nicely! Ok, you have to tell us about the collection of templates you have hanging on the wall!
Sent from my iPad using Tapatalk Pro
Sent from my iPad using Tapatalk Pro
drivesitfar
Well-known member
SD: i was hoping you could maybe find a local guy to help you with cleanup on your almost vacant lot that might to take advantage of some of your skills and quality.
everything is looking pretty sweet and do you have a NICKNAME for your shop other than the NEVER ENDING MONEY PIT? everything you've done seems like it should last for years and you shouldn't or hopefully won't have to re do anything with your well laid out plan.
cheers
everything is looking pretty sweet and do you have a NICKNAME for your shop other than the NEVER ENDING MONEY PIT? everything you've done seems like it should last for years and you shouldn't or hopefully won't have to re do anything with your well laid out plan.
cheers
The air install is coming along nicely! Ok, you have to tell us about the collection of templates you have hanging on the wall
The templates are for interior fabrication with routers. The speed up design, layout and fabrication and air integral to producing parts with crisp lines and nice gaps.
SD: i was hoping you could maybe find a local guy to help you with cleanup on your almost vacant lot that might to take advantage of some of your skills and quality.
everything is looking pretty sweet and do you have a NICKNAME for your shop other than the NEVER ENDING MONEY PIT? everything you've done seems like it should last for years and you shouldn't or hopefully won't have to re do anything with your well laid out plan.
cheers
It's a business.. with a vision. No nicknames. I'm very close to where I want it to be for a while.
Thanks for following along and commenting guys!


Toolfool
Well-known member
Another great machine ! I hope you're going to invite us for the grand opening.
The RapidAir MaxLine tubing straightener came today.


I ran a 6' chunk through it. Came out a lot straighter than I could get without it. Seems like one row of wheel height should be adjustable for tension. Instead they tapped three sets of holes that must line up with their 1/2, 3/4 and 1" tubing.
I ran a 6' chunk through it. Came out a lot straighter than I could get without it. Seems like one row of wheel height should be adjustable for tension. Instead they tapped three sets of holes that must line up with their 1/2, 3/4 and 1" tubing.

