
You are using an out of date browser. It may not display this or other websites correctly.
You should upgrade or use an alternative browser.
You should upgrade or use an alternative browser.
Above 1200 Sq/FT Eastern Washington Workshop
- Thread starter slodat
- Start date
Wokspaces above 1200 squarefeet.
mistervelocity
Well-known member
All cool stuff. Nice work.
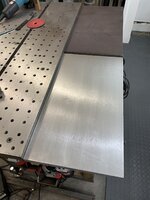
I’ve wanted to clean up the two chunks of 1” plate on my welding table. I couldn’t find an abrasive that is effective at quickly removing the mill scale. Ended up spending a couple hours in the blast cabinet with the harshest I had on hand.
What I started with (there are two). 1’ x 2’ x 1” steel plate.

After sandblasting.

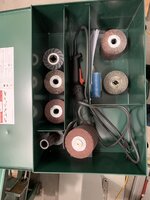
After 60 and then 80 grit flap wheel on the burnisher.

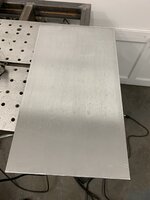
180 scotchbrite.

280 scotchbrite. Final result. I know deep down I’ll want to have them ground. But only to satisfy my eye. At some point I’ll get these two chunks level with the cast iron section.


Burnisher.

What I started with (there are two). 1’ x 2’ x 1” steel plate.
After sandblasting.
After 60 and then 80 grit flap wheel on the burnisher.
180 scotchbrite.
280 scotchbrite. Final result. I know deep down I’ll want to have them ground. But only to satisfy my eye. At some point I’ll get these two chunks level with the cast iron section.
Burnisher.
Attachments
-
 fbdb098f0b269bd0af400fcb960301d7.jpg427.3 KB · Views: 1
 -
 a99660cd6c7908d6fe8b6bc238c7827b.jpg346.9 KB · Views: 0
 -
 29a25a8be4f381b3b23f622fd275959c.jpg578.4 KB · Views: 0
 -
 5352b3b19c6c0b3c5113cacbb06c357c.jpg573.6 KB · Views: 0
 -
 fea18eb1efeb072ecf1265bd821fc429.jpg426 KB · Views: 0
 -
 e855caf43caaf07d903ea6595389c434.jpg385.8 KB · Views: 1
 -
 c73df05ab74e14fe3e129c7c3603389e.jpg303.9 KB · Views: 1
Last edited:


Finallygotit
ALLIANCE MEMBER
Nice!!! 


lilscorpion
Well-known member
v2. Moving on to the next step.
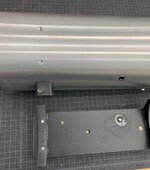
Mounts all of the included hardware (added both fuses) to the back of the tank.

Looks awesome. What’s the tank for?
Looks awesome. What’s the tank for?
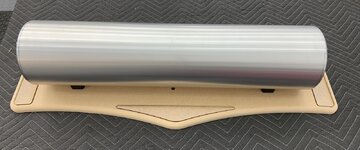
Customer’s car is air bagged. This is the air management system.. AccuAir e-Level controller mounted to their ENDO-CVT tank. The tank has internal valves for all four corners as well as internal compressor. This makes a quiet, compact package once mounted in the trunk. I'm doing a wiring cleanup and some trunk upholstery fabrication on the car. Decided to make this mounting bracket in the process.
Last edited:
jbmatth
Well-known member
The CVT tanks are pretty slick, if I had anything on air I'd seriously look into one. How did you mount the brackets to the tank?
JB
JB
lilscorpion
Well-known member
Customer’s car is air bagged. This is the air management system.. AccuAir e-Level controller mounted to their ENDO-CVT tank. The tank has internal valves for all four corners as well as internal compressor. This makes a quiet, compact package once mounted in the trunk. I'm doing a wiring cleanup and some trunk upholstery fabrication on the car. Decided to make this mounting bracket in the process.
Looks like a high-tech bomb like in the movies. What is the mounting plate and brackets (that mount the panel to the tank) made out of? How is the assembly attached to the tank?
The CVT tanks are pretty slick, if I had anything on air I'd seriously look into one. How did you mount the brackets to the tank?
JB
I agree. The CVT tank setup is really slick. It eliminates a lot of plumbing and wiring and is a very clean, compact setup. I have one going in my personal car.
Looks like a high-tech bomb like in the movies. What is the mounting plate and brackets (that mount the panel to the tank) made out of? How is the assembly attached to the tank?
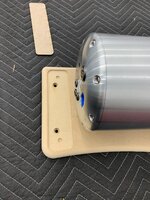
My bracket is made of 1/2 and 3/4 PVC foam board. Flat panel is 1/2 and standoffs are 3/4. Parts are assembled with Weld-On SciGrip #66 PVC cement. I use knife edge threaded brass inserts for the machine screw mounting points. Assembled bracket is screwed to existing threaded holes in the tank. Tank is designed to be mounted on the bottom and on the back (used when mounting on a vertical). I'm using these unused tapped holes to mount my bracket. I used nylon socket head cap screws, pocketed into the pvc. Should be no chance of a nylon SHCS screwing up the threads in the tank.


Top view of the mounting bracket.

Attachments


Last edited:
lilscorpion
Well-known member
My bracket is made of 1/2 and 3/4 PVC foam board. Flat panel is 1/2 and standoffs are 3/4. Parts are assembled with Weld-On SciGrip #66 PVC cement. I use knife edge threaded brass inserts for the machine screw mounting points. Assembled bracket is screwed to existing threaded holes in the tank. Tank is designed to be mounted on the bottom and on the back (used when mounting on a vertical). I'm using these unused tapped holes to mount my bracket. I used nylon socket head cap screws, pocketed into the pvc. Should be no chance of a nylon SHCS screwing up the threads in the tank.
That’s really cool. Can PVC foam board get wet? What’s its durability? Will the screw in inserts allow for getting the screws tight enough that everything feels solidly attached?
That’s really cool. Can PVC foam board get wet? What’s its durability? Will the screw in inserts allow for getting the screws tight enough that everything feels solidly attached?
Yes, it is dimensionally stable, water doesn’t affect it (think pvc pipe), it’s quite strong and the span between fasteners is <12”. You could hang the tank from the mounts I’ve made and it would be good to go. The components I’m mounting don’t weigh two pounds total. The inserts are CA glued to the pvc as I insert them if rotation is a concern. I size the holes such that I don’t have that issue the majority of the time. Screws are tightened down no problem. I make a lot of different panels using this method. If I’m bolting two parts together I only use threaded inserts or rivnuts as appropriate and stainless machine screws. Like other types of fabrication, things get assembled and reassembled many times in the process. Last thing you want is thread into a base material that will fail. The inserts give a solid mechanical connection that’s strong, serviceable and will last.


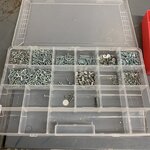
After dinner project tonight. I placed a fastener order earlier today.. a rather good assortment of stainless button head and flat head socket screws 4-40 through 1/4-20. Got to looking at how I had been storing the small fasteners in these small HF compartmented containers.


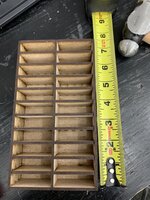
I’ve been noodling on making a complete line of these organizer bins for diy home shop guys. Best way to sort them out is to make them and use them. Started with 4-40. Not a size I use a lot of. But, when you need it, you need it. Don’t want to give up a lot of space, and want them organized. I like the removable tray idea. So, I blended both and came up with this for the 4-40 stuff.

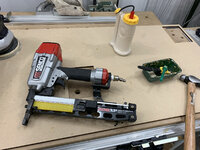
It was built with room for the other fasteners I ordered. If I do make this stuff to sell they will ship flat, fresh off the laser. Buyer can sand if they wish. And, assemble. The snap together with a small ball peen hammer.
Another I made while experimenting.


Parts after a quick pass with the RO sander.

I’ve been noodling on making a complete line of these organizer bins for diy home shop guys. Best way to sort them out is to make them and use them. Started with 4-40. Not a size I use a lot of. But, when you need it, you need it. Don’t want to give up a lot of space, and want them organized. I like the removable tray idea. So, I blended both and came up with this for the 4-40 stuff.
It was built with room for the other fasteners I ordered. If I do make this stuff to sell they will ship flat, fresh off the laser. Buyer can sand if they wish. And, assemble. The snap together with a small ball peen hammer.
Another I made while experimenting.
Parts after a quick pass with the RO sander.
Attachments
-
 c3e9fbe28f2c967b206ecac43ba81b5c.jpg777.5 KB · Views: 2
 -
 02082c68fcd4500ff2003de0db2cf3b3.jpg833.6 KB · Views: 2
 -
 a6bad724297166ec9508b1f5554cda91.jpg501.1 KB · Views: 2
 -
 1731e0d180b648203c45245d4774b094.jpg743.3 KB · Views: 1
 -
 96ba42239219d6b891d94c8c5a0bc85b.jpg551.5 KB · Views: 1
 -
 74b861fad97831a1e261f00a36966ccd.jpg523.4 KB · Views: 1
 -
 8bda0edc42472048d66d2c8f9380e953.jpg433.6 KB · Views: 1
Jo Diesel
Well-known member
Could you make racks for the HF organizers ? right now I am using an office organizer but it is failing. I like being able to grab 1 without having to deal with a pile
Finished the small fastener drawer (4-40, 6-32, 8-32 and 10-24). Most is stainless for use in my interior work.

Finished the AccuAir mounting panel today. Magnetically located and secured panels conceal mounting hardware to the car. It’s always really satisfying to create something exactly as I envisioned it. Happy with how this turned out.


Finished the AccuAir mounting panel today. Magnetically located and secured panels conceal mounting hardware to the car. It’s always really satisfying to create something exactly as I envisioned it. Happy with how this turned out.
Attachments
-
 1721f718b79abffd8b9060736d98e55b.jpg538.2 KB · Views: 1
 -
 533c040ae684e851b9c0dc297d6f00d3.jpg557 KB · Views: 1
 -
 f3416535ab84ef2c3eb643fb624f9870.jpg584.7 KB · Views: 1
 -
 d6410904a10b3fbb73aba1a53bf2f68e.jpg294.8 KB · Views: 1
 -
 221c9817eba109d471487b50c1f2392b.jpg383.2 KB · Views: 1
 -
 6edb860205f9a9f9c50ad6131311c215.jpg570 KB · Views: 1
Last edited:
Bighead38
Well-known member
That looks awesome.
Bob Heine
ALLIANCE MEMBER
If my hardware drawer looked like that it would have to be stainless. My drool would ruin plain steel hardware.
That's the best looking air ride tank setup I've ever seen! Thanks for sharing.
That's the best looking air ride tank setup I've ever seen! Thanks for sharing.
If my hardware drawer looked like that it would have to be stainless. My drool would ruin plain steel hardware.
That's the best looking air ride tank setup I've ever seen! Thanks for sharing.
This sort of thing makes the shop a joy to work in.
Thank you for the kind words, Bob. It’s always cool when I’m able to build the idea I have in my head. This one was fun and turned out how I wanted. Thanks again for following along!


Finallygotit
ALLIANCE MEMBER
That tank set-up is sweet!
rattle_snake
Well-known member
Your work is a pleasure to look at, and given how nice it looks is should also be robust and serviceable. Nice job on the tank controls.
xtremek
Well-known member
The air system looks good, but I want your small fastener drawer.
That tank set-up is sweet!
Thanks Dan!
Your work is a pleasure to look at, and given how nice it looks is should also be robust and serviceable. Nice job on the tank controls.
Justin - wow. Thank you so much for the kind words! I'm really happy with how this turned out. It feels good to create the ideas in my head! The shop is working out well. More to come!
The air system looks good, but I want your small fastener drawer.
The organization stuff is satisfying on a whole other level. It is pure joy opening those drawers and getting what you need. Highly recommended!
Thanks for cheering me on guys! I appreciate it.
lilscorpion
Well-known member
Electronics mounted and wiring has begun.

So damn sweet. Now I want an air setup even if it’s silly on a Jeep. Super impressed. Really.
Attachments

So damn sweet. Now I want an air setup even if it’s silly on a Jeep. Super impressed. Really.
Matt- thank you so much! The transition to work incorporating the digital fabrication into my work is really paying off. I’m excited for what’s next! Thank you for the kind words!
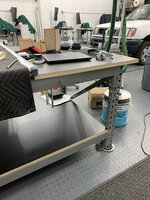
The big workbench has never been too much of a workbench in the way I thought it would be. It’s much more of a counter and desk. It was made of materials from the hallway I removed nearly four years ago. I had painted at that time. Tonight, I cleaned it off, sanded with 80 grit and laid down some black Formica. I knew it would be a huge improvement... I was right. It’s perfect. I had the Formica on hand which made for a one evening project.
Before:

Sanded:

I did the 6’ chunk first. I used upholstery adhesive that I already had in the blue pot. It works well for the laminate.


End result. Much better!

Before:
Sanded:
I did the 6’ chunk first. I used upholstery adhesive that I already had in the blue pot. It works well for the laminate.
End result. Much better!
Attachments
-
 2573a401162a8736466c25eab2007d90.jpg97.2 KB · Views: 3
 -
 a2ed0b89c4f46d3701b2fc6dd5a3a1c3.jpg88.7 KB · Views: 3
 -
 5e29ceac9fd08c4d50cb51acdd773825.jpg103.4 KB · Views: 2
 -
 9e50c5777a02bf80489a9330aeabd9ce.jpg90.2 KB · Views: 2
 -
 1a2c78ae75ae8d8d6f77d6f0510e1af7.jpg74.8 KB · Views: 3
 -
 ead77039bf44a89e4a6a5627fff7e876.jpg100.4 KB · Views: 3
 -
 120100199c6c07cf7355708f9910536d.jpg97.5 KB · Views: 3
 -
 f02bf78dc345fa00b602ddb5cdfcfaf3.jpg96 KB · Views: 2
 -
 13632439a14c0cceaadfe25da00356e8.jpg102.9 KB · Views: 2
xtremek
Well-known member
The bench looks really good
Jayman17
Well-known member
You really do nice work, that tank mount sure is clean looking. Of course the shop always looks good, now even better with new laminate on your bench.
Those fastener trays you make are slick. I guess I never realized that lasers can actually cut the material too. I thought they were just used for making a design element on the surface of something. The possibilities seem endless, I bet someone could spend a lot of time playing around with it.
Thanks for the updates,
Jay
Bib Overalls
Well-known member
Is there anything, besides maybe brain surgery, that you can not do?
Thanks for cheering me on guys! It plays a part in keeping me motivated. I had a friend visit the shop for the first time yesterday. Over time a tour of sorts has evolved to show people why I've done a lot of what I've done and such. When he asked how long I've had the building I think I gave my best explanation yet.. I don't have a wife, kids, grandkids, "hobbies" like sports, skiing, etc, I don't really like to travel too much, and so on. So, I literally spend my off work (from the day job) time in my shop. It's what I like to do with my time. Having this outlet to share all of this with is pretty great!
Thank you to everyone who follows along, comments, asks questions, shares ideas, gives feedback and all of the rest!
Thank you to everyone who follows along, comments, asks questions, shares ideas, gives feedback and all of the rest!
rattle_snake
Well-known member
Is there anything, besides maybe brain surgery, that you can not do?
I believe he has the appropriate tooling to do so but maybe not the licencing aspect.
")
The reworking of the bench top was because I recently got a 3D mouse. As I learn 3D modeling I realize I want to have some good tools for the job.. and a clean, clutter free work space.
What I started with.. the computer tower was on the bench top behind the monitor and it was all compacted against the wall reasonable well.

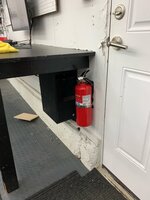
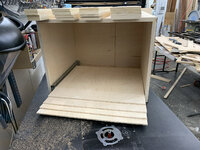
Once the laminate was on I knew I wanted to clean it up as much as possible. This is what I settled on. I made a box to mount the mini tower to the wall under the bench. I occasionally have to hit the power button, so I wanted it at the end of the bench. It’s accessible from the side and otherwise out of the way and out of sight.

I made a 1/4 Baltic birch plywood shelf to hold the wiring up between two of the 2x4 bench top supports. I cut out each corner for cable pass through.

Up in place.

I found this power strip that has through holes for mounting.

I wanted to hide the network cables, power to the power strip under the bench, and the window a/c’s power cord. This is what I came up with. I used some 3/4 plywood scraps to create cable ways and 1/4 to cover them and keep things in place.


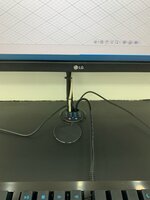
I used a grommet mount USB 3.0 hub for the cable pass through. Nice device and works well.

It includes a dust cover for when nothing is plugged in.

End result..

What I started with.. the computer tower was on the bench top behind the monitor and it was all compacted against the wall reasonable well.
Once the laminate was on I knew I wanted to clean it up as much as possible. This is what I settled on. I made a box to mount the mini tower to the wall under the bench. I occasionally have to hit the power button, so I wanted it at the end of the bench. It’s accessible from the side and otherwise out of the way and out of sight.
I made a 1/4 Baltic birch plywood shelf to hold the wiring up between two of the 2x4 bench top supports. I cut out each corner for cable pass through.
Up in place.
I found this power strip that has through holes for mounting.
I wanted to hide the network cables, power to the power strip under the bench, and the window a/c’s power cord. This is what I came up with. I used some 3/4 plywood scraps to create cable ways and 1/4 to cover them and keep things in place.
I used a grommet mount USB 3.0 hub for the cable pass through. Nice device and works well.
It includes a dust cover for when nothing is plugged in.
End result..
Attachments
-
 f82b550b3777b4b014886099997d451d.jpg92.3 KB · Views: 2
 -
 3b0f1d394332757c8d8cd66f4f931ea4.jpg997.3 KB · Views: 1
 -
 1cfa23087df392b3f296f9e10ac461a8.jpg48.6 KB · Views: 1
 -
 90d0ae8215077a832d8f743adc93f6a3.jpg50.2 KB · Views: 1
 -
 e23cfe6436feb809c96b8318999108cd.jpg65.8 KB · Views: 1
 -
 563947db33cea8d1c03ea462eb2e6cf4.jpg45.9 KB · Views: 1
 -
 32ef7643f13beedfbcddc2a6d8fa90c8.jpg43.7 KB · Views: 2
 -
 195b0a5fdb17add666f26e5f266b90f5.jpg41.5 KB · Views: 2
 -
 9dc9e39c266b41ebed23ae7c8cc1c1ac.jpg87.1 KB · Views: 2
 -
 056249d7c8a9376e58f3a883eb48f718.jpg77.4 KB · Views: 2
 -
 49b864a969602a9fda2acdc545cf5138.jpg68.6 KB · Views: 2
 -
 a3ab093a3737991ee42bff92d2971ce9.jpg78.8 KB · Views: 3
Last edited:
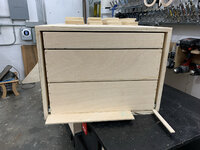
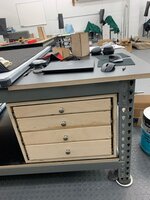
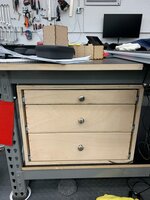
The computer desk facelift continues. I needed a place to put things away. Plan has always been to make a lot of drawers, same style I put in the router table. They are super fast to make and strong enough for any abuse I’ve put them through in the past 3 years. All plywood construction. Case is 3/4 inexpensive “birch shop” from HD, sides are a nice 1/2 I have a ton of that I reclaimed and bottoms are 1/4 Baltic birch. Titebond 3 and 1-3/4 staples.
Two banks of drawers back to back in the same case, going under my tracing table computer. 20” deep on the computer side, 14” deep drawers on the other side.


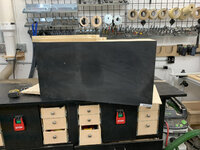
I black laminate on the case side that will be visible.

Parts ready to assemble.


14” deep drawers assembled, ready to mount on the slides.

I had all of the material on hand. Fun project. The storage will help to keep the desk area clutter free. More to follow.
Two banks of drawers back to back in the same case, going under my tracing table computer. 20” deep on the computer side, 14” deep drawers on the other side.
I black laminate on the case side that will be visible.
Parts ready to assemble.
14” deep drawers assembled, ready to mount on the slides.
I had all of the material on hand. Fun project. The storage will help to keep the desk area clutter free. More to follow.
Attachments
-
 a9690faba40ab5a313981a824d124bfb.jpg1.4 MB · Views: 1
 -
 0ddfcda057604ced0d369f9b4355ad77.jpg73.2 KB · Views: 1
 -
 7e1d305d694f66745ceb06ccdaf474d8.jpg40.2 KB · Views: 1
 -
 7acb56f3b70c68b81360699e3203721f.jpg1.5 MB · Views: 1
 -
 e3451496032129150c770e02c693f394.jpg1.4 MB · Views: 1
 -
 6250f6f55779647dd01c3b8cd49c5529.jpg1.5 MB · Views: 2
 -
 4ceed848224701e237942b2e5c48d588.jpg1.5 MB · Views: 2


drivesitfar
Well-known member
SD: nice upgrade with the cabinets!! just curious if you made the drawer fronts a bit wider it might hide the hinges? it probably doesn't make an difference on this workbench upgrade, but thought i'd mention it.
keep up the great work and your shop is becoming one of the nicest ones on GJ. a great combination of HIGH TECH and VINTAGE!!
cheers
keep up the great work and your shop is becoming one of the nicest ones on GJ. a great combination of HIGH TECH and VINTAGE!!
cheers