To avoid these ads, REGISTER NOW!

#FabSpace

bugnut

ALLIANCE MEMBER
Joined
Jul 14, 2012
Messages
3,834
Location
Central Ohio
Matt again more to think about and thanks. I am working on a driver project and when I bought it, it quickly became obvious it was done as a flip. The more I get into it the more I realize I'll need to do serious work when I do the restoration. Today my thinking is a driver and no more. The thought of completing parts with powder coating will probably take place at that time. For the current time it'll be plasti dip or paint.

In the meantime I'll keep my eyes peeled for a used oven!

;)
 
To avoid these ads, REGISTER NOW!

Strouty

Well-known member
Joined
Mar 21, 2010
Messages
38,206
Location
Southern Maine
There’s a few on the market that work the same way functionally. They’re horrible chemicals but diluted down so that they won’t immediately burn you and can be neutralized by water. The o e I picked is Columbia Coatings “Ez Powder Strip” - https://www.columbiacoatings.com/strippers

Sticker shock hits you when you first see 5ga = ~$300 shipped. The value though is time and effort saved times how many times you can use it. Looking at it that way, it becomes only $& per use.

They either screwed you or the price changed, it is $260 with free shipping now. This stuff is also said to be biodegradable, I like that.
 

csp

Well-known member
Joined
Mar 23, 2010
Messages
5,719
Location
Franktown, CO
Nicely done Matt!

What lathe do you have? I remember seeing the mill at your old house, but don't remember the lathe. I'm trying to find a 10-12", but it's a machinery desert in this area.
 
OP
L

lilscorpion

Well-known member
Joined
Mar 15, 2010
Messages
3,599
Location
Colorado
Nicely done Matt!

What lathe do you have? I remember seeing the mill at your old house, but don't remember the lathe. I'm trying to find a 10-12", but it's a machinery desert in this area.


The lathe I had at the old house was an old Clausing 6900 series lathe. When we moved I sold it a d bought a low miles MoriSeiki MS 850 engine lathe which is a many times better machine in all ways.

You’re right, the market is much different now than it was back then here in Denver. There were lots of mom and pop shops that seemed to be closing and auctions seemed to be almost monthly. I attended auctions in person and sometimes I got lucky like with my mill. Now auctions are all online which favors the broker and reseller. Craigs is no longer a good hunting ground either. That’s where I found the Mori. Not even sure where I’d look...

The arms turned out great Matt. Very nice work.

:bowdown::bowdown:


Love your work!!!


Thanks guys!!

They either screwed you or the price changed, it is $260 with free shipping now. This stuff is also said to be biodegradable, I like that.


That’s a much better deal, I paid shipping at that time which was $45 I think. The biodegradable part is nice. I pressure wash the parts right in the driveway with no concerns. That’s said, we’ll see how well the grass comes back at the edge of the driveway in the spring. [emoji3061]
 
OP
L

lilscorpion

Well-known member
Joined
Mar 15, 2010
Messages
3,599
Location
Colorado
Very nice work on the arms, as usual. How long are they? Are JJ's the same size even though tube OD is different?


Front lowers are 24” center to center. Rear lowers are 20” center to center.

I didn’t do a hood job sharing the details. The lower arms are all 1 3/4” .313 wall tapped to 1 1/4”-12. The uppers are made out of 1 1/2” .313 wall tapped to 1”-14. All of the lowers have the same size JJ’s width, thru hole, and ball size. The uppers are different in all regards front and rear.

Yes, i could have made the lowers and uppers out of 1 1/2” .313 and got all JJ’s in 1”-14 thread. Some of the upper JJ’s are narrow width and they’re not available in the 1 1/4”-12 variant so I couldn’t have made all the arms out of the larger material. I thought about it (would have cut down on the number of taps) but decided to stick with the beef down low just cause that’s how I always have done it.
 
OP
L

lilscorpion

Well-known member
Joined
Mar 15, 2010
Messages
3,599
Location
Colorado
I will be curious to see how long it lasts, do you filter it like evaporust?


They say to get longer life out of it you need to filter it. What I have noticed is that if a part sits in the bottom in the dredge, the coating in that spot doesn’t get stripped very well. Other thing they say is to not let it be exposed to the air if possible as that also reduces its life considerably.
 

Strouty

Well-known member
Joined
Mar 21, 2010
Messages
38,206
Location
Southern Maine
I ordered a 5 gallon pail, I use the gamma seal lids with my evaporust projects, have you noticed the o-ring doing anything funny? I actually have bought 6 and 7 gallon buckets to get more height with the lids closed. As an aside, amazon has evaporust for under $16 a gallon right now, I ordered 10 gallons, but may order another ten to have on hand, I am always soaking something and it works so well. If this stripper works like I hope, I will probably order another 5 gallons too.
 
OP
L

lilscorpion

Well-known member
Joined
Mar 15, 2010
Messages
3,599
Location
Colorado
I ordered a 5 gallon pail, I use the gamma seal lids with my evaporust projects, have you noticed the o-ring doing anything funny? I actually have bought 6 and 7 gallon buckets to get more height with the lids closed. As an aside, amazon has evaporust for under $16 a gallon right now, I ordered 10 gallons, but may order another ten to have on hand, I am always soaking something and it works so well. If this stripper works like I hope, I will probably order another 5 gallons too.


I have not yet noticed any deterioration of the o-ring yet. I’ve bee. Very careful this far though and try not to let anything get on it or the lid. Right now I have a 5 gallon bucket up with about 4 1/4 gallons so I have a little hear room.

Didn’t know there were oversized buckets. As long as they’re made out of HDPE, you’re good. I might get one too. I’d like to be able to screw the lid on while parts are soaking.
 
OP
L

lilscorpion

Well-known member
Joined
Mar 15, 2010
Messages
3,599
Location
Colorado
With the parts and the frame ready to go, it’s time to get the brackets, bump stops, shocks and arms installed. Bumps first.

353d5a9248a9517c9f41b188350fa34e.jpg

Followed by brackets and shocks.

13a0f6605b6194689614d748ce29053c.jpg

From there it’s as easy as falling down.

3c5a173cf1215f57a3753ef8212448db.jpg

With paint now done on the front side of the Jeep,
I’m now able to remove the bags and get a better look.

2ce3d5dc20829e2e116abde2c956a00b.jpg

Where it sits now, the coil overs are set to just barely have tension in the coils. I could go 1” or so lower if I wanted to. Right here I have about 4” of up travel which is perfect so I shouldn’t need to.

bdf15a9f841f7d267e5ce9c20e4f6a72.jpg

Now back on it’s own weight. Looks...normal? Picture is deceiving. It looks to be a few inches lower than it was before which is what I wanted. I won’t set the final height until I get the 40’s on it and have the opportunity to cycle the suspension.

afc5e564be971a189451c0981ddcd029.jpg
 

Attachments

  • afc5e564be971a189451c0981ddcd029.jpg
    afc5e564be971a189451c0981ddcd029.jpg
    46 KB · Views: 1
  • 2ce3d5dc20829e2e116abde2c956a00b.jpg
    2ce3d5dc20829e2e116abde2c956a00b.jpg
    31.5 KB · Views: 1
  • 3c5a173cf1215f57a3753ef8212448db.jpg
    3c5a173cf1215f57a3753ef8212448db.jpg
    33.9 KB · Views: 1
  • 13a0f6605b6194689614d748ce29053c.jpg
    13a0f6605b6194689614d748ce29053c.jpg
    32.6 KB · Views: 1
  • bdf15a9f841f7d267e5ce9c20e4f6a72.jpg
    bdf15a9f841f7d267e5ce9c20e4f6a72.jpg
    27.5 KB · Views: 1
  • 353d5a9248a9517c9f41b188350fa34e.jpg
    353d5a9248a9517c9f41b188350fa34e.jpg
    36.5 KB · Views: 1

Strouty

Well-known member
Joined
Mar 21, 2010
Messages
38,206
Location
Southern Maine
I bought them from ULine, but I had a big order anyways. They make you buy minimums and shipping is pricey if you don’t have a coupon code. They are HDPE, I am assuming the gamma seal lids are as well.

https://www.uline.com/BL_8150/Plastic-Pails-and-Lids?keywords=5+Gallon+Plastic+Buckets

Gamma seal lids are HDPE as well. I also bought a 2 gallon buckets with some gamma seal lids for smaller parts. It took me a while to find some nice strainers that fit the buckets, I spent a shocking amount on them, but they are stainless steel and I couldn’t even buy the steel for what I paid, let alone fabricate them.
 
OP
L

lilscorpion

Well-known member
Joined
Mar 15, 2010
Messages
3,599
Location
Colorado
I bought them from ULine, but I had a big order anyways. They make you buy minimums and shipping is pricey if you don’t have a coupon code. They are HDPE, I am assuming the gamma seal lids are as well.

https://www.uline.com/BL_8150/Plastic-Pails-and-Lids?keywords=5+Gallon+Plastic+Buckets

Gamma seal lids are HDPE as well. I also bought a 2 gallon buckets with some gamma seal lids for smaller parts. It took me a while to find some nice strainers that fit the buckets, I spent a shocking amount on them, but they are stainless steel and I couldn’t even buy the steel for what I paid, let alone fabricate them.


Just ordered some of the 7gal buckets and a few more gamma lids from ULine. Thanks for the tip.

You ever use evaporust on taps? I’ve never played with it before but it looks like it works awesome. May be a good way for me to fix some of my mill hood down clamps that got rusted years ago when we moved between houses.

Matt
 

Strouty

Well-known member
Joined
Mar 21, 2010
Messages
38,206
Location
Southern Maine
Evaporust will work great, it won’t hurt anything, I put tools in it that have wooden, plastic, or rubber handles, no issues. It will make seized up (due to rust) adjustable wrench function again. Won’t hurt chrome, seems to turn things made of harder steel black, but the stuff I am still using is really old, so it may be just from the age of the evaporust itself. Some say it will wire brush off, I haven’t experimented with that as it looks cool and I think it keeps rust from coming back. I will get some pictures for you.

I put these parts in last night, the cover plate is really bad and probably won’t be worth the effort, again, this pail is old and has been used a lot. I will update for you.

d08e6d1b6276a704cd9dfbe48f1cfa7f.jpg

fa9f567ffc889f30eddaea4a3020f36c.jpg

f55b76fd881b68a76d4d2a5771f71017.jpg

3be3103320049c093d29bada92fba74a.jpg

f0a80b58ad20b7f1c11d243c759e3b94.jpg
 

Attachments

  • 3be3103320049c093d29bada92fba74a.jpg
    3be3103320049c093d29bada92fba74a.jpg
    101.5 KB · Views: 1
  • f55b76fd881b68a76d4d2a5771f71017.jpg
    f55b76fd881b68a76d4d2a5771f71017.jpg
    62.8 KB · Views: 1
  • fa9f567ffc889f30eddaea4a3020f36c.jpg
    fa9f567ffc889f30eddaea4a3020f36c.jpg
    184.1 KB · Views: 1
  • d08e6d1b6276a704cd9dfbe48f1cfa7f.jpg
    d08e6d1b6276a704cd9dfbe48f1cfa7f.jpg
    82.6 KB · Views: 1
  • f0a80b58ad20b7f1c11d243c759e3b94.jpg
    f0a80b58ad20b7f1c11d243c759e3b94.jpg
    141.5 KB · Views: 0

Joe-R

Well-known member
Joined
Apr 6, 2012
Messages
164
Location
St. Louis
Hi Matt,

I am sorry to have reached the end of your threads for now. Keep it coming! Your threads are definitely some of the best on the GJ. That home powder coating looks to be the bomb for sure, for sure.

Keep up the good work!!
Joe
 

zmotorsports

ALLIANCE MEMBER
Joined
Oct 20, 2009
Messages
21,312
Location
Northern Utah
The suspension is turning out great Matt. You won't want to drive that thing it looks so nice.

As for your suspension, will you still have about 4" of uptravel with the 40's? Is that 4" just until you contact the bump pad or fully compressed air bumps?

For some reason I thought you'd have much more than 4" with the flat fenders. I have just over 4" of uptravel with my OEM fenders.

What about droop? Overall travel full bump to full droop?

Thanks
 
To avoid these ads, REGISTER NOW!

rattle_snake

Well-known member
Joined
Jun 25, 2015
Messages
5,144
Location
Chandler, AZ
Which 40" tires are you planning on? The choices are more limited in that size but picking one always seems hard for me. Do you spend a lot of time contemplating and tire shopping?

Did you pick spring rates or buy a whole kit with mounts and so on? Looks great, should perform great too.
 

Seagoon

Well-known member
Joined
Jan 23, 2014
Messages
859
Location
Scunthorpe. UK.
With the parts and the frame ready to go, it’s time to get the brackets, bump stops, shocks and arms installed. Bumps first.

353d5a9248a9517c9f41b188350fa34e.jpg

Followed by brackets and shocks.

13a0f6605b6194689614d748ce29053c.jpg

From there it’s as easy as falling down.

3c5a173cf1215f57a3753ef8212448db.jpg

With paint now done on the front side of the Jeep,
I’m now able to remove the bags and get a better look.

2ce3d5dc20829e2e116abde2c956a00b.jpg

Where it sits now, the coil overs are set to just barely have tension in the coils. I could go 1” or so lower if I wanted to. Right here I have about 4” of up travel which is perfect so I shouldn’t need to.

bdf15a9f841f7d267e5ce9c20e4f6a72.jpg

Now back on it’s own weight. Looks...normal? Picture is deceiving. It looks to be a few inches lower than it was before which is what I wanted. I won’t set the final height until I get the 40’s on it and have the opportunity to cycle the suspension.

afc5e564be971a189451c0981ddcd029.jpg

Is the truck roof as close to the garage door as it looks, and will it still clear with the 40's on?:shocking:
 

Attachments

  • afc5e564be971a189451c0981ddcd029.jpg
    afc5e564be971a189451c0981ddcd029.jpg
    43.7 KB · Views: 5
  • bdf15a9f841f7d267e5ce9c20e4f6a72.jpg
    bdf15a9f841f7d267e5ce9c20e4f6a72.jpg
    26.2 KB · Views: 5
  • 2ce3d5dc20829e2e116abde2c956a00b.jpg
    2ce3d5dc20829e2e116abde2c956a00b.jpg
    30 KB · Views: 2
  • 3c5a173cf1215f57a3753ef8212448db.jpg
    3c5a173cf1215f57a3753ef8212448db.jpg
    32.4 KB · Views: 1
  • 13a0f6605b6194689614d748ce29053c.jpg
    13a0f6605b6194689614d748ce29053c.jpg
    31.1 KB · Views: 0
  • 353d5a9248a9517c9f41b188350fa34e.jpg
    353d5a9248a9517c9f41b188350fa34e.jpg
    34.8 KB · Views: 0

csp

Well-known member
Joined
Mar 23, 2010
Messages
5,719
Location
Franktown, CO
Regarding Evaporust, this is from earlier today. It works better when heated and better yet in an ultrasonic cleaner. I didn't use the ultrasonic with the Evaporust this time as I had degreasing going on at the same time.

https://www.garagejournal.com/forum/showpost.php?p=8950364&postcount=58

My friend that has the supercharged 3.8 JK has that same coil over kit and it works great! It's flexy as hell and stabile at the same time. He definitely takes more aggressive lines than he did prior to the kit, but with about the same amount of lift.
 
OP
L

lilscorpion

Well-known member
Joined
Mar 15, 2010
Messages
3,599
Location
Colorado
Hi Matt,


I am sorry to have reached the end of your threads for now. Keep it coming! Your threads are definitely some of the best on the GJ. That home powder coating looks to be the bomb for sure, for sure.

Keep up the good work!!

Joe

Oh so much more to come! The Jeep still has many mods to go in up coming months l, we’re putting a turbo on my son’s Jeep, some machines I want to build, and I have a bunch of shop organization projects I want to get back to.

Is the truck roof as close to the garage door as it looks, and will it still clear with the 40's on?:shocking:

No, actually I have quite a bit of room. 4” of clearance to the 7” opening on the jeeps old lift. The née lift appears to have dropped the Jeep an inch at least, maybe 2”. Upsizing the tires to 40’s will net me 1 3/4” more height so I expect to be back around 4” of clearance.

The suspension is turning out great Matt. You won't want to drive that thing it looks so nice.

Yes, this has occurred to me. I keep telling my wife the Jeep is my Porsche and I’m okay with the fact that a Porsche would be cheaper.

As for your suspension, will you still have about 4" of uptravel with the 40's? Is that 4" just until you contact the bump pad or fully compressed air bumps?

The coils at rife height have 4” of up-travel they way they sit now. That’s 4” of shaft exposed. The bumps have 2” of travel before they bottom out so when I set them, I’d have 2” of travel before the bumps engage. I gotta drive it, not sure if only 2” between the two is stupid yet or not. What I do know is I set up Andrew’s suspension to have only 4” of up travel and it’s perfect.

For some reason I thought you'd have much more than 4" with the flat fenders. I have just over 4" of uptravel with my OEM fenders.

What about droop? Overall travel full bump to full droop?

I have it back up on jack stands again but there’s a bunch of room between the top of the tire and the fender. Enough to use all of the up-travel I have...or most. I took it back apart so I could make a few adjustments before I cycle the suspension but I should be back to it soon. It’s gonna be really low like Andrew’s tho and use all of the wheel well.

Which 40" tires are you planning on? The choices are more limited in that size but picking one always seems hard for me. Do you spend a lot of time contemplating and tire shopping?

Yeah, picking tires ***** especially 40’s. Once you go that big, the options are less. The 37’s I have are Nitto Ridge Grapplers and I really liked them. Quiet on the road, wheeled well, wore good, hood in the snow...but not available in 40’s. I looked at a bunch of different tires. Nitto Muds and Trail. Yokohama Geolander Muds and X-MT. These 4 are...meh. Looked at Maxis Treps of course but Andrew has them on his Jeep. Milestar Pategonias I’m not sure I like. I kept going back to the Mickey Thompson tires because they’re different. As a result they kinda have a following that swears by them...so I ended up going with the Mickey Baja MTZ’s.

4915cfc7e858c5e720ea1958a8aa9c0b.jpg

Did you pick spring rates or buy a whole kit with mounts and so on? Looks great, should perform great too.

I bought the kit which comes with brackets, pre-valved shocks, spring rates designed for my model of Jeep, and all the hardware. There’s a few brackets I won’t use because the Dynatrac’s brackets are already installed as beefier. Overall, I’ve used almost all of them tho.
 

Attachments

  • 4915cfc7e858c5e720ea1958a8aa9c0b.jpg
    4915cfc7e858c5e720ea1958a8aa9c0b.jpg
    32.6 KB · Views: 1
Last edited:

zmotorsports

ALLIANCE MEMBER
Joined
Oct 20, 2009
Messages
21,312
Location
Northern Utah
The coils at rife height have 4” of up-travel they way they sit now. That’s 4” of shaft exposed. The bumps have 2” of travel before they bottom out so when I set them, I’d have 2” of travel before the bumps engage. I gotta drive it, not sure if only 2” between the two is stupid yet or not. What I do know is I set up Andrew’s suspension to have only 4” of up travel and it’s perfect.

I have it back up on jack stands again but there’s a bunch of room between the top of the tire and the fender. Enough to use all of the up-travel I have...or most. I took it back apart so I could make a few adjustments before I cycle the suspension but I should be back to it soon. It’s gonna be really low like Andrew’s tho and use all of the wheel well.

Thanks for the answers Matt. I've found my 4.25" of uptravel and about a 5.5-5.75 inches of droop seems to be about perfect for a daily driver/weekend wheeler. It does great in most every situation I've put her in so far and seems to flex out well on obstacles. I don't have much shock left at either end right now so I'm pleased with the setup.

What should your overall travel be with the coilovers? 12-14 inches? So you should land somewhere around 8-10 inches of droop?
 
OP
L

lilscorpion

Well-known member
Joined
Mar 15, 2010
Messages
3,599
Location
Colorado
Thanks for the answers Matt. I've found my 4.25" of uptravel and about a 5.5-5.75 inches of droop seems to be about perfect for a daily driver/weekend wheeler. It does great in most every situation I've put her in so far and seems to flex out well on obstacles. I don't have much shock left at either end right now so I'm pleased with the setup.


What should your overall travel be with the coilovers? 12-14 inches? So you should land somewhere around 8-10 inches of droop?


Mike - these Coil overs are 12” travel so technically 8” droop. I’ll set my hard bump stop and limit strap at a 1/4” before either end of the shocks travel. Net, net, plenty of travel in both directions to get comfortably through the intersection whoops to and from the grocery store. [emoji2957]
 
Last edited:

zmotorsports

ALLIANCE MEMBER
Joined
Oct 20, 2009
Messages
21,312
Location
Northern Utah
Mike - these Coil overs are 12” travel so technically 8” droop. I’ll set my hard bump stop and limit strap at a 1/4” before either end of the shocks travel. Net, net, plenty of travel in both directions to get comfortably through the intersection whoops to and from the grocery store. [emoji2957]

That sounds like a great setup and love the numbers Matt. I'd love to have two more inches of travel but so far I'm pleased with the way mine handles the obstacles and at this point it's taken me so long to get everything tweaked just right I don't want to mess with it.

Looking forward to the finished product Matt.
 
OP
L

lilscorpion

Well-known member
Joined
Mar 15, 2010
Messages
3,599
Location
Colorado
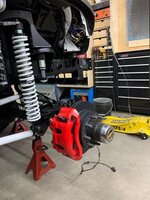
Brake calipers came in today. These come with a black paint but black is boring so I thought I’d try to spice them up. I’ve been watching videos on YouTube and think I’d give powder coating the calipers a shot. I’ve never disassembled or rebuilt a set before but why not..

de1ec3418c35147265f383341b2c2170.jpg

First I need to get the caliper stands off.

f003337e4b293319c5c4d1ca51e23f55.jpg

These are simple so I’ll get them out of the way first.

811a0a04f205ca7a427e9263f2d86d53.jpg

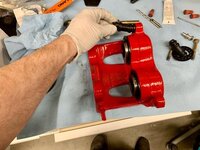
I’ve decided I’ll coat the calipers a bright red (Wheel Red actually). I’m hoping they’ll really stand out through the wheels.

3fdbd1057289094ae0b194b78b5b531a.jpg

Baked and done.

d95715a9d6d5850ac2b3423b7b6d1dab.jpg

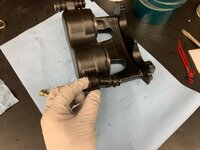
With the stands done, I get back to the disassembly and prep of the calipers. First step is to remove the banjo bolt and copper washers and set them aside until reassembly.

affd8f86fdd5208f5be356eba9faf8d0.jpg

Push out the slide pin and rubber boot.

0b40930c9d57e2557202e5434dc8c7e7.jpg

Here’s how I get the pistons out. Drop in the piston compressor tool so that there’s only 1” of gap between the pistons and the tool. You’re gonna used compressed air to push out the pistons.

d756fa390468a2d5e3704c6b70a2895c.jpg

With only about 1/4” still inside the piston cavity, I can easily pull them both out by hand.

37d42b3e35bf5efb0c5ea1f138f587b3.jpg

Now remove the boots. A flat head screwdriver can be wedged just below the seal and only a little leverage is needed to pop it out.

3c54d3f0428a07a1578780214f264352.jpg

There’s an inner seal that needs to be carefully hooked with a small pick. They come out easily but you still have to be careful to not damage them.

e0c36d0df97a8eedc78a1552eb29cd89.jpg

Now we’re ready to prep for coating. Can’t let **** get into the piston pockets during the sand blasting or coating process.

8fd7970ad5a88c7d660f26c8c744ce3c.jpg

I machined some plugs out of aluminum wrapped with tape so they’d fit snug into the pockets. Should protect the piston pockets during sand blasting.

84870c4e21c19b9417e55d953ccbb86e.jpg

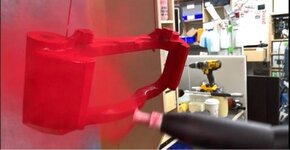
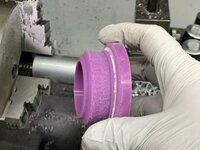
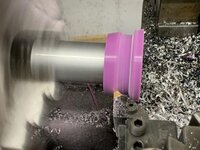
The pucks won’t work for the coating process so I spun some large high temp silicone plugs to fit the holes. To hold them in the lathe, I chucked up a piece of tubing that fit in the plug.

3de89c4b9f41903dad867f1e92e3e861.jpg

The coating on the tube gripped the plug extremely well. The friction of the silicone on the powder coated tube was enough to prevent the plug from slipping at all while turning the OD to size. Who’d a thunk it.

a1d155749b1349221c829c27e9d0abdd.jpg

Honestly, I’m amazed it worked.

47a78bcece4f3a18d33d812a951a1a11.jpg

Snug fit will prevent them from falling out and perfectly protects the pockets.

c8a2f9df4e060aeb305cc2d0be434794.jpg

Coated.

d48e91d43e7bc0bf72200b348acb1808.jpg

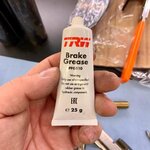
After cooling, it’s back to the bench for reassembly. Pistons go back in nicely with a little bit of this stuff.

211b05993a63550670ec0169527b6bc7.jpg

Slides pop back in place.
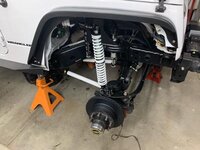
881dba2cf518caa01f11ecac76b121b5.jpg

Ready for install.

1751f2d3ad499560239c7175781d67c5.jpg

It’s a two hand affair so just the money shot.

9f7ccf02b4d72adf30db1560dbeff350.jpg

Kinda difficult to know how much they’ll stand out behind the new wheels until they’re mounted but I suspect they’ll show just fine. What I really like is the contrast between the Cerekoted rotors and the calipers. Part of me wishes I went all in and coated them white. Maybe I’ll try white at some point in the future. Looks about 5000 times better than it did new.

9b1c099d110022dfc5edfca5b0c70a49.jpg
 

Attachments

  • d48e91d43e7bc0bf72200b348acb1808.jpg
    d48e91d43e7bc0bf72200b348acb1808.jpg
    23.6 KB · Views: 0
  • e0c36d0df97a8eedc78a1552eb29cd89.jpg
    e0c36d0df97a8eedc78a1552eb29cd89.jpg
    32.7 KB · Views: 0
  • 3fdbd1057289094ae0b194b78b5b531a.jpg
    3fdbd1057289094ae0b194b78b5b531a.jpg
    17.5 KB · Views: 0
  • 8fd7970ad5a88c7d660f26c8c744ce3c.jpg
    8fd7970ad5a88c7d660f26c8c744ce3c.jpg
    31.7 KB · Views: 0
  • 84870c4e21c19b9417e55d953ccbb86e.jpg
    84870c4e21c19b9417e55d953ccbb86e.jpg
    31.1 KB · Views: 0
  • 3de89c4b9f41903dad867f1e92e3e861.jpg
    3de89c4b9f41903dad867f1e92e3e861.jpg
    32.9 KB · Views: 0
  • affd8f86fdd5208f5be356eba9faf8d0.jpg
    affd8f86fdd5208f5be356eba9faf8d0.jpg
    27.3 KB · Views: 0
  • d95715a9d6d5850ac2b3423b7b6d1dab.jpg
    d95715a9d6d5850ac2b3423b7b6d1dab.jpg
    31.3 KB · Views: 0
  • 0b40930c9d57e2557202e5434dc8c7e7.jpg
    0b40930c9d57e2557202e5434dc8c7e7.jpg
    27.6 KB · Views: 0
  • 9f7ccf02b4d72adf30db1560dbeff350.jpg
    9f7ccf02b4d72adf30db1560dbeff350.jpg
    38.8 KB · Views: 0
  • 211b05993a63550670ec0169527b6bc7.jpg
    211b05993a63550670ec0169527b6bc7.jpg
    33.7 KB · Views: 0
  • d756fa390468a2d5e3704c6b70a2895c.jpg
    d756fa390468a2d5e3704c6b70a2895c.jpg
    30.1 KB · Views: 0
  • c8a2f9df4e060aeb305cc2d0be434794.jpg
    c8a2f9df4e060aeb305cc2d0be434794.jpg
    29.3 KB · Views: 0
  • 47a78bcece4f3a18d33d812a951a1a11.jpg
    47a78bcece4f3a18d33d812a951a1a11.jpg
    26 KB · Views: 0
  • a1d155749b1349221c829c27e9d0abdd.jpg
    a1d155749b1349221c829c27e9d0abdd.jpg
    33.9 KB · Views: 0
  • 37d42b3e35bf5efb0c5ea1f138f587b3.jpg
    37d42b3e35bf5efb0c5ea1f138f587b3.jpg
    33.7 KB · Views: 0
  • 881dba2cf518caa01f11ecac76b121b5.jpg
    881dba2cf518caa01f11ecac76b121b5.jpg
    32.3 KB · Views: 0
  • 3c54d3f0428a07a1578780214f264352.jpg
    3c54d3f0428a07a1578780214f264352.jpg
    32.9 KB · Views: 0
  • 1751f2d3ad499560239c7175781d67c5.jpg
    1751f2d3ad499560239c7175781d67c5.jpg
    38.2 KB · Views: 0
  • 9b1c099d110022dfc5edfca5b0c70a49.jpg
    9b1c099d110022dfc5edfca5b0c70a49.jpg
    33.9 KB · Views: 0
  • 811a0a04f205ca7a427e9263f2d86d53.jpg
    811a0a04f205ca7a427e9263f2d86d53.jpg
    34.3 KB · Views: 0
  • f003337e4b293319c5c4d1ca51e23f55.jpg
    f003337e4b293319c5c4d1ca51e23f55.jpg
    34.8 KB · Views: 0
  • de1ec3418c35147265f383341b2c2170.jpg
    de1ec3418c35147265f383341b2c2170.jpg
    32.1 KB · Views: 0
Last edited:

beelsr

Well-known member
Joined
May 6, 2007
Messages
1,324
Location
NE PA, USA
if they leak, the fluid will just wipe off the PC.

your prep looks good. you lubed the pistons (I've always just used brake fluid) and if the seals weren't twisted and the pistons slid in fine, you'll be fine.
 

Strouty

Well-known member
Joined
Mar 21, 2010
Messages
38,206
Location
Southern Maine
They are pretty simple units, so I agree you will probably be just fine. The attention to detail you generally exhibit makes me think they are better than new now......
 
OP
L

lilscorpion

Well-known member
Joined
Mar 15, 2010
Messages
3,599
Location
Colorado
Nice job on the calipers.
White would be a nightmare to keep looking clean.
Red was a good choice imo.


Yeah that’s what I was thinking too but a friend was over and telling me how cool white would look. I do agree but I gotta live with them...
 
To avoid these ads, REGISTER NOW!
Top Bottom