
You are using an out of date browser. It may not display this or other websites correctly.
You should upgrade or use an alternative browser.
You should upgrade or use an alternative browser.
Falcon's next shop - build thread
- Thread starter Falcon67
- Start date
tadder52
Active member
Just read the thread start to finish. One heck of a nice build.
udderlyoffroad
Well-known member
Wow, just read this thread over the about a week during breaks at work.
Quite a few ideas in there I may have to steal! Especially the cooling tower for the compressor and the vice/vise cut out.
Over here in the UK we suffer from a lack of space on our building lots, so a lot of the good ideas/builds you see on this forum just won't work over here. Your thread on the other hand gives me something to shoot for!
Matt
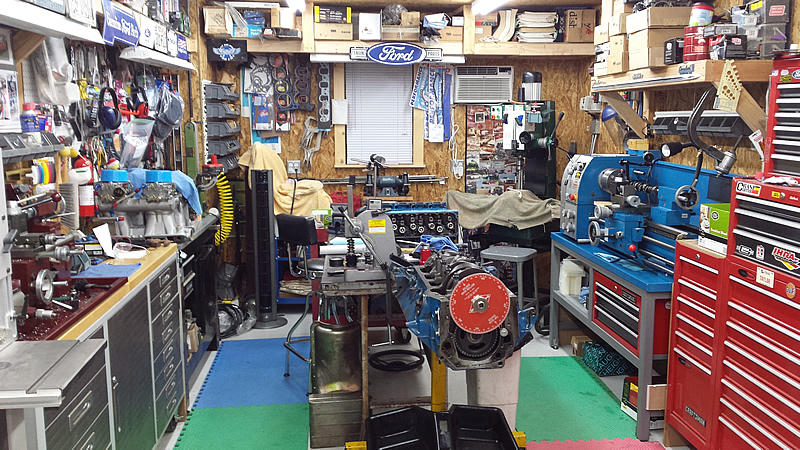
Not too much of an update, but 30 days ago there was ice and today it was 89 degrees. I've been wanting to mount the 8500 BTU window unit in the wall to free up a window. Turned out to be easier than I thought. I used a couple of 12 1/2" pieces of 1x1x1/8 aluminum angle for brackets. Drilled them to replace the "window wings" on the AC unit. Cut a hole in the wall, stuck the unit in the hole, a few screws - done. Still looking for the barn red paint can.
Just about the right height - blows all the way across the room.
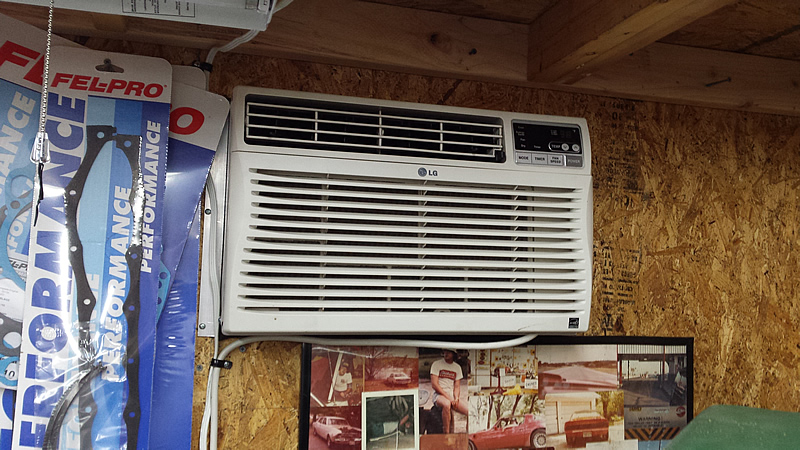
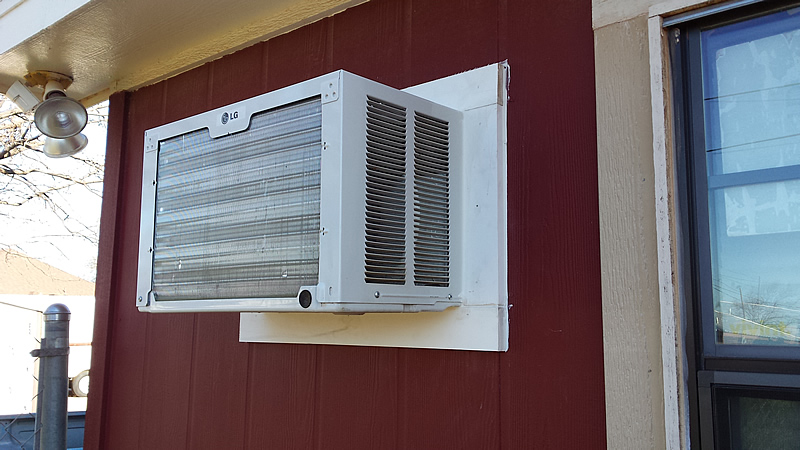
2015 view of the "clean room" - hah.
Just about the right height - blows all the way across the room.
2015 view of the "clean room" - hah.
YukonXL04
Well-known member
I just read through the whole thread as well. Great work, and good job on doing everything yourself!
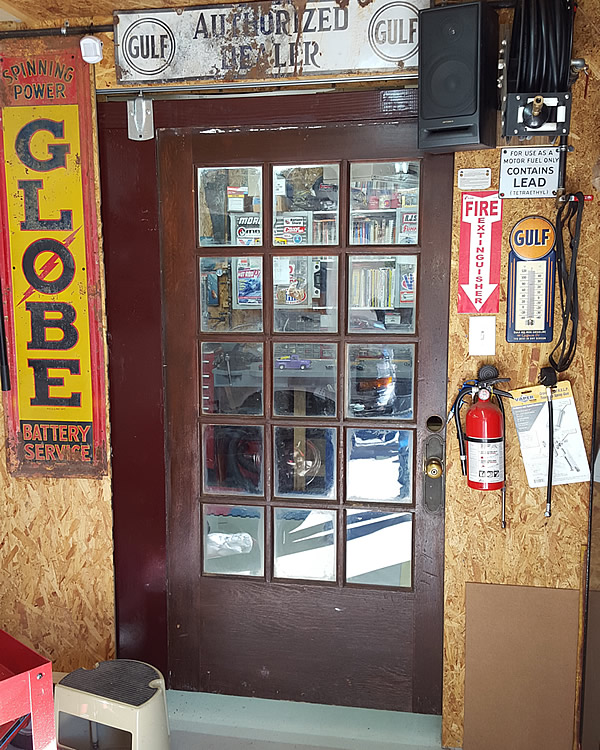
Latest small change - finally updated the work room door.
Before, as it was -
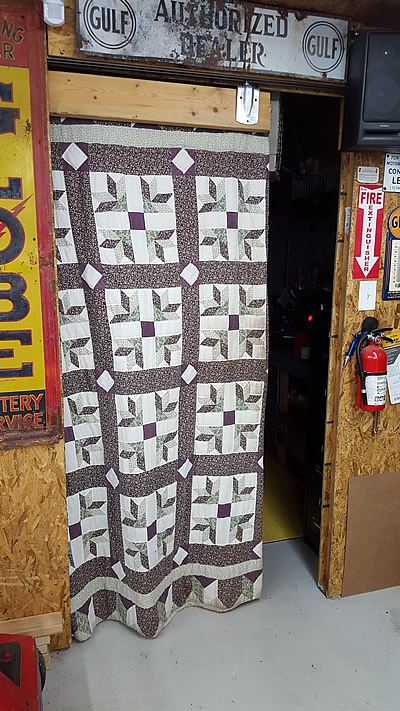
Stopping in at the Habitat Restore we saw this and had an idea.
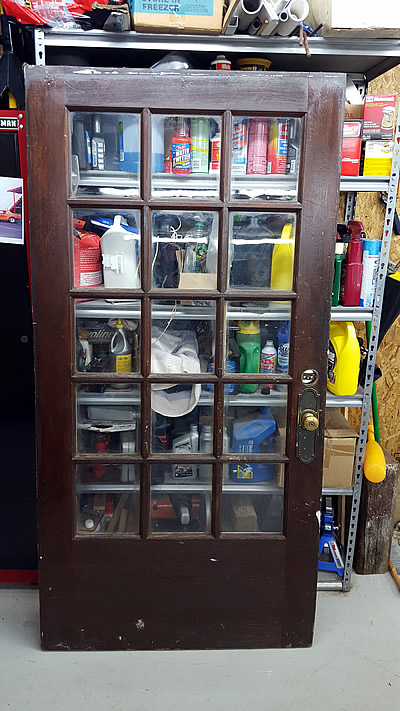
Bought it and 1/4 of a old closet bi-fold to fill out the space. Top is a 2x4 spacer. A little brown Rustoleum and now I've got a real pocket door. the only bad thing is that someone painted the other side of the door with white paint. I might try stripping it later on. The white side was out where they had the door sitting against a rack which is why the first look was "meh". Then I looked at the other side and it was "got to have it". Also wish there was a matching brass door lock plate on the other side - but no. Have to keep an eye out for one. I have some but they don't fit the style of the knob set.
Before, as it was -
Stopping in at the Habitat Restore we saw this and had an idea.
Bought it and 1/4 of a old closet bi-fold to fill out the space. Top is a 2x4 spacer. A little brown Rustoleum and now I've got a real pocket door. the only bad thing is that someone painted the other side of the door with white paint. I might try stripping it later on. The white side was out where they had the door sitting against a rack which is why the first look was "meh". Then I looked at the other side and it was "got to have it". Also wish there was a matching brass door lock plate on the other side - but no. Have to keep an eye out for one. I have some but they don't fit the style of the knob set.
Last edited:
forAK
Well-known member
What a fantastic build! Very cool pocket door mod
ilovevocs
Well-known member
Flacon,
Just read your build thread and have to say I really like your place. Great work from concept through execution.
Just read your build thread and have to say I really like your place. Great work from concept through execution.
GilmourGarage
Well-known member
yup... badass...
updating my thread this year too bud!
updating my thread this year too bud!
Stevo67
Active member
Great build, enjoyed the journey! Some good ideas that I'll hopefully be able to incorporate into my carport to garage conversion, thank you!
Steve
Steve
lieutenant
Well-known member
Cool. Nice to see someone do everything themselves.
Crusher47
Well-known member
Awesome job! Garage looks great, really enjoyed reading the entire thread.
Thanks for all the kind words guys. Hope to update again next year with a lift - dragster is eating all the money this year.")
Dragster ? I believe I missed that update. Yours or for the wife ?
BTW, the "new" pocket door fits your garage just right.

When 24' becomes too short LOL
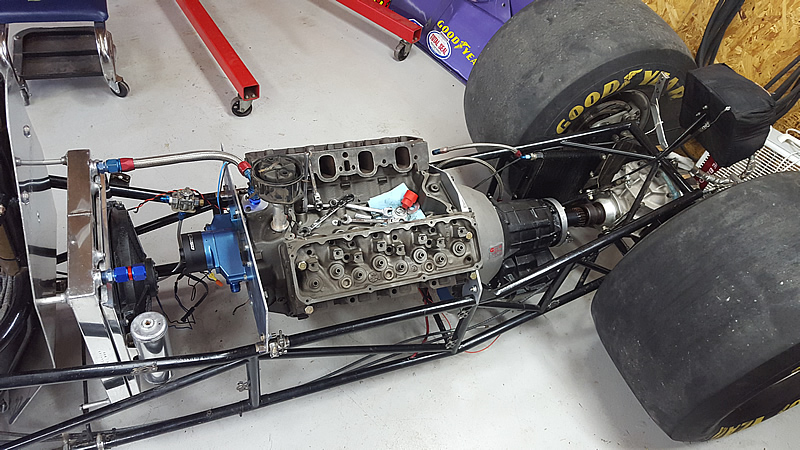
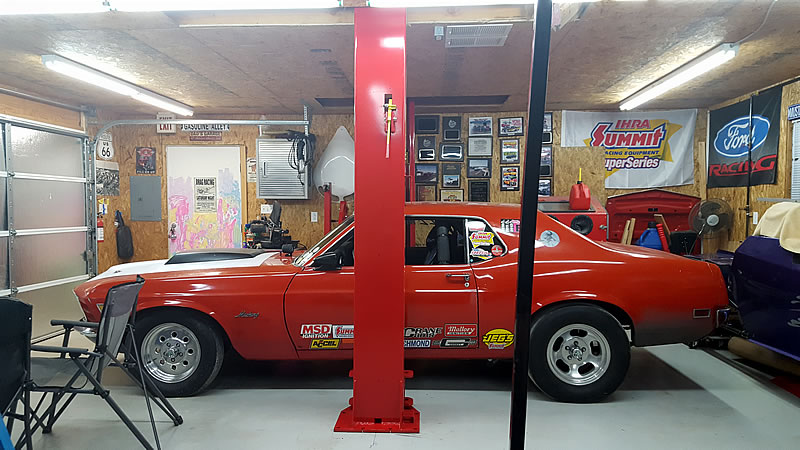
Pro built chrome-moly chassis, should cert to 7.50 in the 1/4.
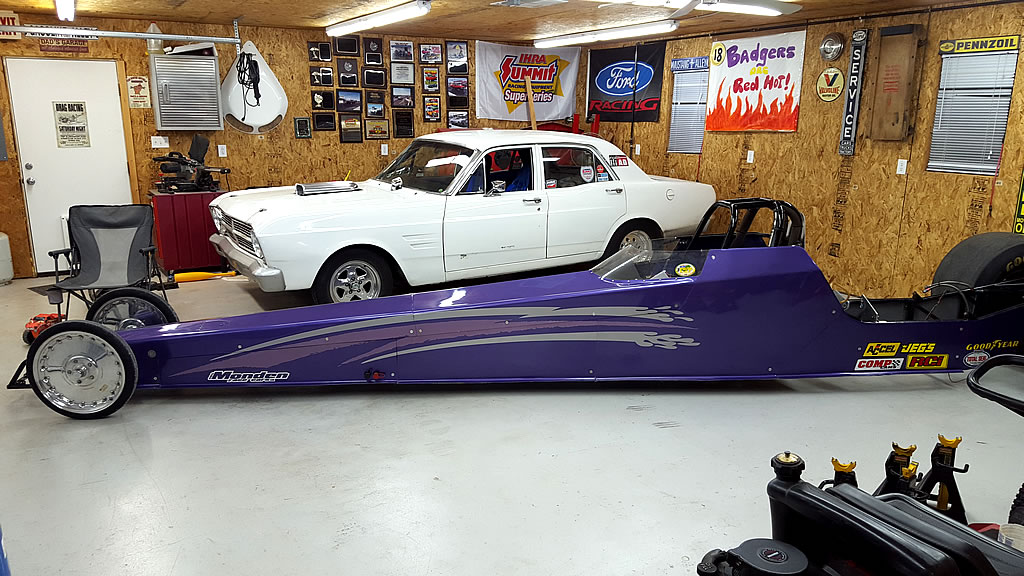
Easy to work on for sure
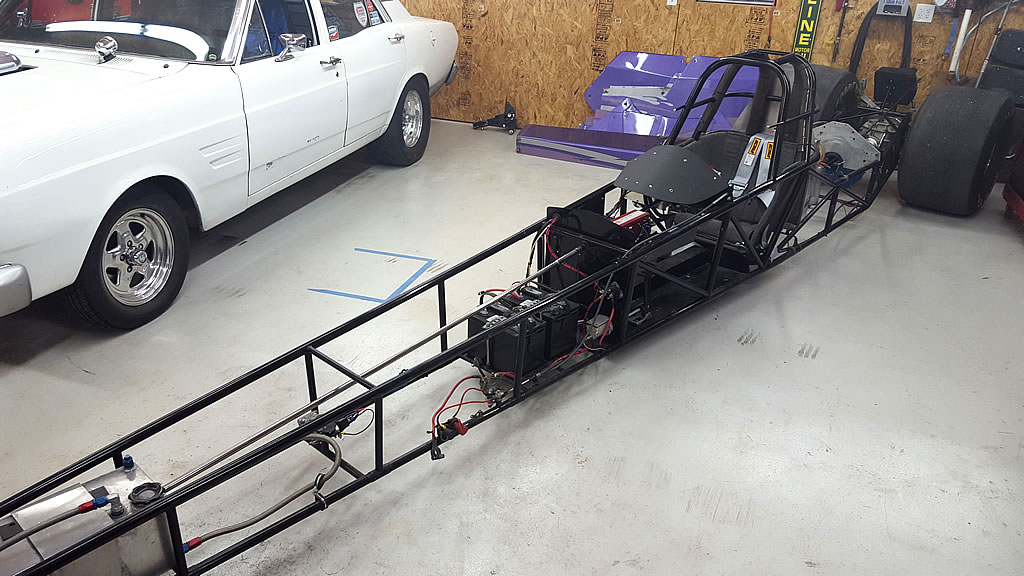
It's getting a 351 Cleveland, of course, mated to a shorty Glide. Still in the mock up stages and engine build. It's for "me" - that is, until I get it running then re-set the pedals so she can make some passes. After she takes a couple of hits....might be back in the family sedan again.
Pro built chrome-moly chassis, should cert to 7.50 in the 1/4.
Easy to work on for sure
It's getting a 351 Cleveland, of course, mated to a shorty Glide. Still in the mock up stages and engine build. It's for "me" - that is, until I get it running then re-set the pedals so she can make some passes. After she takes a couple of hits....might be back in the family sedan again.
350 miles with the trailer, nice lunch at the Weatherford Waffle House and here it is. Groovy, will unpack and check the parts. Have to run by HF to get a couple of more furniture dollies for the 2nd post. Looking at the calendar, if I get one post stood up in the next 60 days, it'll be a miracle.
Vernmotor
Well-known member
Dang gone you are just stepping it up all over . Lift/dragster ..Too much fun
Updating to match the General thread -
We're at the marks on the floor, holes in the ceiling phase. Might get the JV Team over here to stand up the posts LOL. Looks like the posts are just going to clear the joists, so no sectioning required on the joists close to the posts. Still waffling over final placement - 12~16" towards the door could eliminate a bunch of rework on the ceiling tray, but may hurt work space and over all use. The right post (in the middle of the shop) would be closer to a dip in the floor if moved forward very much.
Joist on the left side, post will be 1~2" back from that. Slot is 12" wide, posts are 8" wide so a little room for scooching.
Joist on the left, post will be right next to it. Other post will key off this one's final spot. The stick is a "test pole" built to get an idea of what is in the way when standing up a 9' 4" post.
Last edited:
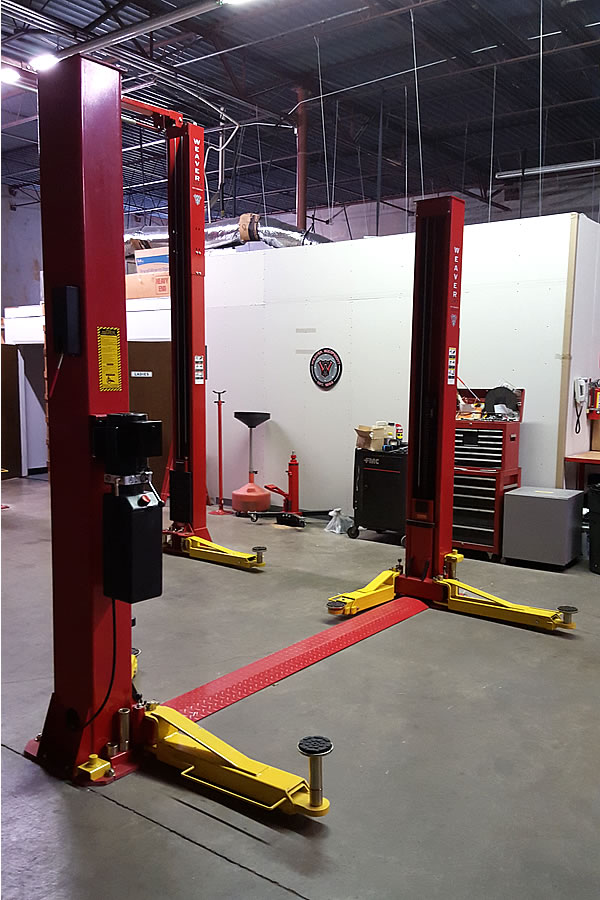
Both posts in place, more or less.
Grab the post at about the 6 1/2' mark and after a bit can just stand it up with a little effort.
Exactly 112.25" between the posts. Still have to shim and bolt. They are pretty close to plumb in these spots.
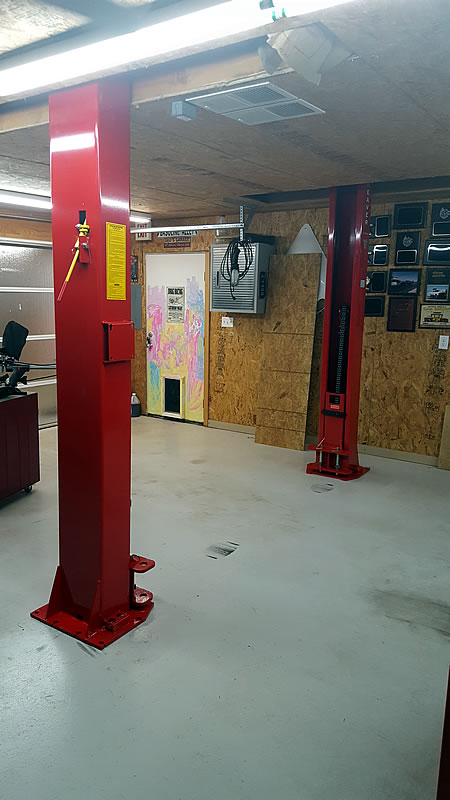
About where the typical race car should balance. Still debating the final position but this is likely the best compromise in the space.
The ceiling rework will be either cut 3 joists or 4. 3 isn't a big deal. 4 might be and will need some study. Mostly worried about loads in the front carried across the door beam.
Grab the post at about the 6 1/2' mark and after a bit can just stand it up with a little effort.
Exactly 112.25" between the posts. Still have to shim and bolt. They are pretty close to plumb in these spots.
About where the typical race car should balance. Still debating the final position but this is likely the best compromise in the space.
The ceiling rework will be either cut 3 joists or 4. 3 isn't a big deal. 4 might be and will need some study. Mostly worried about loads in the front carried across the door beam.
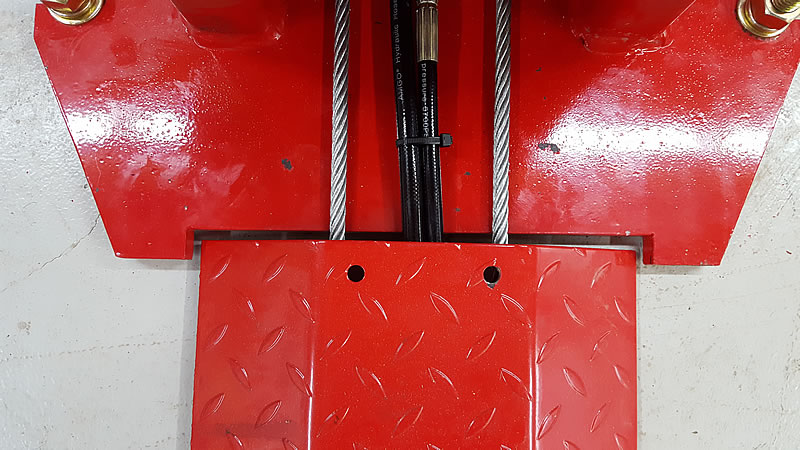
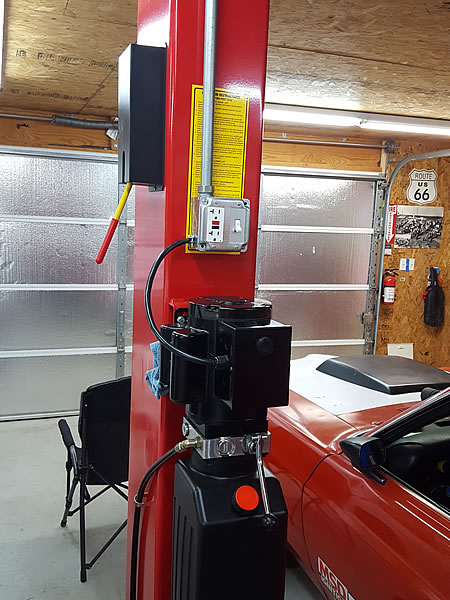
Posts anchored finally. Only two holes had 4", the rest way more - most holes 5" with no break through. There's one front that pulled a little above the 2 1/4" limit but all are holding torque so not worried about that. In a Catch 22 - have the lift cables installed, but can't install the safety release cable until I can release the safety catches. Will have to wire and prime the pump to move the carriages, then finish up the safety cable release.
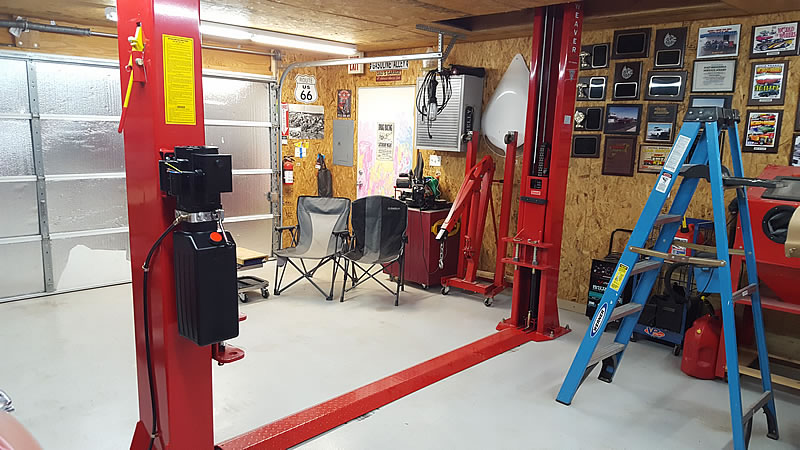
Also have to work out an anchoring setup for the floor plate - nothing provided except a couple of holes in the plate. Thinking about a bracket that clears the cables and bolts to the foot plate.
Also have to work out an anchoring setup for the floor plate - nothing provided except a couple of holes in the plate. Thinking about a bracket that clears the cables and bolts to the foot plate.
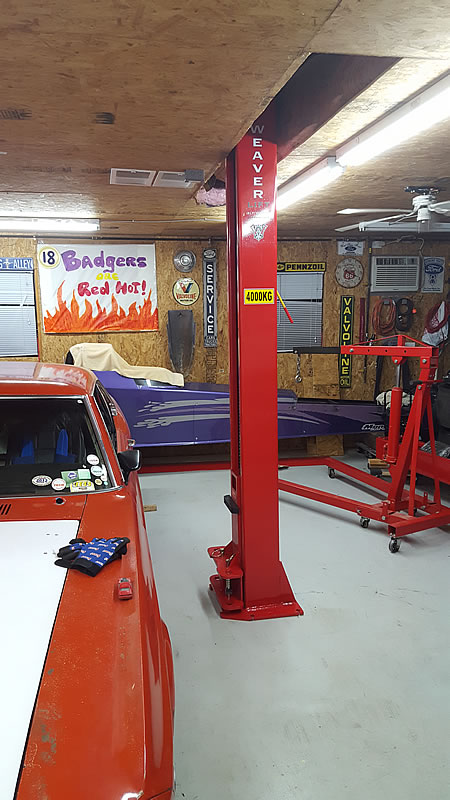
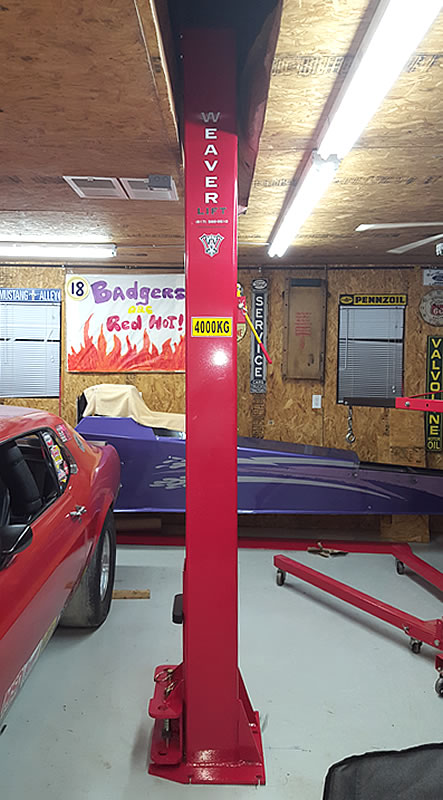
Lift is now operational.
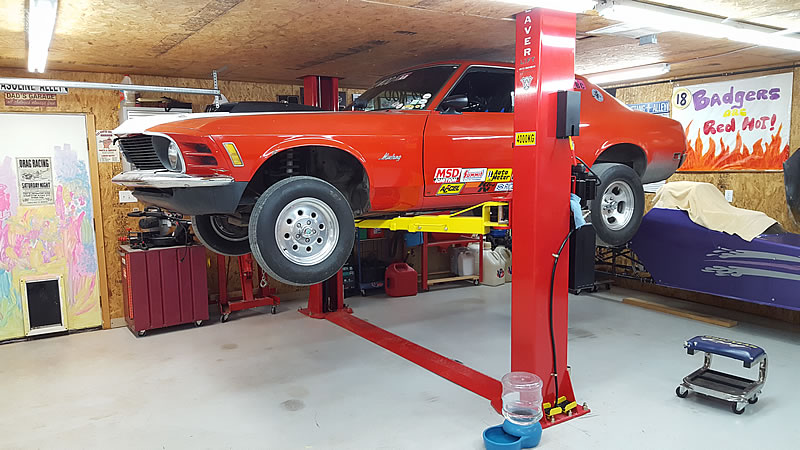
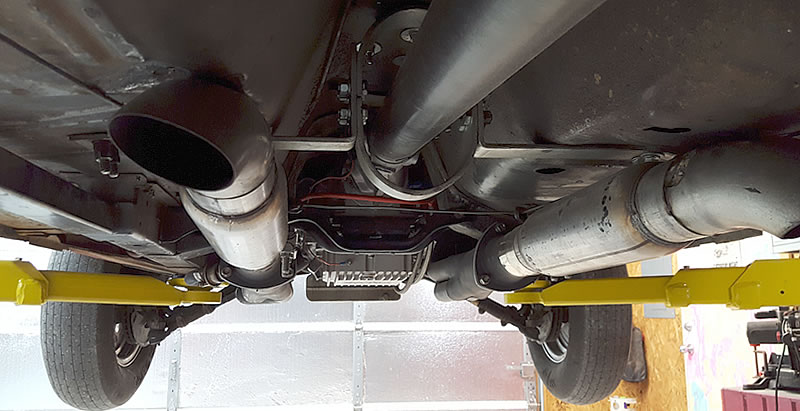
With the ceiling still in place, I can get 49" of clearance. Just enough to roll under. The wheel base is 108", did not have to move the car around to swing and set the lift arms under the car.
Still thinking about the roof. Basically I'll get plenty of clearance to get the cars up 73" by putting in some collar ties 36" above the existing ceiling (well into the upper 1/3 of the rafter locations) and plating off the exposed rafters with OSB. I may also decide to slide one of the existing joists over to the joist in front of the right post (middle of the shop) and turn that rafter/joist pair into a giant truss to support one end of a 4x12 ridge beam for insurance. But pulling out 3 joists should not really cause any stress on the roof. We're at about 7 lbs sq/ft and adding OSB under the rafters would add 2 lb sq/ft, total around 9. Basic design load is 10 and we don't get snow loading here. No storage over the lift area either (not now and won't be any room later) so no live loading.
At a minimum, would lose these joists - maybe cut the left most one loose and slide it over to the left to double the next one. If I do a beam, I might take out one more on the right. It's close to the door of a car up on the lift.

My floor was only sorta-flat, so the posts did wobble just standing there - but only a little. The lift came with shims in the box and I had several left over. The worst spot on any post had 3 thick ones under it. The rest were between none and one thick+one thin.
The method I used was to gently jam a couple of small pry bars or small screwdrivers under the plates and adjust with a rubber mallet until plumb. Then drill three holes in a sorta-triangle format, drive in the anchors, shim as needed, torque the nuts "good-n-tight" then re-check plumb. Then drill the rest of the holes and shim as needed.
With the ceiling still in place, I can get 49" of clearance. Just enough to roll under. The wheel base is 108", did not have to move the car around to swing and set the lift arms under the car.
Still thinking about the roof. Basically I'll get plenty of clearance to get the cars up 73" by putting in some collar ties 36" above the existing ceiling (well into the upper 1/3 of the rafter locations) and plating off the exposed rafters with OSB. I may also decide to slide one of the existing joists over to the joist in front of the right post (middle of the shop) and turn that rafter/joist pair into a giant truss to support one end of a 4x12 ridge beam for insurance. But pulling out 3 joists should not really cause any stress on the roof. We're at about 7 lbs sq/ft and adding OSB under the rafters would add 2 lb sq/ft, total around 9. Basic design load is 10 and we don't get snow loading here. No storage over the lift area either (not now and won't be any room later) so no live loading.
At a minimum, would lose these joists - maybe cut the left most one loose and slide it over to the left to double the next one. If I do a beam, I might take out one more on the right. It's close to the door of a car up on the lift.
Sorry, missed seeing your question!Nice work. I bought the exact same brand lift last week, I got the W-9D and I unloaded it and stood the posts up with my cherry picker just as you did. Do yours wobble when they are stood up ? Mine wobble and I have had to shim it up a lot. In fact I called them and they are sending me more shims. When I spoke with them I said I don't think the bottom is flat. They told me that's fairly common, they draw down while they are being welded and end up with a slightly convex bottom.
I was hoping to have drilled the holes and installed it already but I'm having to wait for these shims. I have a 14' ceiling so thankfully I don't have your problem.
Jamie
My floor was only sorta-flat, so the posts did wobble just standing there - but only a little. The lift came with shims in the box and I had several left over. The worst spot on any post had 3 thick ones under it. The rest were between none and one thick+one thin.
The method I used was to gently jam a couple of small pry bars or small screwdrivers under the plates and adjust with a rubber mallet until plumb. Then drill three holes in a sorta-triangle format, drive in the anchors, shim as needed, torque the nuts "good-n-tight" then re-check plumb. Then drill the rest of the holes and shim as needed.
Last edited:
sean Buick 76
Well-known member
Looking really good, what is the ceiling height? Sorry if I missed it Im scrolling with my phone...
zmotorsports
ALLIANCE MEMBER
Damn Chris. I haven't seen this in a while. You have really been busy between the dragster and the lift installation.
You're probably kicking yourself about now for the ceiling height huh? I know when I built mine back in 1995 I built it with 14' ceilings because I knew one day I would be adding a two-post lift. It took a while but in 2010 I finally added the lift and it has been great. Although now I am leaving that shop behind and getting ready to build one with 16' ceilings.
Shop is filling up there Chris. You'll be adding on soon by the looks of it.
Mike.
>Does the Boss know you took the day off
Evening/weekends LOL. I continually bump up against the max 240 hrs vacation, I need to take some because I'm losing 13 hrs a month. No time, otherwise that digger would be running. I will have to take some time to get the dragster up, have parts need to get on with it. March will be here before you know it.
>You're probably kicking yourself about now for the ceiling height huh?
Nah, I knew going in that if we ever got a lift I could make changes if needed. We built it, we can take it apart! If I really had any $ I could pour an extension and take the back wall out another 6' and re-run the rear rafters to create a lot of space.
>If you can, make the opening at least as wide as the hoist opening,
I'm considering that, in a "one time ceiling mod and done" sort of way. The three joists are pretty easy. That last one is a ****** because of things running down that side - electrical, roof bracing and such. If it got to be a problem for areas near a door, I could notch it out - if I decide to run a beam.
The way the hoist is positioned it would be hard to use it for one of the trucks, more than just something like tire rotation, brakes or minor under chassis maintenance that was a one day thing with the truck up maybe 24" or so. They would hang out the door when balanced on the lift, for sure the F three-fiddy. F150 is 19' long, the F350 is 20'. And I mean every bit of 240" from the receiver on the back to the center of the license plate on the front bumper. I might - maybe - be able to close the door on the F150. The 350 will only fit in the shop if backed in so that the rear bumper rests against the back wall. So any position that would let it be lifted will leave a couple of feet of bed hanging out the door.
Last edited:
The One
Well-known member
Sorry if I missed it, what is your ceiling height?
Perfectstranger
Well-known member
Read thru most of your build, looks great and very well thought out.
Iann128
Member
I just read the whole thread and wish I had read it before building my shop 2 years ago. Looks great! I still don't have all my outlets run yet. Or my air plumbed but you have gave me ideas
Ian
Ian
Left this note out - power run. 10-3 wire so I could have 120V power at the post in addition to the 240V, 30A lift power. The switch is motor rated. Good thing because my 6 yr old grandson came in, walked over to the lift, looked over the control and said (never having seen it before) "This is how you run it" and proceeded to try and run up the lift.
 Kids
Kids New additions to the shop -
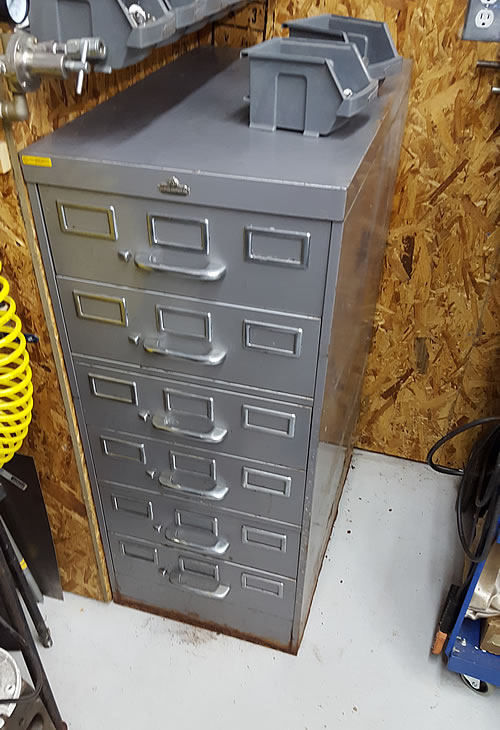
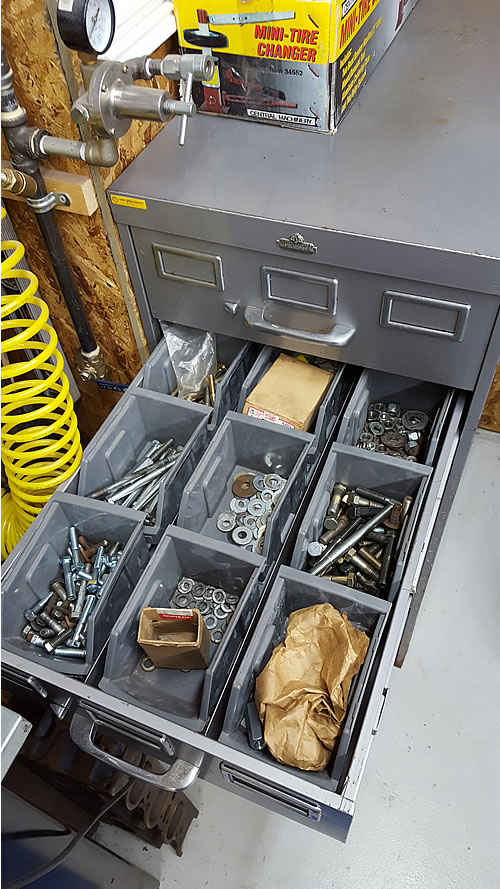
Scored a card file for use as a bolt bin. Zero cost, found in basement rotting away. Eventually I'll need to put a square tube base on it and cut the rot off. A chuck falls off the bottom almost every time I close a door LOL. Freed up some wall space. The bin are the gray items Sears sells for use on their VersaTrack.
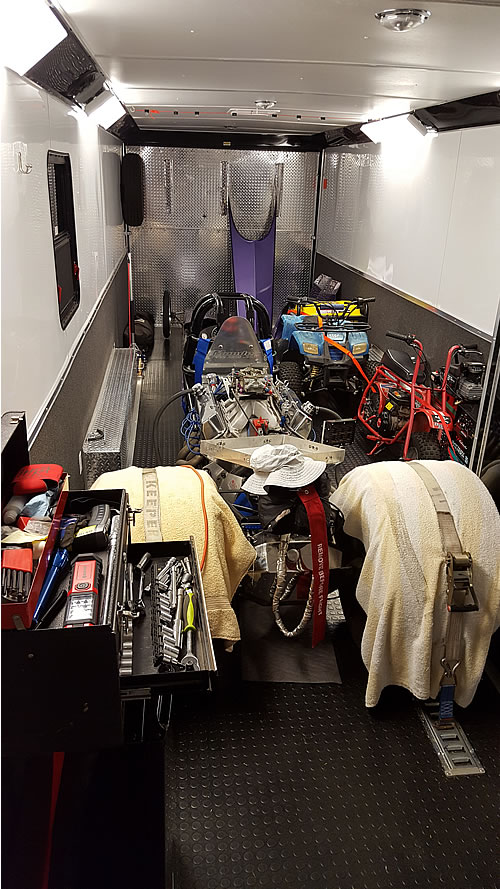
We bought a new race trailer this year - the 24' was pretty full with the dragster and support equipment. Plus we wanted a bath package for traveling to races and staying in the trailer. New 34' trailer finally arrived - so I added an RV style plug outside and now I have a separate dragster workshop on wheels! With AC too. And a potty LOL.

Told my wife that this trailer just proves that I need to make the shop 30' deep. "How much?" Thinking - even a lean-to addition with a 7' ceiling in that last 6' would be more than fine.
Scored a card file for use as a bolt bin. Zero cost, found in basement rotting away. Eventually I'll need to put a square tube base on it and cut the rot off. A chuck falls off the bottom almost every time I close a door LOL. Freed up some wall space. The bin are the gray items Sears sells for use on their VersaTrack.
We bought a new race trailer this year - the 24' was pretty full with the dragster and support equipment. Plus we wanted a bath package for traveling to races and staying in the trailer. New 34' trailer finally arrived - so I added an RV style plug outside and now I have a separate dragster workshop on wheels! With AC too. And a potty LOL.
Told my wife that this trailer just proves that I need to make the shop 30' deep. "How much?" Thinking - even a lean-to addition with a 7' ceiling in that last 6' would be more than fine.
Last edited:
zmotorsports
ALLIANCE MEMBER
Chris, NICE!!!
Love the trailer, makes me really miss mine though.
Keep the pics coming of your setup and of that dragster.
Mike
Love the trailer, makes me really miss mine though.
Keep the pics coming of your setup and of that dragster.
Mike
Will do. Fighting fuel issues all year, rebuilt the BG pump twice, apparently no fix. Made two passes at 120 MPH with the pressure gauge on the zero peg. Put in an old Holley blue yesterday that should get us through the end of the year, then its gonna be APD pump, log, shutoff, carb, new lines and a cell full of Sunoco methanol. $$$$.
The new trailer is great - stayed in it the last two day race as practice for the finals at Texas Motorplex. Genny (6500 Champion) uses about 5 gallon for 7 hours with AC at full blast, lights, water pump and cooking. We did discover last weekend that the AC unit and all the plugs on the right side (looking forward) seem to be on the same side of the line. Battery charger on 40A outside +AC + microwave tripped one side of the 240 line. Got to get into the box and sort that out. Still looking for the right 26" tool box to park in the trailer.
The new trailer is great - stayed in it the last two day race as practice for the finals at Texas Motorplex. Genny (6500 Champion) uses about 5 gallon for 7 hours with AC at full blast, lights, water pump and cooking. We did discover last weekend that the AC unit and all the plugs on the right side (looking forward) seem to be on the same side of the line. Battery charger on 40A outside +AC + microwave tripped one side of the 240 line. Got to get into the box and sort that out. Still looking for the right 26" tool box to park in the trailer.