lovetap
Well-known member
Makes sense, putting in an order. I like the matte colors.He's running a 3d print business with that material... I'd say it's good stuff


Makes sense, putting in an order. I like the matte colors.He's running a 3d print business with that material... I'd say it's good stuff
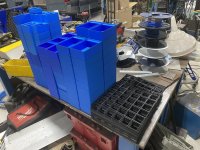
Quality stuff... I got 12 spools... Printed with two flawlessly so far.GJ member @jeepxj is spooling up his 3D filament store, School House Spools: https://schoolhousespools.com/
The matte grey printed very nice.Makes sense, putting in an order. I like the matte colors.

After you brought this up I took a look at this again and realized I'd already printed like half or more of the parts I needed, so decided to finish it up.The easiest thing to do on the wrench holders is to count how many wrenches you have, measure their thickness at both ends right before the box or open end, and then correspond that with the parts on the file and clone them.


Color me interested!The design files in Fusion are a sloppy mess so I don't want to publish them but depending on interest I might try to do a nicer version. I have a few more drawers I might give this treatment to so will probably revisit this concept in the future.
That is a great idea, I like the side to side sliding design over a back to front. What you could possibly do would be to place small wrenches on the top sliding tray and all the larger ones below to minimize the weight/sag issue. However, with the amount of reinforcement you have, I doubt you'd have any issues. If you do decide to publish any, I am interested in them as well! Great design!After you brought this up I took a look at this again and realized I'd already printed like half or more of the parts I needed, so decided to finish it up.
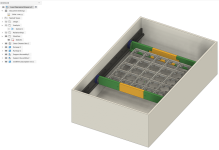
In the process I realized that the drawer I had set aside for my box wrenches would *almost* fit everything, but I'd have a little overflow. Since we're obsessive sorters here, we can all agree that would simply be unacceptable so I came up with a new problem in need of a solution, which is a 3D-printable "drawer within a drawer" or mezzanine tray designed to hold GF baseplates. This allows you to take a drawer that has excess depth and add one or more partial drawers within it to give more space. This works well for me because I prefer to have lots of shallow drawers that make seeing and accessing contents easy.
Because I was lazy and spending too much time building Gridifinity $#@! instead of finishing real projects, I simply hot glued the rails to the tool chest drawer sides and it seems to work just fine for now. The only part that feels a little janky are the wheels, which have a seam because I printed them on draft quality, so they thump a little as they roll. I might try to do a nicer set just so it feels smoother. The final version shown below uses four of the red cross-members that attach to both the yellow/green supports and the Gridfinity baseplates so the end result is more rigid than I expected. With the weight of the wrenches shown below there is no bowing or bounce and I suspect it could easily handle double the weight.
While I have a lot of ideas for how to make this better I've decided to try living with this for a while to see how it holds up. Gridfinity is a bad enough time **** on its own, the last thing I need is meta-gridfinity projects to work on too
The design files in Fusion are a sloppy mess so I don't want to publish them but depending on interest I might try to do a nicer version. I have a few more drawers I might give this treatment to so will probably revisit this concept in the future.
Me too.Color me interested!
Color me interested!
Noted - what size drawers are y'all working with where you might want to use this?Me too.
I've got two HF US General Gen 2 42" boxes.Noted - what size drawers are y'all working with where you might want to use this?


I have two printers (Prusa i3 mk3.5 and Core One) and they have a 0.6mm and 0.4mm high flow nozzle respectively. If this is a first printer I would just start with whatever is standard or maybe a high flow until you figure out what you actually need.In addition to the hot-ends that come with it, what additional ones to I want to order? I'm guessing some high-flow ones as well. What else should I plan to pick up for it?
I'd start with a 0.4mm and run it until you have a need to change.Ok, I'm real close to pulling the trigger on the H2C.
In addition to the hot-ends that come with it, what additional ones to I want to order? I'm guessing some high-flow ones as well. What else should I plan to pick up for it?
Thanks. Not sure I need to add magnets if I fill the drawer with the system? Was thinking the .2 for text but I don’t know. Just don’t want to be in the solution where it all arrives then realize I forgot somethingI'd start with a 0.4mm and run it until you have a need to change.
If you want to print with embedded magnets, a stainless nozzle is needed so it doesn't pick them out of the print.
Hot ends are readily available. I wouldn't have a bunch hanging around for the hell of it
I was able to print 0.75mm thread pitch with a standard P1S 0.4MM nozzle. Being able to go a little faster wouldn't be terrible, but I need to get better with the 0.4 before adding another to the mix
I have to imagine you will do more than gridfinity if you are buying a $2400 printer...Thanks. Not sure I need to add magnets if I fill the drawer with the system? Was thinking the .2 for text but I don’t know. Just don’t want to be in the solution where it all arrives then realize I forgot something
For gridfinity no, but we will be doing other work with engineering filaments where it’s got some advantages. For those projects I see doing some multi material stuff. Plus I hate being limited by machine capabilities and intend to do enough volume I’m concerned about wasted filaments. I fully expect to buy a few more printers once I get the first one set up.I have to imagine you will do more than gridfinity if you are buying a $2400 printer...
You can do quite fine stuff with a 0.4
For gridfinity, I can't see why you would need a 0.6 at all
0.6 nozzles are nice for when you care more about speed than detail, which describes a lot of Gridfinity jobs. There's a good argument to be made that 0.4mm is a nerfed standard that dates to when extruders and printers were much less capable, kind of like how the QWERTY keyboard layout was designed 150 years ago to prevent jams.For gridfinity, I can't see why you would need a 0.6 at all
This is what I'm doing as well.I'd start with a 0.4mm and run it until you have a need to change.
If you want to print with embedded magnets, a stainless nozzle is needed so it doesn't pick them out of the print.
Hot ends are readily available. I wouldn't have a bunch hanging around for the hell of it
I was able to print 0.75mm thread pitch with a standard P1S 0.4MM nozzle. Being able to go a little faster wouldn't be terrible, but I need to get better with the 0.4 before adding another to the mix

Same here, and two 26" HF Us General Gen 2 boxes. I think this would be a great system for the deeper drawers toward the bottom for different stuff like grinding wheels supplies and air tools/nozzles. Same for pliers and cutters, etc.I've got two HF US General Gen 2 42" boxes.
Would I need Fusion to be able to use the file? I have to download some software sometime soon so I can try my hand at making some different designs. I'd be interested in the file if you're willing to share, so thank you!Fyi to @zanyad and @Model A Fan and anyone else interested, I've done a couple new iterations on the design while I was stuck away from the shop. I haven't printed either one yet so caveat emptor but if you use Fusion and want the model file I'm happy to send it to you.
I ended up making two different versions. Both are driven by user parameters so they can be quickly adjusted to fit your exact drawer size. The first one is similar to what I posted above, and is mostly refined for easier assembly. It is adjustable so it will fit a variety of drawer widths without modification. If you have a larger drawer and want to put a good deal of weight on the tray then this is probably the better design as the support rails and cross braces (red/green/blue parts) provide a lot of rigidity. The placement of the baseplates is adjusted when assembled so the baseplates can sit against each other or wherever you want.
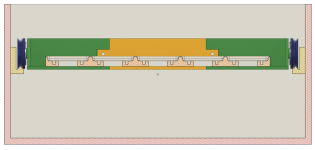
As I was finishing this I was thinking about some of the other drawers I might want to put one of these in, and I realized that this design eats a lot of vertical space as the section view below shows. 35mm or about 1-1/2" to be precise. I have some drawers that are more like 4-5" deep where tiered drawers would be nice if they didn't waste space, so I decided to try a second design.
This is the result. This one relies more on the baseplate(s) for the structure, so it is lighter duty but my gut says it will work fine for the kind of load you're most likely putting in something like this. If you used a solid baseplate like what's shown in the first design I bet it would take a couple pounds without complaint.
What this design gives up in structure it gets back in compactness, as you only lose about a half inch of space. This mockup shows how you could conceivably fit two sub-drawers with 4U bins in a drawer that's 5" deep.
This design is also fully parametrized but does not have adjustment built in, so needs to be printed for a specific drawer. I'll probably change that but want to make one or two of these first and see what I think.
Why wouldn't you want to use/touch these filaments? Fumes and particles? Just no need? I have little kids at home and am trying to avoid stuff that could be harmful to their health (mine and my wife's too). Thanks.I have two printers (Prusa i3 mk3.5 and Core One) and they have a 0.6mm and 0.4mm high flow nozzle respectively. If this is a first printer I would just start with whatever is standard or maybe a high flow until you figure out what you actually need.
I have never had reason to print anything besides PLA and PETG for instance, and I won't touch CF filaments with a 10-foot pole, so I've had no need for anything other than standard type nozzles. A 0.6 can be good if you want speed more than fine detail. You can download a slicer like Prusa or Orca and try out different printer/nozzle configurations to see the difference in print speed.
I don't do a lot of really small modeling (like miniatures) but I do see the 0.6mm start to struggle with lettering, e.g. around 8mm letter height and below things start to look smudged where the 0.4HF still looks very sharp at 4-5mm.
From what I've seen on forums and Facebook groups, there are ways to slice/edit files to minimize waste. Lots of people seem to print their main object and they'll have the machine purge the filament changes into a separate print on the plate where multi-color prints don't matter if they get a bit sloppy looking (fidget spinners, stuff that isn't for show or will be painted later, or the like).For gridfinity no, but we will be doing other work with engineering filaments where it’s got some advantages. For those projects I see doing some multi material stuff. Plus I hate being limited by machine capabilities and intend to do enough volume I’m concerned about wasted filaments. I fully expect to buy a few more printers once I get the first one set up.
Last time I used 3d printers was 20+ years ago. I have a degree in plastics engineering (that was more focused on composure and injection molding) but spent the last. 25+ years shooting full time for Nat Geo and various ski / bike brands. I now own a high end service shop focused on e-bike motors and suspension. Now that 3D printers gave matured a bit I see a lot of benefits to incorporating it into the shop.
Are you able to raise the letters on your prints so they come out crisper? I'm slowly learning how to do this, and I think the way you can do it would be to (on Bambu's software at least) edit and add text to the top surface so it stands proud instead of recessed. You'd have only black on the top as the letters instead of a layer of black and then printing the negative in white to get the lettering.This is what I'm doing as well.
A hardened nozzle wouldn't be a bad idea if you plan to get into those materials. However, I'd wait and just see what you need. Like mike said, nozzles are always in stock and easy to get so you wouldn't be down for a long time waiting for one.
I'm not doing super small text, but for my gridfinity labels the 0.4 nozzle has been good enough. These are 1 grid wide cullenect labels.
Fusion is free and worth learning if you have some time and interestWould I need Fusion to be able to use the file? I have to download some software sometime soon so I can try my hand at making some different designs. I'd be interested in the file if you're willing to share, so thank you!
Fusion and Solidworks are the two I have decided to download and learn. It just seems life gets really busy when you want to learn something newFusion is free and worth learning if you have some time and interest
I dont know what solid works can do that fusion can't, but I'd recommend dedicating time to one as a starting point. If you are using it for 3d printing, fusion will work greatFusion and Solidworks are the two I have decided to download and learn. It just seems life gets really busy when you want to learn something new
The letters are raised. That pic was really zoomed in. Below is the full image. The lettering does get a bit ugly when I'm doing a longer label such as a "hexhead 1/4 - 1-1/2" but still very usable. This is all with a 0.4 nozzle and 0.2 layer height.Are you able to raise the letters on your prints so they come out crisper? I'm slowly learning how to do this, and I think the way you can do it would be to (on Bambu's software at least) edit and add text to the top surface so it stands proud instead of recessed. You'd have only black on the top as the letters instead of a layer of black and then printing the negative in white to get the lettering.
I'm a big fan of the raised letters/numbers in how crisp and clean it looks, especially in small size.

CF, ASA, ABS, and other engineering materials need more dedicated setups due to fumes and particles. I've seen most setups for these materials made to ventilate from the chamber and out a nearby window.Why wouldn't you want to use/touch these filaments? Fumes and particles? Just no need? I have little kids at home and am trying to avoid stuff that could be harmful to their health (mine and my wife's too). Thanks.
Yes. Eventually I'd like to publish STLs or similar but not ready for that just yet.Would I need Fusion to be able to use the file?
All of the above. My research into the subject suggests that typical consumer grade CF filaments are bull$#@! for anything other than aesthetics and the exposure risks to ultrafine carbon emissions are potentially higher than we realize. As such they are an easy "pass" for me. If you must use them I would want outside venting or maybe a HEPA filter in an enclosed printer in a well-ventilated workspace like a garage. PM2.5 emissions are one of those things I think we tend to downplay because they are mostly invisible and the harms (if any) play out over decades.Why wouldn't you want to use/touch these filaments? Fumes and particles? Just no need? I have little kids at home and am trying to avoid stuff that could be harmful to their health (mine and my wife's too). Thanks.
From what I've seen on forums and Facebook groups, there are ways to slice/edit files to minimize waste. Lots of people seem to print their main object and they'll have the machine purge the filament changes into a separate print on the plate where multi-color prints don't matter if they get a bit sloppy looking (fidget spinners, stuff that isn't for show or will be painted later, or the like).
The simplest and cheapest way to do this (and all I have done thus far) is to manually change filaments during the print. Purge towers and the like become an issue when you do automated multi-material printing like the Bambu AMS or Prusa MMS. On a hobbyist scale waste is generally not something you need to worry much about.Are you able to raise the letters on your prints so they come out crisper? I'm slowly learning how to do this, and I think the way you can do it would be to (on Bambu's software at least) edit and add text to the top surface so it stands proud instead of recessed.


Not yet, but great input, I will see if I can add those features. There is a custom tray size feature, where you can make it whatever size you want, it just wont have the gridfinity feet.Cool idea! I need to check it out later.
Does it allow for things like magnets in the bases or half-grid bases? In my tool box, almost every drawer has a half-grid around the edges, which limits the bins I can use. I haven't spent enough time getting good at F360 to model my own yet...
Half units and magnets added. I also added magnets to the actual tool pockets as a feature you can add or remove. Its a little bit buggy, working on cleaning it up. Would love to hear any more suggestions!Cool idea! I need to check it out later.
Does it allow for things like magnets in the bases or half-grid bases? In my tool box, almost every drawer has a half-grid around the edges, which limits the bins I can use. I haven't spent enough time getting good at F360 to model my own yet...
Tray is glued upGreat thread — been following along and it's wild how deep the custom bin rabbit hole goes. I went through the same Fusion 360 cycle for socket trays and screwdriver holders and eventually got tired of measuring every single tool and tweaking sketches for hours.
I ended up building a web tool called GridPilot (gridpilot.us) that speeds up the process. You lay out your tools, snap a photo, and it detects the shapes automatically, then arranges them into a gridfinity-compatible tray layout. It adds engraved labels into the model too so you know what goes where at a glance. Exports directly to 3MF with proper gridfinity stacking feet.
It won't replace Fusion for guys doing really intricate custom stuff, but for "I have a drawer full of sockets and wrenches and I want organized trays for all of them" it cuts the process from hours to minutes. The design and preview are free — you only pay if you export. Figured some of you might find it useful given how many drawers you're all filling up.
Edit: 3/17/26 7:30AM ET, working through an issue with the photo upload pipeline