Hi Paul. That's what I thought, too. The list parts of the WS and OS seems very identical. Well, anyway thank you guys for all your help with my project. Paul, do you think the WS kit release valve packing is the OEM and I can use the dimension as a basis in search of the washer? I can just exchange the OS kit with the WS which is a couple of dollars cheaper. I just want to make sure the packing is the correct one. At least I can use the right packing if it is.Hi OnieH,
Hahaha not a mind reader at all! I don't even know why I checked on this thread, I haven't work on my Hein-Werner jacks for a while because it is so hot where I live and I don't have AC in my garage.
I'm still planning on rebuilding my jack so I won't be able to sell you the thrust washer you need, I'm sorry.
What I would do if I was in your place is call Steve in Hiball's signature and ask if he has the thrust washer available, he might. I bought the nut for my WS that I damaged (see my previous posts) from him a few months back.
If he doesn't have it I would then look at the local hardware store or online (McMaster.com).
If you still can't find it, I would use multiple washers as suggested by Hiball.
I'm not sure how having multiple washers instead of one would affect the release valve function but if Hiball thinks it might, I would take his advice very seriously so I would keep looking for a spare jack for parts, it is surprising how many are still around.
I'll be happy to look for the thrust washer and provide the dimensions. I don't have a caliper but I can try to find one so the measurements are correct.
Hiball may beat me to it, but I'll try anyways. I would then run my measurements by him just to double check. It is amazing all the knowledge he has on jacks, he is truly a great asset to this forum, can't thank him enough!
I'll get back to you with the measurements hopefully by next weekend at the latest.
Keep at it, you got this!
Hi Paul,
Funny that the seller's kits have different parts for the WS and OS, I thought the replacement kits were interchangeable, am I right?

You are using an out of date browser. It may not display this or other websites correctly.
You should upgrade or use an alternative browser.
You should upgrade or use an alternative browser.
Hein Werner OS
- Thread starter Elroy
- Start date
paulsomlo
Well-known member
Hi Paul. That's what I thought, too. The list parts of the WS and OS seems very identical. Well, anyway thank you guys for all your help with my project. Paul, do you think the WS kit release valve packing is the OEM and I can use the dimension as a basis in search of the washer? I can just exchange the OS kit with the WS which is a couple of dollars cheaper. I just want to make sure the packing is the correct one. At least I can use the right packing if it is.
Looking at the parts diagram online, I would guess that the pump cylinder is the same diameter for both jacks, but the main cylinder diameter is different. That would make sense, since one is 1 1/2 tons, the other 1 1/4 tons. I'm basing that on the main cyl cup PN being different. It does appear that the packing is the same for each jack, but I see a different PN for the thrust washer. Hiball can probably answer this off the top of his head.
You could probably use the ID and OD of the packing to spec the thrust washer, but that's not going to help you with the thickness.
Edit: Looking at the pictures in this thread, the packing OD is smaller than the thrust washer OD. You're better off sizing the thrust washer by the stem and large hex nut. Or better yet - call the place in Hiball's signature, they may have one.
Last edited:
Paul, I don't know if you will recall but 4 years ago I tried to rebuilt a Blackhawk sj2 after reading your thread with the same jack. You and Hiball tried to help me then but I was a newbie with handling tools then and I could not follow your directions so out of frustration, I gave up and threw away the jack. I really wanted to have a vintage USA jack and when I saw this HW in craigslist a year ago, I grabbed it. I kept it for a year in my closet without touching it trying to convince myself I could rebuilt after my failure with the Blackhawk. Well, this time I am determine to finish this, and follow my dream to the end no matter what. I will post pictures of my progress. Thank you.I looked at the listing on ebay that corresponds to the picture of the kit you posted - it's for an "OS" model, not a WS. And the alleged thrust washer in that picture is not nearly thick enough, not to mention appearing to have some curvature to it.
The "WS" kit from that same seller does not include the thrust washer (I can't imagine it would).
paulsomlo
Well-known member
Paul, I don't know if you will recall but 4 years ago I tried to rebuilt a Blackhawk sj2 after reading your thread with the same jack. You and Hiball tried to help me then but I was a newbie with handling tools then and I could not follow your directions so out of frustration, I gave up and threw away the jack. I really wanted to have a vintage USA jack and when I saw this HW in craigslist a year ago, I grabbed it. I kept it for a year in my closet without touching it trying to convince myself I could rebuilt after my failure with the Blackhawk. Well, this time I am determine to finish this, and follow my dream to the end no matter what. I will post pictures of my progress. Thank you.
Threw away? SJ2? Is there an emoji for "crying"? We definitely don't want that happening again.
Yes,, Paul. I have the pictures of the jack, and our PM with Hiballs in my old used id profile, myprotj. I have to create a new registration when I could not recall my pw with that profile. i wonder if I could link it to my new one???Threw away? SJ2? Is there an emoji for "crying"? We definitely don't want that happening again.
")
paulsomlo
Well-known member
Yes,, Paul. I have the pictures of the jack, and our PM with Hiballs in my old used id profile, myprotj. I have to create a new registration when I could not recall my pw with that profile. i wonder if I could link it to my new one???
That would be a moderator question, but I'm doubting it. I would have thought there was a password recovery function. If it were me, I would just abandon the old user name, I suppose - you only had 9 posts.
The kit that you bought for the SJ2 - do you still have it? There's a forum member that might be interested.
Hi Onie,
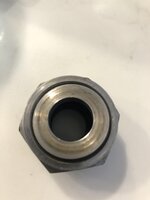
Since I know how hard it is waiting for new information, refreshing the page every 5 minutes etc... I decided to venture into my 105F garage just for you!
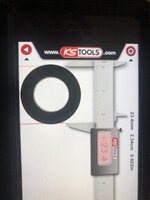
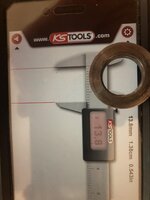
I still need to get a hold of a caliper so I can give you better measurements but here are some pictures in the meanwhile.
I wouldn’t trust the caliper app measurements (the ID least of all) but here are the pictures anyways in case it helps...


Since I know how hard it is waiting for new information, refreshing the page every 5 minutes etc... I decided to venture into my 105F garage just for you!
I still need to get a hold of a caliper so I can give you better measurements but here are some pictures in the meanwhile.
I wouldn’t trust the caliper app measurements (the ID least of all) but here are the pictures anyways in case it helps...
Attachments


Last edited:
Great news, Guys. I finally solved the washer problem. Hiball's signiture HPS has it!!! I called and spoke to Steven, who was very nice and helpful. He showed me the right kit and the extra washer that I needed. He just mailed it an hour ago. What a brisk deal, and very orderly. Wow!! I am so happyThat would be a moderator question, but I'm doubting it. I would have thought there was a password recovery function. If it were me, I would just abandon the old user name, I suppose - you only had 9 posts.
The kit that you bought for the SJ2 - do you still have it? There's a forum member that might be interested.

Thank you all guys for helping me. I will post the progress once I receive the parts.
Paul, yes I still have the kit for the Blackhawk after 4 years, lol!. I have the picture in my profile. I can post it if you need to see. The jack, I unfortunately with sad heart disposed of it. Sorry
Here is the Blackhawk I got 4 years ago. I never used themView attachment 1040516
Last edited:
Hi, Alterego. I have great news!! Like you suggested I called the number in Hiball's signiture and spoke to Steven. He has the washer and the 312 kit which is the correct kit for my jack. Thank you so much for your help and doing all this measuring for me. I will get the kit in a couple of days. I will post the pictures. The beer is on me anytime.Hi Onie,
Since I know how hard it is waiting for new information, refreshing the page every 5 minutes etc... I decided to venture into my 105F garage just for you!
I still need to get a hold of a caliper so I can give you better measurements but here are some pictures in the meanwhile.
I wouldn’t trust the caliper app measurements (the ID least of all) but here are the pictures anyways in case it helps...


Attachments


Hi, Alterego. I have great news!! Like you suggested I called the number in Hiball's signiture and spoke to Steven. He has the washer and the 312 kit which is the correct kit for my jack. Thank you so much for your help and doing all this measuring for me. I will get the kit in a couple of days. I will post the pictures. The beer is on me anytime.
Great news indeed!
Keep going at it and make sure to post pictures of your jack. Or even better, if you can, start a new thread showing what you did and what was hard about your rebuild, I would really enjoy it and I bet more than one forum member would benefit from it. I will do the same once I finish mine.
paulsomlo
Well-known member
Here is the Blackhawk I got 4 years ago. I never used themView attachment 1040516
Here's a GJ member that may be looking for a kit: https://www.garagejournal.com/forum/showpost.php?p=8633909&postcount=26
Hi Hiball. I hope to receive the kit from Steven in a couple of days, together with the thrust washer which he included with the kit. Now, since the packing and the washer were missing from my release valve assembly, can you guide me the correct way of reinstallation of the release valve? Here is the situation so far:
1) I have the stop #26 left screwed on the unit. It did not come with the big nut when I unscrewd it.
2) I have the top nut#20, the gear, the big nut, stud#25, release valve #27 all dismantled.
3) Before inserting the whole assembly, and tightening the big nut to the stop, do I have to make sure the release valve is in open position by turning counter clockwise to avoid the pointer valve from being jammed.I remember Elroy mentioned that in post page 8 #150.
4) the packing and washer sit on the stud, hen covers and press by the big nut, right. How do they stock up? Which gets in first and which way is the washer facing?
5) Do I put them all together before inserting them to the stop and tightening the big nut?
6) The top nut, how tight should it be on the gear.? It seems there is a slight free play between the nut and the gear.
Sorry for all these questions, but I wanted to make sure I followed everything to the T. Thank you.
The thread where Elroy referred to the release valve I mentioned was not in Oboy rebuilt buy In Hein Werner WS floor jack forum, just to clarify.
Since you left the lower piece screwed into the block.
1. Grab the stem, Slide the thrust washer on, then the packing and install thru the upper Release assemble, Install the gear/nut.
2. Thread the release needle valve into the lower part of the stem, Orient the hex portion to where it mates to the lower portion.
3. Start threading the release assembly onto the lower portion till it bottoms out, Stop.. Now rotate the gear to draw the needle valve up and rotate the upper assemble at the same time till it completely bottoms out.
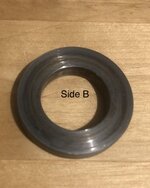
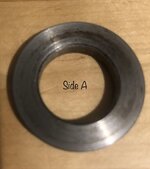
Alerego, since you uninstall the packing and the washer, can you tell me which side of the washer is facing down towards the needle? It seems the sides are not identical.Great news indeed!
Keep going at it and make sure to post pictures of your jack. Or even better, if you can, start a new thread showing what you did and what was hard about your rebuild, I would really enjoy it and I bet more than one forum member would benefit from it. I will do the same once I finish mine.
Hi Onie,
Both sides look the same to me. There is a slight sign of wear on one of the sides (Side B) and a slight side of (burnt) rubber on the other (Side A) so that's what I went by on mine.
In your case, if there is a “flatter” side on your washer, I would put that against the metal and the other side against the rubber seal, assuming it has some sort of grubs or bumps.
Do you have pictures of both sides of your washer?
Here are some of mine, let me know if that helps.
Attachments
Last edited:
I haven't received mine yet. It says on the tracking "delivered" but I did not find it in my mailbox. I will talk to the mailman tomorrow to see what'a going on.Hi Onie,
Both sides look the same to me. There is a slight sign of wear on one of the sides (Side B) and a slight side of (burnt) rubber on the other (Side A) so that's what I went by on mine.
In your case, if there is a “flatter” side on your washer, I would put that against the metal and the other side against the rubber seal, assuming it has some sort of grubs or bumps.
Do you have pictures of both sides of your washer?
Here are some of mine, let me know if that helps.


Attachments


So this was how your release valve mechanism looked like before you were able to dismantle it by unscrewing the square nut aka stop #26? I was wondering how the packing and washer was squeezed with the stem to fit like this? Without the packing and washer, mine looked the same but after install them, I did not have enough clearance for the gear and small top nut to install? Also, I could not screw the upper assembly with the stop since the washer prevents it from screwing down.View media item 100605
I asked a friend to help me and we secured the hex portion to the vise. I bought a 5/16 key that fits pretty well in the square opening for the valve needle. I don't want to damage the valve needle, that's why we used the 5/16 key instead. It didn't work. The key twisted (bottom of the picture below). We used the back of a steel punch and... it did not work either.
We heated the parts and... still no luck. The rubber washer melted and you can see some of it coming out....but still no luck.
Is this a reverse thread? Lefty-loosy. righty-tighty? Any and all advise is welcome. Thanks!
View media item 100606
And, this were the parts after you disassembled the upper release valve? Can you tell me what I am doing wrong since I could not assemble it with the packing and washer with the stem. I will post the pictures of the problem I am having . Thanks.I bought a 5/16 male plug socket and it did the trick!
View media item 101602
Set up:
View media item 101597
View media item 101598
Parts disassembled:
View media item 101599
Square damage:
View media item 101601
Now I have to figure out how to fix the damage. Probably a washer with a square hole... almost there.
Oh, mine!!! You were right!! They were by my nose and I could not believe I wasted time looking for replacement. Thanks a lot, Hiball. As usual you are correct. I am attaching a picture. I removed the packing by pick, but the washer wouldn't bulge. Can I ball peen it from the top with damaging the thread?Are you 100% certain the original washer/seal wasn’t tucked up inside? If it’s doubled it up, that would definitely explain your current situation.
Last edited:
Oh, mine!!! You were right!! They were by my nose and I could not believe I wasted time looking for replacement. Thanks a lot, Hiball. As usual you are correct. I am attaching a picture. I removed the packing by pick, but the washer wouldn't bulge. Can I ball peen it from the top with damaging the thread?
Back on Post #389 I was trying to ascertain if you had completely disassembled the assembly, I should have pushed harder as my gut told me it was still up there... My apologies for not being more direct.
I’ve never had a issue removing the washer, but as long as you try and remove it as even as possible it should come right out. If you have a Hard surface, Try giving it a few whacks to see if it will fall out. I wouldn’t be scared of some light assistance with a punch, just work from side to side till it concedes.
I got it. Finally, Thank you, Hiball. Now at least i can use the new ones so nothing is wasted. But if they were there, why was there a leak on top of the upper assembly?Back on Post #389 I was trying to ascertain if you had completely disassembled the assembly, I should have pushed harder as my gut told me it was still up there... My apologies for not being more direct.
I’ve never had a issue removing the washer, but as long as you try and remove it as even as possible it should come right out. If you have a Hard surface, Try giving it a few whacks to see if it will fall out. I wouldn’t be scared of some light assistance with a punch, just work from side to side till it concedes.
Last edited:
I got it. Finally, Thank you, Hiball. Now at least i can use the new ones so nothing is wasted. But if they were there, why was there a leak on top of the upper assembly?
As that seal wears from repeated rotation, it just starts allowing fluid to seep by. It doesn’t hold constant pressure, the only aids in diverting pressurized oil back towards the reservoir when the Jack is lowered.
I got it. Finally, Thank you, Hiball. Now at least i can use the new ones so nothing is wasted. But if they were there, why was there a leak on top of the upper assembly?
The devil is in the details... isn't it?
There seems to be a lot of packing stuck on the nut, I had mine boiling and I didn't see that much stuck there...
It kind of makes sense there was a leak...
Let me know if you need any pictures/help.
Congrats, you are almost there!
Hiball, I finished the release valve installation, and the pump valve. I used parts from Steve HPS kit. The pump valves in the unit was missing the long spring so I put one. The kit contains these pictured 2 items. It was labeled as 21HW pump kit, and I enclosed the part list diagram to show where it belongs in the piston pump. Since I have the parts, I want to dismantle the piston pump and replace whatever necessary parts must be replaced as a maintenance. Is it hard to upgrade the piston pump? I can only open from the top since I did not want to touch the round plug at the bottom, and replace it a new hex nut. what other parts do I need to replace aside from these two that I have?As that seal wears from repeated rotation, it just starts allowing fluid to seep by. It doesn’t hold constant pressure, the only aids in diverting pressurized oil back towards the reservoir when the Jack is lowered.
View attachment 1041852
Last edited:
No, It’s not difficult.
1. Remove the caging that protects the Pump piston by removing the C ring, be cautious as there is a big spring under the caging.
2. You will then need to unscrew the guide from the block, it takes a special tool but with a pair of channel locks you can generally unthread it. Don’t put a lot of squeeze on the piece as you can damage them.
3. On occasion the top of the pump piston will be swollen and the guide won’t clear for removal, lightly remove some metal to allow it to clear.
4. On the business end of the pump piston, remove the nut/washer, Pull off the old seal/washer and replace with the New parts. When reinstalling the New pieces, Do Not overtighten the Nut as it will draw the face of the seal inward and cause sealing issues.
Where can I get new seal and washer? They are not with my kit?
The leather washer and New piston seal is in the picture you linked.
Are these the parts I posted before?
Yes #429
Ok guys, I am ready to tackle the next step with rebuilding my Hein Werner WS. I am finished with the release valve assembly, small pump valve. Now, the big pump to upgrade the piston. The hardest part is how to remove the clip to release the guard to remove the guide so access to the piston is possible. I created a DIY tool to do it which I saw in one of the threads here. I cut a 2 1/2 x 1/2 x 14 1/2" wood using my Japan made Sharksaw pullsaw, then drilled a hole with a 7/8 spade bit. Once the upper guard is push down enough to clear the clip, then I will hold the wood with the (2) 6" clamps to free my hands in removing the clip. Here is a picture of my small working space in my one bedroom apartment in NYC. After I assemble the parts together, I will post it for clarification.View attachment 1042422
Last edited:
Ok guys, I am ready to tackle the next step with rebuilding my Hein Werner WS. I am finished with the release valve assembly, small pump valve. Now, the big pump to upgrade the piston. The hardest part is how to remove the clip to release the guard to remove the guide so access to the piston is possible. I created a DIY tool to do it which I saw in one of the threads here. I cut a 2 1/2 x 1/2 x 14 1/2" wood using my Japan made Sharksaw pullsaw, then drilled a hole with a 7/8 spade bit. Once the upper guard is push down enough to clear the clip, then I will hold the wood with the (2) 6" clamps to free my hands in removing the clip. Here is a picture of my small working space in my one bedroom apartment in NYC. After I assemble the parts together, I will post it for clarification.View attachment 1042422
Nice vise!
Hiball, what is that special tool to unscrew the guide. Is it a face spanner, because I see two slotted spline on the guard?So here it is like I promised. I used the wood and the clamps. The pictures show the process. I have the clip, upper guard, spring, lower guard out. What is next? Any suggestion?
Hiball, what is that special tool to unscrew the guide. Is it a face spanner, because I see two slotted spline on the guard?
It’s a HW OEM service tool, I think Steve at HPS sells them, But I would just use a pair of vice grips (Light pressure) or channelocks to unthread it. It fits over the piston and has two tips to fit the guide to unthread it. A face spanner would have to be extremely thin and then keeping it from camming out would be a issue I suspect.
Last edited: