Thanks Steve. I will try to improvise some sockets. The problem is not enough space for leverage, and the guide itself is slippery. I might consider working from the bottom ,like what Elroy did. We have the same round nut, use a reverse bit to unscrew it. I will just replace it with the hex.

You are using an out of date browser. It may not display this or other websites correctly.
You should upgrade or use an alternative browser.
You should upgrade or use an alternative browser.
Hein Werner OS
- Thread starter Elroy
- Start date
It’s a HW OEM service tool, I think Steve at HPS sells them, But I would just use a pair of vice grips (Light pressure) or channelocks to unthread it. It fits over the piston and has two tips to fit the guide to unthread it. A face spanner would have to be extremely thin and then keeping it from camming out would be a issue I suspect.
Can the pump piston and seals be pulled from above the guide as it is now, then use a big screwdriver or a small piece of metal or a drag link socket to unscrew the guide, replace the seals put back the piston first and then screw the guide with pliers?
Last edited:
paulsomlo
Well-known member
Can the pump piston and seals be pulled from above the guide as it is now, then use a big screwdriver or a small piece of metal or a drag link socket to unscrew the guide, replace the seals put back the piston first and then screw the guide with pliers?
Nope - there's a snap ring that limits the upward travel of the pump piston. That's what keeps the return spring from pulling the pump piston clear out of the cylinder. Even without that snap ring, the seals wouldn't clear the guide. You either remove the guide, or remove the plug at the bottom.
The problem with the guide aside from limited space, there is no groove or anything protruding to hold the bite of a channel lock, and according to Hiball, "not too much squeeze or it might get damaged". I think I will follow Elroy's method by working from the bottom, and pulling the piston from behind, then the guide mouth can be grabbed with a plier to unscrew it if I decide to uninstall it.
Last edited:
Nope - there's a snap ring that limits the upward travel of the pump piston. That's what keeps the return spring from pulling the pump piston clear out of the cylinder. Even without that snap ring, the seals wouldn't clear the guide. You either remove the guide, or remove the plug at the bottom.
Thanks for clarifying Paul, it has been a long time since I took my jack apart I would have to re-read the thread before I attempt to put it back together.
The problem with the guide aside from limited space, there is no groove or anything protruding to hold the bite of a channel lock, and according to Hiball, "not too much squeeze or it might get damaged". I think I will follow Elroy's method by working from the bottom, and pulling the piston from behind, then the guide mouth can be grabbed with a plier to unscrew it if I decide to uninstall it.
Once the piston is out, I would recommend you use a drag link socket or something similar instead of the pliers, less risk of crushing the guide.
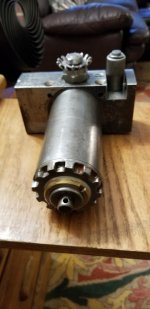
View attachment 1042953Here ready to tackle Pump valve bollt removal from the bottom.
Last edited:
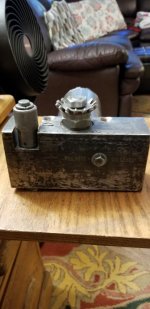
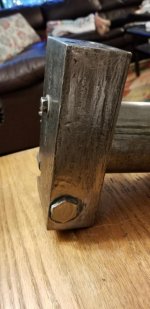
View attachment 1042985
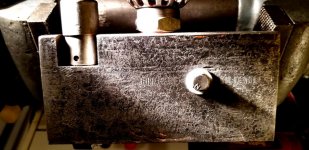
View attachment 1042986Alterego, i hit a snag!! I was able to drill through with the reverse bit, pounded the right extractor as in the picture, but the nut would not bulge not matter if I used socket wrench or wrench with a breaking bar!! I think it is all rusty. I don't want to use heat since illegal in my aparment. Can I just totally break the nut with a cutting drill bit? I am afraid I might damage the female thread on the unit. Any suggestion?? How thick is this nut, is it the small middle diameter, or the big round diameter which I believe is just a washer?
View attachment 1042986Alterego, i hit a snag!! I was able to drill through with the reverse bit, pounded the right extractor as in the picture, but the nut would not bulge not matter if I used socket wrench or wrench with a breaking bar!! I think it is all rusty. I don't want to use heat since illegal in my aparment. Can I just totally break the nut with a cutting drill bit? I am afraid I might damage the female thread on the unit. Any suggestion?? How thick is this nut, is it the small middle diameter, or the big round diameter which I believe is just a washer?
Last edited:
I got it now, it is the big round diameter! It is not a washer so this nut is really thick!! Wow, how can I cut it with a drill bit??Elroy is feeling a little better this evening and was tired about being delayed with that damn plunger plug:

But we ended up with another little problem;

Yep that's a broken screw extractor. Actually it wasn't that big of a deal as there is access to the underside. Only had to flip the block over and drive it out.
Any who, we now "has" success.

The threads look good. That's just some old sealer in there.

And the threads are the correct 3/4"-20

We can now move on to finishing this up.

View attachment 1042985
View attachment 1042986Alterego, i hit a snag!! I was able to drill through with the reverse bit, pounded the right extractor as in the picture, but the nut would not bulge not matter if I used socket wrench or wrench with a breaking bar!! I think it is all rusty. I don't want to use heat since illegal in my aparment. Can I just totally break the nut with a cutting drill bit? I am afraid I might damage the female thread on the unit. Any suggestion?? How thick is this nut, is it the small middle diameter, or the big round diameter which I believe is just a washer?
If I recall correctly I took mine from the top, did not remove the plug so I don't have one available to measure for you.
Perhaps the picture below will help more than I can.
Probably you already tried all of these, but this is all I can think of:
Some drops of Acetone (carburetor cleaner) mixed with ATF around the plug so it hopefully helps loosing the threads, soaking it a couple days.
Kroil same as above
Cutting a diagonal slot (as if it were a screw) on what is left of the bolt and using an impact driver
Cutting on two sides of the round bolt to make it somehow square so a wrench or a socket can grab better
Worst case, asking a friend with a garage to help you heat the plug
If it was easy... it wouldn't be as fun. You got this!
View media item 105988
Hmmm... but how did you remove the guard? Did you use that special tool Hiball mentioned??
I just soak it with PB Blaster. If tomorrow it still will not budge, then heat is the only solution. I might have to do it outside. You don't thing i can damage anything inside, like seal or o ring melting by heating???
I just soak it with PB Blaster. If tomorrow it still will not budge, then heat is the only solution. I might have to do it outside. You don't thing i can damage anything inside, like seal or o ring melting by heating???
Last edited:
Hmmm... but how did you remove the guard? Did you use that special tool Hiball mentioned??
I just soak it with PB Blaster. If tomorrow it still will not budge, then heat is the only solution. I might have to do it outside. You don't thing i can damage anything inside, like seal or o ring melting by heating???
I don't quite remember, did not use the special tool, that's for sure.
I think most likely thin long vise pliers.
paulsomlo
Well-known member
Try a square extractor, instead of the spiral one. Did you already have a replacement plug on hand?
It is getting worst!!! The nut is totally frozen and factory torqued. I don.t know how Elroy was able to pull it out with just the spiral extractor. I bet he used a torch prior to using the extractor but failed to mentioned it. Anyway, it is only heat that will work on this after I tries extractor, punch, impact wrench, chisel. if heat still does not work, then....garbage.
Last edited:
Ha!! Hein Werner 30+ years after selling out is still keeping Unauthorized people from working on there equipment. I never understood there reasoning on using that round plug with the Hex cut off, but obviously it works.
Have you tried to get a pipe wrench on it? There isn’t a lot of meat on the bone, but maybe it will take hold.
Have you tried to get a pipe wrench on it? There isn’t a lot of meat on the bone, but maybe it will take hold.
It is getting worst!!! The nut is totally frozen and factory torqued. I don.t know how Elroy was able to pull it out with just the spiral extractor. I bet he used a torch prior to using the extractor but failed to mentioned it. Anyway, it is only heat that will work on this after I tries extractor, punch, impact wrench, chisel. if heat still does not work, then....garbage.
Onie,
Sorry to hear you are having such a hard time, I have been there, trust me.
I know you must be really frustrated now but before throwing the jack in the garbage, there maybe two or 3 additional options in case the heat doesn't work. If I may, I would suggest taking a break from it for a little while, it usually helps me.
1.- Stop by a muffler place or a welder's shop (or better yet a friend) and ask them to weld a nut (or something else) into what is left of the round nut so you can heat it up, grab into that welded nut/piece and turn.
2.- Or...ask the same shop to weld shut the damaged nut (not sure if this will create an issue with the amount of oil being displaced, maybe a more experienced person can chime in) and try to remove the guide from the top. I'll find my guide and see if I can remember how I did it or come up with a way to remove that one from the top.
3.- If not, carefully drill a bigger, straight whole to take the round nut out and rethread the opening to accept a slightly bigger nut.
Ha!! Hein Werner 30+ years after selling out is still keeping Unauthorized people from working on there equipment. I never understood there reasoning on using that round plug with the Hex cut off, but obviously it works.
Have you tried to get a pipe wrench on it? There isn’t a lot of meat on the bone, but maybe it will take hold.
You have a good slot there for a drag link socket (or any socket that can grab into what is left of the nut) or a pipe wrench and a 6 feet pipe (or longer if available). Is time for that Wilton bullet to shine!
Ok. The heat first. I have a friend who owns a induction Heat gun that we used to unscrew the top nut on the release mechanism that was also frozen. If it fails,then the drag link socket where I made slots. But I believe without heating it first, nothing will work. The spiral extractor was holding tight while I tried with a socket wrench and cheater bar, but no movement, I have to stop cause the extractor would break if the wrench did not!!!
Ok. The heat first. I have a friend who owns a induction Heat gun that we used to unscrew the top nut on the release mechanism that was also frozen. If it fails,then the drag link socket where I made slots. But I believe without heating it first, nothing will work. The spiral extractor was holding tight while I tried with a socket wrench and cheater bar, but no movement, I have to stop cause the extractor would break if the wrench did not!!!
That’s the spirit!
How about the pipe wrench like Hiball suggested?
I took a look at my jack's pump guide and I didn't see any marks on the body. I did see some slight deformation on the one of the slots so... I think I did it the wrong (or at least not recommended) way and I used a brass punch to unscrew the guide from the top. Maybe as a last resort a "wooden punch" would work as well and cause less damage?
I was thinking about the OEM tool, I have not seen a picture of one but I think it should pretty much be a pipe the same diameter of the pump guide cut around with the exception of two sides left long enough to fit on the slots of the guide.
I'll see if I can try to come up with something useful and let you know.
Last edited:
Hi, Alterego. Here is an update with the bolt removal.
1) The heat did not work. I applied the mini ductor automobile induction heater 3 times, 20, 40, 130 seconds nothing happened. I pounded the extractor and socket with a breaking bar, and a 3 foot pipe. The socket gets rounded and the extractor damaged with nicks. Heating it with a torch will only melt and damage some parts, plus is it not allowed in NY apartments.
2) The welding of a nut to the bolt is a good idea but I don't know how to weld, not legal in apartments, and very costly to hire someone to do it.
3) Removing from the top is no longer ideal since the bottom is now the problem with a hole, and no matter what has to be addressed.
Considering all of these things, here is my only option:
My Dremel and tungsten carbide bits with plenty of time and whatever limited patience I have left to do the job.
It is seized in there, that's why they broke off the top to begin with. they aren't going to unscrew. You can forget an easy out. Heat above 1000 degrees will break down the rust, probably ruin the block also.
I would drill as close to center as I can, get a Dremel with a 1/8" carbide burr, grind the bolt away until the threads are about to show in two spots 180 degrees apart. Grind a small punch at a 45 degree angle and use it to peel the rest of the bolt out. If this doesn't work ou can grind the rest of the bolt out and use a tap to start getting the threads out, this will require turning back and forth, cleaning often and blow out with air.
If you don't clean the tap and the hole often enough, you may get the tap stuck in the hole.
Last edited:
Hi, Alterego. Here is an update with the bolt removal.
1) The heat did not work. I applied the mini ductor automobile induction heater 3 times, 20, 40, 130 seconds nothing happened. I pounded the extractor and socket with a breaking bar, and a 3 foot pipe. The socket gets rounded and the extractor damaged with nicks. Heating it with a torch will only melt and damage some parts, plus is it not allowed in NY apartments.
2) The welding of a nut to the bolt is a good idea but I don't know how to weld, not legal in apartments, and very costly to hire someone to do it.
3) Removing from the top is no longer ideal since the bottom is now the problem with a hole, and no matter what has to be addressed.
Considering all of these things, here is my only option:
My Dremel and tungsten carbide bits with plenty of time and whatever limited patience I have left to do the job.
It is seized in there, that's why they broke off the top to begin with. they aren't going to unscrew. You can forget an easy out. Heat above 1000 degrees will break down the rust, probably ruin the block also.
I would drill as close to center as I can, get a Dremel with a 1/8" carbide burr, grind the bolt away until the threads are about to show in two spots 180 degrees apart. Grind a small punch at a 45 degree angle and use it to peel the rest of the bolt out. If this doesn't work ou can grind the rest of the bolt out and use a tap to start getting the threads out, this will require turning back and forth, cleaning often and blow out with air.
If you don't clean the tap and the hole often enough, you may get the tap stuck in the hole.
A solid base + pipe wrench + cheater pipe and a clamp to keep it from camming off while leveraging on it will remove it.
Hi, Alterego. Here is an update with the bolt removal.
1) The heat did not work. I applied the mini ductor automobile induction heater 3 times, 20, 40, 130 seconds nothing happened. I pounded the extractor and socket with a breaking bar, and a 3 foot pipe. The socket gets rounded and the extractor damaged with nicks. Heating it with a torch will only melt and damage some parts, plus is it not allowed in NY apartments.
2) The welding of a nut to the bolt is a good idea but I don't know how to weld, not legal in apartments, and very costly to hire someone to do it.
3) Removing from the top is no longer ideal since the bottom is now the problem with a hole, and no matter what has to be addressed.
Considering all of these things, here is my only option:
My Dremel and tungsten carbide bits with plenty of time and whatever limited patience I have left to do the job.
It is seized in there, that's why they broke off the top to begin with. they aren't going to unscrew. You can forget an easy out. Heat above 1000 degrees will break down the rust, probably ruin the block also.
I would drill as close to center as I can, get a Dremel with a 1/8" carbide burr, grind the bolt away until the threads are about to show in two spots 180 degrees apart. Grind a small punch at a 45 degree angle and use it to peel the rest of the bolt out. If this doesn't work ou can grind the rest of the bolt out and use a tap to start getting the threads out, this will require turning back and forth, cleaning often and blow out with air.
If you don't clean the tap and the hole often enough, you may get the tap stuck in the hole.
I would give Hiball’s suggestion a try first. Can't be said enough: he knows best.
Just for perspective, when removing the ram cylinder in my jack I had to use a big pipe wrench with a 6 feet pipe for leverage and it took all the strength I have (which I admit is not much) to loosen that thing. At one point I felt that either the nut was going to break or I was.
I wouldn’t be surprised if the bottom plug in your jack is way, way tighter than the cylinder in my jack was.
I don’t know the math but I’m sure even a small increase in leverage makes a big difference in torque, if you can get a hold of a cheater pipe longer than 3 feet that would be ideal.
Something that I learned when removing the square holed nut from the release mechanism is that the slightest play will significantly decrease torque. From the pictures I posted you can see that the vise we used was very small, my friend kept tightening the jaws on the vise, good thing you have a good vise. What can’t be seen in the pictures is that the vise was mounted on a wooden base with a wood bracket to a wooden wall so the whole base would pull down slightly when a lot of force was applied. Like Hiball said, make sure you have a very solid base.
Last edited:
Hi, Hiball. Again, your wisdom on the subject is greatly appreciated. You were right. I didn't have the leverage. My vise is installed on a tool cart with wheels. Like i said before, I don't have the pleasure of a garage so my space is quite limited. The last time I tried to have a solid hold with the vise was placing the wood foundation under the front wheel of my car. And the worst part was that I have to do it on the street with all the pedestrians around, lol!!
Anyway, Steve. I wish you were close by cause I am sure I will learn a lot from you. Can you some pointers, once this bolt is removed, how do I go about cleaning the inside of the chamber before put new oil? Also, can you give me the dimension of the oem plug so I can use the right size of tap? I remember Elroy mentioning it before.
Anyway, Steve. I wish you were close by cause I am sure I will learn a lot from you. Can you some pointers, once this bolt is removed, how do I go about cleaning the inside of the chamber before put new oil? Also, can you give me the dimension of the oem plug so I can use the right size of tap? I remember Elroy mentioning it before.
This is what I am looking for.I'm mush-en Buck, I'm mush-en
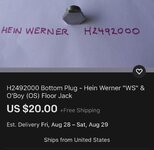
For the record and future reference, these plugs have a 3/4"-20 thread and extend .350" from the sealing surface.
This is what I am looking for.
There is one for sale on eBay, haven’t looked into it but it seems expensive. I wonder if can be acquired for less elsewhere...
https://www.ebay.com/itm/264724858980

Attachments
Last edited:
Hi, Hiball. Again, your wisdom on the subject is greatly appreciated. You were right. I didn't have the leverage. My vise is installed on a tool cart with wheels. Like i said before, I don't have the pleasure of a garage so my space is quite limited. The last time I tried to have a solid hold with the vise was placing the wood foundation under the front wheel of my car. And the worst part was that I have to do it on the street with all the pedestrians around, lol!!
Anyway, Steve. I wish you were close by cause I am sure I will learn a lot from you. Can you some pointers, once this bolt is removed, how do I go about cleaning the inside of the chamber before put new oil? Also, can you give me the dimension of the oem plug so I can use the right size of tap? I remember Elroy mentioning it before.
If you have a second person and a extra pipe wrench you might be able to use them opposite of you to keep things stationary in the vice. It Might get a little sketchy when it finally gives, but should work.
I was able to remove the plunger from the bottom and also the guard using a drag link socket. I have to drill the bottom plug. Now, i know the oem hex plug for the bottom hole is 3/4"-20. i would like to tap the hole the same size so i can use the oem plug. What size of tap and drill bit do I use to accomplish this? Any suggestion guys? I can find a tap with 3/4" but the pitch per inch is 10 or 16 is the finest. I believe the 20 pitch per inch is what the plug has.If you have a second person and a extra pipe wrench you might be able to use them opposite of you to keep things stationary in the vice. It Might get a little sketchy when it finally gives, but should work.
isb cornbinder
Well-known member

Hiball, help!!! I messed up the plunger when drilling the bottom hole. I must have drilled too deep and It damaged the hex screw, the washer, and bit a part of the bolt. I ordered the same size of hex plug, 14-28, and I plan of using a JB cold weld on the damage bolt before screwing back to reinforce the plunger.
Attachments


Hiball, help!!! I messed up the plunger when drilling the bottom hole. I must have drilled too deep and It damaged the hex screw, the washer, and bit a part of the bolt. I ordered the same size of hex plug, 14-28, and I plan of using a JB cold weld on the damage bolt before screwing back to reinforce the plunger.
Yes you did... Lemme see what I got laying around the NOS pile. When you thread that nut back on to secure the washer against the seal, it needs to be somewhat uniform. I haven’t used JB weld enough to know how it reacts to cutting threads etc. After all this trouble, I should have recommended hitting the guide slot with a punch to try and loosen it, it would have definitely deformed it, but I think you would have been time/trouble ahead.
This jack cost me a few hours of time and about $20 in parts. I do not like the jack, consequently, I never use the jack.
Hi Cornbinder,
That is a really good looking jack! What is the eagle insignia on the side?
If I had a jack that pretty, I wouldn’t like using it either!
isb cornbinder
Well-known member
Hi Cornbinder,
That is a really good looking jack! What is the eagle insignia on the side?
If I had a jack that pretty, I wouldn’t like using it either!
The badge is Harley Davidson. I do not like the jack because it struggles lifting my 1940 Ford. The jack is rated at 3000#
I put the jack behind my compressor, in a corner.
At last!! Here is my cylinder ready to be painted.
Great news! Let us know how it works! Congrats!
As I have promised, here are the pictures of my fully restored, painted Hein Werner WS. It took me awhile but i finally did it!! Better late than never, right?
But I hit a glitch again and I need your expert advice on this especially Hiball, who without his help I would never have done this, much less finished it.
Steve, the jack will not lift up, not even a slight twitch with the saddle when i pump it up using the handle. I poured 8 ounces of new oil, pump it several times with the oil plug unscrew, and the handle knob in the released position (counter clockwise). I screw the plug, rotate the knob handle to lock (clockwise), pump the piston, nothing happens? I tried everything that to purge air and refill oil again ( i must have used a quart of oil already) but could not extend the arm up. Then I tried one of your advices with this problem which is to lock the knob position, raise the saddle manually without pumping the piston. With this method, I was able to lift up the arm around 6 inches. It stays extended, then pump the handle to extend it farther up but it would not lift up despite the arm showing slight movement of up and down while pumping the handle. When I release the knob, it will go down smoothly. Here is the weird part that I found, I turn the knob lock position, lift the arm manually as far as possible, let it go ( it stays extended), then instead of using the handle to pump the plunger, I used I 2x4 stick of wood to push down the piston little by little (it is not easy cuz the plunger is hard) and I was able to extend the arm fully ( see the picture).
Question, why would the plunger work ( i have to initially manually lift the arm) using the wood, and not when I am using the handle to pump it.? The plunger feels spongy, and only seems to get harder when I lift the arm manually. but would not lift when I used the handle, but would function when I pump it with the wood??? Please help, Steve.
Attachments


Last edited: