To avoid these ads, REGISTER NOW!

Homemade electrolysis. What do you use?

To avoid these ads, REGISTER NOW!

drivesitfar

Well-known member
Joined
Oct 23, 2013
Messages
36,007
Location
Pacific Northwest
Fretters: refresh my memory if you don't mind. does the negative wire attach to your cage so anything touches the bottom or sides of it are getting the de rusting?

i like my 3 inch Bison (FPU) vice and i'm thinking that 80 mm is also a 3 incher. does it look something like mine?

post it up on the vise thread or your own thread when you get a chance because your burgundy vices are warming me up. :thumbup:

not like the light RED of DOC's Parker. :bounce:
 

Attachments

  • WP_20140328_003.jpg
    WP_20140328_003.jpg
    141.1 KB · Views: 54
  • WP_20140328_002.jpg
    WP_20140328_002.jpg
    124.5 KB · Views: 50
  • WP_20140328_001.jpg
    WP_20140328_001.jpg
    125 KB · Views: 48

Fretters

Well-known member
Joined
Jan 25, 2014
Messages
4,217
Location
South Yorkshire, England
Fretters: refresh my memory if you don't mind. does the negative wire attach to your cage so anything touches the bottom or sides of it are getting the de rusting?

Aye, that's how the basket works. Connected to negative, (cathode), and then pieces just placed in the basket. Saves wiring each piece on manually. Especially useful with small or round pieces, which would be either awkward or time consuming to connect a wire to for derusting.


i like my 3 inch Bison (FPU) vice and i'm thinking that 80 mm is also a 3 incher. does it look something like mine?

post it up on the vise thread or your own thread when you get a chance because your burgundy vices are warming me up. :thumbup:

not like the light RED of DOC's Parker. :bounce:

:D 
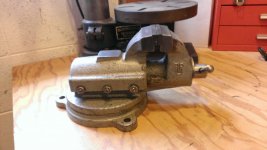
Mines a more standard style. I believe Bison Bial's model designation for this one is 1250. They have the weight listed for the 80mm as 6.6kg, so approx. 15lb in weight. These are the original photo's of it. I'll post some of it when it's finished in the vices thread.

guimage


guimage


Doc & Harley: Regarding the aluminium side of things, I'll have a dig around when it's light for a test piece. I've been trying to think of something to try, and seem to recall having a sump from a little Villiers four stroke somewhere, which is quite badly oxidised and which has some shreds of original paint left on it. That should be a perfect test piece for the vat.
 
Last edited:

bagged89s10

Well-known member
Joined
Mar 13, 2005
Messages
4,607
Location
CT
This is the little mesh basket that I dropped a bollock with, btw. :D


guimage


guimage


guimage


Honestly thought it was brass mesh, and never noted the colour of the cut ends due to the artificial lighting. It was only when I pulled it out of the vat after an overnight session that I noted it was aluminium, due to some of the anodizing having been removed.


On a positive note, it performed admirably. :D I'd popped some copper and brass washers and some brass nuts in there, and they all scrubbed up a treat when they came out. Made this basket due to the larger one just being overkill when only wanting to clean a handful of small pieces.


I like the mesh basket idea. I was thinking about making one to fit my tank. Maybe a large one and then a small one for smaller parts. Wiring each piece is sometimes annoying, but still beats manually wire wheeling off rust.
 

harleybuilder

Well-known member
Joined
Apr 4, 2014
Messages
287
Location
Southern IL
Doc & Harley: Regarding the aluminium side of things, I'll have a dig around when it's light for a test piece. I've been trying to think of something to try, and seem to recall having a sump from a little Villiers four stroke somewhere, which is quite badly oxidised and which has some shreds of original paint left on it. That should be a perfect test piece for the vat.


Fretters. .. Thank you, that would be very much appreciated. I'm really looking forward to the results as I'm sure TM and others are. ....
 

Fretters

Well-known member
Joined
Jan 25, 2014
Messages
4,217
Location
South Yorkshire, England
Regarding aluminium, the best advice would be to not use electrolysis on finely finished pieces. Ran the test, and with the painted portions versus the bare portions, the overall effect was akin to etching a PCB. Underneath the paint the metal was untouched, but the bare metal around the paint was etched/eroded slightly, leaving a raised land where the paint was masking the metal.

For stuff like rough cast aluminium, it wouldn't be a problem, but on well finished pieces, its use wouldn't be advisable. It does remove/loosen the oxide layer well though. You can pretty much just rub the oxide off with your finger when it comes out of the vat.
 

Fretters

Well-known member
Joined
Jan 25, 2014
Messages
4,217
Location
South Yorkshire, England
I like the mesh basket idea. I was thinking about making one to fit my tank. Maybe a large one and then a small one for smaller parts. Wiring each piece is sometimes annoying, but still beats manually wire wheeling off rust.

The baskets are well worth making. Been using my other basket for knocking on a couple of years now, and it's worth its weight. Occasionally the odd piece seems to take an age in the basket, and you might have to take some pieces out and scrub them a time or two during the process before they'll achieve good conductivity, but the baskets truly are a godsend over wiring pieces individually.

I still prefer to do the main pieces wired directly, but for smaller stuff like nuts, bolts, screws, small tools, springs, jaw inserts etc., they generally just go in the basket.
 

harleybuilder

Well-known member
Joined
Apr 4, 2014
Messages
287
Location
Southern IL
Regarding aluminium, the best advice would be to not use electrolysis on finely finished pieces. Ran the test, and with the painted portions versus the bare portions, the overall effect was akin to etching a PCB. Underneath the paint the metal was untouched, but the bare metal around the paint was etched/eroded slightly, leaving a raised land where the paint was masking the metal.

For stuff like rough cast aluminium, it wouldn't be a problem, but on well finished pieces, its use wouldn't be advisable. It does remove/loosen the oxide layer well though. You can pretty much just rub the oxide off with your finger when it comes out of the vat.
Fretters, thank you for doing the test and reporting your findings. .. I think it will be a tool to use in certain situations on reviving some of these grinders. .
 

Fretters

Well-known member
Joined
Jan 25, 2014
Messages
4,217
Location
South Yorkshire, England
I'll take a photo of the piece later and show some before & after photo's so you can see the effect it has. I scraped some of the old paint which was on there with the edge of a copper coin, and the paint came off easily enough. I'll take another photo of that little basket too, so you can see the effect it's had on that. It's removed pretty much all traces of the anodizing from it.
 

torqueman2002

Well-known member
Joined
Jun 3, 2009
Messages
6,139
Location
SE Michigan
I'll take a photo of the piece later and show some before & after photo's so you can see the effect it has. I scraped some of the old paint which was on there with the edge of a copper coin, and the paint came off easily enough. I'll take another photo of that little basket too, so you can see the effect it's had on that. It's removed pretty much all traces of the anodizing from it.
Yes, thank you for your experimenting and sharing the results.

I too plan to make a wire basket.

One question, what 'size' is the mesh/opening and thickness/gauge of the piece. Sorry, I don't know the proper terms.

BTW - after the RED Parker is done [it's all set, I just need to mix the soup and connect the charger], I have a painted cast aluminum Block grinder housing I will try-out in the 'soup'.
:thumbup:
 

torqueman2002

Well-known member
Joined
Jun 3, 2009
Messages
6,139
Location
SE Michigan
I mixed up the 'soup', used rebar tie wire, and an old Heathkit-friend with these vise pieces that have been cleaned with Simple Green.

Fi%20P1100420.jpg


Fi%20P1100437.jpg


Fi%20P1100421.jpg


Fi%20P1100423.jpg


Dynamic jaw hooked-up/suspended from the buss bar, and cooking for about 5 min.
Fi%20P1100425.jpg


The charger didn't like the above set-up.

A bulb will be used to drop the load on the charger and keep it from cycling between the Green and Red zones.

A measure of a 2 filament bulb non-load resistance.
Fi%20P1100428.jpg


Fi%20P1100429.jpg


The charger is 'happier' with the 3 Ohm load in series with the vise pieces.
Fi%20P1100430.jpg


Fi%20P1100432.jpg


3+ hours.
Fi%20P1100433.jpg


Total voltage is 10.72 VDC.
Fi%20P1100434.jpg


Voltage after the bulb, as supplied to vise pieces is 2.066 VDC.
Fi%20P1100435.jpg


Fi%20P1100437.jpg


Current in the system is 348 mA (0.348 Amps).
Fi%20P1100439.jpg
 

G20-Budo

Well-known member
Joined
May 31, 2013
Messages
987
Location
Chandler, AZ
Thanks!

I wonder if it is 'cooking' at the proper level, though. :headscrat

I don't know? When I did mine, I was told it will start kind of bubbling, and mine was (I didn't check the voltage or current). But mine WAS bubbling, and it did work. I'm sure yours is cooking.
 

torqueman2002

Well-known member
Joined
Jun 3, 2009
Messages
6,139
Location
SE Michigan
I don't know? When I did mine, I was told it will start kind of bubbling, and mine was (I didn't check the voltage or current). But mine WAS bubbling, and it did work. I'm sure yours is cooking.

The current is a little lower than I use but it is fine. It will just take a bit longer but the results will be better.

Sent from my LG-D801 using Tapatalk
Thanks guys.

I checked it at noon and it was still slow cooking.

It must be working as you say, because even-though it wasn't terribly rusted to begin with, the paint now just peels away with a light scratching with a finger nail. :rocker:

I decided to use the lower resistance bulb and I saw an immediate increase of bubbles ******* from the rebar.

I'll take some voltage and current readings a bit later and post them up.

Thanks again for the help and advise. :thumbup:
 

bagged89s10

Well-known member
Joined
Mar 13, 2005
Messages
4,607
Location
CT
Thanks guys.

I checked it at noon and it was still slow cooking.

It must be working as you say, because even-though it wasn't terribly rusted to begin with, the paint now just peels away with a light scratching with a finger nail. :rocker:

I decided to use the lower resistance bulb and I saw an immediate increase of bubbles ******* from the rebar.

I'll take some voltage and current readings a bit later and post them up.

Thanks again for the help and advise. :thumbup:


So without a bulb for resistance/load, your battery charger wasn't putting out any or enough amps?
 

Craptain

Well-known member
Joined
Apr 18, 2013
Messages
4,028
Location
Tampa Bay FL
So without a bulb for resistance/load, your battery charger wasn't putting out any or enough amps?
Many "automatic" chargers will not work at all. The earlier ones have current limiters and switch down if the current goes to high. Then back again when the current goes to low.
The bulb limits current to the safe area.

Sent from my LG-D801 using Tapatalk
 

bagged89s10

Well-known member
Joined
Mar 13, 2005
Messages
4,607
Location
CT
I mixed up the 'soup', used rebar tie wire, and an old Heathkit-friend with these vise pieces that have been cleaned with Simple Green.

Fi%20P1100420.jpg


Fi%20P1100437.jpg


Fi%20P1100421.jpg


Fi%20P1100423.jpg


Dynamic jaw hooked-up/suspended from the buss bar, and cooking for about 5 min.
Fi%20P1100425.jpg


The charger didn't like the above set-up.

A bulb will be used to drop the load on the charger and keep it from cycling between the Green and Red zones.

A measure of a 2 filament bulb non-load resistance.
Fi%20P1100428.jpg


Fi%20P1100429.jpg


The charger is 'happier' with the 3 Ohm load in series with the vise pieces.
Fi%20P1100430.jpg


Fi%20P1100432.jpg


3+ hours.
Fi%20P1100433.jpg


Total voltage is 10.72 VDC.
Fi%20P1100434.jpg


Voltage after the bulb, as supplied to vise pieces is 2.066 VDC.
Fi%20P1100435.jpg


Fi%20P1100437.jpg


Current in the system is 348 mA (0.348 Amps).
Fi%20P1100439.jpg


So you put the bulb in series between the charger negative(-) on the charger and the vise or parts you are de-rusting?
 
To avoid these ads, REGISTER NOW!

torqueman2002

Well-known member
Joined
Jun 3, 2009
Messages
6,139
Location
SE Michigan
I'll post my comments in Blue.
So without a bulb for resistance/load, your battery charger wasn't putting out any or enough amps?
It was cycling from ON to OFF (needle would be in the Green Zone {fully charged} then the Red Zone {check battery} on the chargers meter). I believe the charger's self protection circuitry prevented it from charging continuously.

Many "automatic" chargers will not work at all. The earlier ones have current limiters and switch down if the current goes to high. Then back again when the current goes to low.
The bulb limits current to the safe area.
What he ^ said. Thanks, Craptin.
Sent from my LG-D801 using Tapatalk

So you put the bulb in series between the charger negative(-) on the charger and the vise or parts you are de-rusting?
Essentially yes.

Although, in this case the bulb is in series in the Positive (Red wire) circuit between the charger and the rebar.

I don't see what electrical difference it would make, which circuit from the charger the bulb is placed. Someone correct me if it does. I see the Craptin posted that while I was composing.
 
Last edited:

Outlawmws

Well-known member
Joined
Aug 9, 2011
Messages
39,183
Location
The Badlands
TM, double check your polarity (Use the volt meter...), the rebar typically does NOT do the fizzing, the parts should be doing it..
 

torqueman2002

Well-known member
Joined
Jun 3, 2009
Messages
6,139
Location
SE Michigan
The 'soup' was cooking for a total of 28 hours when these pictures and measurements were made.

This is at 28 hours, with the 0.7 Ohm bulb that was installed at 22 hours.
Fi%20P1100442.jpg


Here's a diagram of the set-up.
Fi%20P1100453.jpg


I used the 3.1 Ohm bulb for the first 22 hours.

The table's measurements were taken at 0.5 hours (3.1 Ohm bulb) and 28 hours (0.7 Ohm bulb).
Voltage_Current%20Table.jpg


Oh, I moved the set-up outside.
Fi%20P1100446.jpg


I didn't want to attempt collecting all the Hydrogen gas inside!
:D
 

torqueman2002

Well-known member
Joined
Jun 3, 2009
Messages
6,139
Location
SE Michigan
TM, double check your polarity (Use the volt meter...), the rebar typically does NOT do the fizzing, the parts should be doing it..

Thanks, I will.

I went back through the pictures, the charger:

  • Positive/Red lead goes to the rebar
  • Negative/Black goes to the vise/parts

Is that correct?

If it is, I wonder if the 40 year old Heathkit went and switched sides/polarity? ("Not that there's anything wrong with that." J. Seinfeld)
 

Outlawmws

Well-known member
Joined
Aug 9, 2011
Messages
39,183
Location
The Badlands
Thanks, I will.

I went back through the pictures, the charger:

  • Positive/Red lead goes to the rebar
  • Negative/Black goes to the vise/parts

Is that correct?

If it is, I wonder if the 40 year old Heathkit went and switched sides/polarity? ("Not that there's anything wrong with that." J. Seinfeld)

The diagram and description are correct, the leads being bas-akwards is why I suggested verifying the charger...
 

torqueman2002

Well-known member
Joined
Jun 3, 2009
Messages
6,139
Location
SE Michigan
The diagram and description are correct, the leads being bas-akwards is why I suggested verifying the charger...
I went out and verified (with a voltmeter) the charger leads are correct and the connections matched the diagram.

I switched the charger leads with and then without the bulb, after about 3 mins. the vise parts began to bubble.

I'm letting it cook w/o the bulb, the charger meter is indicating about 7 amps.

Any ideas what might be going on?

Could I have the Sodium Carbonate/Water solution too concentrated? :dunno:
 

Fretters

Well-known member
Joined
Jan 25, 2014
Messages
4,217
Location
South Yorkshire, England
The photo's of that ally test piece, pre:

guimage


guimage


post:

guimage


That white furry oxide which is starting to reappear is just because the part was outside in the pouring rain for a day or so before I took the post-electrolysis photo's. I only gave it a token scrub/wipe after taking it out of the vat, but you can see that the crusty oxide layer has all but gone.

This is the slight etching/eroding effect I mentioned.

guimage


The shiny, raised portion is where the paint was masking it.
 

Fretters

Well-known member
Joined
Jan 25, 2014
Messages
4,217
Location
South Yorkshire, England
I too plan to make a wire basket.

One question, what 'size' is the mesh/opening and thickness/gauge of the piece. Sorry, I don't know the proper terms.

It doesn't really matter. If you have some mesh knocking about, just give it a whirl. As long as it's sturdy enough to hold the pieces you'll be placing in it, it'll be fine. These are both baskets. The larger one on the left has been in use for nigh on two years now.

guimage


You can see with the small basket how the anodized layer has disappeared now, after a couple of sessions in the vat.
 

Fretters

Well-known member
Joined
Jan 25, 2014
Messages
4,217
Location
South Yorkshire, England
Could I have the Sodium Carbonate/Water solution too concentrated? :dunno:

That wouldn't affect it. Adding too much SC is merely just wasting SC, (once you've reached a certain saturation, adding any more has no effect on the process), but it won't adversely affect anything. You may just have had an iffy connection if it was drawing practically nothing to start with and then jumped up to around 7A.

When the setup is running correctly, this is the type of effect you should see. Clear bubbling, (hard to see in the photo, but it is bubbling merrily) from the piece being derusted, with rusty foam generated by the anode(s). Eventually the rusty foam will likely cover the surface of the vat, and then you'll usually see the outline of the piece in that foam via an outline of white bubbles.

guimage


That's just a quick vat setup I chucked together whilst I'm farting around testing aluminium in the other vat.
 

Craptain

Well-known member
Joined
Apr 18, 2013
Messages
4,028
Location
Tampa Bay FL
Just a note on bulb resistance. When you measure resistance with a meter you are measuring cold. The resistance changes significantly hot.
It doesn't matter for our purpose but is something to be aware of. High wattage bulb is low resistance and low wattage is high(er) resistance. Just try a couple of different ones individually or together to achieve what you need.

Sent from my LG-D801 using Tapatalk
 

drivesitfar

Well-known member
Joined
Oct 23, 2013
Messages
36,007
Location
Pacific Northwest
Doc: Since your red parker wasn't that rusty you didn't seem to get the brown scum on top of the water. You said paint was coming off. Any pics and did swivel jaw loosen up?
 

torqueman2002

Well-known member
Joined
Jun 3, 2009
Messages
6,139
Location
SE Michigan
Just a note on bulb resistance. When you measure resistance with a meter you are measuring cold. The resistance changes significantly hot.
It doesn't matter for our purpose but is something to be aware of. High wattage bulb is low resistance and low wattage is high(er) resistance. Just try a couple of different ones individually or together to achieve what you need.

Sent from my LG-D801 using Tapatalk
Very good point, voltage drop across a load when the circuit is powered up is the preferred method.

Voltage_Current%20Table.jpg
 

torqueman2002

Well-known member
Joined
Jun 3, 2009
Messages
6,139
Location
SE Michigan
Doc: Since your red parker wasn't that rusty you didn't seem to get the brown scum on top of the water. You said paint was coming off. Any pics and did swivel jaw loosen up?
That's my thought also, Drives. There was 'scum', just not brown.

Here's a pic. of the tank just before I pulled the 1st batch of vise pieces out.
Fi%20P1100495.jpg


The dynamic jaw as it emerged from the tank.
Fi%20P1100497.jpg


Fi%20P1100498.jpg


Here is the d. jaw after 15 min. of easy scraping and wire brushing.
Fi%20P1100511.jpg


Fi%20P1100512.jpg


I wiped the parts down with Kroil and put a couple of squirts into the hole with the broken bolt/pin that holds the jaw from swiveling.

Tomorrow I will have a go at removing it. The jaw wants to move, as there is easy, but slight side-to-side rotation now.

Right now the tank has a hunk of iron with a bit of rust on it, to run a check and compare with the vise results.
 

bagged89s10

Well-known member
Joined
Mar 13, 2005
Messages
4,607
Location
CT
That's my thought also, Drives. There was 'scum', just not brown.

Here's a pic. of the tank just before I pulled the 1st batch of vise pieces out.
Fi%20P1100495.jpg


The dynamic jaw as it emerged from the tank.
Fi%20P1100497.jpg


Fi%20P1100498.jpg


Here is the d. jaw after 15 min. of easy scraping and wire brushing.
Fi%20P1100511.jpg


Fi%20P1100512.jpg


I wiped the parts down with Kroil and put a couple of squirts into the hole with the broken bolt/pin that holds the jaw from swiveling.

Tomorrow I will have a go at removing it. The jaw wants to move, as there is easy, but slight side-to-side rotation now.

Right now the tank has a hunk of iron with a bit of rust on it, to run a check and compare with the vise results.


I use heavy duty and industrial scotch brite pads after a dip in the tank as well as a wire brush. Seems to work to get better results for me only using a wire brush.

Doesn't the e-tank make paint/rust removal so easy?
ImageUploadedByTapatalk1440249658.633237.jpg
 

drivesitfar

Well-known member
Joined
Oct 23, 2013
Messages
36,007
Location
Pacific Northwest
DOC: your naked Parker is looking good. good luck on getting the swivel jaw off. a good combination of being firm and gentle is the trick to getting a swivel jaw that might not have moved in several decades.

good luck
 

BlueBomber

Well-known member
Joined
Sep 14, 2013
Messages
3,201
Location
Outside Boston, MA
Seeing this thread pop up again and again in my feed motivated me to throw together my electrolysis bath this evening. A great way to procrastinate on other stuff, like getting ready for work tomorrow.

I'm proud to say I put it together exclusively using stuff I picked up for pennies on the dollar at estate sales, to include many of the tools, the rebar, the hose clamps, the bucket and the 12V power source. Even the wire was leftover from another project.

51f92192426eba74f97fa8b9f3432416.jpg

I applied a lot of what I learned on this thread. I used a standard 5-gallon bucket, but had the idea to use the lid to hold the rebar in place. I drilled 8 holes around the perimeter and then cut a hatch just inside the circle of holes. I also cut all but two of the lid "tabs" off so that it wouldn't be so blinking hard to take off later. I cut two notches in the rim to hold my crossbar. Finally, I sank the cut out hatch into the bottom of the bucket to keep the electrodes from walking in.

10cfe4a5cbda0f7175655157e775c1ae.jpg
6ecc5c05cd2d3ca02c3666f26d87d296.jpg
7a66ed5749cb8741a4089e451bc5c3d3.jpg

I wired each individual rebar rod to a master positive rod so that I could disconnect rods in case I needed fewer electrodes. I also connected them to each piece of rebar with hose clamps from an estate sale stash. See, the dead guy was right - he WAS saving them for an important project some day - mine!
I love the speed strippers - they're kinda like using a nail gun. Once you do, you never want to go back to the old way. :) The Channellocks and the strippers were also sale scores.

b1a54cbae8bcaa666975babe21cc97da.jpg

The power supply was this regulated box I picked up down south.

7551236b28693314114f9f1ad381e6b8.jpg

Heck, I even cut the rebar on this old Armstrong pipe vise picked just a week ago.

48abb90c8da1fe4adae217a05806c671.jpg

The only thing I'm missing is steel wire to drop the parts into the bath. I used copper instead. First tool in is the Klein spud ratchet from Alabama.

53628940e5257efa3dc6d533ea8d2a24.jpg


Once I flicked on the switch, the wrench started bubbling merrily. I'll give it an hour and then go check on it.

c1c1b1ab883dde99401d606c7a8577f6.jpg

Meanwhile, I've got a fan overhead to direct the hydrogen off-gas toward the open window. Don't worry - there are no ignition sources in the garage right now, and I will eventually move the bath to an out-building.
 
Last edited:
To avoid these ads, REGISTER NOW!
Top Bottom