APEowner
Well-known member
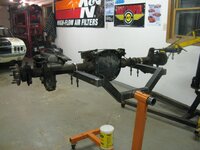
I stuffed one of my race cars into a tire barrier and rather than pay someone to pull the nose back where it belongs I built my own puller and did it myself. The long tube runs back another tube that runs across the car and clamps to the pinch welds.

I don't have any before pics but I must have done something right because all the body parts bolted back on like they're supposed to.

I don't have any before pics but I must have done something right because all the body parts bolted back on like they're supposed to.

")


 That picture scares the snot out of me...