To avoid these ads, REGISTER NOW!

Hot Dawg 45K Heater Install

csp

Well-known member
Joined
Mar 23, 2010
Messages
5,719
Location
Franktown, CO
None of that tells us how far the run is going to be from the existing line to your new heater or if the point you're going to be tapping into is the 3/4" line or the 1/2" line (it should be the bigger of the two).

Yes, just the same type of flex line used on dryers and stoves. The gas has no idea if it's going into a furnace or a stovetop or a dryer. It all works the same.
 
To avoid these ads, REGISTER NOW!
OP
D

D45

Well-known member
Joined
Mar 21, 2014
Messages
4,834
Location
NW INDIANA
Well the length of the run depends on where I go from

The 1/2" line feeding the fireplace is one option. The fireplace is on the shared common wall with the garage. The garage heater is about 15-17 feet from where I would install a T fitting, in the crawl and under the fireplace

Option two is the tap in to this junction area, somehow and run a completely new line 24 feet into the garage, under the crawl. Then another 15 feet away to the garage heater
 
OP
D

D45

Well-known member
Joined
Mar 21, 2014
Messages
4,834
Location
NW INDIANA
Gas%20Line1_zps0gglaner.png
 

csp

Well-known member
Joined
Mar 23, 2010
Messages
5,719
Location
Franktown, CO
You don't want to tap into the 1/2" line. It's already sized for the fireplace alone.

Go with 3/4" and tap into the larger line. It would be better if that one was 1", but it is what it is.
 
OP
D

D45

Well-known member
Joined
Mar 21, 2014
Messages
4,834
Location
NW INDIANA
Ok so could I get away with running a single 3/4" or 1" line, to replace the 1/2" line that runs under the crawl ( and feeds the fireplace).........and using a T fitting and extended that line into the garage?
 
OP
D

D45

Well-known member
Joined
Mar 21, 2014
Messages
4,834
Location
NW INDIANA
Ok, getting ready to redo the gas lines this weekend..........

Here is the crawl, and you can see the long run of the gas line on the right

IMG_20160123_140337774_zpsbkhkfuz1.jpg


Again, here is the gas line junction that needs to be modified

gas_zpsffexaqox.jpg


Can I just replaced the line 1/2" line in the crawl with 3/4" (1/2" to 3/4" elbow) or should all the 1/2" be replaced with the 3/4" fittings/pipe/extension?
 
Last edited:
OP
D

D45

Well-known member
Joined
Mar 21, 2014
Messages
4,834
Location
NW INDIANA
I ended up leaving the setup for the gas dryer, but replaced everything next to it with all 3/4" pipe and fittings

I started by removing the 3/4" T fitting which reduces down to 1/2" at both Ts

I replaced this will a 3/4" to 1/2" to 3/4" reducing T fitting, and it connected right back into the gas dyer line, kind of like this one:

http://www.homedepot.com/p/Mueller-...ron-Threaded-Reducing-Tee-520-434HN/100202756

I did not buy any pipe or fittings from Home Depot. ALL CHINA!

Thankfully, my local True Value carries all fittings and pipe that are USA made, for only a tad more

I have the pipe ran into the garage and capped off. I need to run it up the wall about 10 feet and then down the wall another 8-10 feet, where a flexible appliance hose will connect the heater to the hard pipe


Hopefully this will be enough the supply the fireplace and the garage heater
 

tpdimock

Member
Joined
Sep 18, 2016
Messages
10
Location
Upstate NY
FYI - I am following this thread with much interest as I just bought the same unit (45K Hot Dawg). The unit is mounted in my garage in the rafters and I have run the electrical.
Question: Should the fan to blow the air into my garage space run immediately when power has been applied at the unit? In the process of wiring up an on/off switch to the unit, I got the wires crossed and blew a 20 amp circuit breaker in my garage. My fear is that I may have blown a component (transformer?) in the unit. Once I sorted out the wires at the switch, when I apply power to the unit, the green light on the circuit board is lit, which is a good sign. But the fan isn't running..
Thanks -
 

csp

Well-known member
Joined
Mar 23, 2010
Messages
5,719
Location
Franktown, CO
The fan only comes on when the limit switch reaches the correct pre-set temperature to turn the fan on. It's not supposed to run otherwise.
 

toyotadriver

Well-known member
Joined
Dec 30, 2010
Messages
1,586
Most basic thermostats have a fan only switch that will allow you to just run the fan. That will also test to make sure the fan is working.
 

csp

Well-known member
Joined
Mar 23, 2010
Messages
5,719
Location
Franktown, CO
Manual fan on requires three thermostat wires to be connected: R, W and G.

It won't work with two wire thermostat wire.
 
Last edited:

toyotadriver

Well-known member
Joined
Dec 30, 2010
Messages
1,586
I'd go to an auto parts store and purchase gray high temp silicone to seal where the storm collar attaches to the B vent pipe.
 

csp

Well-known member
Joined
Mar 23, 2010
Messages
5,719
Location
Franktown, CO
There's no need for high temp on the outside wall of B-vent, especially outside of the building.
 

rlitman

Well-known member
Joined
Oct 18, 2010
Messages
24,609
Location
Long Island
There's no need for high temp on the outside wall of B-vent, especially outside of the building.


True, but pure silicone from the hardware store (GE Silicone II) is high temp silicone anyway. Just don't use latex-silicone blends.
 
OP
D

D45

Well-known member
Joined
Mar 21, 2014
Messages
4,834
Location
NW INDIANA
I so silicon to seal the collar to the vent

I bought roofing silicon for under the flashing

Anything else need to be sealed? I see some suggest all connecting parts, above the roof line, before they are connected/screwed together
 

csp

Well-known member
Joined
Mar 23, 2010
Messages
5,719
Location
Franktown, CO
True, but pure silicone from the hardware store (GE Silicone II) is high temp silicone anyway. Just don't use latex-silicone blends.

It is, but not in the same "high temp" relative temperatures as auto parts store RTV which was suggested. RTV has no place in HVAC exhaust venting.
 
To avoid these ads, REGISTER NOW!
OP
D

D45

Well-known member
Joined
Mar 21, 2014
Messages
4,834
Location
NW INDIANA
Ok, trying to determine what is best

Manual says 12" distance suggested from back of heater to the upright vent pipe

If I use the "draft hood connection" piece with the elbow, I have about 11" total length

If I use a 12" section (double wall) with the elbow, I have 18" total length

Obviously the draft hood connector is a better fit, but it is shorter

Suggestions?

12" pipe with elbow:
IMG_20161025_220702736_HDR_zps7tsput1n.jpg


IMG_20161025_220719322_zpszmupanhk.jpg


Draft hood connector with elbow:
IMG_20161025_220754974_zps8vohv0hb.jpg


I guess the instruction does say the distance should be 12" min, not the length of the pipe. With the draft hood connect and elbow positioned on the thick pipe coming out of the back of the heater, I barely have 12"

IMG_20161025_220903531_zpshnbo95mw.jpg
 
OP
D

D45

Well-known member
Joined
Mar 21, 2014
Messages
4,834
Location
NW INDIANA
I also wired up two wire thermostat and coiled a nice section of wire from the heater to the wall
 

tpdimock

Member
Joined
Sep 18, 2016
Messages
10
Location
Upstate NY
Just did this myself...
From the back of the unit, attach the Draft Hood Connection to the exhaust port, then the Straight piece (that is about 11 in long to) to the other end of the DHC, then the elbow.
 
OP
D

D45

Well-known member
Joined
Mar 21, 2014
Messages
4,834
Location
NW INDIANA
Just did this myself...
From the back of the unit, attach the Draft Hood Connection to the exhaust port, then the Straight piece (that is about 11 in long to) to the other end of the DHC, then the elbow.

Unfortunately, I do not have that much room to use all three pieces together
 

csp

Well-known member
Joined
Mar 23, 2010
Messages
5,719
Location
Franktown, CO
If you get the 12" minimum with the draft hood connect and the ninety, and there's no room for anything else don't you have the answer to your question???

The 12" minimum is from the back wall of the heater to the centerline of your vertical pipe, as per the drawing. You have more than 12" based on one of the photos as the tape measure isn't even at the end of the vent pipe.

:bangmyheadonabrickwall:
 
Last edited:
OP
D

D45

Well-known member
Joined
Mar 21, 2014
Messages
4,834
Location
NW INDIANA
Thanks man, so helpful..............

I connected the draft hood to the 90 elbow and attached it to the heater

Straight up, I have about 43" to the roof's plywood

According to manual, for my roof pitch, I need to have atleast 1' termination section above the roof (not including the cap)

http://www.northerntool.com/images/downloads/manuals/28794.pdf


IMG_20161025_220903531_zpshnbo95mw.jpg


I am so cheap.........I am bummed that I feel the need to spend $13 on a 3" vent support brace, to help secure and hold the vertical vent to a ceiling joist

I also says I need 1" clearance around the vent, so I need to make a 4" hole for the 3" vent
 
Last edited:
OP
D

D45

Well-known member
Joined
Mar 21, 2014
Messages
4,834
Location
NW INDIANA
My goal will be to use a 24" b-vent section from the cap down through the roof

This way, there will not be any exposed joints above the roof line

I will probably have to end up using two of the 24" sections of b-vent and one 12" section, so this will put the cap around 17" above the roof.

I really hope this height will be ok
 
Last edited:

csp

Well-known member
Joined
Mar 23, 2010
Messages
5,719
Location
Franktown, CO
I do, NEVER installed one before and I am not paying anyone to do it for me

Sorry you do this for a living and know it all

It has nothing to do with doing this for a living or knowing it all. It's about using the information that's right in front of you to solve a problem. I don't install these every day for a living, however I do solve problems every day, many of which are the result of people not attempting things they shouldn't or trying to be cheap.

You had two possible scenarios. One that wouldn't fit the space you have and one that obviously met the specifications required. Do you not trust your ability to make a decision?

FYI, I didn't have the internet to run to the first time I had one of these to install. It's still working to this day.
 
OP
D

D45

Well-known member
Joined
Mar 21, 2014
Messages
4,834
Location
NW INDIANA
Anyways

I looked at the flexible conduit tonight that came with the heater and noticed only two wires at the end, white and black..........no third ground wire

So I take the side panel off and the green ground is capped off with a wire nut. Odd?

I'm going to see if I can pull a ground wire thru the flexible conduit or just buy a new 10 foot section of 12/3 flexible conduit and connect a plug at the end

Cheapest is obvious just buy a section of green wire and push it thru.......I will try that first tomorrow
 
Last edited:
OP
D

D45

Well-known member
Joined
Mar 21, 2014
Messages
4,834
Location
NW INDIANA
I was able to pull all three wires easily through the 3/8" flexible conduit

I hooked up all three wires inside the heater, with wire nuts, and secured the conduit on and around the ceiling joists towards the general area where the new outlet will be mounted

I need to buy a plug for the end of the wiring harness, to plug into the outlet

This week I plan to add a new outlet, which will supply power for the heater and my ceiling fan

I go on vacation for two weeks, starting Friday........and will soon be able to fire it up and have heat
 
OP
D

D45

Well-known member
Joined
Mar 21, 2014
Messages
4,834
Location
NW INDIANA
I also lowered the mounting height of the heater by 3", better clears the ceiling joists to direct down flow better
 
OP
D

D45

Well-known member
Joined
Mar 21, 2014
Messages
4,834
Location
NW INDIANA
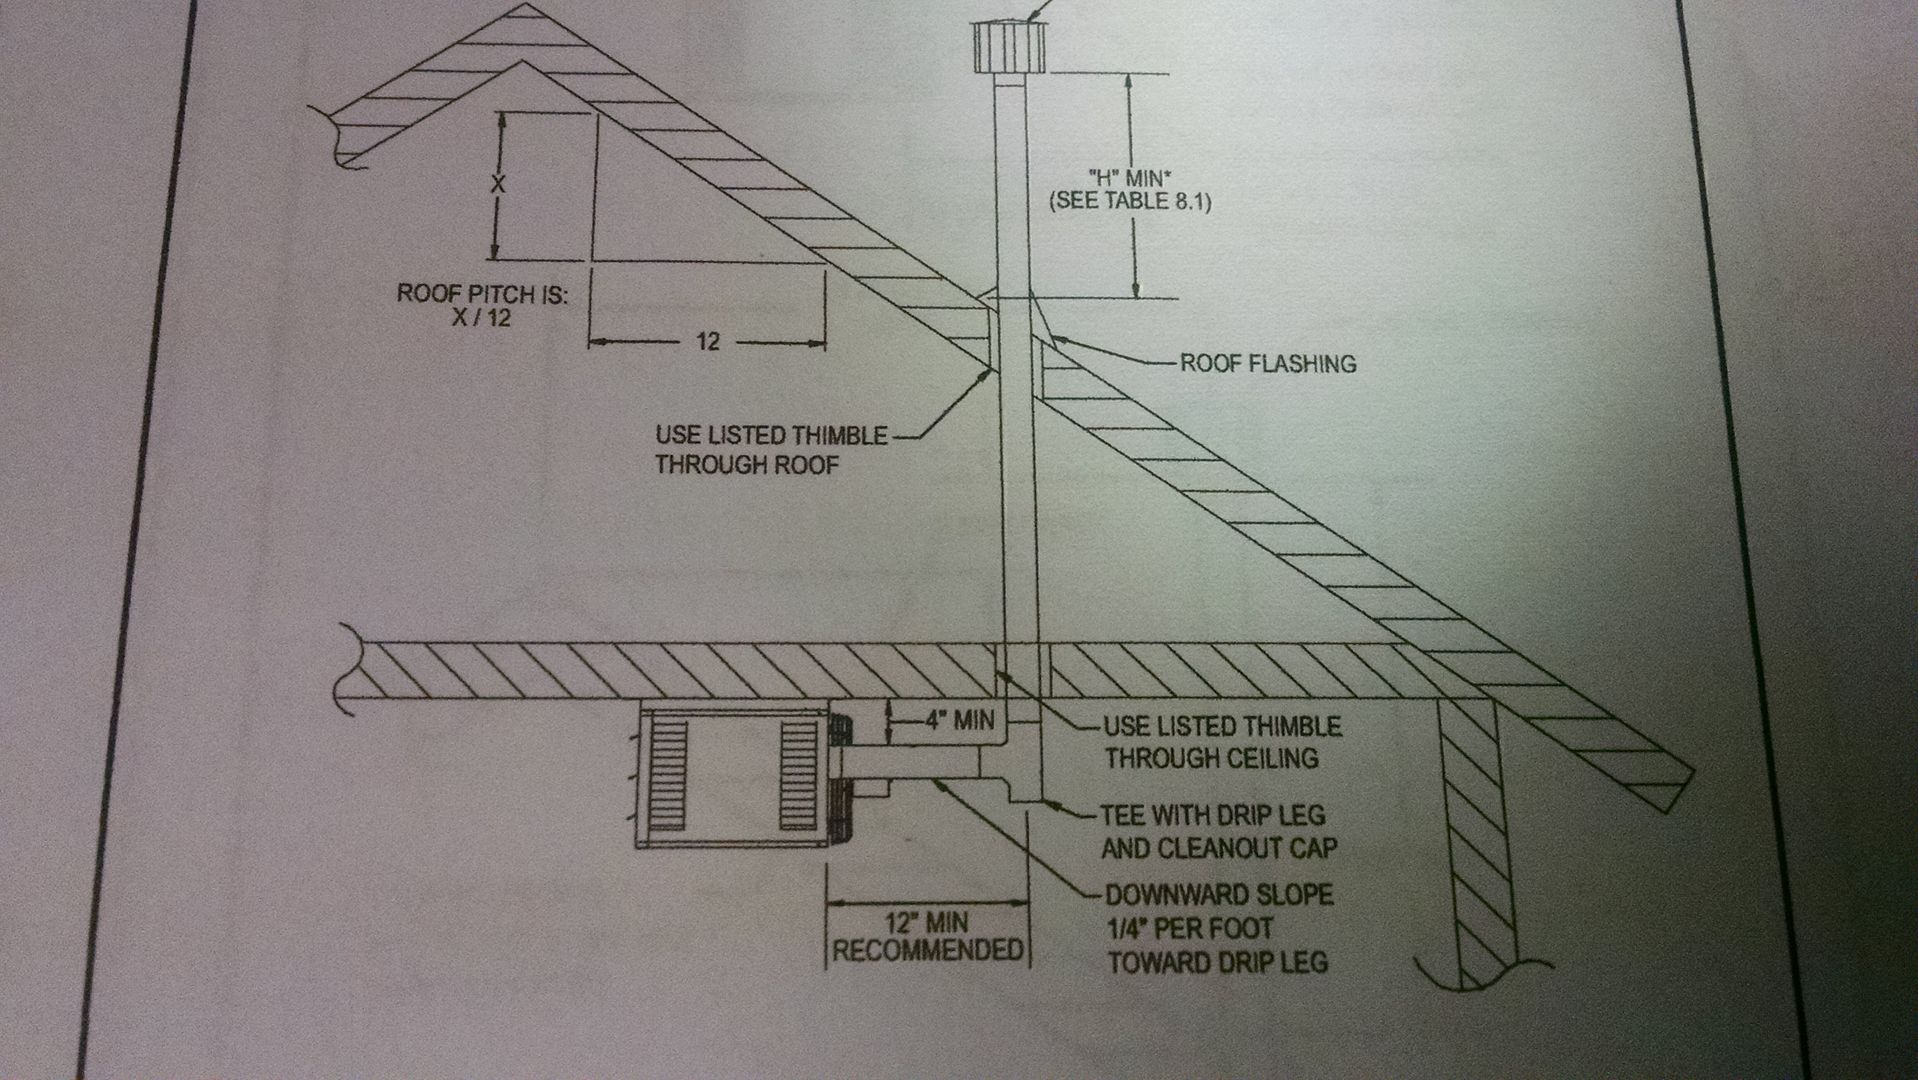
I used "neoprene" roof caulk, which a local neighbor highly recommended over the traditional black roofing caulk

I also found some clear 100% exterior silicon, which I used on the "above the roof" vent connections, storm collar, etc

IMG_20161113_104542224_HDR_zpszgkbjbmz.jpg


Overall the roof vent install went smoothly

I used 3" metal plumbing hangers for supporting the vertical stack inside the garage. Its rock solid

Drilled a hole for the center of the hole/center of the vent pipe
IMG_20161113_110828116_zpsolcr7mg9.jpg


5" hole, done with a jigsaw
IMG_20161113_112628282_zpszzxun0hm.jpg


Traced the flashing
IMG_20161113_113110201_zps9muvsgcv.jpg


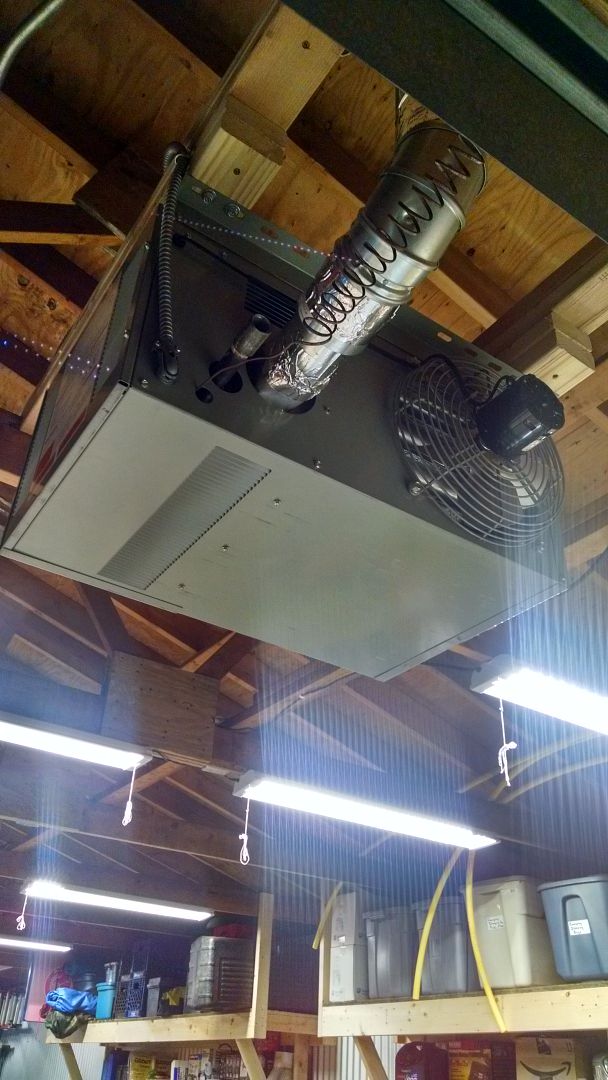
My phone died on my for the rest of the install and I didn't want to go back up, so here are some inside pics

IMG_20161113_184816820_zpsqwlzgkkb.jpg


IMG_20161113_184745549_zpsiqbo3kgt.jpg


IMG_20161113_184735368_zpspnfsza0d.jpg


IMG_20161113_184755188_HDR_zpszamqrdkc.jpg


IMG_20161113_184802410_zpslhgt3mpq.jpg


Hope to finish the gas line, drip pipe, valve, and flexible appliance hose install over the next week and have HEAT!!!

I would estimate I have $125 into this install, so far

The gas line and gas line parts will increase the price fast, but I will only use USA gas pipe and connections from my local True Value

The gas valve inside the heater has a 1/2" size, since I am running 3/4" to the heater, should I also use 3/4" for the valve and drip pipe and reduce it down to 1/2" closest to the heater (as possible)

3/4" flexible appliance connector line is kind of hard to find
 
OP
D

D45

Well-known member
Joined
Mar 21, 2014
Messages
4,834
Location
NW INDIANA
should the flexible gas line go directly into the heater or should the drip leg/pipe and valve be attached to the heater?
 
OP
D

D45

Well-known member
Joined
Mar 21, 2014
Messages
4,834
Location
NW INDIANA
Prices so far:

Heater: FREE
B Vent Kit: $63.75
Thermostat: $20.05
Tstat Wire: $8.00
Black Roof Caulk: $6.00
Clear Silicon: $5.00
Ground Wire: $3.00
Plug: $6.00

The black gas pipe, valves, and flexible connector will add a lot to this price, but still under $125 so far.......

Can anyone suggest a configuration at the heater valve? I obviously need to run a 1/2" stub from the valve to the outside of the heater, but then what? Does the drip leg and valve go first and then the flexible line?

Or, run the flexible line directly into the heater and do the valve and drip leg at the other end?
 
To avoid these ads, REGISTER NOW!
Top Bottom