To avoid these ads, REGISTER NOW!

Jake's Projects ...... or, .... How I waste my time

OP
J

jakemac

Well-known member
Joined
May 21, 2013
Messages
9,035
Location
New England
I had to go into my grandfather's shop this afternoon to get the tire inflater. While I was in there I checked out the junk drawer and found an odd little wrench hiding under some broken wrenches.

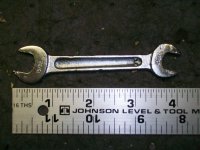
It's a Bonney #HI8 DOE wrench. 13/32-15/32.
It had some pitting and missing chrome, but after a little soak in CLR to remove the rust and a run on the wire wheel and buffer it came out nice. I'll probably never need either of those odd sizes, but I'll keep it in my wrench drawer just in case.

Thanks Dad. :D
 

Attachments

  • 100_2353.jpg
    100_2353.jpg
    143.2 KB · Views: 89
  • 100_2354.jpg
    100_2354.jpg
    145.5 KB · Views: 94
  • 100_2356.jpg
    100_2356.jpg
    143.5 KB · Views: 101
  • 100_2357.jpg
    100_2357.jpg
    140.4 KB · Views: 105
To avoid these ads, REGISTER NOW!

bubinga

Well-known member
Joined
Jul 26, 2014
Messages
12,744
Location
Bridgeport Ohio. (Across River From Wheeling WV)
Hay jake, Naw, that blue is real close.
looks good. OEM craftsman stand' Right?.....(Yes, Read the whole post bubinga.....LOL)
what are the tin things on the end, look like metal paper plates?
EDIT!!
OK Bubinga, Read the 2nd post. LOL

I've got a pile of projects backing up in my shop (as I put it together), so I thought I'd start a separate thread instead of squeezing them into someone else's posts.


First up is a new wire wheel set-up.

I'm tired of having to start my old wheel by pulling the pulley belt. It would also be nice to not have to swap wheels when I need a course wire. So, my old trusty deathtrap needs to go. Enter a new deathtrap.

I'm replacing this -


With this - (I freely admit that I planned this with the thought to inspire jealousy in a certain un-named member here :p)


I started with the motor, a 1/2hp 1750rpm Craftsman. It needed a TON of sawdust blown out, a new cord, and the bearings needed to be re-greased. The second and third pictures are of me getting it ready for paint without taking the motor apart. Getting the tape into the housing was challenging.

I used Valspar Classic Royal Blue. I was hoping it would come close to Craftsman Blue, but it's too bright. Still, it's the closest rattle can I've found so far.

The stand is an original Craftsman stand that I paid WAY too much for. It got wire wheeled (the last job with the old contraption) and painted Rustolium Metalic Black.

(More in the next post)
 
Last edited:
OP
J

jakemac

Well-known member
Joined
May 21, 2013
Messages
9,035
Location
New England
Hay jake, Naw, that blue is real close.
looks good. OEM craftsman stand' Right?.....(Yes, Read the whole post bubinga.....LOL)
what are the tin things on the end, look like metal paper plates?
EDIT!!
OK Bubinga, Read the 2nd post. LOL


This is still my favorite and most used tool in my shop. I did eventually buy longer arbor adapter's for it. They make working on longer pieces easier without hitting the dust guards, but I get a little more vibration even after spending time on balancing. Still, it's fun to use. The Crafsman stand keeps it at just the right height for me to work at waist level for bearing down when I need to.

I've run it for long stints and worked it hard, and it has never gotten more than lukewarm.


Thanks for stopping in guys.
 
Last edited:

bubinga

Well-known member
Joined
Jul 26, 2014
Messages
12,744
Location
Bridgeport Ohio. (Across River From Wheeling WV)
The adapter is secure to the shaft, it's the nut spinning in the wrong direction that has trouble staying tight. I need to get LH and RH adapters.


Good idea, but then I wouldn't have had anything to grab to get the motor spinning. :lol:
put another pulley on it, and wrap a rope around it, and start it lawn mower style. LOL
Thats what I use to do with an old craftsman lathe I had as a kid,
I didn't know how to change a Cap, of fix the start switch. LOL
 
OP
J

jakemac

Well-known member
Joined
May 21, 2013
Messages
9,035
Location
New England
Who Hoo !! :rocker:
I finally had the time to start another project that wasn't just cleaning up a bunch of wrenches.

A little over 18 months ago, I picked up a pair of Dake 001 arbor presses in rough shape. (Story Here) I took them apart and stripped the paint months ago and they've been sitting in pieces on my bench ever since. Today I had the chance to start working on one of them. I would have liked to have welded in a plug for the hole that was cut out of the side, but that's beyond my skill set so it will have to stay.

Today it was a final run on the wire wheel for the body, then a wipedown and a coat of rust inhibitor after masking off the bits that need to stay bare. Once that was dry, a nice coat of primer was applied.

While the primer was drying, I was off to Home Depot to get paint for the topcoat. Then Lowes, then Ace, then True Value. Guess what. Nobody is carrying the paint I want to use anymore. So back to the house to search the internet.

:tantrum2: $!/+@%#¥ Every color in that brand is priced below $12 except the one color I need. For that one, most places want around $35 per can ! $!/+@%#¥ :tantrum2:

I finally found some reasonably priced at Menard's. Unfortunately the closest store is several states away. :mad: I ordered it online and will have wait for it to be shipped. :sad:

In the meantime I'll try to get the other parts cleaned up and polished. Here's where I'm at so far.
 

Attachments

  • image.jpg
    image.jpg
    8.9 KB · Views: 79
OP
J

jakemac

Well-known member
Joined
May 21, 2013
Messages
9,035
Location
New England
Shiny, Shiny, Shiny ...........

Now I just have to wait for the mailman.
 

Attachments

  • image.jpg
    image.jpg
    8.5 KB · Views: 55
Last edited:

nine4gmc

Well-known member
Joined
Mar 24, 2012
Messages
14,357
Location
Dallas
Jake, i have the same Dake 001, do you mind posting a rough sketch of the press plate, mine was missing and i would like to fab one up. Thanks!

Sent from my SM-T230NU using Tapatalk
 
OP
J

jakemac

Well-known member
Joined
May 21, 2013
Messages
9,035
Location
New England
I don't have an original plate. Both of my 001's were altered for specific tasks. I ordered cheap ones off eBay, but three of the four slots are the same size and it's cast as opposed to forged so I may order an original instead. The cheapest I could find is this one -

http://www.industrialzone.com/79676-dake-700792-table-plate-sub-assy.html

EDIT - WARNING, I just tried to order and in addition to having a lousy server that keeps crapping out, there is a $50 minimum order (before shipping) that they don't tell you about until checking out. I wasted 45min just to find out they didn't want my money. YMMV
 
Last edited:
OP
J

jakemac

Well-known member
Joined
May 21, 2013
Messages
9,035
Location
New England
While waiting for the paint for the Dake to show up, I started on the Greenerd #2. Of course, I needed to order paint online for this on too. :rolleyes:

I used white primer on this one, to help keep the topcoat brighter.
 

Attachments

  • image.jpg
    image.jpg
    12 KB · Views: 47

nine4gmc

Well-known member
Joined
Mar 24, 2012
Messages
14,357
Location
Dallas
Nice, the Dake 001 I have was painted white by the po. I need to go through it one day.
 
OP
J

jakemac

Well-known member
Joined
May 21, 2013
Messages
9,035
Location
New England
The paint for the Dake showed up today. While I was waiting for the paint to dry, I found out that the paint pen I was going to use for the lettering had dried out. So tomorrow I'll have to go out and buy another one. So, it will be a few more days for the final reveal.

The paint for the Greenerd should be here tomorrow, so hopefully I'll have that one done at the same time. We'll see.
 
Last edited:
OP
J

jakemac

Well-known member
Joined
May 21, 2013
Messages
9,035
Location
New England
It's finally done !

Here it is, the Dake 001.
I wanted to do this one in metallic red, so I ended up having to mail order it and wait. I'm a little disappointed that there isn't more metallic in it, but it still came out nice. As I was painting the press, I kept looking at the letters - DAKE ENGINE CO., and it dawned on me that I HAD to paint it in a fire engine theme. So the black letters I planned on became gold and I added some simple pinstripes. I had some major issues when I clearcoated over the gold paint pen. It ate it. I had to wait for everything to dry and start over. TWICE !!

TIP - if you plan on clearcoating over a paint pen, be careful. The clearcoat will eat the gold paint. To counteract this, paint the letters (and striping) twice, making sure you have a thick coat of paint on the letters. Let the paint dry fully. When you go to spray the clear over it, start with a thin coat and let it dry. Then do another thin coat. This will seal the paint on the letters without severely damaging it. Once the last thin coat dries you can then safely put on your cover coats.

Here are the pics (one at a time, thanks iPad)


Next - the Greenerd........
 

Attachments

  • image.jpg
    image.jpg
    23.7 KB · Views: 68
To avoid these ads, REGISTER NOW!
OP
J

jakemac

Well-known member
Joined
May 21, 2013
Messages
9,035
Location
New England
The other side......
Sorry for the lousy pics, my tablet has a cheap camera.
(my stump isn't cut level, so I had to skew the pictures)
 

Attachments

  • image.jpg
    image.jpg
    13.2 KB · Views: 55
Last edited:

nine4gmc

Well-known member
Joined
Mar 24, 2012
Messages
14,357
Location
Dallas
I thought the house in the background was leaning :lol_hitti

Good tip on the paint pens, I haven't used them yet but plan to in the future.

You could have Dremmeled the "D" into a "J" and had a Jake 001 :lol:
 
OP
J

jakemac

Well-known member
Joined
May 21, 2013
Messages
9,035
Location
New England
Well, in a rare burst of productivity, I was able to finish the Greenerd #2.
At first I was going to use the same paint as the Dake, but after I ordered the paint I realized that this one is a Greenerd, it needs to be painted, well ................green. :lol: So another paint order needed to be placed. The metallic shows up better in the green than in the red. I also ordered a generic 5" steel plate off eBay for it as well.

My troubles with the clearcoat on the Dake gave me time to work on this one while paint was drying. Back and forth I went. While assembling the Greenerd, I had some trouble getting the pin to line up on one of the handle caps. I pity the next guy who has to take the handle apart (a BFH may have been involved).

I used the same gold paint pen for the lettering. Silver just didn't pop against the green like the gold does. Thanks to my experience with the Dake, there were no issues with the clearcoat on this one.

Just like both my Dake's, a PO cut a chunk out of the yoke to make more room in the throat. So it isn't a true 2-ton press anymore, but it should be fine for the few times that I'll use it.
 

Attachments

  • image.jpg
    image.jpg
    11.8 KB · Views: 86
OP
J

jakemac

Well-known member
Joined
May 21, 2013
Messages
9,035
Location
New England
A different angle ......


Now I guess it's back to cleaning rust off of wrenches and rebuilding ratchets for a while. They've been building up. I stopped so that I wasn't creating dust while I was painting. At least I won't get yelled at over paint fumes in the house for a while (at least until I start working in the other Dake 001 sitting on my bench :evil:)


(I need a better looking stump. :sad:)
 

Attachments

  • image.jpg
    image.jpg
    13 KB · Views: 44
Last edited:

nine4gmc

Well-known member
Joined
Mar 24, 2012
Messages
14,357
Location
Dallas
The stump is fine, you need bigger pics, or maybe I just need glasses... Okay, I know I need glasses but bigger pics would help. :lol:

Great job on those, now smash something!
 
OP
J

jakemac

Well-known member
Joined
May 21, 2013
Messages
9,035
Location
New England
Nine - the lousy camera on my old iPad won't let me take better pictures. I'm stuck with these for now.


Three more refurbished ratchets this week.

#1 - Another Craftsman 1/2dr =V= teardrop with the Butterfly selector.
This one was from an owner that admitted to leaving his tools out in the weather, and didn't care. The only reason he was selling the ratchet was because he didn't feel like driving to Sears to exchange it for a new one. I spent the whole time talking to him biting my tongue.
The ratchet was so corroded that the selector was barely salvageable. Most of the chrome is gone, showing the copper underneath. Surprisingly, the ratchet came apart fairly easily. After a cleaning, lube, and polish, the ratchet is ready to be put back to work.

#2 - A Craftsman (underlined) circle-H 3/8dr box head.
This came from a cleanout of an old shadetree mechanic's shop. It was buried on the bench, but rusted up nearly solid. I unfroze it with a little PB Blaster and by clamping the anvil in a vise and lightly tapping the handle with a plastic hammer. After that, it came apart without trouble. Cleaning it up posed some issues. The selector is riveted on, trapping the pawls, so I had to work carefully when using the wire wheel and buffer.

#3 - A J.H. Williams S-52 1/2dr ratchet.
This one was an eBay buy. I needed one for a set I'm working on and decided that I didn't want to wait any longer to find one in the wild (I'll probably find 3 now). It was in working condition, but there was a lot of missing chrome and what was left had sharp edges that would cut your hand. By my standards i paid too much, but it is what it is. I spent a lot of time on the wire wheel with this one to smooth out the chrome spikes. I can still feel some of them, but they won't cut you now.
 

Attachments

  • image.jpg
    image.jpg
    14.1 KB · Views: 70

nine4gmc

Well-known member
Joined
Mar 24, 2012
Messages
14,357
Location
Dallas
Jake, I think I have about 3 of those Williams ratchets, wish I would have known you needed one!

Sent from my SM-T230NU using Tapatalk
 
OP
J

jakemac

Well-known member
Joined
May 21, 2013
Messages
9,035
Location
New England
The funny (dangerous/expensive) thing about sale-ing is the snowball effect. You pick up one piece and a year later you pick up a second piece, before you know it you have half a set. Then all of a sudden it hits you that you NEED to complete the set ........ NOW ! My Williams combo set has cost me a couple hundred dollars over several years, all because of 3 wrenches I picked up cheap for a job I needed to finish. And that's not the only unfinished set lurking in my shop to trigger my OCD like a demonic jack-in-the-box. I'm doooooooooooomed !
 

taumac

Well-known member
Joined
Aug 30, 2011
Messages
8,104
Location
Brooksville, Fl
The funny (dangerous/expensive) thing about sale-ing is the snowball effect. You pick up one piece and a year later you pick up a second piece, before you know it you have half a set. Then all of a sudden it hits you that you NEED to complete the set ........ NOW ! My Williams combo set has cost me a couple hundred dollars over several years, all because of 3 wrenches I picked up cheap for a job I needed to finish. And that's not the only unfinished set lurking in my shop to trigger my OCD like a demonic jack-in-the-box. I'm doooooooooooomed !


LMAO, it's so true. My problem Is how many times did you see stuff in the past and now you can't find them. LOL
 
OP
J

jakemac

Well-known member
Joined
May 21, 2013
Messages
9,035
Location
New England
I forgot to take before pictures, but this week I've been working another pair of ratchets. The first was a SnapOn that just needed some lube and polishing. The second is a Herbrand S-10 1/2dr. At first I thought it was just gummed up with old grease. I wish.

In addition to being gummed up, one if the pawls was broken into three pieces. One of the pieces was missing. Ideally, I would have built up a weld and then machined it down to make the repair. Sadly, I don't have that skill.

Instead, I decided to try an epoxy solution. I chose to use a 2-part liquid epoxy, rather than a putty epoxy because I believe it achieves a better bond if you can keep it from running. YMMV. This one also lists a higher strength than the others I looked at (3000psi). I used the same epoxy to fill some casting voids on a vise project.

I didn't want to have to risk re-drilling the hole, so I used a plastic rod from my modeling scraps and wrapped the dowel with a little wax paper to fill up the space. Once the epoxy had started to cure for a few hours (16hrs to full cure) I unstuck the spacer from the epoxy and reinserted it until fully cured.
 

Attachments

  • image.jpg
    image.jpg
    9 KB · Views: 45
Last edited:
OP
J

jakemac

Well-known member
Joined
May 21, 2013
Messages
9,035
Location
New England
Once the epoxy had cured, I filed the fix into shape.
The repair should hold up to light use, but I don't know that I'd trust it for regular use.
The ratchet is planned for sitting in a drawer anyway.

I'm waiting on some new 5-40 screws to show up in the mail from Fastenal tomorrow, so I can finish putting the ratchet together.

The repaired pawl is on the left.
 

Attachments

  • image.jpg
    image.jpg
    7.3 KB · Views: 46

Sam'sAutoParts

Well-known member
Joined
Aug 27, 2013
Messages
2,075
Location
Northeast PA
Nice repair Jake, I will have to remember that. I have a welder but with my luck the pawl would end up being a puddle before I knew it...lol
 
OP
J

jakemac

Well-known member
Joined
May 21, 2013
Messages
9,035
Location
New England
Forgot to post this yesterday.

The screws for the repaired Herbrand S-10 showed up yesterday, so the assembly can be completed. Or so I thought. It turns out that the 5/8" screws are 1/16" short. It worked out ok though, the new screws get just enough bite to be used.

The problem showed up once I put the ratchet together. For some reason the pawls would work one way, but not the other. The gears worked fine in reverse, but would free spin in the forward position without the repaired pawl engaging.

So I opened it up and removed some of the SuperLube, thinking that it was restricting the movement. Once it was together again, the problem came back.

Take it apart again. This time I swapped the pawls to see if it's an issue with the repaired pawl. Nope. Same thing with the unrepaired pawl.

Take it apart once again. Stare at it intensely for 10min, hoping to intimidate it into submission. Apparently that tactic will work on a toddler, but not a ratchet.

Just for the hell of it, I rotated the selector slightly. Now it works fine.
There must have been a flat spot on the sliding post that I couldn't see that kept the pawl on one side from engaging.

Here she is all shiny.
 

Attachments

  • image.jpg
    image.jpg
    12.5 KB · Views: 67
Last edited:
To avoid these ads, REGISTER NOW!
Top Bottom