
You are using an out of date browser. It may not display this or other websites correctly.
You should upgrade or use an alternative browser.
You should upgrade or use an alternative browser.
Kansas Camaro Corral
- Thread starter camarosrus69
- Start date
rpenner54
Well-known member
Very nice!
C_F
ALLIANCE MEMBER
Great looking progress!
OP
camarosrus69
Well-known member
I'll bet you're getting excited!
Looking good. Nice neighborhood too.
Are those attic trusses so you can store things? That bottom chord of the trusses looks beefy.
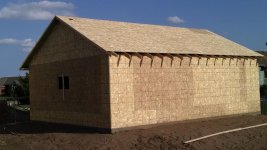
Thanks lake. Trusses are beefy enough to be a real room. A very small one with a 5 1/2 foot ceiling. I'll be adding a pull down ladder and the end will open, perhaps with a door, to load stuff from the end. That's one reason I'm bummin' a little about the ceiling height of 10 1/2 feet. It didn't seem that high in Sketchup. I should have known better. I work on a CAD system all day long and I know things look different in real life than they do on a computer, scale-wise. I have more pictures and will be adding them shortly.
OP
camarosrus69
Well-known member
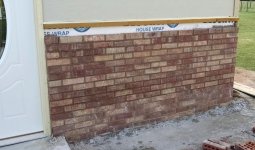
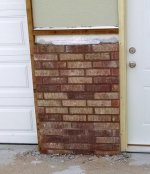
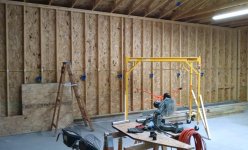
Thanks for the atta-boys guys. I'm starting to psyched. It's amazing how someone can get excited about a large wooden box. But I guess it's more about what you're gonna do with it. The box is is roofed,wrapped and doored (walk-in). The window has arrived, as well as the tracks for the garage door. The door itself, is still AWOL. I found a couple guys to do the brick, but haven't seen their numbers yet. Also have a guy to install the garage door, whenever it arrives. The Framer/roofer hinted that he would be interested in putting on the siding, but I'm still thinking I'm gonna do that. Pictures as promised. Some are by my daughter, as I was out of town for a few days last week.
Attachments
-
 IMG_20170918_172116243.jpg142.1 KB · Views: 154
 -
 IMG_20170918_172225074.jpg148.7 KB · Views: 147
 -
 IMG_20170918_172248349.jpg148.1 KB · Views: 152
 -
 IMG_20170919_193118829.jpg139.8 KB · Views: 149
 -
 IMG_20170920_124319911.jpg145.8 KB · Views: 160
 -
 IMG_20170921_190527676.jpg145.9 KB · Views: 143
 -
 IMG_20170922_163343195.jpg148.3 KB · Views: 125
OP
camarosrus69
Well-known member
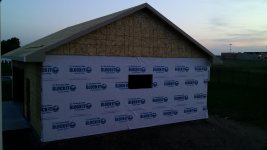
As you can see by a couple of photos in the previous post, I ran a little short on the house wrap. I decided not to buy a second roll as that stuff is pretty pricey and I was only going to use about a quarter of it. I thought I could snag a chunk from a place in town that sells donated excess building material. (part of Habitat For Humanity) They say they sometimes get the wrap stuff in, but don't have any at the moment. I did score a 9 x 12 piece, on Craigslist, and think it will finish out the front. I still need to cover the gable ends. I have an unused roll of synthetic underlayment that I was going to take back, but maybe I'll use it as wrap instead.
Now for the unfortunate circumstances of the last week. As I was returning from Menard's Monday evening, which was a trip to save some money on the fascia boards, a deer jumped from behind a tree strip, and I of course, hit her. I guess she didn't hear me coming. So my trip to save about a hundred bucks, cost me some doe. A thousand bucks, actually. Total damage to the car is in excess of $6000. Maybe I should go into body work. I was guessing about $3000, but the hood alone is $1300. I know it could be fixed cheaper, but it's not my place to negotiate for the insurance company, and it's going to cost me $1K regardless.
Now for the unfortunate circumstances of the last week. As I was returning from Menard's Monday evening, which was a trip to save some money on the fascia boards, a deer jumped from behind a tree strip, and I of course, hit her. I guess she didn't hear me coming. So my trip to save about a hundred bucks, cost me some doe. A thousand bucks, actually. Total damage to the car is in excess of $6000. Maybe I should go into body work. I was guessing about $3000, but the hood alone is $1300. I know it could be fixed cheaper, but it's not my place to negotiate for the insurance company, and it's going to cost me $1K regardless.
Attachments


Last edited:
ohyeahjay
Member

C_F
ALLIANCE MEMBER
That ***** about the deer hit! At least it didn't go over the hood & into the windshield.
The garage is looking great!
The garage is looking great!
OP
camarosrus69
Well-known member
Yeah, it was a fairly small doe, and I managed to scrub off a little speed before contact. The collision still flexed the front end enough to crack one of the coolant tanks between the engine and the radiator support.(Or maybe it is behind the bumper cover. I just know where the cap is.) It triggered the engine light and ultimately left me on the side of the road a couple miles later.
Last edited:
OP
camarosrus69
Well-known member
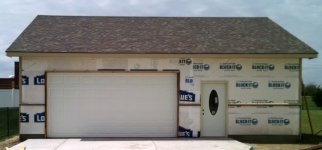
New updates. Doors are on. Edges are trimmed. Ready for brick and siding. Also car is back from the body-shop, and I'm a $1000 lighter. Weather is not cooperating with the idea of putting on siding, so I am finalizing my wiring plan so I can get some wire and outlets boxes while they're on sale this week. Here are some photos of my "baby" as it stands today, plus one of a little friend I met while hauling the siding back to the garage. He was in a pile of 2X2s that I hauled back as well. My daughter posted the picture on some spider web site (no pun intended), and the responses said it is a tarantula. They also commented that it was a good looking spider, so we named it "Choola", and my daughter moved it over to a tree strip away from all of the houses. I thought that the little drip on his head was water. As it turns out, that is spider blood. I must have bonked him with a board.
Attachments


Last edited:
OP
camarosrus69
Well-known member
As some of you may have noticed, the pace has slowed considerably. The work is up to me now, not my check book. My framer offered to side it for a $1000, but gee, I think I just spent that getting my car out of body-shop jail. I decided to see just how tough the job would be first, by doing the front myself. And I did it old school, with a hammer. My daughter played go-fer, which was quite helpful. I must have bent 20 nails trying to get through that damn, hard, concrete siding. Tomorrow (Saturday) is supposed to be rainy, all day, so I will probably be down at HF checking out their nail guns. A friend or two may be showing up Sunday. If so, we should be able to finish the back side. I was up in the attic for the first time this week, and it is fairly spacious. It will take me a little while to fill it up. I can actually stand up, if I'm between the trusses. That option will disappear when the ceiling goes in. You may notice the gap in the far corner. That was due to a miscalculation because I forgot the floor was 10.5 feet wide and not 10 feet even. I wish I had been home when the mistake was discovered. because I would have put the gap up in the front corner, where the pull-down stairway will go. The last picture was taken standing in the attic looking out at the scissor trusses. I'm going to move that lateral brace over a couple feet and put an access panel to the area in the trusses. I'll need to rig up some kind of ramp/stairway to span the two foot gap between the attic and the access hole, when I use it.
Attachments


Last edited:
lakeroadster
Well-known member
Awesome space you are creating!
OSB requires a lot of nails.... I was surprised just how many...
Nailing per code (6" on-center along supported panel edges; 12" on-center in panel interior is typical).
You might find this interesting... Floor, Roof, and Wall Panel Installation - osb
OSB requires a lot of nails.... I was surprised just how many...
Nailing per code (6" on-center along supported panel edges; 12" on-center in panel interior is typical).
You might find this interesting... Floor, Roof, and Wall Panel Installation - osb
C_F
ALLIANCE MEMBER
Your siding job looks pretty good from here! I think if it was me, I would have started on a side that faces the neighbor's house, just in case. 
I'm surprised you didn't find a bunch of Choola's brothers & sisters with him. Good for you for relocating him, instead of "squish first, ask questions later".
I'm surprised you didn't find a bunch of Choola's brothers & sisters with him. Good for you for relocating him, instead of "squish first, ask questions later".
OP
camarosrus69
Well-known member
Thanks Lake, and C F. I was a little worried about starting on the front side, but it was the smallest, it didn't have tall gable ends to deal with, and the concrete made it easy to use my scaffold. I did have to deal with the doors, but I was fortunate to not have to notch for the walk-in door. I'm hoping that back side will seem easy by comparison, due to the fact that there is nothing to trim around.
OP
camarosrus69
Well-known member
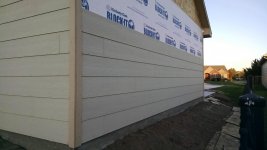
A quick update on the siding work. As expected Saturday was a bust. I did get a nail gun at HF. Sunday was clear, cold, windy and muddy in the morning. It warmed into the 60s by afternoon. My neighbor was able to help for several hours, and we were able get 7 rows on the back and the bottom row on the north side before he had to leave. That's the first picture. Monday we put in a few hours in and got the north side up to just under the window (too dark for photo when we finished) and today's accomplishment is seen in the second picture We're getting more organized, and don't have any more funky notches to cut. So hopefully the remainder will be quicker. Yeah right, who am I kidding. Those gables are gonna be a *****. In case you're wondering why we didn't finish the back, that's as high as we could reach, and the ground was too soft for ladders on Sunday.
Attachments


rattle_snake
Well-known member
Nice progress looking good.
OP
camarosrus69
Well-known member
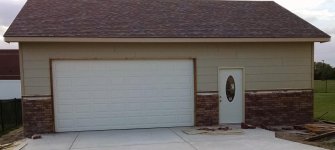
Well, I now have two sides sided, and the brick is almost done. I thought it would be done today, but he showed up at 11:00 and boogied at 5:00 with the ledge left to do. I wasn't out side when he left so I don't know if he'll be back tomorrow or Monday. Weather is forecast to rain, tomorrow evening. I couldn't do siding while the bricklayer was here because he had string line across the door and everything is in the garage. It was probably just as well. It was very windy today, and I wasn't anxious to climb a ladder with a 12 foot sail in my hands. If he does show tomorrow, he won't have a string line because he' be using the cedar trim boards as the guides.
Attachments

OP
camarosrus69
Well-known member
Hey, thanks for stopping by Rattle Snake. Things are progressing, at a much slower pace as I mentioned before. The brick guy had a family emergency last Friday, which is why he put in a short day. He finished on Monday, and I was wrong about not needing a string line for the ledge. I almost clotheslined myself in the chest, walking through the door. Oldest daughter's boyfriend helped on Sunday, and we put up 6 rows of siding on the south side. Daughter number two and I put a couple more rows on the north side, yesterday. The rest of the time as been too windy for me. I did get a bunch of electrical outlet boxes installed on the walls and the ceiling, as well. We're now at the point of needing ladders and cutting angles on the ends. Lifting the siding and climbing the ladder is cumbersome and dangerous. I actually found that the ground on the north side is level enough to use a scaffold. However my scaffold is of the small variety, and won't reach the top. I'm toying with the idea of putting some pulleys toward the top under the eaves to lift the siding. Has anyone got any wonderful brainstorms about performing this fete? Time, sun, and temperature are starting to run out on getting the exterior finished this year.
Attachments


Last edited:
highflier
Active member
When doing siding on a ladder, you need two people.
Each one sets their ladder resting on the lowest course.
Easy to set the siding in place and nail.
But, with one gun is a little slower.
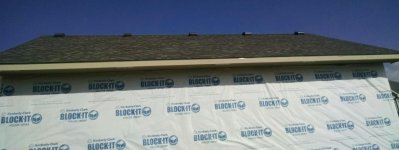
I notice the backside pic you have covered the upper edge of house wrap with siding and the gable isn't wrapped. It needs to overlap to prevent any water that gets in from getting on the osb.
It's not uncommon to trim the siding to soffit with cedar 1x2 or hardie 1x4.
Using trim will allow the cuts on your gable end to be easier.
They don't have to be exact.
Face nailing is definitely stronger, but really time consuming when prepping for paint!
Looks good!
Each one sets their ladder resting on the lowest course.
Easy to set the siding in place and nail.
But, with one gun is a little slower.
I notice the backside pic you have covered the upper edge of house wrap with siding and the gable isn't wrapped. It needs to overlap to prevent any water that gets in from getting on the osb.
It's not uncommon to trim the siding to soffit with cedar 1x2 or hardie 1x4.
Using trim will allow the cuts on your gable end to be easier.
They don't have to be exact.
Face nailing is definitely stronger, but really time consuming when prepping for paint!
Looks good!
Last edited:
sean Buick 76
Well-known member
It looks awesome!
lakeroadster
Well-known member
You do good work.. 
OP
camarosrus69
Well-known member
Thanks Sean and John. It looks good in the pictures, what you can't see are the misfires from the nail gun. Using a framing gun may have been a mistake, but I didn't see a siding nail gun at HF and the little research I did, did not lead me to believe that there was much difference except the length of the nail. The gun was highly reviewed and I didn't expect to use it after this anyway. The problem is about every 20th nail goes awry and gets all bent to hell and invariably, tears up the siding. A couple of the screwups were due to me being too close to the corner when I pulled the trigger, and blowing the corner off the board. We were going to try my neighbor's gun, but the nails wouldn't fit. Anyway, most of snafus can be covered with some caulk and paint. I just don't think I'll be making this a sideline business. We made progress today. Six more rows of siding on the south side. No pictures, but I'll try to do better tomorrow. I really hope to at least get the south side done, and maybe the north if I'm lucky. I decided to use the scaffolding that the framer appears to be storing in my garage, since he doesn't seem to need it at the moment. I was concerned about trying to get it level, but a little digging on one side and shimming on other, and its perfectly level and stable.
Last edited:
OP
camarosrus69
Well-known member
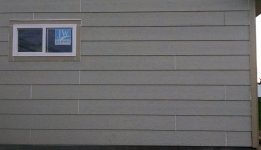
Happy news! The siding is done. I was definitely correct in my assessment that the gables would be a *****. The weather didn't cooperate at all, last week. And while I didn't hear their excuse, meteorologists totally missed the forecast for the weekend. It was supposed to sunny and in the 60s, but instead, it was cold, dreary and damp. We forged ahead with a few extra layers of clothing. It was drizzling both mornings, so we waited for it to dry out a bit before starting at about noon. The sun came out about the time we finished, late Sunday afternoon, which provided a little extra daylight for me to to tear down the scaffolding after, our one hour earlier, sunset. (End of Daylight Savings Time, for those of you not reading this in real time.) The framer was kind enough to put off finishing a couple odds and ends, so that I could use his scaffold to do the job. He came today, finished his part and left with all of his stuff. I, in turn, went out and swept up about 50 pounds sawdust, dirt, and wood debris, so I can turn my focus to the inside. I will be temporarily installing some of my lights and powering them with an extension cord. I hope to get all the wires run in the next couple weeks, so that I can get framing inspection done and start insulating.
In response to highflier's comment about house wrap. I bought roofing underlayment that comes in 4 foot widths and installed that in the gable area. I was able to stuff it behind the top row of siding, which was where the top of wrap was. I had about a 6 inch overlap.
In response to highflier's comment about house wrap. I bought roofing underlayment that comes in 4 foot widths and installed that in the gable area. I was able to stuff it behind the top row of siding, which was where the top of wrap was. I had about a 6 inch overlap.
Attachments


Last edited:
C_F
ALLIANCE MEMBER
That turned out really great, straight as an arrow!
OP
camarosrus69
Well-known member
Thanks, C F, DynoDave, and Dominico. I'm very happy to have it weather tight. This weekend was spent cleaning up the area. Our HOA had a free dumpster day on Saturday. I took a pickup load down. Saturday weather sucked again. I think that's three in a row. I'm recovering from a bit of tendinitis in my elbow from last weeks thrash, so I took it easy for the rest of the day. Today I spent some time putting up some lights so I can see what I'm doing in there, and I carried the portable torpedo propane heater out to the garage, in anticipation of the coming colder temps. Next on the agenda is to drill holes for routing wire though the walls. That brings me to a question I want to pose for the experts on this forum. Is there a particular height that the wires run thru the walls? My outlets are 48 inches above the ledge. I'm thinking of the running wires about 6 inches above the boxes. That's about 2 inches below the nails for the siding, on the outside. I may add a few more lights on the south side. I closed the door for the pictures to test the brightness.
Attachments


Last edited:
OP
camarosrus69
Well-known member
Hello again. It has been several days since I last updated my post. Stuff has been getting done, It just isn't very noticeable to the casual observer. The weather has been very nice for the last couple of days, and I managed to prime the rough cedar get the rest of the siding caulked. On the inside, I drilled most of the holes for the electrical wire routing(hitting three nails and breaking one spade bit), and ran the wires for all the 110 outlets, and half of the lighting.
On the unfortunate side of the ledger, I guess I misunderstood my framer when he said the framing inspector wanted to see the holes for the electrical, before he could buy off the framing inspection. I called for an inspection this week, and when he arrived, he said that he wanted the electrical to be finished, and he would buy them both off at the same time. That's all well and good, but I wanted to start putting in some insulation. He did give it a once over, and said he didn't see any show stoppers. He also said he would need to see the truss spec sheets when he noticed my attic storage area. I asked him about the hole placement I had chosen for the wires. He said it was fine, and that I didn't need the nail plates, but it wouldn't be a bad idea anyway. There are currently about 65 holes. I did some research and found an incredibly wide range of prices for those little plates. From about 12 cents each. to $1.82 each. Interestingly, the 12 cent place had free shipping for orders over $30, but I was only buying about $8 worth. So I punched it in to see how much shipping would cost.........$495
  I guess they wanted me to buy $30 worth. After some more digging, I found that Home Depot sells them singly for 30 cents, and in boxes of 50 for about $11. I splurged and bought two boxes.
Also, this week, I had my first electrical contractor come over to see my project and start on an estimate for running power out to the garage. I have another (maybe two) coming next week.
Tomorrow, I plan to drill a few more holes, run wire for the rest of the lights, and install about 65 nail plates.
By the way, if you notice that it looks like I missed a couple siding seams for caulk, that's because the stuff Menards sold me turns clear after it cures, and the stuff I bought later stays white. That was kind of a pain, because I had to get on a ladder to check a few of them to make sure.
On the unfortunate side of the ledger, I guess I misunderstood my framer when he said the framing inspector wanted to see the holes for the electrical, before he could buy off the framing inspection. I called for an inspection this week, and when he arrived, he said that he wanted the electrical to be finished, and he would buy them both off at the same time. That's all well and good, but I wanted to start putting in some insulation. He did give it a once over, and said he didn't see any show stoppers. He also said he would need to see the truss spec sheets when he noticed my attic storage area. I asked him about the hole placement I had chosen for the wires. He said it was fine, and that I didn't need the nail plates, but it wouldn't be a bad idea anyway. There are currently about 65 holes. I did some research and found an incredibly wide range of prices for those little plates. From about 12 cents each. to $1.82 each.
Interestingly, the 12 cent place had free shipping for orders over $30, but I was only buying about $8 worth. So I punched it in to see how much shipping would cost.........$495 I guess they wanted me to buy $30 worth. After some more digging, I found that Home Depot sells them singly for 30 cents, and in boxes of 50 for about $11. I splurged and bought two boxes. Also, this week, I had my first electrical contractor come over to see my project and start on an estimate for running power out to the garage. I have another (maybe two) coming next week.
Tomorrow, I plan to drill a few more holes, run wire for the rest of the lights, and install about 65 nail plates.
By the way, if you notice that it looks like I missed a couple siding seams for caulk, that's because the stuff Menards sold me turns clear after it cures, and the stuff I bought later stays white. That was kind of a pain, because I had to get on a ladder to check a few of them to make sure.
Attachments


firebirdparts
Well-known member
I have a bunch of 2nd gen Firebirds, and picking them up by the rocker panels would scare me quite a bit. I have a two poster, but even with that you can't reach forward enough to really hold the front end up. they flex noticeably on my two post lift.
Herb Adams told me "they mounted the front end in rubber and then said "wonder why it's moving around?"
Herb Adams told me "they mounted the front end in rubber and then said "wonder why it's moving around?"
OP
camarosrus69
Well-known member
Firebirdparts, I'm guessing you are referencing the way the scissor lift supports the car in my sketchup picture. And while it looks like the car is being lifted by the rocker panels, I assure you that, in reality, the car is supported by the subframe in the front and the boxed frame section ahead of the spring perch in the rear. As I mentioned to Lakeroadster, there are rubber blocks provided to position under the various cars' lift points. As to the floppy nature of the subframe design, I am very aware of it. When I got my first 69 Camaro project, it was missing one of its body mounts, replaced by a rotting chunk of wood. Whenever I went over a railroad crossing or some other undulation in the road, the car would make a, not very subtle, left-right, left-right turn. It was a bit unnerving.
Last edited:
OP
camarosrus69
Well-known member
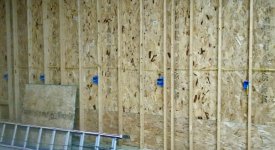
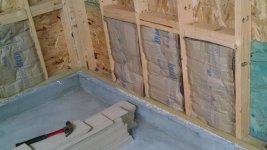
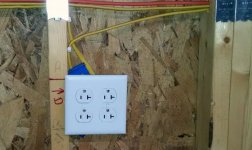
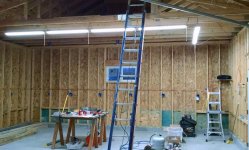
It's been almost a month since my last update, but things are progressing. I've gotten two bids so far to run power out to the garage, but I think I need at least another one. The first was a bit of a non-starter as they insisted that they would have to do the whole job, since they said "they would have to warranty it." Since I already have all of the outlets, wires and switches and have proceeded to install about half of it, that's not going to happen. The second accepted my work, but will not warranty it (fine by me) but their bid was higher than what the first wanted for the equivalent amount of work, according to the somewhat itemized estimates. If I can find someone that will trench the line out to the garage and connect it to the house for about the same price as the first one, I'll probably be satisfied. As you can see by a few of the photos, I set up a bit of an assembly line to wire up the outlets. I messed up a bit when I made the mass purchase of outlets. I bought 43 20-amp outlets, and as I was wiring up the outlets for the ceiling lights, I remembered that they were on a 15-amp circuit with 14 ga. wire. I suspected that even though the outlets were on the 11+ foot tall ceiling and would never see a 20-amp appliance, it was not to code, and would only cause me grief with the inspection. I also noticed that the GFCIs that I bought were not tamper resistant, which is also a code requirement here. So, I had to make a road trip back to Menards to get the right stuff. I also did a bit of insulating. I took advantage of another 11% rebate sale and bought 26 rolls of R-13 insulation, which is enough to do the walls, and got their volume discount as well. Side note, 26 rolls of R-13 will fit in to the back of two Honda Fits, with room to spare. I only put insulation into bays that had no wiring and didn't staple it, in case the inspector made me pull it out again. Another side note, how do you like my outriggers? I took the last picture while standing in my attic. Can anyone tell me what's wrong with that shot? I sent it to my framer with the same question. He replied with an "oops!" I pulled out the truss spec sheet to confirm, and yes, there should be a brace running horizontally through the top of the attic trusses. Fortunately, I still had a 12 foot long 1 X 4 lying around, and so I put it work, bracing laterally.
I only put insulation into bays that had no wiring and didn't staple it, in case the inspector made me pull it out again. Another side note, how do you like my outriggers? I took the last picture while standing in my attic. Can anyone tell me what's wrong with that shot? I sent it to my framer with the same question. He replied with an "oops!" I pulled out the truss spec sheet to confirm, and yes, there should be a brace running horizontally through the top of the attic trusses. Fortunately, I still had a 12 foot long 1 X 4 lying around, and so I put it work, bracing laterally.Attachments
-
 IMG_20171206_192409633.jpg134.7 KB · Views: 167
 -
 IMG_20171217_154734626.jpg145.6 KB · Views: 149
 -
 IMG_20171217_154708618.jpg143.7 KB · Views: 869
 -
 IMG_20171217_154655190.jpg155.8 KB · Views: 152
 -
 IMG_20171203_171938232.jpg146.2 KB · Views: 146
 -
 IMG_20171203_171922221.jpg147.7 KB · Views: 147
 -
 garage 12-3.jpg150.8 KB · Views: 154
Last edited:
C_F
ALLIANCE MEMBER
Nice progress!
BTW, in my world, this would be considered upside down. I would NEED to go through & turn the plugs all right side up.

BTW, in my world, this would be considered upside down. I would NEED to go through & turn the plugs all right side up.
rpenner54
Well-known member
Try http://rayselectricinc.com/ and see what they will do for you. They are usually very fair and will do just as much or little as you want. That's who I use for large remodel jobs I get on.
lakeroadster
Well-known member
Make that lateral brace happen... good catch On my first garage, circa 1983 ish, ... that was the only thing the inspector ever caught.
There is another thread here on TGJ where a guy mentioned the wisdom of installing outlets ground up. In the ground up orientation if you have a plug in the outlet and the plug isn't fully pushed in if something metal falls down onto the prong.. it won't be a dead short.
Makes sense.
On my first garage, circa 1983 ish, ... that was the only thing the inspector ever caught.Nice progress!
BTW, in my world, this would be considered upside down. I would NEED to go through & turn the plugs all right side up.
There is another thread here on TGJ where a guy mentioned the wisdom of installing outlets ground up. In the ground up orientation if you have a plug in the outlet and the plug isn't fully pushed in if something metal falls down onto the prong.. it won't be a dead short.
Makes sense.
Last edited:
C_F
ALLIANCE MEMBER
There is another thread here on TGJ where a guy mentioned the wisdom of installing outlets ground up. In the ground up orientation if you have a plug in the outlet and the plug isn't fully pushed in if something metal falls down onto the prong.. it won't be a dead short.
Makes sense.
Hmmm, that's a good point, a scenario I hadn't thought of.
OP
camarosrus69
Well-known member
CF, I actually posted that photo wondering if I would get that comment. I've never installed an outlet this way in my entire life. I heard, or read somewhere, that hospitals are required to install outlets this way for the very reason lakeroadster mentioned. Since this will be my ICU for my cars, I decided to apply the same logic.
Rpenner, thanks for the heads up. I will give them a call next week.
Rpenner, thanks for the heads up. I will give them a call next week.
OP
camarosrus69
Well-known member
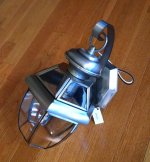
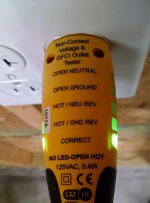
Hope everyone had a good Christmas. I thought I would show what little progress I made this week. It has been a bit on the chilly side, and I'm getting to the point where I can't proceed without the electric in and the inspection passed so I can start insulating for real. My part of the electrical work is about 90% done. I still need to purchase an outside outlet box and a couple boxes for the exterior lights. I did get a few nice garage-related presents. One daughter gave me a circuit tester. I temporarily hooked up two of my three outlet circuits and tested all of the outlets and passed with flying color (green). My wife and other daughter went together on a Maxline airline kit. And finally I bought myself a present, which just arrived today, a pair of outside lights to match the house, . Now that I have them I can figure out what the box for them will look like. Oh yeah, and the real reason I wanted to post today was to show that my garage is no longer a virgin. I put the Camaro in the garage for the first time, so that my daughter could use the attached garage for her car. Now if I could only work on it in there.
Attachments


Last edited:
lakeroadster
Well-known member
Kitty tested, kitty approved
Got a car cover for your Camaro?
Got a car cover for your Camaro?