To avoid these ads, REGISTER NOW!

let's see your craftsman block grinders

To avoid these ads, REGISTER NOW!

bulletpruf

Well-known member
Joined
Nov 28, 2013
Messages
10,959
Location
San Antonio
Picked this up yesterday; needed because I'm trying to get a shop up and running and I gave away my spare block grinder and stand to a buddy who didn't have one.

Anyway, it needs to be cleaned up but it runs well. Only issue is the switch is inop so the prior owner put a switch in the cord. I have an original stand that I will be bolted to.

It's dual voltage but currently running on 110. The instructions to run on 220 should be on the inside of the bottom cover; at least that's where they were on the last dual voltage unit I had.

Almost forgot - set me back $35. I thought that was fair.

IMG_1759.jpgIMG_1760.jpgIMG_1762.jpgIMG_1763.jpg
 

Dave Lagerstrom

New member
Joined
Mar 3, 2021
Messages
4
Location
Edina, MN
This has been a fun thread to read. I just brought home a grinder on a stand from an auction. Paid $75. I was just excited to get a nice heavy stand and a 1 HP grinder. Then I started reading here...

Attached are photos from the auction. I had no idea it was a Craftsman and highly sought after.

The light was replaced with a trouble light at the end of the gooseneck. Left cover is missing. After getting it home, I ran it and it was good but the left shaft is bent. I turned it off and it spun on for a couple minutes.

Since the label is totally worn off, I have no idea what the part number is. It is commercial as the wiring diagram inside the bottom cover shows how to change the wiring for 220v operation.

I have it apart now and will get it cleaned up. Hopefully I can straighten out the shaft, but worst case is I have a one wheel grinder.

I figure I can make a cover for the left side, hammer out the dents on the top, paint and and enjoy.

Just wanted to share that these things are still out there.
 

Attachments

  • 1 HP Block Front close.jpeg
    1 HP Block Front close.jpeg
    455.1 KB · Views: 72
  • 1 HP Block Full View.jpeg
    1 HP Block Full View.jpeg
    417.9 KB · Views: 68

Old Radar

Well-known member
Joined
Apr 17, 2019
Messages
2,755
Location
San Antonio, TX
Welcome Dave! You have a well used but reliable grinder--or at least most of one! ;)

Your most salient point is "...that these things are still out there." You may want to keep your eyes open for another one that has issues and combine them instead of manufacturing your own parts--depending if you plan to just use it after a cleanup or restore it to something closer to its former glory. In addition to the issues you mentioned I see the left side is missing its rest and the shaft that supports it, a long run out after power off could mean your bearings are dry. The right side spark arrestor is missing, but easy to make, but straightening a bent shaft is beyond my capability, since I'm a little OCD when it comes to grinder vibration...
As for the label, if you haven't found @mattblast already, he's our resident label guru, here.
 

Dave Lagerstrom

New member
Joined
Mar 3, 2021
Messages
4
Location
Edina, MN
Thanks for the reply. My goal is to have a usable grinder. I will try to make it look as nice as possible but I don't think this particular unit is the right candidate for a 100 point restoration. Trying to straighten out the shaft will be a new experience for me. Time to make some aluminum v blocks and give it a shot. The other parts should be fairly easy to reproduce. That is a big part of how I have fun in the garage.

Awesome info on the labels from Matt. Greatly appreciated. It would be nice to get a new label. Maybe I have to make up a serial number?

Cheers.
-Dave
 

MrJeep

Member
Joined
Jul 28, 2020
Messages
11
Location
GA
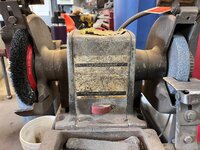
Got this 8" Craftsman 3/4 HP a couple of weeks ago for $35 at a local Trash and Treasures meet. Looks like it wasn't used much and still has the original wheels. It's only missing one eye shield and the quench tray.
 

Attachments

  • 1000005692.jpg
    1000005692.jpg
    906.6 KB · Views: 57
  • 1000005693.jpg
    1000005693.jpg
    382.8 KB · Views: 49

ctuai

Well-known member
Joined
Aug 24, 2019
Messages
556
Location
Des Moines, IA
Just pulled this 1/3 hp, 397.19580. Super clean, just wiped it down. It came with its original power tool stand, 38221.103, 38222.103, which I didn't realize are sized. Probably, always been on a stand as it still has all its' rubber feet. I might have to keep it as a set.
1726446111815.png1726446042688.png
 
Last edited:

vincent123

New member
Joined
Feb 15, 2021
Messages
2
Location
VT
I just inherited this 1/4hp grinder from my dads uncle. I’d like to fit CBN wheels to sharpen wood turning tools. Does anyone know if this is possible?
 

Attachments

  • image.jpg
    image.jpg
    741.4 KB · Views: 33

McBrownie

Well-known member
Joined
Mar 27, 2014
Messages
1,827
Location
Cleveland, OH
I just inherited this 1/4hp grinder from my dads uncle. I’d like to fit CBN wheels to sharpen wood turning tools. Does anyone know if this is possible?
A family heirloom! Congrats. I have an 8” CBN wheel on a 3/4hp cap start block. The wheel is fairly heavy and takes some power to get it going. Maybe 6” wheels wouldn’t need as much hp to get them going. I really like CBN better than traditional wheels. No dressing required and no risk of the wheels breaking.
 

RubiconJK

Well-known member
Joined
May 15, 2016
Messages
1,380
Location
"I'm bad, I'm Nationwide"
I just picked up this 1/3 HP with an OEM stand today from a local seller. It runs great and I'm about to tear it down and do a good clean up and restore. I watched a really good video referenced either here or on the other block grinder thread but the paint colors were not given for the Rustoleum rattle can paint. Anyone have info on that or any other suggestions? Thanks.tempImageIulkik.pngtempImage464xId.png
 

FrankLee

Well-known member
Joined
Sep 13, 2010
Messages
3,587
Location
seMI, 48317

RubiconJK

Well-known member
Joined
May 15, 2016
Messages
1,380
Location
"I'm bad, I'm Nationwide"
Nice! I like my 1/3 hp 115.7566 better than the 1/2 hp versions.
https://www.garagejournal.com/forum...rs-wheres-the-love.339921/page-9#post-9927133


Based on my experience, I believe that wrinkle brown paint would clean up nicely with Grez-Off followed by a paste wax.

A common substitute for the Power Bronze gold is Rustoleum Champagne Mist. But you should use the color you like.
Thanks Frank. I'll first just try cleaning the wrinkle brown cast iron parts as you suggested. The Power Bronze is the center strap and guarding trim plus the stand? I'd like to go back with something close to original.
 

FrankLee

Well-known member
Joined
Sep 13, 2010
Messages
3,587
Location
seMI, 48317
Thanks Frank. I'll first just try cleaning the wrinkle brown cast iron parts as you suggested. The Power Bronze is the center strap and guarding trim plus the stand? I'd like to go back with something close to original.
Correct. The lamp also was Power Bronze.

Those 1/3 hp models did not come equipped with a lamp. Your lamp was a Sears catalog/off-the-shelf option. How did the PO attach it?
https://www.garagejournal.com/forum...-wheres-the-love.339921/page-10#post-10781035
 

Attachments

  • lamp 1959.JPG
    lamp 1959.JPG
    270.3 KB · Views: 9
Last edited:

RubiconJK

Well-known member
Joined
May 15, 2016
Messages
1,380
Location
"I'm bad, I'm Nationwide"

FrankLee

Well-known member
Joined
Sep 13, 2010
Messages
3,587
Location
seMI, 48317
Can you suggest a good source for replacement bearings?
I use JSBGreatBearings. Much of their stuff is from PRC, but I've used dozens of their bearings with no problem. They have good prices and free shipping.

Accurate Bearing is a popular source if you want other than PRC.

See my recent link above for all components I used on a 115.7575 refurb. I don't recall whether the 7566 and 7575 bearings are the same.
 

RubiconJK

Well-known member
Joined
May 15, 2016
Messages
1,380
Location
"I'm bad, I'm Nationwide"
I've sent JSB an email asking for pricing. I hope I don't have to pay more for bearings than I did for the grinder and stand together ($40)! Once I removed the bearings I see a number 3202 on them which upon researching I believe designates them as 15mm ID, 35mm OD, and 15.9mm width.

Also as promised, below is a pic showing how the lamp was attached. This is the left housing (looking from front) with a drilled hole in the back for the lamp to attach. Likely, as you suspected, done by the PO.

The other photo shows the glass from the guards which may be the most difficult part of my clean up!! tempImage2onHI8.pngtempImageHaKVOR.png
 
To avoid these ads, REGISTER NOW!

FrankLee

Well-known member
Joined
Sep 13, 2010
Messages
3,587
Location
seMI, 48317
I've sent JSB an email asking for pricing. I hope I don't have to pay more for bearings than I did for the grinder and stand together ($40)! Once I removed the bearings I see a number 3202 on them which upon researching I believe designates them as 15mm ID, 35mm OD, and 15.9mm width.
The new bearing is likely a 6202, but measure, measure, measure. 6202 bearings come in four bores; 15mm, 16mm, 1/2" and 5/8". They are also available with seals or shields and multiple grades.

Also as promised, below is a pic showing how the lamp was attached. This is the left housing (looking from front) with a drilled hole in the back for the lamp to attach. Likely, as you suspected, done by the PO.
I agree.

The other photo shows the glass from the guards which may be the most difficult part of my clean up!!
The glass should clean up ok with a razor blade and a cleaner like Simple Green.

The tabs on their frames will all likely break off. I used 3M molding tape and a terpolymer caulk to secure the glass.
IMG_3227.JPGIMG_3228.JPGIMG_3229.JPGIMG_3230.JPG
grinder glass.JPG
 

RubiconJK

Well-known member
Joined
May 15, 2016
Messages
1,380
Location
"I'm bad, I'm Nationwide"
The new bearing is likely a 6202, but measure, measure, measure. 6202 bearings come in four bores; 15mm, 16mm, 1/2" and 5/8". They are also available with seals or shields and multiple grades.
Good point. Any issue with using the none sealed type? Repackable I suppose?
The glass should clean up ok with a razor blade and a cleaner like Simple Green.
Will give it a go.
The tabs on their frames will all likely break off. I used 3M molding tape and a terpolymer caulk to secure the glass.
Some of them were already feeling like they were about to break as I was removing the glass. Thanks very much for the tips Frank.
 

FrankLee

Well-known member
Joined
Sep 13, 2010
Messages
3,587
Location
seMI, 48317
Good point. Any issue with using the none sealed type? Repackable I suppose?
OEM bearings were shielded. I generally switch to sealed for most applications, especially for dust/grit spewing machines like sanders and grinders.
Some of them were already feeling like they were about to break as I was removing the glass. Thanks very much for the tips Frank.
After my first grinder refurb with that style eye shield frame, I never bothered to try and save those tabs. I just broke them off when I removed the glass and filed the frame edges smooth.
 

RubiconJK

Well-known member
Joined
May 15, 2016
Messages
1,380
Location
"I'm bad, I'm Nationwide"
OEM bearings were shielded. I generally switch to sealed for most applications, especially for dust/grit spewing machines like sanders and grinders.
Looks like the difference between the 3202 and 6202 is the width. 3202 was 15.9 mm and 6202 is 11 mm. No problem with the more narrow width of the 6202? I'm seeing 15 mm bore double metal sealed 6202 Timken's on Amazon for $12.50/pair.

I finished disassembly and cleanup today. Hopefully prime tomorrow.
 

RubiconJK

Well-known member
Joined
May 15, 2016
Messages
1,380
Location
"I'm bad, I'm Nationwide"
Before and after on the above mentioned bench grinder. I'm super happy with how it turned out. It looks and runs great. Thanks very much to @FrankLee for the suggestions and comments above. I've done a few of these now and here are some of my learnings from this one:
1. Simple Green worked great on the guard glass! But don't use it to clean the name plate. It removed some of the print on the plate so I'll probably be ordering a new decal to go over it.
2. As FrankLee suggested above, measure the replacement bearings and as I learned, don't order replacements by simply the bearing designation number. All worked out in the long run, but could have saved myself some trouble.
3. Protect the shaft threads during the rebuild process. Chasing threads is no fun!
tempImageGMR0Wc.pngtempImagewtteMY.png
 

Old Radar

Well-known member
Joined
Apr 17, 2019
Messages
2,755
Location
San Antonio, TX
1. Simple Green worked great on the guard glass! But don't use it to clean the name plate. It removed some of the print on the plate so I'll probably be ordering a new decal to go over it.
Super job on the restoration! I'm right with you on the name plate. I barely touched mine with degreaser and the red vanished! @mattblast fixed me up with a great replacement.

New Grinder Label.jpgCM PreBlock 1-59.jpg
 

jrobb316

Well-known member
Joined
May 18, 2014
Messages
1,377
Location
WI
If you could keep only one, which would it be? The flat top says it has more amps, but I wonder if thats just the way it was measured and has no real difference. Both have lights and quench trays, I have one original stand. I'm leaning toward the round top. It will have grinding stones installed.

round.jpgflat.jpg
 

Outlawmws

Well-known member
Joined
Aug 9, 2011
Messages
39,195
Location
The Badlands
I'd mount up a grinding stone, fire it up and see which sounds the best for start and shut down, - all things being equal there, I'd take a 2x2 and while running, "load" the spinning wheel to the point of stall, and see which seems to have more power.
 

JMP

Well-known member
Joined
Jul 6, 2024
Messages
414
I just joined the club. Runs like a top and was made in 1964. Wish I found this thread sooner.

Is there a big difference in utility between a 1/3 and 1/2 hp model? Right now this one is more than plenty but definitely would like to have a second one someday setup for different jobs.

image_50754049.JPG

image_50424065.JPG
 

R_C

Well-known member
Joined
Mar 6, 2018
Messages
144
Location
Wyoming
I just joined the club. Runs like a top and was made in 1964. Wish I found this thread sooner.

Is there a big difference in utility between a 1/3 and 1/2 hp model? Right now this one is more than plenty but definitely would like to have a second one someday setup for different jobs.

image_50754049.JPG

image_50424065.JPG
That grinder is in nice shape. I only have the same 1/3 hp model so I can't vouch for the 1/2 hp model. Here are pictures of my grinder before and after restoration.

BenchGrinderBefore.jpg
BenchGrinderAfter1.jpg
BenchGrinderAfter2.jpg
BenchGrinderAfter3.jpg

Since it came without the tool rests, I had to fabricate something that came close. I haven't been able to find an original lamp. Can anyone give me some dimensions of the original lamp hood? I found the lamp below on ebay. I think it is considerably smaller than the original lamp but it was cheap and I may end up using it if I can't find an original.

Lamp1.jpg
Lamp2.jpg
 
  • Love
Reactions: JMP

JMP

Well-known member
Joined
Jul 6, 2024
Messages
414
Since it came without the tool rests, I had to fabricate something that came close. I haven't been able to find an original lamp. Can anyone give me some dimensions of the original lamp hood? I found the lamp below on ebay. I think it is considerably smaller than the original lamp but it was cheap and I may end up using it if I can't find an original.
That's some nice work. I might restore it down the road when I'm in a better spot to take on such a project but for now I at least need to do some cleaning and basic reconditioning. I'll need to get a tool to dress the wheels and the plug on my cord is very brittle with chunks starting to break off. I know I got super lucky to get mine with the lamp since I didn't see it pictured in the listing. I did see a replacement lamp that sold on eBay for about $30 so maybe one might turn up. The cord on that lamp you have pictured seems pretty short compared with the one on mine. Unless someone here beats me to it, I'll take some measurements after the Thanksgiving madness.
 

RTullius

New member
Joined
Dec 3, 2024
Messages
1
A rare Craftsman factory grinder/disc setup with original stand and sharpening attachment.
I just bought one like this 1/2 hp, with the 8” disc, no sharpener jig, runs good, looks good, will need
a new nameplate, paid $60, also came with a 7” Variable speed Delta, that would start if you gave the wheel a little spin. Got it home, took apart Delta to get specs for capacitor, ordered one from Amazon for $19, installed it today, run great, probably will sell it for $80. Any idea what year Sears was selling them with this option?
Thanks for any info you can provide.
 

ching0n

Well-known member
Joined
Jul 21, 2016
Messages
1,496
Can someone give me the cliff notes on the most desired block grinders? I'm seeing 1/4, 1/3, 1/2, & 1 hp models in my area. The 1 hp may be when marketing switched because it looks like it draws the same amperage as the 1/2hp & is black.
 

FrankLee

Well-known member
Joined
Sep 13, 2010
Messages
3,587
Location
seMI, 48317
The more hp, the more desirable(?). I believe that the 1/3 and 1/2 hp square-top models are the most common. The 3/4 and 1 hp models are less common and generally more money.

However, IMO, the earlier round-top cast-iron models should be a quest grinder.

I have and use both a 1/3 hp, 397.19391 square-top and a 1/3 hp, 115.7566 round-top cast iron. The 7566 is my favorite, by far.


Below is a rotor assembly from a 1/3 hp square-top grinder.
IMG_6667c.JPG


Below is a rotor assembly from a 1/2 hp, 115.7575 cast iron grinder.
IMG_6668c.JPG


Here they are side-by-side. This is why I prefer the cast iron models.
IMG_6666c.JPG
 
Last edited:
To avoid these ads, REGISTER NOW!
Top Bottom