To avoid these ads, REGISTER NOW!

let's see your craftsman block grinders

drivesitfar

Well-known member
Joined
Oct 23, 2013
Messages
36,008
Location
Pacific Northwest
JZ: do the wheels turn freely when it's not turned on if you give them a spin? if so maybe it's just a coincidence that the switch or another part quit working and needs replacing. good luck and i'll keep watching while the pros guide you through the fix.
 
To avoid these ads, REGISTER NOW!

softailgarage

Well-known member
Joined
Apr 20, 2011
Messages
5,153
Location
Bullhead City, Az.
Check the wiring. Actually, check the wheel area for obstruction first. Does it work with the wheel off? If not then check the wiring. I wouldn't run the motor more than you have to, sounds like it may be burning out. Watch for the magic smoke,
 

JZiggy

Well-known member
Joined
Dec 1, 2014
Messages
990
Location
Atlanta
Same issue with wheels on or off. Drives, I will get some pictures later. Nothing of note in the pictures I have taken so far, really.

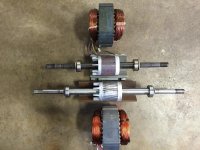
At one point I mounted the rotor in a vise (to change bearings) equipped with plastic soft jaws. I clamped gently on the rotor itself, before thinking better of it and clamping onto the shaft instead. Is it possible the rotor could have been damaged?? It seems like it is very stoutly built.

Both coils read normal resistances, so they aren't broken. Connector and wires all look good, I have put the DMM across basically everything I can think of.
 

JZiggy

Well-known member
Joined
Dec 1, 2014
Messages
990
Location
Atlanta
I took the block down again and am in the process of putting it back together.

Wiring:
IMG_3710_zpsurttdzgj.jpg


Housing (By the way, are you guys used to seeing these metal shims? I tried to reinstall exactly as they were):
IMG_3712_zpsqg7dbdfh.jpg


IMG_3716_zps6pn0cey3.jpg


Some evidence of rubbing. Im guessing this could be due to a slight misalignment of the housing halves. Then when the armature pulls on the rotor it is able to close the air gap and stick:
IMG_3719_zpslbxfoec7.jpg


IMG_3722_zpswjxec2rg.jpg


IMG_3723_zpsp5qempww.jpg


I hit these surfaces with some fine grit paper. Also checked the rotor diameter in a few spots with calipers -- that sucker is totally round, no distortion.
 

harleybuilder

Well-known member
Joined
Apr 4, 2014
Messages
287
Location
Southern IL
Sonofa&=#÷* anyone have a source for the long bolts that connect the halves together on the round tops. I guess it had a crack in the threads and I didn't notice it. .....

33db8be393c25f1da2ba65ce2f323b01.jpg
 

nine4gmc

Well-known member
Joined
Mar 24, 2012
Messages
14,357
Location
Dallas
What about a piece of all-thread with nuts on both ends? I may have an original one for a round top.
 

balane

Well-known member
Joined
May 4, 2011
Messages
2,996
Location
Pacific Northwest
It dawned on me that I've never done a block with any color so I wanted to experiment a little. The cast parts are metal flake blue and the trim pieces are in satin nickel. This grinder was capital U ugly when I got it.

I know the badge isn't age correct but that's my favorite Cman logo so that's what I used.

.
 

Attachments

  • Sam_2671.jpg
    Sam_2671.jpg
    142.8 KB · Views: 30
  • Sam_2674.jpg
    Sam_2674.jpg
    142.7 KB · Views: 60
  • Sam_2672.jpg
    Sam_2672.jpg
    145.4 KB · Views: 38
  • Sam_2670.jpg
    Sam_2670.jpg
    149.1 KB · Views: 33
  • Sam_2668.jpg
    Sam_2668.jpg
    146 KB · Views: 35
  • Sam_2667.jpg
    Sam_2667.jpg
    147.2 KB · Views: 40
  • Sam_2665.jpg
    Sam_2665.jpg
    147.3 KB · Views: 46

McBrownie

Well-known member
Joined
Mar 27, 2014
Messages
1,827
Location
Cleveland, OH
Sonofa&=#÷* anyone have a source for the long bolts that connect the halves together on the round tops. I guess it had a crack in the threads and I didn't notice it. .....

It's been a bad day for Blocks. This would be a lot of trouble but, if you have access to a welder, you could cut it in the middle and splice in a piece to lengthen it.
 

JZiggy

Well-known member
Joined
Dec 1, 2014
Messages
990
Location
Atlanta
FIXED!!!

Finished_zps6phlch76.jpg


In my earlier post I noted the scoring between the rotor and armature. Turns out one new bearing was seated tight and another was sloppy in the housing... 0.006" to be exactly. I trimmed a piece of brass 0.003" shim, stuck it in the housing, and pressed the bearing/shaft assembly in. As I drew the halves together and when tightening the bolts I tapped the housing halves with a plastic hammer and rotated the shaft occasionally to make sure it was still running free.

It now starts up repeatedly (2.5s to get to speed) and runs very smoothly.

Guys, a sincere thank you to you for your troubleshooting ideas. I now understand these blocks and electric motors in general much, much better.
 

McBrownie

Well-known member
Joined
Mar 27, 2014
Messages
1,827
Location
Cleveland, OH
FIXED!!!

In my earlier post I noted the scoring between the rotor and armature. Turns out one new bearing was seated tight and another was sloppy in the housing... 0.006" to be exactly. I trimmed a piece of brass 0.003" shim, stuck it in the housing, and pressed the bearing/shaft assembly in. As I drew the halves together and when tightening the bolts I tapped the housing halves with a plastic hammer and rotated the shaft occasionally to make sure it was still running free.

It now starts up repeatedly (2.5s to get to speed) and runs very smoothly.

Guys, a sincere thank you to you for your troubleshooting ideas. I now understand these blocks and electric motors in general much, much better.

Great news! I just noticed that yours is a 257.191500. The one I had the alignment and bearing fitment problem with was a 257.191401 - the 1/2hp model. I bet they are same housings.
 
Last edited:

JZiggy

Well-known member
Joined
Dec 1, 2014
Messages
990
Location
Atlanta
Thanks! Those welded aluminum brackets were actually there when I got it. I adapted them for the DeWalt shields and drilled everything to take a 5/16" bolt.
 

harleybuilder

Well-known member
Joined
Apr 4, 2014
Messages
287
Location
Southern IL
It's been a bad day for Blocks. This would be a lot of trouble but, if you have access to a welder, you could cut it in the middle and splice in a piece to lengthen it.
I don't have a tig, guess I could try to mig it if I can't come up with one.
McMaster has lots of long screws in 8-32 and 10-24/32 size (not sure which one you need). No hex head ones, but standard machine screw heads are available.
I'll take some measurements and look at them and fastenall.
 

harleybuilder

Well-known member
Joined
Apr 4, 2014
Messages
287
Location
Southern IL
It dawned on me that I've never done a block with any color so I wanted to experiment a little. The cast parts are metal flake blue and the trim pieces are in satin nickel. This grinder was capital U ugly when I got it.

I know the badge isn't age correct but that's my favorite Cman logo so that's what I used.

.
Looks great. Love the colors. ...
 

danstead

Well-known member
Joined
Jan 14, 2015
Messages
181
Location
Western, Pa
Block Grinder Guru's

I don't know much about the Cman 397's but it is now on my "I need List"

Would $40-$50 be a fair price for one that runs well but needs restored?

Anything I should look out for when buying one?

I also saw an old Wilton recently, were they a well made grinder?

Thanks in advance

131558218723
 

Attachments

  • 397.jpg
    397.jpg
    10.6 KB · Views: 47
To avoid these ads, REGISTER NOW!

drivesitfar

Well-known member
Joined
Oct 23, 2013
Messages
36,008
Location
Pacific Northwest
Dan: i paid quite a bit more for my block grinders, but i like the ones that didn't need to be rebuilt. if your area doesn't have too many blocks ask Doc (Tourqueman) if he might have one he can ship you.

or i like old USA made Dayton grinders, Baldor, and even the old Jet grinders work well. if you happen to find an old USA made grinder they all have more power than that Wilton probably has.

good luck and take a look at the vintage grinder thread too.

JZ: happy to hear you are good now

Harley: if you ask me that question next year hopefully i'll be able to locate that bolt, but sadly i probably own several and have no idea where it might be.

good luck

ALL: if any of your are looking for better health ideas click on my losing weight thread because i have exercise and a lot of good ideas going to be on that thread as i lose my beer/ice cream/food belly.
 

torqueman2002

Well-known member
Joined
Jun 3, 2009
Messages
6,139
Location
SE Michigan
I took the block down again and am in the process of putting it back together.

Wiring:

Housing (By the way, are you guys used to seeing these metal shims? I tried to reinstall exactly as they were):

Some evidence of rubbing. Im guessing this could be due to a slight misalignment of the housing halves. Then when the armature pulls on the rotor it is able to close the air gap and stick:

I hit these surfaces with some fine grit paper. Also checked the rotor diameter in a few spots with calipers -- that sucker is totally round, no distortion.
I have not seen those shims before.


Fixed it! Great! :thumbup:
 
Last edited:

Bobioz1

Well-known member
Joined
Jun 26, 2013
Messages
821
Location
Northern il. (For now)
I've had 8 of these apart and never seen those shims. Never seen that circlip between the bearing and shaft either. When you put the halves together, take the rubber feet off and find a nice flat place to set the grinder while you tighten up the bolts. Glad you got it going.
 

torqueman2002

Well-known member
Joined
Jun 3, 2009
Messages
6,139
Location
SE Michigan
I've had 8 of these apart and never seen those shims. Never seen that circlip between the bearing and shaft either. When you put the halves together, take the rubber feet off and find a nice flat place to set the grinder while you tighten up the bolts. Glad you got it going.
The 'C' clips between the bearing and rotor are found on 3/4 & 1-HP grinders.

http://tinyurl.com/Go-Blue-Block-Grinder
 

McBrownie

Well-known member
Joined
Mar 27, 2014
Messages
1,827
Location
Cleveland, OH
The 'C' clips between the bearing and rotor are found on 3/4 & 1-HP grinders.

http://tinyurl.com/Go-Blue-Block-Grinder

I had 'C' clips, or circlips, on my 3/4hp 5/8" arbor and it made truing up the wheels darn near impossible. A single split shaft bearing works much better, however, they need to have the I.D. machined to .667-.669" (17mm). This also applies to 1/2" arbor machines (as they both use the same bearings), but the 1/2" shafts already have a machined shoulder in place. I was lucky and GJ'r exmaxima1 offered to open one up for me.

http://www.garagejournal.com/forum/showpost.php?p=4493828&postcount=4
 
Last edited:

torqueman2002

Well-known member
Joined
Jun 3, 2009
Messages
6,139
Location
SE Michigan
.....

Would $40-$50 be a fair price for one that runs well but needs restored?
Anything I should look out for when buying one?
.....
Thanks in advance
131558218723
For the 1 you pictured:
$40 is a good price for a 1/3-HP rtop
$40 is a great price for a 1/2-HP rtop
$40 is a fantastic/you **** price for a 3/4-HP rtop
$40 is a you **** x2 price for a 1-HP ftop

The missing quench tray can be found here:
http://www.searspartsdirect.com/cra...780/0009/397/model-39719440/0247/0721000.html

and here:
http://www.ereplacementparts.com/quench-tray-p-972856.html

When I buy, I check the following, listed in importance:

  • missing parts
  • condition
  • noise when starting & stopping
 

Bobioz1

Well-known member
Joined
Jun 26, 2013
Messages
821
Location
Northern il. (For now)
Not talking about the snap rings outside the case halves. I was talking about the circlip inside the case halves in ziggys picture. Looks like it's the stop for the bearing. He must have a smaller diameter the length of his shaft. Sorry ziggy. Here is a 3/4 and a 1 h.p. No circlips.
 

Attachments

  • image.jpg
    image.jpg
    146.3 KB · Views: 38

exmaxima1

Well-known member
Joined
Jun 25, 2011
Messages
6,340
Location
Midwest
.

I took the relay apart anyway, and sure enough the contacts were quite cruddy. Cleaned them all up with 1000 grit paper and replaced. Dr. Block, thanks for the idea to do this, I would have bought a relay otherwise :)


I hope this isn't too hard to do. I just picked up a 1/2hp block that won't start without a shove. My fault: I didn't bother to check it when I bought it as I was mainly interested in the stand, and the seller said the grinder worked, but now I find I will need to do some troubleshooting....
 

JZiggy

Well-known member
Joined
Dec 1, 2014
Messages
990
Location
Atlanta
It's not hard. The little relay is pretty robust and it seemed like it would difficult to mess anything up.
 

nine4gmc

Well-known member
Joined
Mar 24, 2012
Messages
14,357
Location
Dallas
Not talking about the snap rings outside the case halves. I was talking about the circlip inside the case halves in ziggys picture. Looks like it's the stop for the bearing. He must have a smaller diameter the length of his shaft. Sorry ziggy. Here is a 3/4 and a 1 h.p. No circlips.

That's what she said. :lol_hitti
 

torqueman2002

Well-known member
Joined
Jun 3, 2009
Messages
6,139
Location
SE Michigan
Not talking about the snap rings outside the case halves. I was talking about the circlip inside the case halves in ziggys picture. Looks like it's the stop for the bearing. He must have a smaller diameter the length of his shaft. Sorry ziggy. Here is a 3/4 and a 1 h.p. No circlips.
Bobioz1,

I'm not following, sorry.

What 'snap rings outside the case halves' and 'circlip inside the case halves' are you referring to?

Also, what are the HP and model numbers of the Blocks are the rotors and stator (field) windings?

Pictures would be a great help.
:thumbup:
 
Last edited:

Dorsey

Member
Joined
Nov 2, 2012
Messages
9
Location
Valrico, FL
Hi All - Picked up a 1/2 hp today off CL for $50 and hoping I can get inducted into the club. It works good and is complete except for one eye shield (see attached). Also got the blade sharpener with it. Thanks for all the great info on this thread. Two questions:

1) anyone have the instructions for attaching and using the blade sharpener.
2) anyone have a source for a 7 inch diameter, 1 inch wide wire wheel with 1/2 inch arbor.

Thanks again.
 

Attachments

  • grinder 003.jpg
    grinder 003.jpg
    138.5 KB · Views: 46
  • grinder 004.jpg
    grinder 004.jpg
    140.6 KB · Views: 38
To avoid these ads, REGISTER NOW!
Top Bottom