
You are using an out of date browser. It may not display this or other websites correctly.
You should upgrade or use an alternative browser.
You should upgrade or use an alternative browser.
let's see your craftsman block grinders
- Thread starter emeraldcoupe
- Start date

bczygan
Well-known member
x2!
I like this idea. Now, what common household item is 0.010"?
Beer can?
Copy paper (A4) is .004"
bczygan
Well-known member
JZ - If you don't get to the root cause, after following the procedure in my PM, feel free to send the 3/4-HP Block to me.
I'll move it to the top of the Que and see what in the world is making it behave like it is.
I have some 3/4-HP Blocks that I can swap-out parts to see if a different field coil ***'y, and/or arbor, and/or housings, and/or relay, and/or, ....?
BTW - I'm thinking of posting that procedure here, if you're OK with that.
I'd like to get others input on it.
I just need to figure out how to format the indents, for readability.
")
Hey Dr Block,
Sorry if I wasn't clear -- the shimming process fixed the issue on my 3/4hp block.
Many thanks for the offer to have a look. I really appreciate that.
drivesitfar
Well-known member
JZ: you have to admire and respect doc's love for these old blocks and his generousity is second to none. Balane runs his blocks maybe around the clock restoring vises and tools and i bet doc could've fixed the one he burned up if balane didnt just turn it into a parts vise.
These old blocks seem to be the best grinder in this catagory and price range and dont look too bad either.
joy: nice looking duo and awesome bench.
These old blocks seem to be the best grinder in this catagory and price range and dont look too bad either.
joy: nice looking duo and awesome bench.
Agreed on all points, Drives. You guys at GJ have got me hooked with the friendly, helpful atmosphere 
While it was fresh in my mind I went ahead and tore my 3/4hp block back down and tried the improved shim method.
- With one clamshell off, loosen four armature bolts. This allows it to move relative to the clamshell it is mounted to.
- Stuff 0.010" shims on all four sides of the rotor between it and the armature.
- Tap the armature with a rubber hammer to equalize.
- Snug the four armature bolts down.
- Install the other clamshell half. Install 3 long bolts loosely.
- Tap housing with soft hammer to equalize.
- Snug the 3 long bolts down.
- Reach in with pliers and pull out the four shims.
Now the block has no start up noise AT ALL. Just the gentle, soothing hum of magnetostriction, no grinding / growling in the least.
I have my 1/2hp block apart too waiting for bearings. It was interesting to note that the armature core is about 3/8" longer in the 3/4hp block -- this indicates that rotor alignment is that much more critical! Also, main winding wires are 0.050" and 0.060" between the 1/2hp and 3/4hp, respectively (Dr. Block, I'm sure you have a spreadsheet somewhere for this information )
While it was fresh in my mind I went ahead and tore my 3/4hp block back down and tried the improved shim method.
- With one clamshell off, loosen four armature bolts. This allows it to move relative to the clamshell it is mounted to.
- Stuff 0.010" shims on all four sides of the rotor between it and the armature.
- Tap the armature with a rubber hammer to equalize.
- Snug the four armature bolts down.
- Install the other clamshell half. Install 3 long bolts loosely.
- Tap housing with soft hammer to equalize.
- Snug the 3 long bolts down.
- Reach in with pliers and pull out the four shims.
Now the block has no start up noise AT ALL. Just the gentle, soothing hum of magnetostriction, no grinding / growling in the least.
I have my 1/2hp block apart too waiting for bearings. It was interesting to note that the armature core is about 3/8" longer in the 3/4hp block -- this indicates that rotor alignment is that much more critical! Also, main winding wires are 0.050" and 0.060" between the 1/2hp and 3/4hp, respectively (Dr. Block, I'm sure you have a spreadsheet somewhere for this information
)csargents1546
Well-known member
I was putting my 397.19440 back together. I can not locate my diagram I made of the electrical. Was hopi g someone has a good picture. I tried searching this thread but my head is about to explode with all these blocks.
McBrownie
Well-known member
Agreed on all points, Drives. You guys at GJ have got me hooked with the friendly, helpful atmosphere
While it was fresh in my mind I went ahead and tore my 3/4hp block back down and tried the improved shim method.
- With one clamshell off, loosen four armature bolts. This allows it to move relative to the clamshell it is mounted to.
- Stuff 0.010" shims on all four sides of the rotor between it and the armature.
- Tap the armature with a rubber hammer to equalize.
- Snug the four armature bolts down.
- Install the other clamshell half. Install 3 long bolts loosely.
- Tap housing with soft hammer to equalize.
- Snug the 3 long bolts down.
- Reach in with pliers and pull out the four shims.
Now the block has no start up noise AT ALL. Just the gentle, soothing hum of magnetostriction, no grinding / growling in the least.
Very nice. I'm going to take my 1/2hp split-phase apart and do that. I really struggled getting that one running after a tear down.
McBrownie
Well-known member
JZ: These old blocks seem to be the best grinder in this catagory and price range and dont look too bad either.
Drives, very well put. They are not the best all around, but the best bang for the buck even though otherZ might not agree.
McBrownie
Well-known member
Reach in where and pull out the shims?
Nines,
Use long enough shims so that you can pull them out before putting the center tin back in place. Basically bend them at right angles. I would think they need to be 6" or so in length.
torqueman2002
Well-known member
No, not your fault.Hey Dr Block,
Sorry if I wasn't clear -- the shimming process fixed the issue on my 3/4hp block.
Many thanks for the offer to have a look. I really appreciate that.
I see now your shim post was after you PM'd me.
I posted a reply to your shim post, after which I replied to your PM.
Sorry, the confusion
 is on my part.
torqueman2002
Well-known member
Let me know if you need the diagram on the inside of the bottom cover.I was putting my 397.19440 back together. I can not locate my diagram I made of the electrical. Was hopi g someone has a good picture. I tried searching this thread but my head is about to explode with all these blocks.


If these don't give you all the angles you need, let me know. I'll take more pictures.
I may even have some of another 397.19440, I'll post if I can find them.
Don't power it up, until you're comfortable the wiring is OK.
We'll get it straightened out.
Here's another 397.19440.


Last edited:
drivesitfar
Well-known member
Pd: not saying we all dont like your old craftsman grinder,but its not a block. Probably more like yours in the vintage grinder thread that most of us post our older grinders on.
Good luck with the restoration.
Good luck with the restoration.
Shiftless
Well-known member
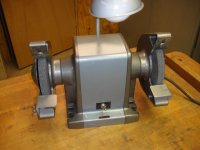
Anybody care to advise me about buying this block for $15 ?
poor pictures of a grinder in poor condition but...
No light, no eye shields...
I have a half horse block on its original cast iron stand in much better condition for a user, so why am I even considering this piece of ....
seller says it runs
poor pictures of a grinder in poor condition but...
No light, no eye shields...
I have a half horse block on its original cast iron stand in much better condition for a user, so why am I even considering this piece of ....
seller says it runs
Attachments

Last edited:
torqueman2002
Well-known member
They grow on you, don't they?!Anybody care to advise me about buying this block for $15 ?
poor pictures of a grinder in poor condition but...
No light, no eye shields...
I have a half horse block on its original cast iron stand in much better condition for a user, so why am I even considering this piece of ....
seller says it runs
Parts are available for mot of it, eye shield kit (non OEM), bearings, wheels, tool rests (may take a while, or make your own), power cord, cap if it has one. Just about the only thing not available (and it maybe, over on OWWM) would be the centrifugal start-up switch, but with careful dis-assembly, it will be fine.
It would make a nice wire wheeler for cleaning nuts, bolts, and the other endless bits 'n pieces that always seem to need a light touch.
$15 is a good price.
You can leave the 1/2-HP to heavier duty jobs.
torqueman2002
Well-known member
I've bought these Arbor Spacer, 5/8 ID, 0.118-0.236" Thick from Grainger. They're good quality and at $2.00 a good deal.
They offer free pick-up, for me it's a 2 mile drive.

https://www.grainger.com/product/DA...m/rp/s/is/image/Grainger/1LNE6_AS01?$smthumb$
I've used washers, but these spacers are made to spin ~3,600 RPM. (I hope, they're made in China. )
)
They offer free pick-up, for me it's a 2 mile drive.
https://www.grainger.com/product/DA...m/rp/s/is/image/Grainger/1LNE6_AS01?$smthumb$
I've used washers, but these spacers are made to spin ~3,600 RPM. (I hope, they're made in China.
)Thanks, I moved it. You're right the other thread is a much better fit, I had no idea it even existed!Pd: not saying we all dont like your old craftsman grinder,but its not a block. Probably more like yours in the vintage grinder thread that most of us post our older grinders on.
Good luck with the restoration.
Sent from my SM-G900P using Tapatalk
torqueman2002
Well-known member
pdubss - Here you go, a Block grinder for you, that was posted: <time title="2015-10-02 11:57pm" datetime="2015-10-02T23:57:59-0400">9 days ago</time> in CL - price will likely be softening.


http://toledo.craigslist.org/tls/5250012098.html
If you prefer the rtop 1/3-HP Block, complete:
http://www.garagejournal.com/forum/showpost.php?p=5185224&postcount=7024
Pick-up and shipping is available. See my post:
http://www.garagejournal.com/forum/showpost.php?p=4516788&postcount=3761
http://toledo.craigslist.org/tls/5250012098.html
If you prefer the rtop 1/3-HP Block, complete:
http://www.garagejournal.com/forum/showpost.php?p=5185224&postcount=7024
Pick-up and shipping is available. See my post:
http://www.garagejournal.com/forum/showpost.php?p=4516788&postcount=3761
Last edited:
torqueman2002
Well-known member
Nice looking family!Here's a couple of mine ...

Are you hoping for more?

Shiftless
Well-known member
They grow on you, don't they?!
Parts are available for mot of it, eye shield kit (non OEM), bearings, wheels, tool rests (may take a while, or make your own), power cord, cap if it has one. Just about the only thing not available (and it maybe, over on OWWM) would be the centrifugal start-up switch, but with careful dis-assembly, it will be fine.
It would make a nice wire wheeler for cleaning nuts, bolts, and the other endless bits 'n pieces that always seem to need a light touch.
$15 is a good price.
You can leave the 1/2-HP to heavier duty jobs.
Thanks Torqueman
Looking at the ones posted this morning that are much nicer for not much more money makes me want to pass up the $15 dollar one I asked about. I should focus on my vises that need my time.
But you are right about the blocks "growing on you". It certainly is not my personal responsibility to rescue this particular example. I can't read the label but it doesn't look at all like a one horsepower industrial duty model! I can't help myself...I'm gonna email the guy to see what the horsepower rating is

Update: Moral of the story is to never ask the guys on GJ if it is a good idea NOT to buy a tool.
It is mine now.
The Torqueman called it...they grow on you!
Attachments

Last edited:
torqueman2002
Well-known member
Got a 1/2hp block torn down yesterday. Figured some folks would want to see the grisly details
Pretty clean innards!
Did the bearings stay on the arbor/shaft, or in the housings?
What are your plans for it?
Looking forward to your posts, as always.
torqueman2002
Well-known member
Here, just hold the puppy.Thanks Torqueman
Looking at the ones posted this morning that are much nicer for not much more money makes me want to pass up the $15 dollar one I asked about. I should focus on my vises that need my time.
But you are right about the blocks "growing on you". It certainly is not my personal responsibility to rescue this particular example. I can't read the label but it doesn't look at all like a one horsepower industrial duty model! I can't help myself...I'm gonna email the guy to see what the horsepower rating is
Update: Moral of the story is to never ask the guys on GJ if it is a good idea NOT to buy a tool.
It is mine now.
The Torqueman called it...they grow on you!
I have a a number of these 1/3-HP m-397.19580 & 581s. PM me if you need parts, ie: center band w/ machine tag, or just the tag.
You're on the right path, feel the force.
Shiftless
Well-known member
Thank you Dr. Blockhead...I will probably take you up on that in the future. 
drivesitfar
Well-known member
Doc: thats exactly how i ended up with my last dog. I sent my wife to go look at a puppy for some friends of ours and Taffy came home with her.
You are a great enabler especially since you help us for free unlike the Vet.
JZ: where's the dirt on that grinder? Thanks for the pick and good luck.
Shift: wear some warm clothes because you are headed to Wonderland and that rabbit hole is pretty deep.
You are a great enabler especially since you help us for free unlike the Vet.
JZ: where's the dirt on that grinder? Thanks for the pick and good luck.
Shift: wear some warm clothes because you are headed to Wonderland and that rabbit hole is pretty deep.
Pretty clean innards!
Did the bearings stay on the arbor/shaft, or in the housings?
What are your plans for it?
Looking forward to your posts, as always.
The bearings stayed on the shaft but I was pleased that the new ones pushed into the housings with a big of force... I used some loctite anyway, however.
I used the shim rotor alignment method with great success again. I will make a separate thread detailing that method HERE
It got new Nachi bearings and its start relay contacts cleaned. Just need to make some eye shields for it and pack it away as a Christmas gift for someone

Last edited:
The bearings stayed on the shaft but I was pleased that the new ones pushed into the housings with a big of force... I used some loctite anyway, however.
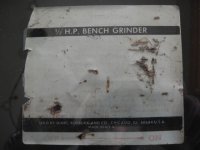
If the bearings went in tight, and you installed the spring washers on the ends correctly, Loctite would not be necessary. Those springs do a great job. Great looking grinder---what's the Model Number? I think I have the same one, but can't read the label anymore
Attachments
Last edited:
torqueman2002
Well-known member
The bearings stayed on the shaft but I was pleased that the new ones pushed into the housings with a big of force... I used some loctite anyway, however.
I used the shim rotor alignment method with great success again. I will make a separate thread detailing that method HERE
It got new Nachi bearings and its start relay contacts cleaned. Just need to make some eye shields for it and pack it away as a Christmas gift for someone
FYI - I had the same problem with a 3/4-HP.If the bearings went in tight, and you installed the spring washers on the ends correctly, Loctite would not be necessary. Those springs do a great job. Great looking grinder---what's the Model Number? I think I have the same one, but can't read the label anymore

I've updated the switch, but here's the label.

There are editable MS-Word files here, and in my signature line, 1st link.
http://www.garagejournal.com/forum/showpost.php?p=4000529&postcount=3
Now, a word about the files. Save an original. Then edit a copy, because MS-WORD really struggles with these files. I spent more time on the label than any other part of the restore. The 'fields' move around and distort when the text is edited.
If anyone has a friendlier file, that you don't need sophisticated editing skills and expensive sw, please let me know. I'll share it in my link.
Shiftless
Well-known member
Doc: thats exactly how i ended up with my last dog. I sent my wife to go look at a puppy for some friends of ours and Taffy came home with her.
You are a great enabler especially since you help us for free unlike the Vet.
JZ: where's the dirt on that grinder? Thanks for the pick and good luck.
Shift: wear some warm clothes because you are headed to Wonderland and that rabbit hole is pretty deep.
Drives:
Warning duly noted.
If the bearings went in tight, and you installed the spring washers on the ends correctly, Loctite would not be necessary. Those springs do a great job. Great looking grinder---what's the Model Number? I think I have the same one, but can't read the label anymore
It's 397.19340
There are editable MS-Word files here, and in my signature line, 1st link.
http://www.garagejournal.com/forum/showpost.php?p=4000529&postcount=3
Now, a word about the files. Save an original. Then edit a copy, because MS-WORD really struggles with these files. I spent more time on the label than any other part of the restore. The 'fields' move around and distort when the text is edited.
You've sent me those files before, but I am not savvy enough to handle them. But thanks again anyway!
Pupuhd
Well-known member
If anyone has a friendlier file, that you don't need sophisticated editing skills and expensive sw, please let me know. I'll share it in my link. [emoji106]
Torque: I'm in the process of reassembling the 1/3hp grinder I got from you early this year. I went back to the above link and only see labels for the 3/4 & 1/2 hp models. Does any one here have a decent scan/file of 1/3 hp models.
I may try myself to scan and edit a new one using inkjet water labels. Then transfer to a new piece of aluminum. I just ordered off ebay aluminum solid rivets.
I "see" said the blind man to the deaf man as he picked up his hammer and saw.
torqueman2002
Well-known member
Hey Pup,Torque: I'm in the process of reassembling the 1/3hp grinder I got from you early this year. I went back to the above link and only see labels for the 3/4 & 1/2 hp models. Does any one here have a decent scan/file of 1/3 hp models.
I may try myself to scan and edit a new one using inkjet water labels. Then transfer to a new piece of aluminum. I just ordered off ebay aluminum solid rivets.
I "see" said the blind man to the deaf man as he picked up his hammer and saw.
I have a 20MB Zip file with 6 files for 1/3-HP m-397.19580. If my mail server doesn't choke on it, you should see it soon. I hope one of the pictures can help.
Last edited:
Pupuhd
Well-known member
Got it. Thank you. 2nd photo looks promising.Hey Pup,
I have a 20MB Zip file with 6 files for 1/3-HP m-397.19580. If my mail server doesn't choke on it, you should see it soon. I hope one of the pictures can help.
I "see" said the blind man to the deaf man as he picked up his hammer and saw.
Pupuhd
Well-known member
Ok, maybe some one here can verify my next step here with new found issue. This week I'm re-assembling my 1/3HP grinder. Tonight while cleaning the stator, I noticed the insulation on the black wire is brittle and crumbling off. Upon further inspection after removing the rest of the brittle insulation the copper wire is discolored. I assume this is due to overheating, correct me if I'm wrong.
My question, I was able to gingerly pull out 1/4 inch of the insulated wire to try to get better insulation but it too was brittle and kept falling off. While pulling it would also pull an adjacent bare copper wire.
Can I just insulate the black wire down to this point? Will there be any issues like a short if I don't get an overlap with the new insulation over the old one. I'll be using the marine grade heat shrink tubing for this, the stuff with the glue inside.
jakemac
Well-known member
Try some liquid electrical tape on the hard to reach area before you put the heat shrink on. Better to over-do it than risk missing a spot.
Pupuhd
Well-known member
Great idea. Have to pickup a bottle after work tomorrow. I was trying to salvage the copper right angle female connection, however that too was brittle at the crimp and snapped off.Try some liquid electrical tape on the hard to reach area before you put the heat shrink on. Better to over-do it than risk missing a spot.
I "see" said the blind man to the deaf man as he picked up his hammer and saw.