Reversepolarity
Well-known member
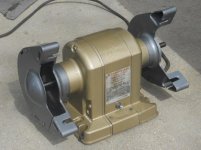
Big Shout-out to crsinmich for finding me this sweet baby at a local flea market. $25 bucks!!!
Nice the wheels cost that

Big Shout-out to crsinmich for finding me this sweet baby at a local flea market. $25 bucks!!!
Nice the wheels cost that
Big Shout-out to crsinmich for finding me this sweet baby at a local flea market. $25 bucks!!!
Hey MBS! Nice grinder! Resto sounds like a fun project. Lemme know if there is anything I can do to help at all..
Please raise your hand if you have one of these.
That's nice, and in great shape.
Did you guys even know there was such a thing. I didn't.
Man. I aint ready through 400 pages to see if there's another one,,,lol. Can't ya just tell me.
I can't recall seeing many, maybe only 1.
And it's like brand new. Not bad for a 1977.
You guys think the sander is gimmicky.
Not sure, I'd think the disk diameter is smallish. Maybe, the woodworkers can chime in.
I wonder if it would put a lot of pressure on the bearings.
It should be OK. There are spring washers in place that should keep the arbor aligned.
Maybe it's a bad design and they didn't make many. Or did they,,,lol. Why aint I seen one before.
not even the model number shows up on google. But it is on searsdirect.
Cal, your Sanding attachment from the 76-77 catalog:

Good find.
Do you have that catalog. I wonder if it would fit a 3/4.
You'll need the 3/4-HP 5/8" arbor adapter.
If you notice mine was not a add on. It came made that way. Notice the label.
Kool!
Big Shout-out to crsinmich for finding me this sweet baby at a local flea market. $25 bucks!!!
Nice price for a good 1/3-HP project. I see the spark arresters are wrongly placed.
Man you guys are going to think I'm nut's. But here goes.
I wished I had never bought this combo unit,,,lol. I really can afford to keep one of these 3 newly acquired grinders.
First I got the 3/4 with the missing lamp shades and a cracked shield. It will be here on the 18th. Then the fairly nice 3/4. It could use a label. Then this 1/2 combo last night. But it was so cool I had to get it,,,lol.
I know you guys are going to say keep them all. But that is not an option.
What I would like to do is put the sander attachment on a 3/4. I think that sander would be great for smoothing out a radius. But then I have just destroyed a sweet 1/2.
But I still absolutely need a wire wheel.
My chemo brain is killing me right now trying to decide how to configure these grinders. I literately have a headache from trying to decide what to do. The best I can come up with keep the combo as is and set up a 3/4 with a wire wheel/stone. Then hope to God I can sell off the other 3/4 to pay for what I keep. But I don't think I can get that much out of one.
What would you guys do.
What do you guys think a decent 3/4 would bring. And just curious what do you think I could get out of the combo.
I gotta go take a nerve pill,,,lol.
")
Good to see all the posting today. I'll make my comments in blue, below.
Craftsman 1/3 HP. Craigslist find. As purchased / not cleaned up yet.
Anyone have information on the disc sander attachment? Haven't found any manufacturer's identifiers.
Thanks.Dr. B I think Cal meant a 3/4 HP...
Congratulations, nice grinder.
'Blockhead' !!??!! Well now, I resemble that remark. I even added a picture to my profile and signature just now.
To fit a lamp like the following one, connect the neutral (white/ribbed) wire of the lamp to the neutral (white/ribbed) wire inside the grinder, and the hot (black) wire to the hot (black) wire inside the grinder; alternately, connect the hot to the controlled side of the power switch. That will turn off the lamp with the power switch or you can turn it off at the lamp (the switches will be in series, both need to be on for the lamp to turn on)--> http://tinyurl.com/ka87ssb

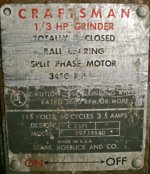
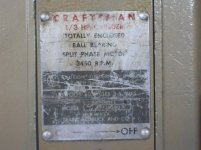
I have noticed a slight difference in otherwise seeming identical 1/3 hp grinders. Some label say "Industrial Rated" others do not. Other than that, the label are identical. Same serial #. Same Design #. Can anyone explain the difference? Is there a difference?
Most often 'Commercial' and 'Industrial Rated' are used on dual voltage (115 V/230 V) Blocks. I'm not sure about these two 1/3-HP m-397.19580 Blocks.
Hey Torqueman, can you use a LED light bulb with this light (the one from Amazon) It says "It can use a standard light bulb if plugged into the wall, (* plug or adapter is not included) or a special 6.3 volt light bulb if plugged into the sewing machine motor" Does this light need a special bulb if connected through the motor?
Thanks for you help.
I'd say yes, the lamp can be used with a LED. That is a 115 VAC LED.
To use the lamp, you'll just need to wire the center contact to switched Hot, and the threaded side contact to neutral.
The optional LED mentioned on Amazon, appears to be a 6 VAC (?) LED for use with the sewing machine motor circuit.
Product Description
1 piece INDUSTRIAL sewing machine or home purpose FLEXIBLE GOOSENECK LIGHT lamps WHITE Color ~ stainless steel bendable item comes with ONE 110V LIGHT BULB We also have 6 LIGHT BULB (connect to home power cord (send us message IF YOU like to have 6v bulb) Main goal is for industrial gooseneck light with a rocker switch, for all industrial sewing use, It can use a standard light bulb if plugged into the wall, (* plug or adapter is not included) or a special 6.3 volt light bulb if plugged into the sewing machine motor.
'Morning MBS!
I'll post my replies/comments in blue.
Here's a CM goose neck black lamp. @ $22.50 + S/H, it's more, but no painting, if you like the black color.
http://www.ereplacementparts.com/light-assembly-p-972577.html
My $100,000.00 grinder:
(well, it did come with a garage and house)
It was pretty old and ratty, with half the left base broken off, but still worked great. Looking around here, I found a member with parts to sell. Thanks, SoftailGarage! The pix pretty well tell the tale of what happened next. I just couldn't live with that practically new end frame on my junky grinder. Though the Power Bronze color isn't correct for any Blocks I've seen, I like its looks on other Crafty tools, so on it went. The two tones are Rustoleum Hammered, in Gold and Gray. I think it looks nice - and also I already had the paint, left over from a couple of other projects.
BFBOB, that is beautiful!! Very nice job! I like the color scheme.
I just got the same grinder, it is in need of a good resto! I am looking forward to doing it!
BFBOB, I am looking into getting labels printed for our model. Serial #3971580, like these.
http://www.garagejournal.com/forum/showthread.php?t=310883
I will let you know if I can get it done.
Again very nice job!
BFBOB - nice job on rescuing a Block!
mbsinmich - If you are making a list for that labe, I'm sure I can use 2, maybe 3. It might help share any set-up cost.
Here's a picture of how I remove bearings that stay on the arbor....
Also need to clarify which style bearing puller I will need.
Thanks in advance!


BFBOB, that is beautiful!! Very nice job! I like the color scheme.
I just got the same grinder, it is in need of a good resto! I am looking forward to doing it!
BFBOB, I am looking into getting labels printed for our model. Serial #3971580, like these.
http://www.garagejournal.com/forum/showthread.php?t=310883
I will let you know if I can get it done.
Again very nice job!
Nice job.Here was my restoration from a while back http://www.garagejournal.com/forum/showthread.php?t=199416
You betcha!Thanks TM! I may just go ahead and order a splitter/puller since I have a couple blocks to go through. A good excuse to buy another tool!
Thanks for the kind words. Yes, I'm interested in a new label. Are you talking about printed on metal, or self adhesive plastic, or??
One technique I've used that has worked out well is to reverse the image and print it on the back of laser-compatible clear sheet. Then, bond it to the nameplate (or whatever) with clear spray adhesive applied to the label. Of course, it doesn't look exactly like the original lithograph on aluminum, but if all you can get is a picture, or create a reasonable facsimile in CorelDraw, it's sure better than nothing. Gotta love computers.
I'll be heading to Lowes for some new feet (thanks to GJ!) and who knows, maybe they'll have some solid rivets for reattaching the nameplate.
Hello Bob, I'm not exactly sure what the label are, here is the link to the printing place. It says they are "metallic". There is a 10 piece minimum, but I did not think I would have much trouble dispersing them. I will have to create the label in CorelDraw or other graphic program--so we'll see how it goes. If I can get it done, I will contact you with the results.
http://www.case-badges.com/metallic-rectangular-custom-labels-3-x-4-max-p-360.html
Take a look at how beat up my original label is!
P. S. let me know if you find the rivets, as you can see I am missing one.
Yep, I'm a CorelDraw jockey too, since V1.1! I've been playing around a bit recreating the label since I haven't seen an exact replica. Actually, I'm thinking about making a custom label - keeping all the correct numbers, but replacing the plain-type Craftsman at the top with a full-width Crown Top logo, and leaving the only mention of Sears at the bottom. Hey, why not? It's already the "wrong" colors!
I haven't found a really good CrownTop logo to work with yet... maybe you could post one?? In .cdr format, of course!
***FLASH***
Found one in Torqueman's "What's the fuss?" thread. Not quite pristine, but plenty good enough for a starting point. Oddly enough, his example, which he calls a "Pre-Block" has almost exactly the label I've been thinking of creating!
Rivets: McMaster-Carr (dotcom, of course). They've got a huge variety of solid aluminum rivets. My Block isn't close at hand, so I can't measure them, but I'm quite certain they have one that'll fit. Cheap too. 250 of 'em for about 7 bux.


I have a number of CM label jpg pics, on my hd. Let me know what HP & m-#, and I will see if I can help you out....
I haven't found a really good CrownTop logo to work with yet... maybe you could post one?? In .cdr format, of course!
***FLASH***
Found one in Torqueman's "What's the fuss?" thread. Not quite pristine, but plenty good enough for a starting point. Oddly enough, his example, which he calls a "Pre-Block" has almost exactly the label I've been thinking of creating! ....

Diesel,My little 1/4hp, got it from my great uncles estate just need to clean it up and make a proper stand.

CRS, welcome to the thread and Block ownership. Nice Block.Hi guys:This is my first time posting on this thread. I usually hang out on the vise thread. My brother, mbsinmich, had so much fun with the block grinder that I found for him that I went and bought one for myself. Actually, I got two grinders and two stands but none of those others were any great shakes. I also got a Desmond Stephans Simplex No. 43S bench vise but that’s another story for another thread.